Mastering Image Resizing in Photoshop: The Essential Guide for Visual Creators on Tophinhanhdep.com

In the dynamic world of digital imagery, where stunning visuals reign supreme, the ability to manipulate and optimize your images is not just a skill – it’s a necessity. From crafting breathtaking Wallpapers and Backgrounds that perfectly adorn any screen, to showcasing exquisite Beautiful Photography in high resolution, or even preparing intricate elements for Digital Art and Graphic Design, precise image resizing is a fundamental technique. Here at Tophinhanhdep.com, we understand that every pixel counts. Our platform is dedicated to providing you with an unparalleled collection of Aesthetic, Nature, Abstract, and even Sad/Emotional images, alongside comprehensive tools and insights into Photography, Image Tools, Visual Design, and Image Inspiration & Collections. To truly harness the power of your visuals and prepare them for various applications – whether for web, print, or digital display – mastering image resizing in Adobe Photoshop is paramount.
Photoshop stands as the industry standard for image manipulation, offering robust features for scaling your images and individual layers. This comprehensive guide, brought to you by Tophinhanhdep.com, will walk you through the essential steps and advanced considerations for resizing images effectively, ensuring your creations maintain their quality, integrity, and impact across all platforms.

Resizing Entire Images and Documents for Perfect Proportions
When you need to adjust the overall dimensions of your image – perhaps to fit a specific screen resolution for a Wallpaper, prepare a High Resolution image for a client, or optimize a Stock Photo for web upload – resizing the entire document is your go-to method. This process directly changes the canvas size and pixel dimensions of your entire image file.

Step-by-Step: Adjusting Image Size for Optimal Results
The most direct way to resize a full image or document in Photoshop is through the “Image Size” dialog box. This powerful feature allows you to control dimensions, resolution, and resampling methods, all crucial for preserving or enhancing image quality.
- Open Your Image in Photoshop: Begin by launching Adobe Photoshop and opening the image file you wish to resize. You can do this by going to
File > Openand selecting your desired image from your computer. Tophinhanhdep.com encourages experimenting with different Photo Ideas and Thematic Collections to see how resizing can transform your initial captures. - Access the Image Size Dialog: Once your image is open, navigate to the top menu bar. Click on
Image, then selectImage Size. Alternatively, for a quicker access, you can use the keyboard shortcutAlt + Ctrl + I(Windows) orOption + Cmd + I(Mac). This will bring up the “Image Size” dialog box, presenting you with a wealth of options. - Understanding Pixel Dimensions and Document Size:
- Pixel Dimensions: This section displays the current width and height of your image in pixels, along with the estimated file size. As you adjust the dimensions, you’ll notice the file size changing, providing a clear indication of how your resizing impacts storage and load times – a critical factor for web optimization and Image Compressors.
- Document Size: Here, you can specify the physical dimensions (e.g., inches, centimeters, millimeters) and resolution of your image, which is particularly important for print applications.
- Maintaining Proportions with “Constrain Proportions”:
- Before making any changes, ensure the “Constrain Proportions” checkbox is activated (represented by a chain-link icon between the width and height fields). This is arguably the most crucial step for maintaining the visual integrity of your image. When checked, Photoshop automatically calculates the corresponding height when you input a new width, and vice-versa. This prevents your Beautiful Photography from becoming stretched or squashed, preserving its original aspect ratio.
- If you uncheck this box, Photoshop will allow you to enter independent values for width and height, potentially leading to a distorted image. While there might be specific creative reasons for intentional distortion in Digital Art or Photo Manipulation, for most general resizing, proportionality is key.
- Setting Your Desired Dimensions:
- In the “Pixel Dimensions” section, you can input your new width or height values in pixels. For example, if you’re preparing a Background image for a specific screen, you’d enter the screen’s pixel dimensions.
- Alternatively, under “Document Size,” you can select “inches” (or your preferred unit) and input your desired physical width and height. This is essential if you’re preparing an image for printing, such as a High Resolution print of a Nature photograph.
- Adjusting Resolution:
- The “Resolution” setting (typically measured in pixels/inch or dpi) determines the image’s detail level, particularly important for print. While 72 pixels/inch is generally sufficient for web display, Tophinhanhdep.com recommends a resolution of at least 200 pixels/inch for good quality prints, with 300 pixels/inch being ideal for professional printing of Stock Photos or Digital Photography.
- Understanding Resampling Methods:
- When you change the pixel dimensions of an image, Photoshop needs to either add or remove pixels – this is called resampling. The “Resample Image” checkbox, when active, allows you to choose how Photoshop performs this operation. The choice of resampling method significantly impacts the quality of your resized image:
- Automatic (Default): Photoshop intelligently selects the best method based on your resize operation.
- Bicubic Smoother (Enlargement): Best for enlarging images, as it smoothly interpolates pixels to minimize jagged edges. Useful when upscaling Aesthetic images for larger displays.
- Bicubic Sharper (Reduction): Ideal for shrinking images, as it enhances sharpening to retain detail. Perfect for optimizing High Resolution images for web.
- Bicubic (Smoother gradients): A general-purpose method, providing good results for both enlargement and reduction.
- Preserve Details 2.0 (Enlargement): A newer, more advanced method for enlargement that attempts to maintain texture and details, often used in conjunction with noise reduction.
- Nearest Neighbor (Hard Edges): Fastest but lowest quality, creating blocky edges. Only suitable for very specific pixel art styles.
- Bilinear (Medium Quality): Better than Nearest Neighbor but not as good as Bicubic.
- Tophinhanhdep.com suggests using “Bicubic Automatic” if you’re unsure, but for specific tasks like upscaling Abstract art or preparing Sad/Emotional imagery for large prints, understanding these options can make a significant difference.
- When you change the pixel dimensions of an image, Photoshop needs to either add or remove pixels – this is called resampling. The “Resample Image” checkbox, when active, allows you to choose how Photoshop performs this operation. The choice of resampling method significantly impacts the quality of your resized image:
- Apply and Save: Once you are satisfied with your settings, click “OK” to apply the changes. Then, to save your resized image, go to
File > Save As. It’s crucial to use “Save As” and give the resized image a new name to avoid overwriting your original file. This way, you always have the original, untouched version available for future use or different resizing needs. This practice is essential for photographers working with Digital Photography and Stock Photos.
Resizing Individual Layers with Free Transform
Beyond resizing the entire canvas, Photoshop frequently requires you to adjust the size of individual elements within your composition. Whether you’re integrating new components into a Graphic Design project, scaling textures in Digital Art, or fitting elements perfectly into a Photo Manipulation, the Free Transform tool is your invaluable ally.
The Free Transform Tool: Your Gateway to Layer Manipulation
The Free Transform tool offers an intuitive way to resize, move, and rotate selected layers, allowing for precise control over your composite images.
- Select the Desired Layer: In the Layers panel, click on the specific layer you wish to resize. If you’re working with multiple elements in a complex Visual Design, selecting the correct layer is the first critical step.
- Activate Free Transform: Press
Ctrl + T(Windows) orCmd + T(Mac) to activate the Free Transform function. Alternatively, you can go toEdit > Free Transformfrom the top menu. A bounding box with handles will appear around your selected layer, indicating it’s ready for transformation. - Resizing the Layer:
- Click and Drag Handles: Simply click and drag one of the corner handles of the bounding box to resize your layer. Dragging an edge handle will resize only that side, potentially distorting the layer.
- Proportional Scaling (Post CC 2019): Starting with Photoshop CC 2019, proportional scaling became the default behavior. This means when you drag a corner handle, the layer automatically resizes proportionally without holding any keys. This streamlines the process for maintaining the aspect ratio of Aesthetic elements or Beautiful Photography within your composition.
- Non-Proportional Scaling (Post CC 2019): If you do want to resize non-proportionally (i.e., stretch or squash the layer) in CC 2019 and newer, you would hold down the
Shiftkey while dragging a corner handle. This is a significant change from older versions and can be a “gotcha” for long-time Photoshop users. - Proportional Scaling (Pre-CC 2019): In Photoshop versions prior to CC 2019, you had to hold down the
Shiftkey while dragging a corner handle to resize proportionally. Releasing theShiftkey would allow non-proportional scaling. - Resizing from the Center: To resize the layer from its center point instead of the corner you’re dragging, hold down the
Alt(Windows) orOption(Mac) key while dragging any handle. This is an excellent trick to maintain the layer’s original central position, saving you the extra step of repositioning after resizing – especially useful for symmetrical Abstract designs or perfectly centered Mood Boards.
- Confirm or Cancel: Once you are satisfied with the new size and position, press
Enter(or click the checkmark icon in the Options bar) to confirm the transformation. If you want to cancel the changes and revert the layer to its original state, simply press theEscapekey (or click the cancel icon in the Options bar).
Enhancing Workflow with Smart Objects
While the Free Transform tool is indispensable, Tophinhanhdep.com highly recommends incorporating “Smart Objects” into your workflow, especially when frequently resizing layers. This technique is a game-changer for preserving image quality in Digital Photography and complex Photo Manipulation.
- What is a Smart Object? A Smart Object is a layer in Photoshop that contains raw image data from a raster or vector image, preserving its original characteristics. When you resize a Smart Object, Photoshop retains the original pixel information, allowing for non-destructive transformations.
- The Problem with Raster Layers: If you resize a regular (raster) layer down, then later decide to resize it back up, Photoshop has already discarded pixels, leading to significant quality loss and pixelation. Your crisp High Resolution image can quickly become blurry and unusable.
- The Smart Object Solution: By converting a layer to a Smart Object before resizing, you can scale it down and then scale it back up repeatedly without losing the original pixel quality. While resizing beyond the Smart Object’s original pixel dimensions will still introduce some quality degradation (as Photoshop still has to interpolate new pixels), it ensures you always have the best possible quality from the original source. This is vital for Stock Photos and Digital Art where assets might be reused at various scales.
- How to Convert to a Smart Object: Simply right-click on the layer in the Layers panel and select
Convert to Smart Object. Once converted, a small icon will appear on the layer thumbnail, indicating it’s now a Smart Object. Now, proceed with Free Transform (Ctrl + TorCmd + T) as you normally would, confident that your transformations are non-destructive.
Beyond Basic Resizing: Advanced Techniques & Quality Preservation
While basic resizing is straightforward, truly mastering image manipulation for Tophinhanhdep.com’s diverse range of Images and Visual Designs involves understanding the nuances of quality preservation and exploring Photoshop’s broader transformation capabilities.
Resampling Methods for Superior Image Quality
As mentioned earlier, resampling is how Photoshop adds or removes pixels when you change an image’s dimensions. Selecting the right resampling method is crucial for maintaining the visual integrity of your Photography and Digital Art.
- Enlarging Images (Upscaling): When making an image larger, Photoshop must invent new pixels. Methods like
Bicubic SmootherorPreserve Details 2.0are designed to create these new pixels intelligently, reducing jaggedness and maintaining clarity. This is particularly important if you’re preparing a small image for a larger Wallpaper display or using an element in a Graphic Design layout that requires expansion. While Tophinhanhdep.com offers AI Upscalers as a dedicated tool, understanding Photoshop’s built-in options complements these advanced solutions. - Shrinking Images (Downscaling): When making an image smaller, Photoshop removes pixels.
Bicubic Sharperis generally the best choice here, as it adds a subtle sharpening effect to compensate for the detail lost during pixel reduction. This is essential for optimizing High Resolution Stock Photos for web use, ensuring they load quickly without appearing soft. - Default and Automation: For most users, “Bicubic Automatic” provides a good balance, letting Photoshop choose the best method. However, for critical Photo Manipulation or preparing specific Aesthetic images, manual selection offers greater control.
Additional Layer Transformations for Creative Control
The Free Transform tool is just one aspect of Photoshop’s transform capabilities. Under the Edit > Transform menu, you’ll find a suite of additional tools that offer unique ways to reshape your layers, opening up a world of Creative Ideas for Digital Art and Visual Design.
- Scale: Essentially the core function of Free Transform (resizing), but as a standalone option.
- Rotate: Allows precise rotation of layers.
- Skew: Distorts a layer by slanting it horizontally or vertically, useful for perspective adjustments in Photo Manipulation.
- Distort: Provides individual control over each corner of a layer, allowing for complex perspective changes. This is incredibly powerful for placing flat textures onto angled surfaces or creating unique Abstract effects.
- Perspective: Applies a one-point perspective to a layer, making it appear as if receding into the distance or coming closer.
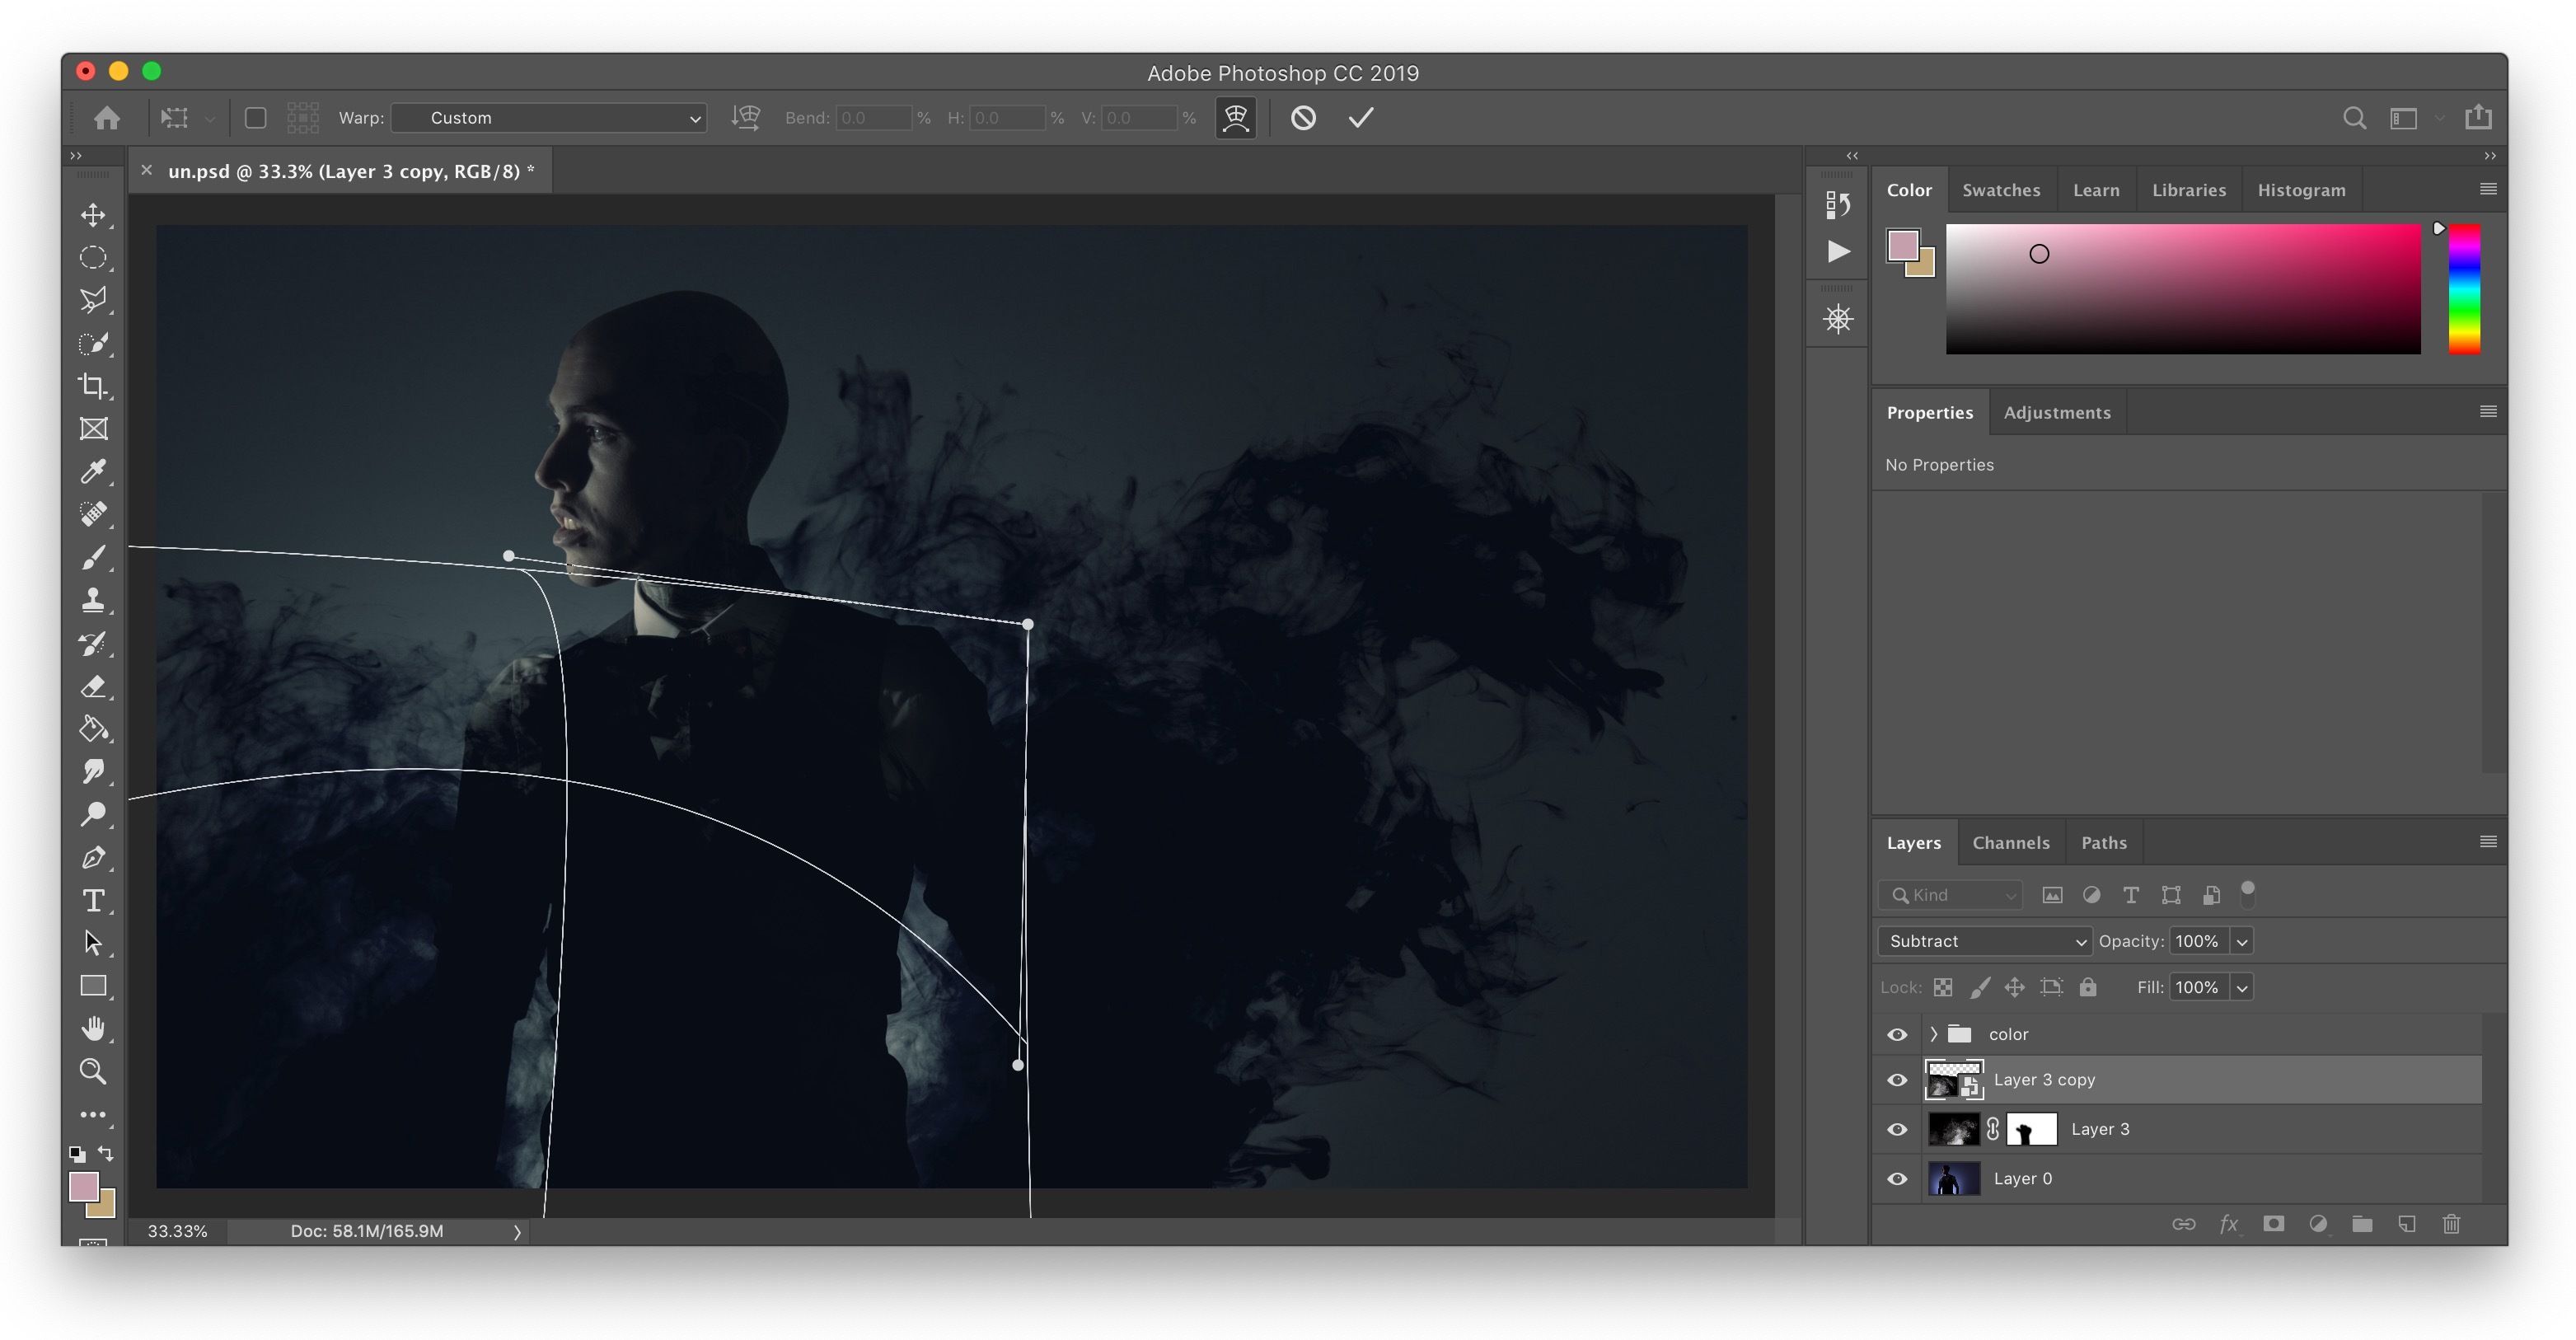
- Wrap: This highly versatile tool allows you to bend and mold your layer using a mesh grid, enabling organic and non-linear distortions. Imagine wrapping an image around a curved surface or creating fluid shapes for Digital Art. Tophinhanhdep.com encourages users to experiment with these tools to elevate their Editing Styles and achieve truly unique visuals.
- Flip Horizontal/Vertical: Simple but effective tools for mirroring layers.
These advanced transformation tools, combined with a solid understanding of resizing, empower you to manipulate your images with unparalleled precision, transforming raw Digital Photography into captivating Visual Designs and Thematic Collections.
Integrating Resizing with Tophinhanhdep.com’s Vision
At Tophinhanhdep.com, our mission is to be your ultimate destination for all things visual, offering everything from stunning Wallpapers and Backgrounds to insights into Digital Photography and advanced Image Tools. Mastering image resizing is not just a technical skill; it’s a gateway to maximizing the potential of our platform and your own creative output.
Optimizing Images for Wallpapers, Backgrounds, and Digital Art
- Screen Fit: For Wallpapers and Backgrounds, precise resizing ensures your chosen image perfectly fits various screen resolutions without awkward cropping or stretching. A beautifully scaled Nature scene or an intricate Abstract design looks best when it fills the display as intended.
- Web Performance: Large image files slow down website loading times, impacting user experience. Efficient resizing reduces file size, which when combined with Tophinhanhdep.com’s recommended Image Compressors and Optimizers, ensures that your Aesthetic galleries and Trending Styles load quickly and smoothly.
- Creative Assets: In Graphic Design and Digital Art, resizing layers ensures that all elements – whether they are Stock Photos, textures, or custom shapes – integrate seamlessly into your composition, maintaining scale and proportion. This precision is vital for creating cohesive Mood Boards and professional Photo Manipulation.
Preserving High-Resolution Photography and Stock Photos
- Print vs. Web: Photographers often capture images in High Resolution to allow for large prints. Resizing techniques enable them to create web-friendly versions of these images without degrading the original file, which can then be displayed beautifully on Tophinhanhdep.com.
- Licensing and Usage: When working with Stock Photos, understanding resizing ensures you adapt them to your project’s specific needs while adhering to licensing requirements, often related to pixel dimensions.
- Future-Proofing: Saving your resized images as new files (using “Save As”) and employing Smart Objects safeguards your original Digital Photography assets, ensuring they remain high-quality for any future use, whether for new Thematic Collections or unexpected client requests.
Leveraging Tophinhanhdep.com’s Ecosystem
Tophinhanhdep.com doesn’t just offer stunning imagery; we provide a complete ecosystem for visual creators. Our Image Tools section includes Converters, Compressors, Optimizers, and AI Upscalers that complement your Photoshop resizing efforts. For instance, after meticulously resizing an image in Photoshop to its target dimensions, you might then use our Image Compressor to further reduce its file size without noticeable quality loss, making it ideal for web sharing or for contributing to Tophinhanhdep.com’s extensive Image Collections. Our AI Upscalers can even assist in situations where you need to enlarge an image beyond its optimal Photoshop resampling capabilities, offering another layer of quality preservation for your Beautiful Photography and Digital Art. Furthermore, our Image-to-Text tools can help in documenting and categorizing your resized images, making them easily searchable within your own archives or for contributing to the rich metadata of Tophinhanhdep.com.
Inspiration is also at the heart of what we do. By mastering resizing, you’ll be better equipped to explore Photo Ideas, create compelling Mood Boards, and contribute to or draw from our Thematic Collections and Trending Styles. Your ability to adapt images to various contexts ensures your creative visions are always realized with precision and quality.
Conclusion
The ability to resize images in Photoshop is more than a technical skill – it’s an indispensable art form that underpins every aspect of digital image creation and presentation. Whether you’re optimizing an Aesthetic Background for a website, preparing High Resolution Photography for print, or crafting intricate elements for Digital Art, the precision and control offered by Photoshop’s resizing tools are crucial.
This guide from Tophinhanhdep.com has equipped you with the knowledge to confidently tackle image and layer resizing, emphasizing the importance of proportionality, resolution, resampling methods, and the transformative power of Smart Objects. By integrating these techniques into your workflow, you ensure that your images consistently look their best, preserving their quality and impact across all platforms and applications. Explore our vast collections, utilize our powerful tools, and continue to refine your Photoshop skills to unlock a world of visual possibilities. With Tophinhanhdep.com as your guide, your journey into exceptional digital imagery is just beginning.