The Ultimate Guide to Resizing JPEG Images for Flawless Visuals with Tophinhanhdep.com

In today’s visually-driven digital landscape, images are everywhere—from the stunning wallpapers on our devices and aesthetic backgrounds for our virtual meetings, to the captivating nature and abstract photography that populate our social media feeds. Whether you’re a professional photographer curating a high-resolution portfolio, a digital artist engaged in photo manipulation, or simply someone sharing beautiful photography with friends, mastering image resizing is an indispensable skill. JPEG, or JPG, files are the workhorses of digital imagery, renowned for their efficient compression that makes them ideal for web use and sharing. However, their versatility often comes with the necessity to adjust their size to meet specific requirements for emails, websites, or various applications. An oversized image can slow down website loading times, consume unnecessary storage, or appear distorted on certain displays, while an undersized image can look pixelated and unprofessional.
At Tophinhanhdep.com, we understand the critical role image size plays in visual communication and overall user experience. Our comprehensive suite of Image Tools, including powerful Converters, Compressors, Optimizers, and AI Upscalers, is designed to empower you with seamless control over your digital visuals. This article, inspired by our commitment to high-quality digital photography and efficient image management, will guide you through the essential techniques and best practices for resizing JPEG images across a multitude of platforms. We’ll delve into the nuances of maintaining image quality, leveraging cutting-edge AI for upscaling, and ensuring your images always look their best, whether for a creative project or a simple share.
Understanding JPEG Image Resizing: Fundamentals and Quality Considerations
Before diving into the practical “how-to,” it’s crucial to grasp the fundamental concepts behind JPEG image resizing. Understanding the terminology and implications will enable you to make informed decisions, ensuring your resized images consistently achieve the desired aesthetic and technical specifications. This foundation is key to producing high-resolution, stock photos-quality visuals, and refining your digital photography skills.
Why Resizing JPEGs Matters
The need to resize JPEGs arises from various practical and aesthetic considerations in digital imaging.
- Web Optimization: For websites and blogs, oversized images can significantly increase page loading times, leading to a poor user experience and negatively impacting search engine rankings. Resizing images to optimal dimensions and file sizes is a cornerstone of effective web design and digital photography.
- Email and Messaging: Most email providers and messaging apps impose file size limits. Resizing JPEGs ensures that your beautiful photography can be shared without encountering attachment errors or lengthy upload times.
- Device Compatibility and Display: Images are viewed on a myriad of devices with different screen resolutions—from large desktop monitors displaying stunning wallpapers to compact mobile screens. Resizing images allows them to display correctly without excessive scrolling, cropping, or pixelation, preserving their aesthetic appeal.
- Storage Management: High-resolution images, while perfect for detailed viewing, can consume significant storage space on your devices or cloud services. Reducing their dimensions, especially for images not requiring extreme detail, helps manage storage efficiently. This is particularly relevant when archiving large collections of stock photos or personal beautiful photography.
- Print vs. Digital: Print media typically requires much higher resolutions (e.g., 300 DPI) than digital screens (e.g., 72 DPI). Resizing for print involves adjusting dimensions and understanding DPI to ensure sharp, clear physical output.

The Nuance of Quality Loss: Resizing vs. Compression
A common concern when resizing JPEGs is the potential loss of image quality. It’s important to distinguish between two related but distinct processes:
- Resizing (Changing Dimensions): This refers to altering the physical width and height (in pixels) of an image. When you make an image smaller, the software discards pixel data, which usually results in a clean, smaller image with minimal perceptible quality loss unless you zoom in extensively. However, when you make an image larger (upscale), the software must invent new pixel data, leading to a noticeable decrease in sharpness and clarity, often appearing blurry or pixelated. This is where Tophinhanhdep.com’s AI Upscalers become invaluable, using advanced algorithms to intelligently add detail and preserve image quality during enlargement, transforming standard digital photography into high-resolution masterpieces.
- Compression (Reducing File Size): JPEG is inherently a “lossy” compression format. This means that every time a JPEG is saved, especially at a lower quality setting, some image data is permanently discarded to achieve a smaller file size. Repeated saving and re-saving at low-quality settings can progressively degrade an image. Tophinhanhdep.com’s Compressors and Optimizers are designed to intelligently reduce file size while minimizing visible quality loss, striking a balance perfect for web use and sharing while maintaining the integrity of your beautiful photography.
The general rule of thumb is: always work on a copy of your original, high-resolution image, and try to resize down rather than up whenever possible. When upscaling is necessary, especially for stock photos or graphic design elements, Tophinhanhdep.com’s AI Upscalers are your best ally.
Key Terminology: Pixels, Resolution, and Aspect Ratio
To effectively resize images, a grasp of key terminology is essential:
- Pixels: The smallest individual colored squares that make up a digital image. The more pixels an image has, the more detail it can display and the larger its physical dimensions can be before pixelation occurs.
- Resolution: Often expressed as the number of pixels in an image’s width and height (e.g., 1920x1080 pixels). For print, resolution is also described in Dots Per Inch (DPI) or Pixels Per Inch (PPI), indicating the density of pixels in a physical print. A higher DPI means a sharper print.
- Aspect Ratio: The proportional relationship between an image’s width and height (e.g., 16:9 for widescreen, 1:1 for square). Maintaining the aspect ratio during resizing prevents distortion, ensuring your image isn’t stretched or squished. Many Tophinhanhdep.com tools offer options to lock or unlock the aspect ratio, giving you precise control for all your digital art and photo manipulation needs.
Practical Methods for Resizing JPEGs Across Platforms
Resizing JPEG images can be achieved through various methods, depending on your device and specific needs. Tophinhanhdep.com offers robust solutions, alongside other common tools, to cater to every scenario, from quick adjustments for social media to detailed edits for graphic design.
Online Resizers: Convenience and Accessibility with Tophinhanhdep.com
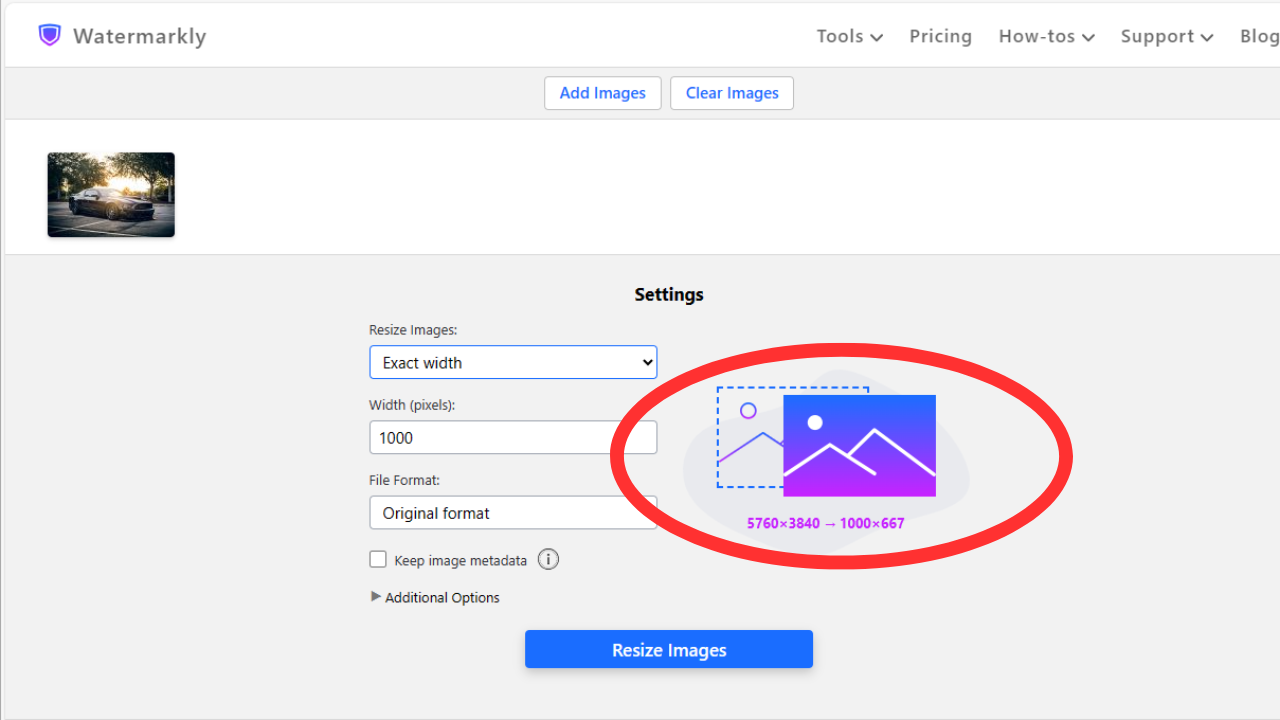
For unparalleled convenience and powerful features, online image resizers are often the go-to choice, especially for users who prioritize accessibility and batch processing. Tophinhanhdep.com’s online image resizer is a prime example, designed to make the process effortless and efficient.
Tophinhanhdep.com’s Image Resizer boasts several standout features:
- Batch Processing: Upload and resize multiple JPEG files simultaneously. This is a game-changer for digital photographers and content creators dealing with thematic collections or numerous stock photos, saving valuable time compared to processing images one by one.
- Versatile Format Support: Beyond JPEGs, Tophinhanhdep.com supports a wide array of formats including PNG, WEBP, HEIC, GIF, and BMP. You can even convert your images to different formats (JPEG, PNG, WEBP) right within the export settings, making it a comprehensive Image Converter as well.
- Precise Control: Resize images by entering exact pixel dimensions for width and height or by specifying a percentage of the original size. This flexibility allows for precise adjustments, whether you’re optimizing images for specific aesthetic backgrounds or fitting them into a complex graphic design layout.
- “High Quality Resize” (AI-Powered Upscaling): When you need to enlarge an image, especially for high-resolution displays or print, our “High Quality Resize” option utilizes Tophinhanhdep.com’s AI Upscalers. This advanced technology intelligently fills in pixel “blanks,” minimizing blurriness and pixelation, and delivering sharper, clearer enlarged images that preserve the integrity of your beautiful photography.
- Instant Preview: See the impact of your resizing settings in real-time before downloading. This visual feedback is crucial for fine-tuning and ensuring the final output meets your expectations, reducing guesswork in photo manipulation.
- Security and Privacy: Your uploaded files are processed securely and are often automatically deleted after a short period, ensuring your intellectual property and personal data remain protected.
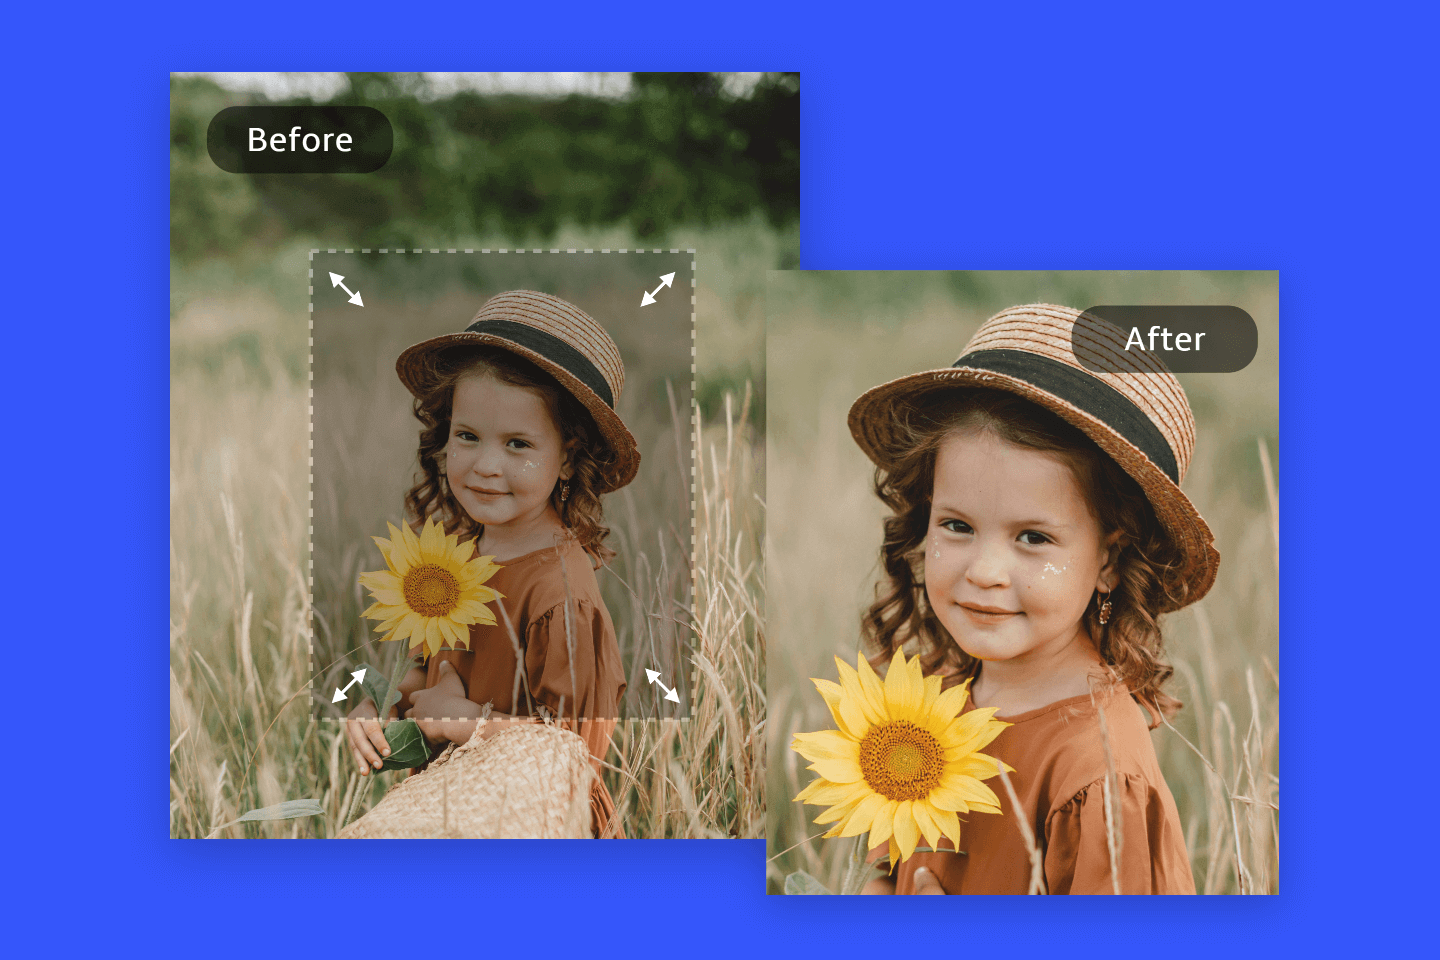
- Cropping Functionality: For situations where a specific aspect ratio is required (e.g., turning a rectangular image into a square for Instagram), Tophinhanhdep.com offers cropping. While automatic cropping based on the image’s center is available in the resizer, for more granular control over the cropping area, Tophinhanhdep.com’s dedicated photo crop tool provides superior flexibility, allowing you to selectively remove unwanted parts and achieve precise compositions for your creative ideas.
To use Tophinhanhdep.com’s image resizer:
- Visit the Tophinhanhdep.com website.
- Click the “Resize JPEG Online” button or navigate to the Image Resizer tool.
- Upload your JPEG files (or drag and drop them) from your computer. You can upload multiple images in one go.
- Choose your resizing method: “Exact width,” “Exact height,” “No larger than” (for maximum dimensions), “Exact width & height” (to specify both, with options for padding or cropping), or a percentage.
- If enlarging, consider checking the “High Quality Resize” box for AI-enhanced results.
- Adjust quality/compression settings if available and desired.
- Click “Resize images” and then download your processed files.
This robust online tool is ideal for digital photographers, visual designers, and anyone seeking efficient and high-quality image resizing without needing to install software.
Desktop Tools: Built-in Solutions for Windows and Mac
For users who prefer offline tools or have specific operating system preferences, several built-in desktop applications offer reliable JPEG resizing capabilities.
Windows
-
Microsoft Paint: A simple, pre-installed image editor perfect for basic resizing.
- Make a copy of your original JPEG.
- Right-click the image file and select “Edit” to open it in Paint.
- Click the “Resize” button (or Ctrl+W) in the Home tab.
- Choose to resize by “Pixels” or “Percentage.” For most cases, using percentages (e.g., 50% for half size) is intuitive.
- Ensure “Maintain aspect ratio” is checked to prevent distortion.
- Enter your desired values and click “OK.”
- Go to “File” > “Save As” and select “JPEG” format, giving it a new name to preserve the original.
Pros: Extremely easy to use, pre-installed, good for basic adjustments. Cons: Limited advanced features, no preview of quality loss until applied, no batch processing.
-
Photos App: The default image viewer in Windows also offers basic resizing.
- Open your JPEG in the Photos app (usually by double-clicking).
- Click the three-dot menu in the top-right corner and select “Resize.”
- Choose a preset size (e.g., “Small,” “Medium”) or “Define custom dimensions.”
- Enter specific width and height values. The app usually maintains the aspect ratio by default.
- Click “Save” to create a new, resized file, leaving your original intact.
Pros: Simple, quick, preserves original, built-in. Cons: Lacks fine-grain control, no quality preview, no batch resizing.
Mac
-
Preview: macOS’s versatile built-in application for viewing and editing images.
- Make a copy of your original JPEG.
- Open the image in Preview (usually by double-clicking the file).
- Click “Tools” in the menu bar, then select “Adjust Size.”
- In the “Image Dimensions” window, choose your desired units (Pixels, Percent, etc.) from the drop-down menu.
- Enter a new width or height. Ensure “Scale proportionally” is checked to maintain the aspect ratio.
- Observe the “Resulting Size” at the bottom of the window to see the new file size, which is helpful for managing email or web constraints.
- Click “OK” to apply changes. If unsatisfied, use Cmd+Z to undo.
- Go to “File” > “Save” to overwrite the copy, or “File” > “Export” to save as a new file, potentially in a different format or with adjusted quality.
Pros: Pre-installed, user-friendly, real-time file size preview, includes other basic editing tools. Cons: No batch processing, limited advanced features for professional digital photography.
Specialized Desktop Software
While not built-in, dedicated desktop software offers more advanced controls:
- Icecream Image Resizer: (Windows) A user-friendly tool specifically designed for batch resizing of various image formats, including JPEG. It offers presets for common uses (email, desktop), manual resolution entry, and intelligent handling of vertical images.
- GIMP (GNU Image Manipulation Program): (Windows, macOS, Linux) A powerful, free, and open-source raster graphics editor. While it has a steeper learning curve, it offers extensive resizing options, control over interpolation methods for quality, and a wide array of other image editing and photo manipulation tools. It’s an excellent choice for those venturing into more complex visual design and digital art.
- Adobe Photoshop: (Windows, macOS) The industry standard for professional image editing. Photoshop provides the most granular control over image resizing, compression, and quality. While it requires a subscription, its features for resizing JPEGs without perceptible quality loss (especially when downscaling or using sophisticated resampling algorithms) are unparalleled, making it ideal for high-resolution stock photos and complex graphic design projects.
Mobile Resizing: On-the-Go Adjustments (iOS & Android)
Mobile devices have become primary tools for capturing beautiful photography. When it comes to sharing these images, quick resizing is often necessary. While native apps typically lack dedicated resizing features, third-party apps fill this gap.
For iOS (iPhone, iPad, iPod Touch)
Numerous apps are available on the App Store to resize images.
- Install an App: Search for “Image Size,” “Image Resizer,” or similar in the App Store. Popular options like “Image Size” are straightforward.
- Grant Access: Upon opening, the app will request access to your photos. Granting this is essential.
- Select Photo: Choose the JPEG from your camera roll that you wish to resize.
- Resize Options: Tap the “Resize” or dimension icon. You can usually enter exact pixel dimensions or choose from preset sizes. Most apps maintain the aspect ratio by default; look for a “chainlink” or “padlock” icon to unlock if you need to adjust width and height independently (though this risks distortion).
- Save: Once satisfied, tap “Save” or “Download” to save the resized image to your camera roll, typically as a new file to preserve your original.
For Android Devices
Similar to iOS, Android relies on third-party apps for robust image resizing.
- Download an App: Head to the Google Play Store and search for “Image Resizer,” “Photo & Picture Resizer,” or “Image Shrink.”
- Permissions: Allow the app access to your device’s photos and storage.
- Open Image: Navigate through the app’s interface to select the JPEG you want to resize.
- Adjust Size: Find the resize tool. You can often choose from predefined sizes, specify exact pixel dimensions, or use percentages. The aspect ratio is usually locked by default; disable this only if you understand the potential for distortion.
- Save: The app may automatically save the resized image, or you might need to tap a “Save” or “Download” button. Resized images are typically stored in a new folder within your “Pictures” directory, named after the app, leaving your original intact.
Mobile resizing apps are invaluable for quick adjustments for social media posts, messaging, or basic email attachments, ensuring your aesthetic and nature photography can be shared efficiently from anywhere.
Advanced Strategies and Best Practices for Optimal JPEG Resizing
Beyond the basic mechanics, a few advanced strategies and best practices can significantly enhance your JPEG resizing workflow, especially when striving for high-resolution output or managing extensive image collections for digital photography and graphic design.
Batch Processing: Efficiency for Large Collections
For digital photographers, content managers, or anyone dealing with numerous images, resizing them one by one is impractical. Batch processing is an indispensable feature that allows you to apply resizing (and often other edits like compression or watermarking) to multiple JPEGs simultaneously.
- Tophinhanhdep.com’s Online Resizer: As highlighted earlier, our online tool excels in batch processing. You simply upload all your images, define your desired output settings once, and the platform processes them all, ready for bulk download. This is a powerful feature for handling stock photos, thematic collections, or preparing image assets for an entire website.
- Dedicated Desktop Software: Tools like Icecream Image Resizer (Windows) or certain advanced features in GIMP and Adobe Photoshop also offer robust batch processing capabilities. These are particularly useful for professional digital photography workflows where local processing power and control are preferred.
Embracing batch processing is a cornerstone of efficient image management, allowing you to quickly prepare large volumes of images for various purposes, from creating mood boards to updating trending styles on your platform.
Resizing for Specific Platforms: Social Media and Web Optimization
Different online platforms have unique image requirements concerning dimensions and file size. Adhering to these specifications ensures your images appear crisp, load quickly, and are not automatically (and often poorly) re-compressed by the platform.
- Social Media:
- Instagram: Popular for square (1080x1080px), portrait (1080x1350px), and landscape (1080x566px) formats. Tophinhanhdep.com’s resizer, especially with its cropping features, allows you to perfectly prepare images for these aspect ratios. Our dedicated photo cropper even offers ready-made presets for Instagram.
- Facebook: Recommended sizes vary for profile pictures, cover photos, and feed images. For feed, 1200x630px is a common recommendation for optimal display.
- YouTube Thumbnails: A crucial element for video engagement, typically 1280x720px.
- Websites and Blogs: Aim for images that are large enough to look good on modern screens but small enough to load quickly. Often, 1920px width for hero images and 800-1200px width for in-content images are good starting points, coupled with optimization for file size.
Tophinhanhdep.com’s Image Optimizers and Compressors work hand-in-hand with our resizer to ensure that not only are your images the correct dimensions but also that their file size is minimized for lightning-fast web performance, aligning perfectly with modern visual design principles.
Minimizing Quality Loss: Tips from the Pros
While some quality degradation is inherent when altering JPEGs, especially when upscaling or aggressively compressing, several techniques can minimize this effect:
- Always Work on Copies: Never edit your original high-resolution image directly. Always create a duplicate to work on, preserving your master file.
- Prioritize Downscaling: Resizing an image to a smaller dimension generally results in less noticeable quality loss than enlarging it.
- Leverage AI Upscalers for Enlargement: When increasing image size is unavoidable, utilize Tophinhanhdep.com’s AI Upscalers. These intelligent tools analyze image content and generate new pixels that blend naturally, preventing the blocky or blurry artifacts typically associated with standard upscaling. This is a game-changer for enhancing low-resolution digital photography or creating high-resolution versions of aesthetic visuals.
- Smart Compression: After resizing, if the file size is still too large, use Tophinhanhdep.com’s Compressors with a discerning eye. Experiment with different quality settings (e.g., 70-80% quality often looks excellent while significantly reducing file size) to find the optimal balance between file size and visual fidelity.
- Consider Image Format Conversion: For images with sharp edges or text (e.g., logos, screenshots), converting from JPEG to PNG after resizing can sometimes yield better quality, as PNG is a lossless format that handles sharp details better. Tophinhanhdep.com’s Image Converters make this process simple.
- Subtle Post-Resizing Adjustments: Occasionally, a resized image might benefit from slight sharpening or contrast adjustments to regain some perceived crispness. Use these sparingly and subtly.
Common Challenges and Troubleshooting in JPEG Resizing
Even with the best tools and intentions, users may encounter common issues when resizing JPEGs. Understanding these challenges and knowing how to troubleshoot them ensures a smoother workflow and superior results, critical for any graphic design or photo manipulation project.
Addressing Pixelation and Blurriness
- The Problem: Pixelation (jagged, blocky edges) and blurriness are the most common complaints when enlarging JPEGs. This occurs because the software has to invent pixel data, and without intelligent algorithms, it simply stretches existing pixels.
- Tophinhanhdep.com’s Solution: Our AI Upscalers are specifically engineered to combat this. Instead of merely stretching pixels, the AI analyzes patterns and details within the image to intelligently generate new, coherent pixel information. This results in significantly sharper and clearer enlarged images, making it possible to transform standard digital photography into high-resolution assets suitable for larger prints or displays without compromising their beautiful aesthetic. If you’re encountering pixelation when needing a larger image, using Tophinhanhdep.com’s AI Upscaler is your best defense.
Managing Unexpected File Size Changes
- The Problem: Sometimes, even after resizing an image to smaller dimensions, the file size might not reduce as much as expected, or conversely, might become excessively small and compromise quality.
- Troubleshooting:
- Compression Settings: When saving, check the compression quality setting. A “high quality” JPEG save (e.g., 90-100%) will result in a larger file size than a “medium quality” save (e.g., 70-80%). Adjust this slider according to your needs. Tophinhanhdep.com’s image resizer often allows you to control this.
- Metadata: Images often contain metadata (EXIF data from cameras, GPS coordinates, etc.) that adds to the file size. Some tools can strip this metadata during saving, further reducing the file size.
- Tophinhanhdep.com’s Compressors and Optimizers: For precise file size control, especially when aiming for specific targets (e.g., “compress to 200kb”), Tophinhanhdep.com’s dedicated Compressors are invaluable. They allow you to reduce file size without changing pixel dimensions, optimizing your images for web and sharing while preserving visual quality as much as possible.
Maintaining Aspect Ratio and Preventing Distortion
- The Problem: Accidentally stretching or squishing an image, making subjects appear too wide or too thin. This happens when the aspect ratio is not maintained during resizing.
- Troubleshooting:
- “Maintain Aspect Ratio” Feature: Always ensure the “Maintain aspect ratio,” “Constrain proportions,” or “Scale proportionally” checkbox is selected in your image editing software. This links the width and height fields so that changing one automatically adjusts the other. All reliable resizing tools, including Tophinhanhdep.com’s resizer, provide this option.
- Cropping for New Ratios: If you need an image to fit a specific, different aspect ratio (e.g., turning a landscape photo into a square portrait for Instagram), the correct approach is usually to crop the image first, then resize it. Tophinhanhdep.com offers flexible cropping tools within its resizer and a dedicated photo cropper, allowing you to visually select the area you want to keep, ensuring your visuals maintain their intended composition and aesthetic. This is a fundamental technique in photo manipulation and visual design.
In conclusion, effective JPEG image resizing is a cornerstone of modern digital photography and content creation. Whether you are optimizing images for your website, sharing beautiful photography with friends, or engaging in complex graphic design, understanding the tools and techniques available is paramount. Tophinhanhdep.com stands as your comprehensive partner in this endeavor, offering a full spectrum of Image Tools—from intelligent AI Upscalers that breathe new life into enlarged images, to efficient Compressors and Converters that streamline your workflow. Explore Tophinhanhdep.com today to transform your digital imagery with seamless, high-quality image management, ensuring your visuals are always flawless and impactful, no matter their destination.