How to Resize Multiple Images at Once

In our visually-driven world, almost everyone has amassed a colossal collection of digital photographs and images. From cherished family memories to professional “High Resolution” shots for “Digital Photography” portfolios, these visual assets are integral to our daily lives and creative pursuits. However, a common challenge arises: these images aren’t always the perfect size for every purpose. Whether you’re preparing “Stock Photos” for a website, compiling “Wallpapers” for a new device, sharing “Beautiful Photography” on social media, or optimizing images for “Graphic Design” projects, individual resizing can quickly become an arduous and time-consuming task. Imagine manually adjusting hundreds, or even thousands, of images one by one – it could take days!
Fortunately, the landscape of “Image Tools” has evolved significantly, offering robust solutions for batch resizing multiple images simultaneously. This not only saves immense time but also optimizes file sizes, preserving valuable storage space without compromising visual quality. On Tophinhanhdep.com, we understand the critical role efficient image management plays in “Visual Design” and “Photography” workflows. This comprehensive guide will walk you through various methods for batch resizing, leveraging both built-in operating system features (Windows and macOS) and powerful online “Image Tools” available right here on Tophinhanhdep.com. Get ready to transform your approach to image management, ensuring your “Aesthetic” and “Nature” shots, or even “Abstract” and “Sad/Emotional” collections, are perfectly presented for any platform or purpose.

Streamlining Image Resizing on Windows
Windows users have several effective options for batch resizing images, ranging from a clever built-in trick to a dedicated utility for power users. These methods not only adjust the dimensions of your photos but also significantly reduce their file size, which is crucial for web optimization and efficient storage of your vast “Image Inspiration & Collections.”
The Windows “Mail Recipient” Trick
This seemingly unconventional method is surprisingly effective and doesn’t require any additional software, making it a fantastic quick “Image Tool” for basic batch resizing. The core benefit is that it resizes images by creating temporary, smaller versions, ideal for quick sharing or embedding in documents without the heft of original “High Resolution” files.
To begin, it’s easiest if all the photos you intend to resize are gathered in a single folder. If not, create a new folder – perhaps on your desktop or in your “Photos” directory – and give it a descriptive name like “Resized Photos.”
- Select Your Images: Navigate to your photos. To select multiple images, click on the first one, then hold down the
CTRLkey (orShiftfor a contiguous block) and click on each additional photo you wish to include. Once all desired images are selected, release theCTRLkey. - Copy to Your New Folder: Right-click on any of the selected photos and choose “Copy.” Then, open the new folder you created, right-click anywhere inside it, and select “Paste.” This ensures you’re working with copies, safeguarding your original “Digital Photography” assets.
- Initiate the Resizing Process: With your new folder open and all target images present, select all photos within it. A quick way to do this is to click on one photo, then hold
CTRLand pressA. - Access the “Send To” Menu: Right-click on any of the now-selected photos. Hover over “Send To,” and then click “Mail Recipient.”
- Note on Windows 11: Users on Windows 11 may first need to click “Show more options” after right-clicking to reveal the “Send To” menu.
- Choose Your Desired Size: A small “Attach Files” window will appear. Here, you’ll be presented with a dropdown menu offering various common image sizes (e.g., Small, Medium, Large, Original). Select the size that best fits your needs. The system intelligently maintains the aspect ratio, preventing distorted “Visual Design.”
- “Attach” (Without Actually Emailing): Click “Attach.” Windows will then attempt to open your default email program (like Outlook or Thunderbird). If you don’t have one configured, you might see a message stating, “There is no email program associated to perform the requested action.” It’s crucial to leave this pop-up open and not close your email program if it launches. We’re not actually sending emails; this is just the mechanism Windows uses to generate the resized copies.
- Retrieve Your Resized Photos: Open your Windows search box (or press
Windows Key + S). Type%temp%and press Enter. This will open your Temporary folder. - Locate and Organize: Within the
%temp%folder, you’ll find the newly resized versions of your photos. You can sort by “Type” or search for common image extensions (e.g.,.jpg,.png) to quickly locate them. Drag or copy these resized images to your dedicated “Resized Photos” folder, ensuring your “Image Inspiration & Collections” are neatly organized.
This trick is perfect for users seeking a quick, no-fuss method to prepare images for emails, basic web uploads, or digital presentations, ensuring they fit within common size constraints for various “Photo Ideas.”
Leveraging PowerToys for Batch Resizing in Windows 10/11
For those who regularly engage in “Digital Photography” and “Visual Design,” Microsoft PowerToys offers a more robust and customizable solution for batch image resizing. PowerToys is a set of utilities designed to enhance the Windows experience for “power users,” and its “Image Resizer” tool is a standout for image manipulation. It provides granular control over dimensions and file formats, making it an indispensable “Image Tool” for professionals and enthusiasts alike.
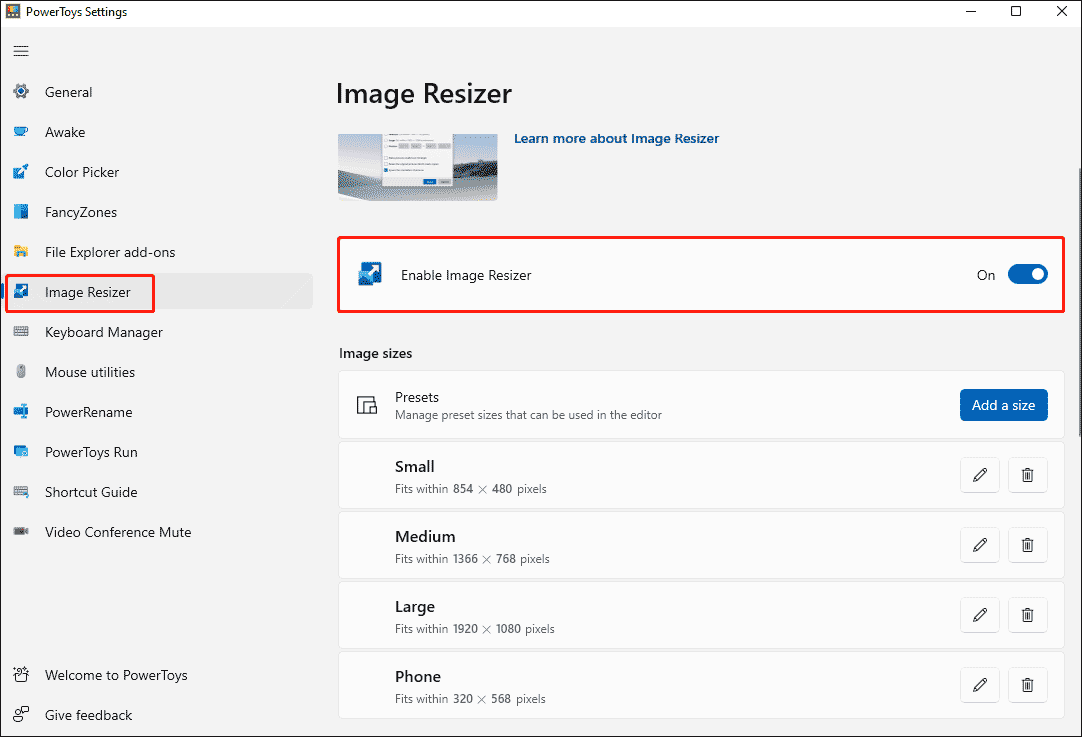
- Install PowerToys: If you haven’t already, download the PowerToys app from a reliable source like the official Microsoft GitHub page. Run the installer and follow the on-screen instructions.
- Enable Image Resizer: Once installed, open the PowerToys app. In the left sidebar, select “Image Resizer.” Ensure the “Enable Image Resizer” option is toggled to “On.”
- Configure Presets (Optional but Recommended): Within the Image Resizer settings, you can define custom preset sizes. This is incredibly useful for maintaining consistency across your “Image Inspiration & Collections,” such as always resizing to a specific dimension for “Wallpapers” or “Backgrounds.” Click “Add a size” under “Image sizes” and input your desired width, height, and chosen resize type (Fill, Fit, or Stretch).
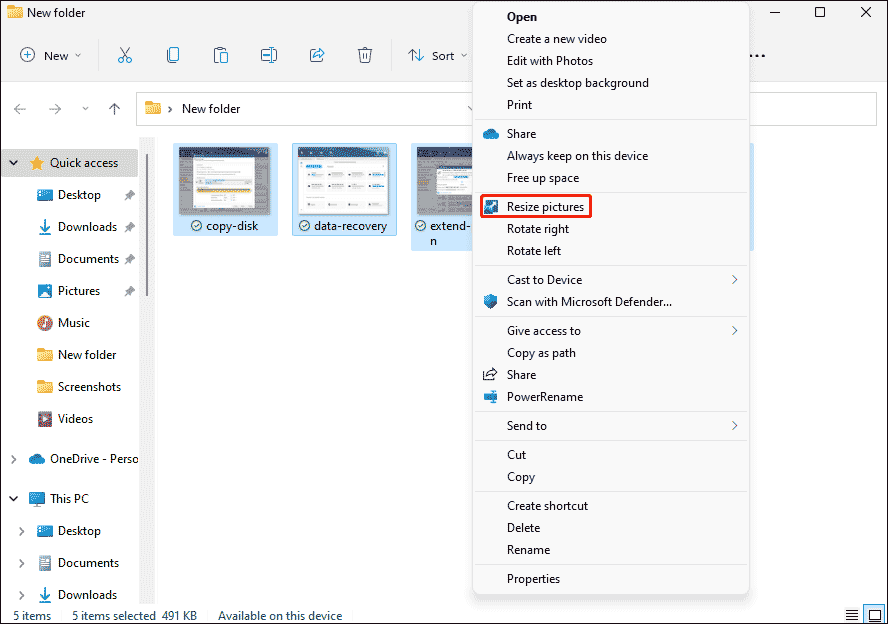
- Select Images for Resizing: Open File Explorer and navigate to the folder containing the images you wish to resize. Select all the target images (using
CTRL + Aor by holdingCTRLand clicking individual files). - Access the Resizer: Right-click on any of the selected images.
- On Windows 10, you’ll likely see “Resize pictures” directly in the context menu.
- On Windows 11, you may need to click “Show more options” first, then select “Resize pictures.”
- Choose Resizing Options: The “Image Resizer” window will appear.
- Preset Sizes: Select from predefined options like Small, Medium, Large, or Phone.
- Custom Size: Choose “Custom” to manually enter precise width and height values in pixels. This is ideal for specific “Graphic Design” requirements or when preparing images for “High Resolution” displays.
- Resize Type: If using custom dimensions, select a resize type:
- Fill: Expands or shrinks the photo to completely fill the target dimensions, potentially cropping parts of the image to fit.
- Fit: Ensures the entire image is visible within the target dimensions, adding blank space if the aspect ratio doesn’t match.
- Stretch: Forces the image to fit the exact dimensions, which can lead to distortion if the aspect ratio changes. For “Beautiful Photography” and preserving “Aesthetic” quality, “Fit” is usually preferred with “Scale proportionally” enabled (which is often the default).
- Execute Resizing: Click the “Resize” button. PowerToys will process the images and save resized copies in the same folder as your originals, appending “_resized” or a similar suffix to their filenames. This non-destructive approach is excellent for maintaining your initial “Digital Photography” files.
PowerToys elevates image resizing from a tedious chore to an efficient “Image Tool” integrated seamlessly into your Windows workflow, providing precision for any “Visual Design” project.
Mastering Batch Photo Resizing on macOS
macOS users are also well-equipped with powerful built-in functionalities and creative automation tools to handle multiple image resizing tasks. Apple’s native applications, combined with the versatility of Shortcuts, make batch image processing an intuitive experience, crucial for maintaining the quality of your “Images (Wallpapers, Backgrounds, Aesthetic, Nature, Abstract, Sad/Emotional, Beautiful Photography)” and optimizing your “Photography” workflows.
Quick Resizing with macOS Preview
Preview, Apple’s default image and PDF viewer, is a deceptively powerful “Image Tool” that can perform batch operations, including resizing. It’s an excellent solution for quickly adjusting image dimensions without needing to download any third-party software, maintaining the integrity of your “High Resolution” images for various uses.
- Select Your Images: In Finder, select all the images you wish to resize. You can click and drag a selection box, or hold the
Commandkey and click individual files. - Open with Preview: Right-click (or Control-click) on any of the selected images. From the contextual menu, choose “Open With” and then “Preview.” All selected images will open within a single Preview window, displayed as thumbnails in the sidebar.
- Select All Images in Preview: Go to the menu bar at the top of your screen, click “Edit,” and then select “Select All” (or press
Command + A). This ensures that the resizing operation will apply to every image currently open in Preview. - Adjust Size: With all images selected, go to the menu bar again, click “Tools,” and then select “Adjust Size.”
- Define Dimensions and Proportions: A dialog box will appear. Here, you can specify your desired “Width” or “Height.”
- Scale Proportionally: Ensure the “Scale Proportionally” box is checked. This critical feature automatically adjusts the other dimension to maintain the original aspect ratio, preventing distortion and preserving the “Aesthetic” quality of your “Beautiful Photography” and “Digital Art.”
- You can also choose units (pixels, percent, inches, cm, mm) and adjust resolution if needed.
- Apply and Save: Click “OK.” Preview will immediately resize all selected images.
- Save Changes: The resized images are automatically saved, replacing the original files. If you wish to preserve your original “High Resolution” images, it’s a good practice to duplicate the files before starting the resizing process (
Command + Din Finder).
This method is fast, efficient, and perfectly integrated into the macOS ecosystem, making it a go-to “Image Tool” for regular batch resizing. It’s particularly useful for quickly preparing images for web galleries, “Mood Boards,” or standard print sizes.
Automating Resizing with macOS Shortcuts
For those who frequently perform image resizing as part of a larger “Visual Design” workflow or for specialized “Image Inspiration & Collections,” the macOS Shortcuts app offers powerful automation capabilities. You can create custom shortcuts to resize images to specific dimensions with just a few clicks, streamlining your “Digital Photography” post-processing. While specific third-party shortcuts exist, understanding how to use the Shortcuts app for this purpose allows for immense flexibility. Tophinhanhdep.com encourages users to explore the creation of custom shortcuts or to utilize pre-built, robust options for tailored image processing.
Let’s consider how you’d use a powerful resizing shortcut, similar to one you might find or create for Tophinhanhdep.com users:
- Obtain or Create a Resizing Shortcut: You can find community-shared shortcuts online (e.g., from Tophinhanhdep.com’s “Image Tools” section for Mac users) or build your own within the Shortcuts app. A typical resizing shortcut would include actions like “Get Selected Files,” “Resize Image” (where you define parameters like size, percentage, or longest edge), and “Save File.”
- Add to Shortcuts App: Once obtained, add the shortcut to your Shortcuts app library.
- Enable as a Quick Action: To make the shortcut easily accessible, open the Shortcuts app, locate your resizing shortcut, and click the info icon (ⓘ) or settings icon. Ensure “Finder” is checked under “Use as Quick Action” or “Services Menu.” This integrates the shortcut into your Finder’s contextual menu.
- Use the Shortcut in Finder: Select one or more images in Finder that you wish to resize.
- Activate the Quick Action: Right-click on the selected images. Hover over “Quick Actions” (or “Services” on older macOS versions), and then click on your designated resizing shortcut (e.g., “Tophinhanhdep.com Resize Images”).
- Specify Resizing Parameters: The shortcut will prompt you to choose how you want to resize the images – typically by a specific width/height, a percentage, or by setting a maximum “Longest Edge.” This flexibility is invaluable for preparing images for diverse “Thematic Collections” or “Trending Styles.” Input your desired values.
- Choose Export Location: Finally, the shortcut will ask you where to save the resized images. Select your preferred destination folder, which could be a specific directory for “Backgrounds” or “Photo Ideas.”
- Completion Notification: Once the process is complete, you might receive a notification like “Great Success!” indicating that your images have been successfully resized and saved.
The Shortcuts app transforms image resizing into a powerful, automated process, saving “Digital Photography” enthusiasts and “Graphic Design” professionals significant time and effort, especially when dealing with complex “Creative Ideas” and extensive “Image Inspiration & Collections.”
Cloud-Based Solutions and the Future of Image Optimization
While desktop applications offer powerful local control, online “Image Tools” provide unparalleled accessibility and cross-platform convenience for resizing multiple images. Tophinhanhdep.com specializes in offering a suite of such tools, making efficient image processing available to everyone, regardless of their operating system or device. These web-based solutions are particularly useful for quick adjustments, collaborative “Visual Design” projects, and optimizing images for online platforms, aligning perfectly with “Trending Styles” and digital sharing needs.
Efficient Online Batch Resizers on Tophinhanhdep.com
Our platform, Tophinhanhdep.com, hosts sophisticated online image tools designed for rapid and secure batch resizing. These tools eliminate the need for software installation, making them accessible from any web browser and ideal for users who prioritize speed and convenience in their “Digital Photography” workflow. We prioritize user privacy, ensuring that your images are handled with care and deleted from our servers immediately after processing.
Here’s a general overview of how you can leverage Tophinhanhdep.com’s powerful online batch resizers:
- Navigate to the Batch Resizer: Visit the “Image Tools” section on Tophinhanhdep.com and select the “Batch Resizer” or “Multiple Photos” option.
- Upload Your Images: Click on “Add Multiple Pictures” or “Choose Images.” You’ll be prompted to select the images from your computer. Our tools are designed to handle large volumes, whether you’re uploading “Nature” shots, “Abstract” art, or a collection of “Sad/Emotional” images for a project.
- Initiate Upload: Once selected, click “Upload Files.” The upload time will depend on the number and initial size of your “High Resolution” images and your internet speed. Rest assured, during this process, Tophinhanhdep.com maintains strict privacy protocols, with immediate deletion of your images from our servers post-processing.
- Choose Resizing Options: After uploading, you’ll be presented with various resizing parameters:
- Scale: Reduce photos by a chosen percentage (e.g., 50% for quick reduction).
- File Size: Target a specific file size (e.g., less than 200KB) for easy web uploads or email attachments, optimizing your “Stock Photos” for various platforms.
- Exact Dimensions: Input precise width and height in pixels for specific “Graphic Design” requirements, ensuring your “Beautiful Photography” fits perfectly into layouts.
- Output Format: Select the desired output format (e.g.,
.JPGfor web,.PNGfor transparency).
- Process and Download: Once you’ve made your selections, click the “Resize My Photos!” or “Go” button. The resizing will commence, and a progress meter will typically be displayed.
- Download Resized Images: Upon completion, you’ll be able to download your resized images, usually as a convenient zipped file. This ensures your newly optimized “Image Inspiration & Collections” are ready for immediate use.
The elegance of Tophinhanhdep.com’s online tools lies in their simplicity and efficiency. Some of our advanced tools even offer local processing, meaning your pictures are resized directly on your computer without ever being uploaded to a server, providing maximum speed and privacy – a feature highly valued by “Digital Photography” professionals. This approach makes Tophinhanhdep.com a superior choice for secure and fast image optimization.
Beyond Resizing: The Tophinhanhdep.com Ecosystem for Image Management
Resizing is often just one step in a comprehensive “Digital Photography” and “Visual Design” workflow. Tophinhanhdep.com offers a complete ecosystem of “Image Tools” designed to support every aspect of your creative journey, ensuring your “Images (Wallpapers, Backgrounds, Aesthetic, Nature, Abstract, Sad/Emotional, Beautiful Photography)” are always at their best.
- Complementary Image Tools: Beyond resizing, explore our “Converters” to change file types, “Compressors” to further reduce file size without losing quality, “Optimizers” for web performance, “AI Upscalers” to enhance “High Resolution” details in smaller images, and “Image-to-Text” tools for content extraction. These tools work in tandem, allowing you to resize a batch of “Stock Photos,” then compress them, and finally optimize them for a website, all within the Tophinhanhdep.com environment.
- Enhancing Photography & Visual Design: Proper image sizing is fundamental for “High Resolution” display, whether for printing “Beautiful Photography” or showcasing “Digital Art” online. Our tools empower you to prepare images for diverse “Editing Styles,” ensuring your work maintains its professional appeal. For “Graphic Design” and “Photo Manipulation,” correctly sized assets are paramount for efficient project execution and achieving desired “Creative Ideas.”
- Curating Image Inspiration & Collections: Resized and optimized images are easier to manage and share, enriching your “Photo Ideas,” “Mood Boards,” and “Thematic Collections.” Consistent sizing contributes to a cohesive “Aesthetic” in your “Wallpapers,” “Backgrounds,” and curated content that reflects “Trending Styles.” Whether you’re building a portfolio of “Nature” photography or assembling a mood board for “Sad/Emotional” visual narratives, Tophinhanhdep.com ensures your images are perfectly prepared.
Conclusion
The days of tediously resizing individual images are firmly in the past. With the diverse array of “Image Tools” available today, including powerful built-in operating system features and advanced online solutions on Tophinhanhdep.com, batch image resizing has become an efficient and straightforward process. Whether you’re a “Digital Photography” enthusiast, a “Graphic Design” professional, or simply someone with a vast collection of “Images (Wallpapers, Backgrounds, Aesthetic, Nature, Abstract, Sad/Emotional, Beautiful Photography),” mastering these techniques is essential for effective image management.
From the clever “Mail Recipient” trick in Windows to the integrated Preview application on macOS, and the robust PowerToys utility, local resizing offers speed and control. However, for unparalleled accessibility and a comprehensive suite of “Image Tools,” Tophinhanhdep.com stands out as your go-to online resource. Our platform not only provides efficient batch resizers that prioritize privacy and performance but also offers a wide range of complementary tools like converters, compressors, and AI upscalers. This ensures your “High Resolution” images are always optimized for any “Visual Design” project, “Image Inspiration & Collections,” or sharing purpose.
Embrace the power of batch resizing and transform your digital workflow. Explore the intuitive “Image Tools” on Tophinhanhdep.com today and discover how effortless it can be to prepare your “Beautiful Photography” and creative assets for the world. Happy photo editing!