How to Resize Images in Paint: A Comprehensive Guide for Digital Creators on Tophinhanhdep.com

In the dynamic world of digital imagery, where stunning wallpapers, captivating backgrounds, and beautiful photography adorn every screen, understanding how to manage image dimensions is paramount. Whether you’re a budding photographer, a visual designer, or simply someone who loves sharing aesthetic images with friends and family, the ability to resize and optimize your pictures is a fundamental skill. Tophinhanhdep.com, a comprehensive resource for high-resolution photography, diverse image collections, and cutting-edge image tools, recognizes this essential need.
This article delves into one of the most accessible and widely available methods for basic image manipulation: resizing pictures using Microsoft Paint. While Tophinhanhdep.com offers a suite of advanced Image Tools like Converters, Compressors, Optimizers, and AI Upscalers for professional and batch processing needs, Paint remains an excellent starting point for quick, simple adjustments on a Windows platform. We’ll guide you through the process step-by-step, explain the critical concepts, and show you how to enhance your visual design workflow, even with a basic tool.
Understanding Image Resizing Fundamentals for Optimal Visual Impact
Before diving into the practical steps, it’s crucial to grasp the core concepts behind image resizing. This knowledge will not only help you use Paint more effectively but also inform your decisions when utilizing Tophinhanhdep.com’s more advanced Image Tools for complex projects.
What is Image Resizing and Why is it Essential?
Image resizing refers to changing the dimensions (width and height) of an image. This process is essential for several reasons:
- File Size Management: High-resolution digital photos, especially those categorized under “Beautiful Photography” or “High Resolution” on Tophinhanhdep.com, can have very large file sizes (often 1MB to 2MB or more). While excellent for print or detailed viewing, these large files can slow down website loading times, clog email inboxes, and consume excessive storage on social media platforms. Resizing reduces the number of pixels, directly translating to a smaller file size, making them quicker to download and upload. This is crucial for web optimization, ensuring your “Wallpapers” or “Backgrounds” load swiftly for users.
- Display Across Devices: Images need to look good on various screens, from small smartphone displays to large desktop monitors. Resizing ensures that images are appropriately scaled for different viewing contexts, preventing pixelation on enlargement or unnecessary large files on smaller screens.
- Platform Requirements: Many online platforms (social media, blogs, online registration forms, e-commerce sites) have specific dimension or file size requirements for profile pictures, banner images, or product photos. Learning to resize helps you meet these specifications effortlessly, ensuring your “Aesthetic” or “Nature” photos are always perfectly presented.
- Visual Design Integration: For graphic design projects or digital art, images often need to fit into predefined layouts or containers. Precise resizing is key to maintaining a polished and professional look, whether it’s for a “Mood Board” or a “Thematic Collection.”
The Importance of Aspect Ratio
One of the most critical concepts in image resizing is the aspect ratio. This is the proportional relationship between an image’s width and its height. For example, a 16:9 aspect ratio means that for every 16 units of width, there are 9 units of height. Common aspect ratios include 4:3 (traditional photography), 3:2 (DSLR photography), and 16:9 (widescreen displays).
When resizing, maintaining the aspect ratio is crucial to prevent distortion. If you change the width without proportionally adjusting the height (or vice versa), your image will appear stretched or squished. For creators focused on “Beautiful Photography” or “Digital Art,” preserving the original composition and aesthetic integrity is paramount. Paint, like most image editing tools, offers a “Maintain aspect ratio” option to simplify this.
Pixels vs. Percentage: Choosing Your Measurement
Paint provides two primary ways to specify new dimensions:
- Percentage: This method resizes the image relative to its current size. If an image is 100% of its original size, setting it to 50% will halve its dimensions, and 200% will double them. This is often the easiest method for a quick reduction or enlargement when you don’t need exact pixel values.
- Pixels: This method allows you to set precise width and height values in pixels. This is ideal when you need an image to fit into a specific container size, such as a website banner (e.g., 825px wide for a full-width banner, 580px for a middle section, or 235px for a highlight box, as specified by some web design guidelines).
Paint vs. Paint 3D: A Clarification
It’s important to distinguish between the classic Microsoft Paint (often simply called “Paint”) and the newer “Paint 3D.” This guide focuses on the classic Paint program, which is standard on Windows platforms and found in “All Programs > Accessories.” While Paint 3D offers more advanced features, including some 3D modeling capabilities, the basic 2D image resizing functions are more straightforward and readily available in the classic Paint interface.
Step-by-Step Guide: Resizing Images with Microsoft Paint
Microsoft Paint is a simple yet effective tool for basic image resizing. Here’s how you can use it to prepare your “Images” for various purposes, from “Wallpapers” to “Digital Photography” portfolios.
Preparing Your Image for Resizing

Before you start, a crucial best practice is to always work on a copy of your original image. This safeguards your high-resolution original from any irreversible changes and ensures you always have the pristine version available for other uses, such as “High Resolution” prints or future “Photo Manipulation.”
- Make a Copy: Locate the image you wish to resize. Right-click on it, select “Copy” from the drop-down menu. Then, right-click on an empty space in the same folder or on your desktop and select “Paste.” You will now have a duplicate of your image.
- Open Paint:
- On Windows, you can usually find Paint by going to “Start” -> “All Programs” -> “Accessories” -> “Paint.”
- Alternatively, you can type “Paint” into the Windows search bar and select the application.
- Open the Image in Paint: Once Paint is open, click on the “File” tab (usually in the upper-left corner) and select “Open.” Browse to the location where you saved your copied image, select it, and click “Open.” Your image will now appear in the Paint workspace. You might notice the original pixel dimensions displayed near the bottom of the Paint window, offering a helpful reference.
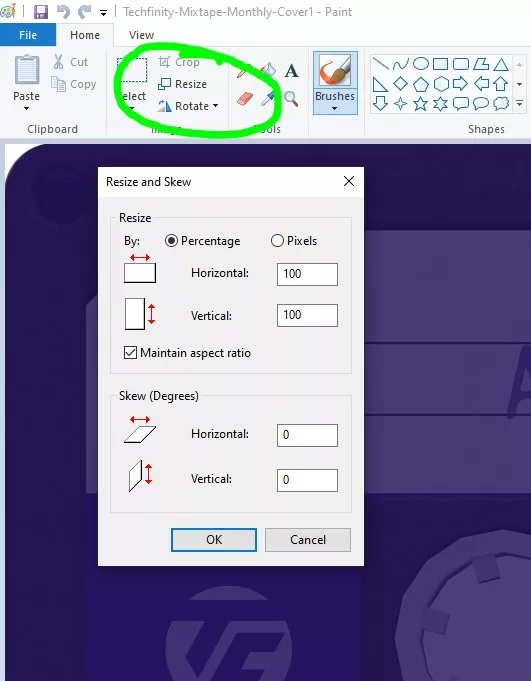
Mastering the Resize and Skew Tool
The “Resize” function is your primary tool for altering image dimensions in Paint.
- Locate the Resize Tool: With your image open, navigate to the “Home” tab in the Paint ribbon. In the “Image” section (usually located toward the middle-right), you will find the “Resize” button. It often appears as an icon with two overlapping squares or arrows pointing in opposite directions. Click this button.
- The Resize and Skew Dialog Box: A “Resize and Skew” dialog box will pop up, presenting your resizing options.
- Choose Your Measurement Unit:
- Percentage: This is the default and often the easiest for quick adjustments. Ensure the radio button next to “Percentage” is selected. The current values for “Horizontal” and “Vertical” will typically be 100, representing 100% of the current size.
- Pixels: If you need exact pixel dimensions (e.g., for a specific website banner or “Digital Photography” requirement), select the radio button next to “Pixels.” You will see the current width and height of your image displayed in pixels.
- The Critical “Maintain Aspect Ratio” Checkbox: Below the measurement options, you’ll see a checkbox labeled “Maintain aspect ratio.” This is crucial for preventing image distortion.
- Checked: Always ensure this box has a checkmark. When checked, you only need to enter a value for either “Horizontal” or “Vertical” (whether in percentage or pixels). Paint will automatically calculate the corresponding value for the other dimension to keep the image’s proportions intact. This is vital for preserving the integrity of your “Nature” or “Abstract” images.
- Unchecked: If you uncheck this box, you can independently adjust both “Horizontal” and “Vertical” values. However, if these values are not proportional to the original image’s width and height, your resized image will appear stretched or squished, leading to an undesirable “Photo Manipulation” effect. Only uncheck this if you explicitly intend to distort the image, which is rare for standard resizing.
- Enter New Dimensions:
- Using Percentage: Type a number into the “Horizontal” text box.
- To shrink the image (e.g., for email or web upload), enter a number less than 100 (e.g., 75 for 75% of the original size).
- To enlarge the image, enter a number greater than 100 (e.g., 150 for 150% of the original size).
- Using Pixels: If “Maintain aspect ratio” is checked, type your desired pixel value into either the “Horizontal” (width) or “Vertical” (height) text box. For example, if Tophinhanhdep.com specifies a banner image of 825 pixels wide, enter “825” in the “Horizontal” box.
- Using Percentage: Type a number into the “Horizontal” text box.
- Apply Changes: After entering your desired value, click “OK.” Paint will instantly resize your image on the canvas. Take a moment to review the result.
Saving Your Resized Image
Once you’re satisfied with the resized image, the final step is to save it.
- Access Save Options: Click on the “File” tab again, and then select “Save as.”
- Choose a Format: A sub-menu will appear, offering various image formats:
- JPEG (or JPG): This is generally the best format for photographs (“Digital Photography,” “Nature,” “Beautiful Photography”) as it offers good compression with acceptable quality loss. It results in smaller file sizes, ideal for web use and sharing.
- PNG: This format is excellent for images with transparency or sharp lines, such as logos or graphics. It offers lossless compression, meaning no quality is lost, but file sizes can be larger than JPEGs for complex photos.
- BMP: A bitmap image format, typically uncompressed, leading to very large file sizes. Generally not recommended for web use or sharing due to its size.
- GIF: Suitable for simple animations and images with limited colors. Not ideal for photographs. For most photographic images, choose “JPEG picture.”
- Name Your File and Choose Destination: A “Save As” dialog box will open.
- File name: Enter a short, descriptive name for your resized image. It’s good practice to add a suffix like “_resized” or include the new dimensions (e.g., “myphoto_800px.jpg”) to differentiate it from your original. Avoid spaces in file names if it’s for web upload.
- Save as type: Ensure your chosen format (e.g., JPEG) is selected here.
- Save in: Select the folder where you want to save the new image.
- Click “Save”: Your resized image is now saved and ready to be uploaded to Tophinhanhdep.com, shared on social media, or used in your “Visual Design” projects.
Beyond Simple Resizing: Cropping for Impact and Efficiency
Resizing changes the overall dimensions of an image, but sometimes you need to alter the composition or remove unwanted elements. This is where cropping comes in. Cropping is distinct from resizing; it removes the outer parts of an image to focus on a particular area or adjust the frame.
What is Cropping and Why is it Important?
- Focus and Composition: Cropping allows you to eliminate distracting backgrounds or elements, draw attention to the main subject, and improve the overall composition of your “Photography.” This is a key technique in “Photo Manipulation” to enhance visual storytelling.
- Aspect Ratio Adjustment: You can use cropping to achieve a specific aspect ratio without distorting the image, for example, changing a landscape photo into a square for Instagram or creating a panoramic crop for a website banner.
- File Size Reduction: Similar to resizing, cropping also reduces the image’s file size because you’re literally discarding pixels from the edges. This contributes to better “Optimizers” for web content.
The Art of Cropping in Paint
Paint provides a straightforward way to crop your images:
- Make a Copy and Open in Paint: As with resizing, always start by making a copy of your image and opening it in Paint.
- Locate the Select Tool: On the “Home” tab, in the “Image” section, click the small down arrow (▼) beneath the “Select” button. A drop-down menu will appear.
- Choose Your Selection Method:
- Rectangular selection: This is the most common method. It allows you to drag a rectangular selection box over your image.
- Free-form selection: If you need to select an irregular shape, this option allows you to draw a custom outline. For general cropping, “Rectangular selection” is usually preferred.
- Draw Your Selection: Click and drag your mouse over the part of the image you wish to keep. A dotted rectangular line will appear, indicating your selected area.
- Refining Your Selection: If you need to adjust the selection, simply click anywhere outside the dotted line to deselect it and start over. For precise cropping (e.g., removing a border), start from a corner and drag diagonally.
- Execute the Crop: Once you have perfectly outlined the area you want to keep, click the “Crop” button. This button is usually found in the “Image” section of the “Home” tab, to the right of the “Select” tool. Clicking it will instantly remove everything outside your selected area, leaving only the focused portion of your image.
- Save Your Cropped Image: Go to “File” > “Save as,” choose your desired format (e.g., JPEG), provide a new descriptive name (e.g., “myphoto_cropped.jpg”), and save the file.
Cropping, unlike enlarging, maintains the quality of the remaining image section because no new pixels are being created. This makes it an excellent technique for fine-tuning your “Creative Ideas” and ensuring your “Image Inspiration” truly shines.
When Paint Isn’t Enough: Advanced Resizing and Optimization with Tophinhanhdep.com’s Tools
While Microsoft Paint is a fantastic starting point for basic image resizing and cropping, it does have its limitations, especially for serious “Photography,” “Visual Design,” or large-scale “Image Collections.”
Limitations of Microsoft Paint:
- Batch Processing: Paint can only process one image at a time, making it tedious and inefficient for resizing “dozens or hundreds of pictures,” as often required for “Stock Photos” or large “Thematic Collections.”
- Quality Loss on Enlargement: While Paint can enlarge images, it does so by simply stretching existing pixels, leading to noticeable pixelation and a significant reduction in image quality. This is particularly problematic for “High Resolution” images or “Digital Art” where clarity is paramount.
- Limited Advanced Features: Paint lacks sophisticated tools for color correction, complex “Photo Manipulation,” advanced compression algorithms, or “AI Upscalers” that can intelligently enhance image detail.
- Format Flexibility: While it supports common formats, it doesn’t offer the extensive “Converters” or optimization features found in dedicated tools.
Elevate Your Image Workflow with Tophinhanhdep.com’s Image Tools:
For those who regularly work with images—from optimizing “Wallpapers” for web use to preparing “High Resolution” files for professional display—Tophinhanhdep.com offers a robust suite of online “Image Tools” designed to overcome Paint’s limitations and provide a more comprehensive solution.
- Batch Resizing & Compression: For managing large volumes of “Stock Photos” or “Image Collections,” Tophinhanhdep.com’s tools allow you to resize and compress multiple images simultaneously. This saves hours of manual work, enabling efficient preparation of galleries, “Mood Boards,” or “Trending Styles.” You can simply select a folder of images, specify your desired dimensions or percentage, and let the tool handle the rest, even intelligently maintaining aspect ratios for you.
- AI Upscalers: Unlike Paint, Tophinhanhdep.com’s “AI Upscalers” utilize artificial intelligence to enlarge images while preserving or even enhancing detail. This is revolutionary for creators dealing with lower-resolution source material or wanting to prepare “Aesthetic” images for high-definition displays without pixelation, a capability far beyond Paint’s reach.
- Image Converters: Easily transform images between various formats (e.g., JPG to PNG, or to web-optimized formats like WebP) to suit different platforms and purposes, ensuring maximum compatibility and efficiency for your “Backgrounds” or “Digital Art.”
- Optimizers & Compressors: Beyond simple resizing, Tophinhanhdep.com’s “Optimizers” and “Compressors” can significantly reduce file sizes without noticeable loss in visual quality. They employ advanced algorithms that fine-tune image data, ideal for accelerating website loading times and enhancing the user experience for “Wallpapers” and other visual content.
- Image-to-Text: For specialized needs, tools like “Image-to-Text” allow you to extract editable text from images, adding another layer of utility for managing “Visual Design” assets and documentation.
These tools are built for the modern digital creator, complementing the basic skills learned in Paint by offering speed, precision, and advanced capabilities that align with the high standards of “Digital Photography” and professional “Graphic Design.”
Conclusion: Mastering Your Images for the Digital Age
The ability to resize and manipulate images is a cornerstone skill in today’s visually driven world. From quickly shrinking a family photo for email to optimizing a “High Resolution” “Nature” image for a website, tools like Microsoft Paint provide an accessible entry point. By understanding concepts like aspect ratio, pixels, and percentage, and mastering the “Resize” and “Crop” functions, you can significantly improve your basic image management workflow.
However, as your needs evolve and you delve deeper into “Photography,” “Visual Design,” or managing extensive “Image Collections,” the limitations of basic tools become apparent. This is where Tophinhanhdep.com steps in. Our comprehensive suite of “Image Tools”—including powerful “Compressors,” “Optimizers,” “AI Upscalers,” and “Converters”—offers the advanced functionality, speed, and quality necessary to tackle any image challenge. Whether you’re curating “Mood Boards,” designing “Abstract” art, or preparing “Stock Photos” for professional use, Tophinhanhdep.com provides the resources to ensure your images are always perfectly suited for their purpose, enhancing your creative journey and delivering optimal visual impact.