How to Restore Deleted Images: A Comprehensive Guide for Preserving Your Visual Memories on Tophinhanhdep.com

In our increasingly visual world, images serve as cherished archives of our lives, capturing everything from breathtaking landscapes and abstract art to intimate family moments and daily inspirations. Whether you’re a professional photographer curating high-resolution stock photos or an enthusiast documenting life’s aesthetic beauty with your smartphone, losing these visual assets can be a profoundly frustrating experience. An accidental tap, a software glitch, or a corrupted storage device can make your precious wallpapers, backgrounds, and creative ideas vanish in an instant.
The good news is that deleted doesn’t always mean gone forever. Just as Tophinhanhdep.com offers a wealth of resources for visual design, photography, and image inspiration, we also understand the critical importance of preserving your digital memories. This comprehensive guide will walk you through various methods to restore deleted images from different devices and platforms, from quick fixes to advanced recovery techniques. We’ll also provide essential tips to prevent future data loss, ensuring your visual heritage remains intact for years to come.
The Nuances of Image Deletion: Temporary vs. Permanent Loss
Before diving into recovery methods, it’s crucial to understand the two primary categories of image deletion: temporary and permanent. Your approach to recovery will depend significantly on which type of deletion you’re facing.
The Digital Safety Nets: Recycle Bins and Recently Deleted Folders
Most operating systems and cloud services incorporate a temporary holding area for deleted files. This acts as a crucial first line of defense against accidental deletion, offering a straightforward path to recovery.
- Windows Recycle Bin: When you delete an image on a Windows PC or laptop using the standard “Delete” key or right-click context menu, it’s moved to the Recycle Bin. Files remain here until the bin is manually emptied or a certain storage limit is reached.
- Mac Trash Bin: Similar to Windows, macOS moves deleted files to the Trash. Notably, even files deleted from external drives or SD cards connected to your Mac often pass through the Trash, unlike in Windows.
- Android Gallery’s “Recently Deleted” Album: Modern Android devices, particularly those with Google Photos integrated, often feature a “Recently Deleted” album within the Gallery app. Images deleted from your main gallery are typically held here for 30 days before permanent removal.
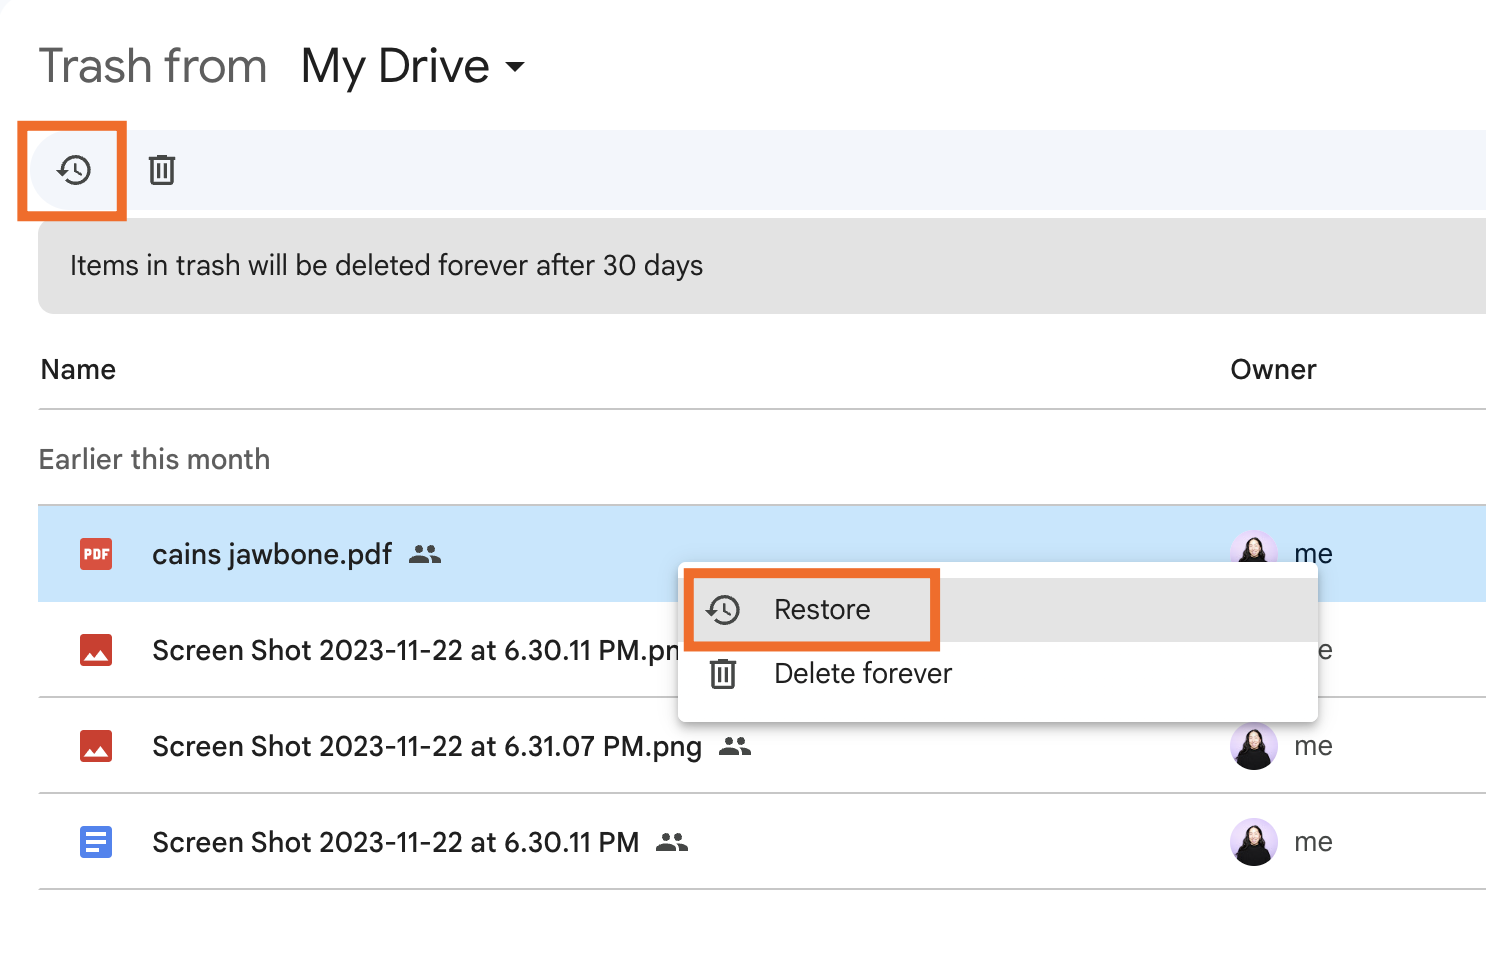
- Google Photos, Google Drive, OneDrive, Dropbox, and other Cloud Services: If you have automatic backup and sync enabled, these services usually maintain their own “Trash” or “Archive” folders where deleted images reside for a set period (e.g., 60 days for Google Photos) before being permanently purged. This is especially useful for recovering images that mysteriously “disappeared” from your gallery due to an app malfunction or software error.
- Samsung Cloud and other Manufacturer-Specific Backups: Many smartphone manufacturers (like Samsung, HUAWEI, Xiaomi) offer their own cloud backup services. If synced, deleted photos might still be retrievable from these dedicated cloud environments.
Recovering from these temporary locations is usually as simple as locating the image, selecting it, and choosing the “Restore” or “Put Back” option.
Understanding Permanent Deletion and Its Implications
“Permanent” deletion signifies that an image has bypassed or been removed from the temporary holding areas. This happens in several common scenarios:
- Shift + Delete (Windows): Using this key combination on Windows directly removes files without sending them to the Recycle Bin.
- Emptying the Recycle Bin/Trash: Once you clear these temporary folders, the files are marked for permanent deletion.
- Deleting from External Drives/SD Cards (without Mac): On Windows, files deleted directly from external storage devices often bypass the Recycle Bin.
- After the Retention Period: Images automatically purged from “Recently Deleted” albums or cloud service trash folders after their allotted time.
- Factory Reset: A factory reset of a device wipes all user data, including photos.
- Storage Corruption or Physical Damage: In severe cases, a storage device might become corrupted or physically damaged, rendering files inaccessible.
When images are “permanently” deleted, they aren’t immediately erased from the storage device. Instead, the space they occupied is marked as “available” for new data. This means the image data might still be present until new files are written over it. The key to successful recovery in these scenarios is to stop using the device immediately to minimize the chance of overwriting the lost data. This is where advanced recovery methods come into play, often involving specialized image recovery software or professional data recovery services.
Step-by-Step Recovery Across Major Platforms
The methods for restoring deleted images vary depending on the device or platform you’re using. Here, we break down the most effective strategies for each.

Android Devices: Navigating Cloud, SD Cards, and Specialized Tools
Android phones are a primary source for capturing everyday moments and visual inspirations. If your photos go missing, several avenues can help you get them back.
Checking Cloud Backups and Built-in Features
The first step for any Android user should be to check integrated backup services.
- Google Photos Trash/Archive:
- Open the Google Photos app.
- Tap “Library” then “Trash” (or “Archive” if they were archived).
- Select the photos you wish to restore and tap “Restore.” They will return to your gallery and any albums they were in.

-
Google Drive: If you manually uploaded photos or had a separate sync set up:
- Open the Google Drive app.
- Log in to your account.
- Browse for your photos and download them back to your device.
-
Microsoft OneDrive/Dropbox:
- Access the respective app or website on your Android device or computer.
- Navigate to the “Recycle Bin” or “Deleted files” section.
- Select and restore your desired images.
-
Manufacturer Cloud Services (e.g., Samsung Cloud):
- If you own a Samsung device, access “Samsung Cloud” settings.
- Check for synced gallery data and follow prompts to restore. Similar services exist for other Android brands.
Recovering from SD Cards
If your Android photos were stored on an external SD card, recovery can be more direct, especially if the card was used as removable storage.
- Remove the SD card from your Android device.
- Connect it to a computer using a card reader.
- Utilize specialized image recovery software (as recommended by Tophinhanhdep.com’s Image Tools section) on your computer. These tools can scan the SD card for recoverable data.
- Preview and select the images you wish to restore, saving them to a new, safe location on your computer.
Note: If your SD card was formatted as “adopted storage” (internal storage extension), its contents are encrypted, making direct recovery significantly more challenging, if not impossible, with standard software.
Utilizing Advanced Android Recovery Software
When cloud backups fail, or images were permanently deleted from internal storage, advanced image recovery software offers a deeper scan. Tophinhanhdep.com recommends exploring tools that can perform deep scans of your device’s internal memory. These often require connecting your phone to a computer and, in some cases, may work best with a “rooted” device, though some tools offer “quick recovery” modes without rooting.
- Download and install a reputable Android image recovery tool from Tophinhanhdep.com’s curated list of Image Tools.
- Connect your Android phone to your computer and enable USB debugging (if prompted by the software).
- Follow the software’s instructions to scan your device’s internal storage for deleted photos.
- Preview the found images and select those you want to restore, saving them to your computer rather than back to the phone’s internal storage immediately.
iPhone and iOS: Leveraging Apple’s Ecosystem and Beyond
Apple’s integrated ecosystem offers robust backup solutions for iPhone users.
The “Recently Deleted” Album
This is your first port of call for recently deleted iPhone photos.
- Open the Photos app on your iPhone.
- Scroll down to “Albums” and select “Recently Deleted.”
- Locate the photos you wish to recover. They are typically stored for 30 days.
- Tap “Select,” choose your images, and then tap “Recover.”
Restoring from iCloud Backups
If you regularly back up your iPhone to iCloud, you can restore a previous backup containing your deleted photos.
- Verify a valid backup: Go to Settings > [Your Name] > iCloud > Manage Account Storage > Backups.
- Perform a factory reset: This step is crucial as you cannot selectively restore from iCloud; it’s an all-or-nothing process. Go to Settings > General > Transfer or Reset iPhone > Erase All Content and Settings.
- Restore from iCloud Backup: During the setup process, choose “Restore from iCloud Backup” and select the relevant backup.
Important: If iCloud Photos was enabled, photos are stored in your iCloud Photos library, not device backups, so this method won’t apply directly to those photos.
Recovering from iTunes/Finder Backups
For users who back up their iPhone to a computer via iTunes (Windows or older macOS) or Finder (newer macOS), this provides another recovery option.
- Connect your iPhone to the computer used for backups.
- Open iTunes or Finder.
- Select your device icon (in iTunes) or click your iPhone in the sidebar (in Finder).
- Click “Restore Backup,” choose the backup containing your photos, and proceed.
Note: Similar to iCloud, this is a full device restore, overwriting current data. Also, photos are included only if iCloud Photos was turned off during the backup.
Specialized iOS Recovery Tools
For more granular recovery or if backups are unavailable, specialized iOS image recovery software can help. These tools, often found in Tophinhanhdep.com’s Image Tools section, can scan iTunes/Finder backups for individual photos without requiring a full device restore. Some can also attempt direct device scans, though iOS security limitations make this more challenging without a jailbroken device.
- Download and install an iOS image recovery tool recommended by Tophinhanhdep.com.
- Connect your iPhone to your computer and follow the software’s prompts.
- Choose to scan your iPhone or existing iTunes/Finder backups.
- Preview and select the deleted images, then recover them to your computer.
Windows Systems: From Recycle Bin to Advanced Software Solutions
Whether you’re managing professional photography portfolios or personal aesthetic collections, Windows offers robust recovery options.
The Recycle Bin: Your First Stop
Always check here first for recently deleted images.
- Double-click the Recycle Bin icon on your desktop.
- Locate and select the photos you want to restore.
- Right-click your selection and choose “Restore,” or drag them to a preferred folder.
Leveraging Windows Backup and File History
If you’ve enabled Windows’ built-in backup features, these can be invaluable.
- Connect your backup drive (if external).
- Go to Control Panel > System and Security > Backup and Restore (Windows 7) (even on newer Windows versions) or use File History settings.
- Choose “Restore my files” or “Restore all users’ files.”
- Browse for your lost photos and select “Restore.”
Advanced Recovery with Photo Recovery Software
For images permanently deleted (e.g., after emptying the Recycle Bin or using Shift+Delete), specialized image recovery software is often the most effective solution. Tophinhanhdep.com features several powerful tools in its Image Tools section that can perform deep scans of your hard drive, SSD, or external storage devices.
- Download and install a leading image recovery software (from Tophinhanhdep.com’s recommendations) onto a drive different from the one where you lost photos to prevent overwriting.
- Launch the software and select the drive or partition where your photos were deleted.
- Initiate a scan. The software will search for recoverable image files, often supporting various formats (JPEG, PNG, RAW, PSD, etc.).
- Preview the found images and select those you wish to restore.
- Choose a new destination to save the recovered files, not the original location.
macOS Environments: Trash, Time Machine, and Professional Recovery
Mac users have strong native tools and third-party options for image recovery, crucial for graphic designers and digital artists.
The Mac Trash Bin
Your initial check for deleted photos on a Mac.
- Click the Trash icon in your Dock.
- Find the images you want to recover.
- Right-click on the item and select “Put Back” to return it to its original location.
Time Machine Backups: A Safety Net
Apple’s Time Machine is an excellent built-in backup solution.
- Connect your Time Machine backup drive to your Mac.
- Open the folder where your photos were originally located.
- Click the Time Machine icon in the menu bar and select “Browse Time Machine Backups.”
- Use the timeline to navigate to a point before the deletion.
- Select the items and click “Restore.”
iTunes/Finder Backups for Older Systems
As mentioned for iPhones, if your Mac runs an older macOS version with iTunes (pre-Catalina 10.15), you might have iOS device backups that contain photos. Newer macOS versions use Finder for this. The process is similar to iPhone recovery: connect the device, open iTunes/Finder, and choose to restore a backup.
Mac Photo Recovery Software
When native methods fail, powerful image recovery software for Mac can scan your internal or external drives, including formatted SD cards or USB drives. Tophinhanhdep.com highlights several such tools that excel at recovering various image formats.
- Download and install advanced image recovery software (as recommended by Tophinhanhdep.com) on a different drive than the one being scanned.
- Launch the application and select the disk where the photos were lost.
- Start the scanning process.
- Filter results by “Pictures” or file type, preview images, and select what to recover.
- Save the recovered files to a new location.
Note: For Macs with SSDs, the TRIM command can automatically wipe deleted data blocks, making recovery from internal SSDs more difficult if a significant amount of time has passed.
Digital Camera Photo Retrieval
Digital cameras, from DSLRs to mirrorless systems, are central to beautiful photography. Recovering images from them usually involves their memory cards.
- Stop using the camera immediately to prevent new photos from overwriting deleted ones.
- Remove the memory card (SD, CF, etc.) from the camera.
- Connect the memory card to your computer using a card reader.
- Alternatively, connect the camera directly to your computer via USB cable, ensuring it’s in “USB Mass Storage” mode if possible.
- Use specialized image recovery software (available through Tophinhanhdep.com’s Image Tools) on your computer to scan the memory card or camera’s internal storage.
- Preview and select the deleted photos.
- Recover the images to a folder on your computer.
When All Else Fails: Professional Data Recovery Services
In cases of severe physical damage, deeply corrupted storage, or if you’re uncomfortable with DIY software, professional data recovery services are your last resort. These experts, often equipped with cleanroom labs, can sometimes retrieve data even from seemingly irreparable devices. Tophinhanhdep.com can help you locate reputable data recovery services if you face such a challenging scenario.
Proactive Measures: Safeguarding Your Visual Assets
While knowing how to restore deleted images is crucial, preventing loss in the first place is always the best strategy. Embrace these habits to protect your visual memories and creative works.
Implementing a Robust Backup Strategy
The “3-2-1 backup rule” is a golden standard for data protection:
- 3 Copies of Your Data: Keep your original plus at least two backups.
- 2 Different Media Types: Store copies on different types of storage (e.g., internal hard drive, external hard drive, cloud storage).
- 1 Off-site Copy: Keep at least one backup physically separate from your primary data (e.g., in the cloud or at a different location) to protect against local disasters like fire or theft.
Utilize cloud services like Google Photos, iCloud, OneDrive, or Dropbox for automatic photo synchronization. Also, regularly transfer images to external hard drives or network-attached storage (NAS) devices.
Smart Habits for Photo Management and Prevention
- Regularly Offload and Organize: Don’t let your phone or camera’s memory card fill up. Periodically transfer photos to a computer or dedicated storage, then organize them into logical folders and tag them. This reduces clutter and makes it easier to find specific images, lessening the chance of accidental deletion.
- Enable Cloud Auto-Uploads: For mobile devices, enable automatic uploads to a cloud service. This ensures that as soon as you capture a beautiful photograph or a compelling visual, it’s backed up almost instantly.
- Exercise Caution Before Deleting: Human error is a leading cause of data loss. Take an extra moment to confirm before deleting files, especially when selecting multiple images.
- Use Write Protection: Many SD cards have a small physical “lock” switch. Engaging this switch makes the card read-only, preventing accidental deletion or formatting. Unlock it only when you intend to write new data or modify existing files.
- Keep Software Updated: Regularly update your operating systems, apps, and camera firmware. These updates often include bug fixes that can prevent software errors leading to data loss or corruption.
- Monitor Storage Health: Be aware of your storage devices’ health. Tools can monitor hard drive or SSD status, warning you of potential failures before they lead to data loss.
Conclusion
Losing precious images can feel like losing a piece of your story or a fragment of your creative vision. However, as this guide demonstrates, there are numerous effective methods to restore deleted images across various devices and platforms. From the immediate safety net of “Recently Deleted” folders to the powerful capabilities of specialized image recovery software and professional data recovery services, hope is often at hand.
At Tophinhanhdep.com, we are dedicated to helping you explore, create, and preserve stunning visuals. By understanding the nuances of deletion and proactively implementing sound backup strategies, you can significantly reduce the risk of losing your aesthetic wallpapers, high-resolution photography, and heartfelt memories. Should data loss occur, remember that Tophinhanhdep.com’s Image Tools section provides resources and recommendations to help you navigate the recovery process, ensuring your visual inspiration remains safeguarded. Preserve your legacy, one pixel at a time.