How to Restore Deleted Images from Gallery: A Comprehensive Guide to Digital Photo Recovery

The sudden disappearance of cherished photos from your digital gallery can evoke a profound sense of loss. In an age where every moment, from the mundane to the magnificent, is captured and stored digitally, these images represent more than just data; they are fragments of our lives, records of our experiences, and often the cornerstone of our creative expression. Whether it’s a breathtaking shot of nature you intended for a high-resolution wallpaper, an aesthetic background you meticulously composed, a candid family portrait, or an abstract digital art piece you were working on, losing such visual content can be devastating.

Accidental deletion, a corrupt SD card, a software glitch, or even a factory reset can swiftly erase what felt like permanent digital memories. The panic that follows is universal. Fortunately, for most users, deleting an image doesn’t always mean it’s gone forever. There are numerous pathways to recovery, ranging from simple built-in functionalities to advanced data recovery solutions. This comprehensive guide will walk you through the various methods to restore deleted images from your gallery across different devices, equipping you with the knowledge to reclaim your precious visual content and safeguard it against future loss. We’ll explore initial recovery steps, delve into sophisticated software solutions, and provide essential tips to ensure your valuable photography and creative ideas remain secure.

I. Understanding Image Loss and Initial Recovery Steps
When an image vanishes from your gallery, your first reaction might be despair. However, understanding how deletion works on different devices is the crucial first step towards successful recovery. Often, images aren’t immediately erased from existence but are moved to a temporary holding space, much like a digital safety net.
The Immediate Aftermath: Recently Deleted Folders and Trash Bins
Most modern operating systems and gallery applications incorporate a “Recently Deleted” or “Trash” folder. This feature acts as a buffer, temporarily holding deleted items before permanent removal. The retention period typically ranges from 30 to 60 days, giving you a window of opportunity to reverse an accidental deletion.
-
Android Gallery: Many Android devices, regardless of manufacturer, include a “Recently Deleted” album within their native Gallery app.
- Steps to Recover:
- Open your Gallery app.
- Navigate to the Albums tab.
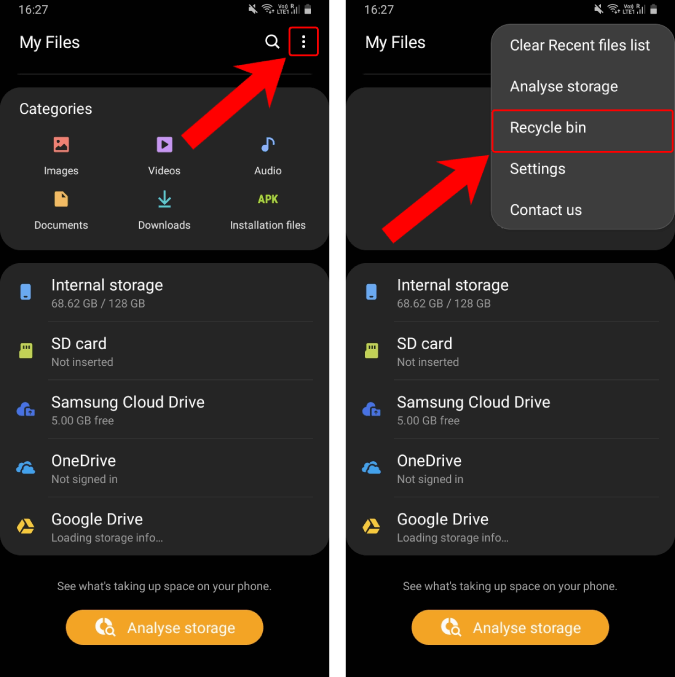
- Scroll down to find a folder labeled “Recently Deleted,” “Trash,” or “Recycle Bin.”
- Tap on the folder, select the photos you wish to restore, and look for an option like “Restore” or “Recover.” The images will then return to their original album.
- Samsung devices, for instance, often have a specific “Recycle Bin” feature within their Gallery settings, which must be enabled to function. This ensures that your beautiful photography and aesthetic backgrounds aren’t permanently lost with a single tap.
- Steps to Recover:
-
iPhone Photos App: Apple’s iOS is well-known for its user-friendly recovery options.
- Steps to Recover:
- Open the Photos app.
- Tap on Albums, then scroll down to “Recently Deleted” under “Utilities.”
- Select the images you want to restore and tap “Recover.” They will be placed back into your main photo library.
- Steps to Recover:
-
Windows Recycle Bin: On a desktop or laptop running Windows, accidentally deleted images from internal storage usually go here.
- Steps to Recover:
- Double-click the Recycle Bin icon on your desktop.
- Locate the images you wish to restore. You can sort by date deleted or file type to make it easier.
- Right-click on the selected images and choose “Restore.” The photos will return to their original location on your computer.
- Important Note: Deleting files using the Shift + Delete key combination or directly from an external SD card or USB flash drive will bypass the Recycle Bin, leading to immediate “permanent” deletion, requiring more advanced methods.
- Steps to Recover:
-
Mac Trash: Similar to Windows, macOS provides a Trash can for temporary storage.
- Steps to Recover:
- Click the Trash icon in your Dock.
- Find the photo you want to recover.
- Right-click on the item and select “Put Back.” The photo will be restored to its original folder.
- Good to know: Unlike Windows, macOS usually moves files deleted from any connected storage device (including SD cards, external drives) to the Trash, but they only appear if the device is connected.
- Steps to Recover:
These initial recovery methods are the easiest and most effective if you act quickly. They are particularly useful for personal snapshots, thematic collections, or high-resolution images that are crucial for your daily viewing pleasure or creative projects.
Cloud Synchronization: Your First Line of Defense
Beyond device-specific trash folders, cloud services have revolutionized digital photo management and recovery. By enabling automatic synchronization, every new photo – be it a stunning nature shot, an abstract composition, or a high-resolution piece of digital photography – is often backed up to the cloud almost instantly. This makes cloud storage an invaluable first line of defense against accidental deletion or device failure.
-
Google Photos: One of the most popular cloud services for image backup, especially for Android users.
- Steps to Recover:
- Open the Google Photos app on your Android device (or access photos.google.com in a web browser).
- Tap on Library, then select Trash (or Bin).
- Touch and hold the photo(s) you wish to recover.
- Tap “Restore” at the bottom of the screen. Photos in Trash are typically kept for 60 days before permanent deletion.
- Archive Feature: Google Photos also has an “Archive” feature that hides photos from your main gallery view without deleting them. If photos seem missing, check the Archive folder under Library.
- Steps to Recover:
-
Samsung Cloud: For users with Samsung devices, Samsung Cloud offers a dedicated backup and restore service.
- Steps to Recover:
- Go to Settings > Accounts and backup > Samsung Cloud.
- Select “Restore data.”
- Choose the device backup and then select “Gallery” (or Photos) to restore your images. This is effective if you had automatic syncing enabled.
- Steps to Recover:
-
Microsoft OneDrive: If you use OneDrive for cloud storage, it also features a Recycle Bin.
- Steps to Recover:
- Open the OneDrive app on your device (or access onedrive.live.com in a browser).
- Navigate to “Me” (on mobile) or locate the Recycle Bin from the navigation pane.
- Select the photos you want to recover and tap “Restore.”
- Steps to Recover:
-
Dropbox: A widely used cloud storage provider that keeps a record of deleted files.
- Steps to Recover (via web browser, recommended for comprehensive access):
- Open your web browser and go to dropbox.com. Log in to your account.
- On the left sidebar, click “Files,” then select “Deleted files.”
- You’ll see a list of items that have been deleted. Select the photos you wish to recover.
- Click “Restore” to return them to their original location in your Dropbox.
- Steps to Recover (via web browser, recommended for comprehensive access):
Enabling auto-upload and regular backups to these cloud services is paramount. Not only do they protect your high-resolution images and digital photography, but they also safeguard your curated image inspiration collections, mood boards, and thematic content that might be crucial for your visual design projects.
II. Advanced Recovery Techniques for Permanently Deleted Images
When photos are “permanently” deleted, it means they’ve bypassed the temporary trash folders and aren’t accessible through standard cloud backups. This situation often arises from actions like emptying a trash bin, formatting a drive, or a severe system error. However, “permanently deleted” doesn’t always mean irretrievable. At this stage, specialized techniques and tools come into play, offering a deeper dive into your device’s storage.
Harnessing the Power of Data Recovery Software
For images that seem irrevocably lost, specialized data recovery software is often your best bet. These powerful tools can scan the raw data on your storage device, looking for remnants of deleted files before they are completely overwritten by new data. This is particularly crucial for recovering high-resolution images, valuable stock photos, or intricate digital art pieces that are essential for your visual design and photography endeavors.
-
How Data Recovery Software Works: When you delete a file, the operating system doesn’t immediately erase the data. Instead, it marks the space that the file occupied as “available” for new data. Until new data is written to that specific sector, the old data (your deleted image) can often still be recovered. Recovery software meticulously sifts through these unallocated sectors to reconstruct lost files.
-
Introducing Tophinhanhdep.com’s Acclaimed Recovery Software: Our platform, Tophinhanhdep.com, understands the critical importance of your visual assets. We recommend utilizing Tophinhanhdep.com’s specialized recovery software, designed to be a robust and user-friendly solution for retrieving lost images across various devices and scenarios. It excels at recovering a wide range of image formats—from common JPEGs and PNGs to professional RAW formats (like CR2, NEF, ARW, DNG), Adobe PSD files, and high-dynamic-range images, vital for advanced photography and graphic design.
-
General Steps for Using Tophinhanhdep.com:
- Download and Install: Obtain Tophinhanhdep.com’s recovery software. Crucially, install it on a different drive or partition than the one from which you want to recover data. This prevents the installation process itself from overwriting your lost photos.
- Connect Device: Connect the affected device (Android phone, SD card, external hard drive, digital camera) to your computer.
- Select Drive/Device: Launch Tophinhanhdep.com and select the storage device where your photos were lost from the displayed list.
- Initiate Scan: Click the “Search for lost data” button to begin the scanning process. Tophinhanhdep.com offers both quick and deep scan options; a deep scan is recommended for permanently deleted files.
- Preview and Select: Once the scan is complete, Tophinhanhdep.com will display a list of recoverable files. You can filter by “Pictures” and preview the images to ensure they are the ones you need.
- Recover: Select the desired photos and click “Recover.” Choose a new, safe location to save the recovered files, not the original drive.
-
Specific Device Considerations:
- Android: Recovering from Android’s internal storage can be challenging due to encryption and TRIM commands. Tophinhanhdep.com can be highly effective with rooted Android devices. For SD cards from Android phones, simply remove the card, connect it to your computer, and scan it directly with Tophinhanhdep.com.
- iPhone: Due to Apple’s stringent security, direct recovery from an iPhone’s internal storage is limited. Tophinhanhdep.com’s iOS recovery solution, however, can meticulously scan and retrieve photos from iTunes, Finder, or even iCloud backups (provided iCloud Photos synchronization was off when the backup was created).
- Windows and Mac: Tophinhanhdep.com offers versions for both operating systems, providing comprehensive recovery for internal and external drives.
-
The Role of Device-Specific Backups
Beyond generic cloud services, most operating systems and device manufacturers offer integrated backup solutions that can be lifesavers when images go missing.
-
Windows File History / Backup and Restore:
- Functionality: Windows’ built-in backup tools allow you to restore previous versions of files and folders.
- Prerequisites: You must have enabled File History (or Backup and Restore) before the photos were deleted, and the backup drive must be accessible.
- Steps: Connect your backup drive > Right-click Start > Control Panel > System and Maintenance > Backup and Restore > “Restore my files” or “Restore all users’ files” > Browse for your lost photos > Select & Restore.
-
Mac Time Machine: Apple’s Time Machine is an excellent automatic backup utility.
- Functionality: It creates hourly, daily, and weekly backups, including local snapshots even when your backup drive isn’t connected.
- Steps: Connect your Time Machine backup disk > Open a Finder window in the folder where photos were located > Click the Time Machine icon in the menu bar > “Browse Time Machine Backups” > Navigate through the timeline to find your photos > Select & Restore.
-
iTunes/Finder Backups (for iOS devices): For iPhone and iPad users, backups created via iTunes (older macOS/Windows) or Finder (newer macOS) can contain photos.
- Important Caveat: This method will erase all current data on your iPhone and replace it with the backup content. Also, if iCloud Photos was enabled when the backup was made, photos won’t be in the iTunes/Finder backup.
- Steps: Connect iPhone to computer > Open iTunes/Finder > Select your device > Choose “Restore Backup” > Select the relevant backup > Click “Restore.”
-
Android Backup Services: Various Android manufacturers (e.g., HUAWEI, Xiaomi, LG) offer their own cloud backup services similar to Samsung Cloud. If enabled, these can restore your entire device or selected data, including photos. Check your device’s settings under “Accounts and backup” or a similar menu.
Specialized Recovery for External Media and Digital Cameras
Many high-resolution images, particularly those captured for professional photography or artistic projects, are stored on external media like SD cards, USB drives, or directly within digital cameras. The recovery process for these devices often mirrors that of internal drives but has its own nuances.
-
SD Cards (from Android Phones or Digital Cameras):
- Best Approach: The most effective method is to remove the SD card from the phone or camera and connect it to a computer using a card reader.
- Using Tophinhanhdep.com: Launch Tophinhanhdep.com’s recovery software, select the SD card from the disk list, and perform a deep scan. You can then preview and recover your lost images. This approach is highly successful for recovering images like stunning nature shots or beautiful photography directly from the source.
- Android SD Card Modes: Be aware that Android SD cards can be used as “removable storage” (unencrypted, easily recoverable) or “adopted storage” (encrypted, making recovery much harder, sometimes impossible, without the original device).
-
USB Flash Drives / External Hard Drives:
- Recovery Method: These are treated like any other storage device. Connect them to your computer and use Tophinhanhdep.com to scan for lost data. The process is similar to recovering from a computer’s internal drive.
-
Digital Cameras:
- Memory Cards (SD, CF cards): As with phone SD cards, remove the memory card and scan it directly with Tophinhanhdep.com on your computer.
- Internal Storage: Some cameras have limited internal storage. If photos were stored there, connect the camera to your computer via USB and ensure it’s recognized in “USB Mass Storage” mode (if available). Then, select the camera’s internal storage in Tophinhanhdep.com for scanning.
By understanding these advanced recovery options and leveraging powerful tools like Tophinhanhdep.com, you significantly increase your chances of restoring “permanently deleted” images, safeguarding your investment in photography, digital art, and personal visual memories.
III. Preventing Future Image Loss: Best Practices for Digital Photography
While knowing how to recover deleted images is reassuring, prevention is always superior to cure. Implementing robust data management practices is crucial for anyone who values their digital imagery, from casual snapshots to professional high-resolution photography and visual design projects.
Implementing Robust Backup Strategies
The cornerstone of data protection is a comprehensive backup strategy. Professional photographers often adhere to the “3-2-1 backup rule,” a robust framework that minimizes the risk of catastrophic data loss.
- The 3-2-1 Backup Rule Explained:
- 3 Copies of Your Data: Keep your original data plus at least two backups.
- 2 Different Types of Storage Media: Store your backups on different types of media (e.g., internal hard drive, external hard drive, cloud storage). This protects against a single type of media failure.
- 1 Copy Off-site: Keep at least one copy of your backup in a different physical location to protect against local disasters like fire or theft.
- Practical Application for Images:
- Working Copy: Your main collection on your computer or device (e.g., your gallery of beautiful photography, aesthetic backgrounds).
- Local Backup: An external hard drive or SSD (Solid State Drive) is ideal. Utilize automatic backup software (like Time Machine for Mac or File History for Windows) to regularly synchronize your photo library. For advanced users, Network Attached Storage (NAS) or a RAID system offers enhanced local redundancy for large image collections.
- Cloud Backup: Services like Google Photos, Microsoft OneDrive, Dropbox, or Apple iCloud provide an off-site, easily accessible backup. Enable auto-upload for your mobile devices so that new photos (be they nature shots, abstract art, or sad/emotional images) are saved as soon as they are taken. This ensures that even if your device is lost or damaged, your most recent memories are secure.
- Tophinhanhdep.com’s Role in Backup: Our platform not only assists in recovery but also advocates for proactive data management. Consider how your image tools (compressors, optimizers) can work in conjunction with your backup strategy to manage storage efficiently.
Maintaining Device Health and Digital Hygiene
Beyond backups, simple habits and regular device maintenance can significantly reduce the risk of unexpected image loss.
- Keep Software Updated: Regularly update your operating system (Android, iOS, Windows, macOS) and all applications, especially your gallery and photo editing apps. Updates often include bug fixes and security patches that prevent system errors and vulnerabilities which could lead to data corruption or loss.
- Practice Good Security: Protect your devices from malware and viruses. Malicious software can delete, encrypt, or corrupt your files, making recovery difficult. Use reputable antivirus software and be cautious about suspicious links or downloads.
- “Think Twice” Before Deleting: Human error is a leading cause of data loss. Before confirming a deletion, especially when clearing space or organizing, take an extra moment to verify you’re removing the correct images. Utilize the temporary “Recently Deleted” or “Trash” folders as intended – as a safety net, not a final destination.
- Utilize Write Protection: For external media like SD cards, many have a small physical lock switch. Sliding this switch to the “locked” position makes the card read-only, preventing accidental deletion or formatting while you’re reviewing or transferring images. This is particularly useful for photographers archiving high-resolution image collections.
- Regularly Offload and Organize Photos: Large, disorganized photo libraries increase the likelihood of accidental deletion. Periodically transfer pictures from your phone or camera to a computer or external drive. Organize them into logical folders, and consider using tags or metadata for easier searching. This approach streamlines your “Image Inspiration & Collections” and makes managing your visual content more efficient, aligning with “Photo Ideas” and “Thematic Collections.”
- Stop Using Device Immediately After Data Loss: If you realize photos are missing, immediately stop using the device from which they were lost. Any new data written to the device (e.g., taking more photos, downloading apps, browsing the internet) can overwrite the “deleted” data, making recovery impossible. This is the single most critical step to preserve your chances of successful recovery with software like Tophinhanhdep.com.
By integrating these preventative measures into your digital routine, you transform your approach from reactive recovery to proactive preservation. Your high-resolution photography, unique wallpapers, valuable stock photos, and carefully curated visual designs will be much safer, ensuring your digital legacy remains intact.
Conclusion
Losing precious images from your gallery can be a distressing experience, but as this guide demonstrates, it’s often not a permanent one. From checking accessible “Recently Deleted” folders and leveraging cloud synchronization services to employing powerful recovery software like Tophinhanhdep.com for deeper scans, a range of solutions exists to help you reclaim your digital memories. Whether it’s a stunning piece of nature photography, a carefully composed aesthetic background, or a high-resolution image critical for your visual design work, these assets are invaluable and worth the effort to recover.
However, the best approach to image preservation lies in prevention. By adopting robust backup strategies, maintaining regular device hygiene, and thinking critically before deleting, you can significantly reduce the risk of ever facing data loss. Safeguard your digital life by regularly backing up your photos to multiple locations, utilizing auto-upload features, and keeping your systems updated. Your beautiful photography and creative visual collections are more than just files; they are a part of your story, and with the right knowledge and tools, you can ensure that story is never truly lost.