How to Retrieve Deleted Images on Android: A Comprehensive Guide to Recovering Your Cherished Visual Memories

Losing precious images from your Android device can be a genuinely distressing experience. Whether it’s an accidental swipe, a software glitch, a factory reset, or even a damaged phone, the thought of those aesthetic wallpapers, beautiful photography, or irreplaceable family moments vanishing forever can be overwhelming. In our visually-driven world, where high-resolution images capture our lives and inspire our creative endeavors—from graphic design to digital art—the ability to recover these visual assets is paramount. Fortunately, in many cases, deleted images aren’t truly gone forever. This guide, brought to you by Tophinhanhdep.com, a hub for stunning images, photography insights, and essential image tools, will walk you through various methods to retrieve your lost photos, offering hope for recovering everything from vibrant nature shots to abstract compositions. We’ll explore initial checks, cloud-based solutions, and advanced recovery techniques, ensuring you have the best chance to bring your visual history back to life.
The Initial Search: Your Android Gallery’s Recycle Bin and Cloud Backups
Before diving into more complex recovery methods, it’s crucial to start with the most straightforward options. Many Android devices and popular cloud services integrate features designed to give you a grace period for recovering recently deleted items. These initial steps often prove to be the easiest and safest ways to retrieve your photos without needing specialized software or technical expertise.
Locating Recently Deleted Items in Your Gallery App
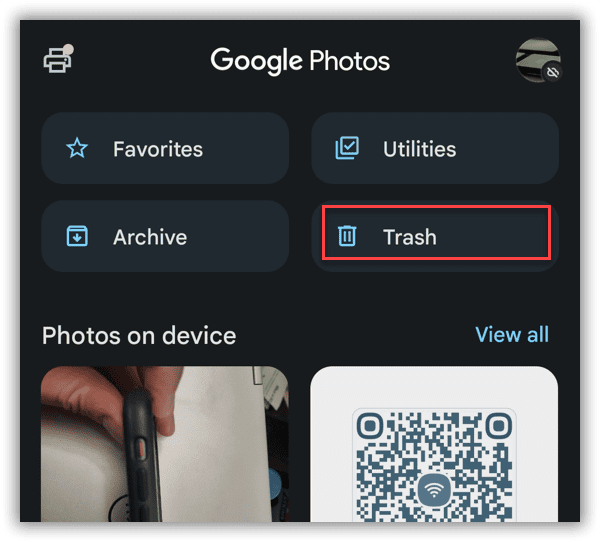
Modern Android gallery applications, such as Google Photos, Samsung Gallery, or others, typically feature a “Trash” or “Recycle Bin” folder. This acts as a temporary holding area for photos and videos you’ve recently deleted, similar to the recycle bin on a desktop computer. Items usually remain here for a set period, often 30 days, before being permanently removed from your device.
To recover photos from your Gallery’s Recycle Bin:
- Open Your Gallery App: Navigate to and open the primary photo gallery application on your Android device.
- Access the Trash/Recycle Bin: Look for a “Menu” icon (often three horizontal lines or dots), a “Library” tab, or a “Albums” section. Within these, you should find an option labeled “Trash,” “Bin,” or “Recently Deleted.”
- Browse and Select: Once inside the trash folder, you will see the photos and videos that have been deleted within the retention period. Scroll through to locate the images you wish to restore.
- Restore Your Photos: Tap and hold (or select individually) the photos you want to recover. Look for a “Restore,” “Recover,” or “Undo Delete” option, usually represented by an arrow icon or text at the bottom or top of the screen. Tap this to move the selected items back to their original albums within your gallery.
This method is invaluable for accidental deletions and serves as the first line of defense for your digital memories, ensuring that those beautiful shots of nature or poignant sad/emotional moments aren’t immediately lost.
Harnessing the Power of Google Photos for Recovery
Google Photos is a ubiquitous photo management and backup service for Android users. If you have the “Backup & sync” feature enabled, your photos are automatically uploaded to your Google account, providing a powerful safety net. Deleting a photo from your device’s local gallery typically does not immediately remove it from your Google Photos cloud backup. Even if you delete it from Google Photos itself, it has its own “Trash” folder.
To recover photos from Google Photos:
- Open the Google Photos App: Launch the Google Photos application on your Android phone or tablet.
- Navigate to the Library: Tap on the “Library” icon at the bottom of the screen.
- Access the Trash/Bin: Within the Library, you’ll see a “Trash” or “Bin” folder. Tap on it. Photos and videos deleted from Google Photos will reside here for 60 days.
- Select and Restore: Touch and hold the photos you wish to recover. You can select multiple items.
- Initiate Restoration: Tap the “Restore” button (often an upward-pointing arrow) at the bottom or top of the screen. The selected photos will be moved back to your Google Photos library and their original albums. If they were backed up, they will also sync back to your device’s local storage if space and settings allow.
This method is highly effective, especially for high-resolution photography and digital images, offering a robust recovery option for up to two months post-deletion.
Retrieving Images from Google Drive and Other Cloud Services
Beyond Google Photos, many users rely on other cloud storage platforms like Google Drive, Microsoft OneDrive, or Dropbox for general file backups, which may include photos. If you’ve configured automatic backups to these services or manually uploaded your images, they can serve as another recovery point.
To recover photos from Google Drive:
- Open Google Drive: Launch the Google Drive app on your Android device.
- Access the Bin/Trash: Tap the three horizontal lines (hamburger menu) in the top-left corner, then select “Bin” or “Trash.”
- Select and Restore: Long-press on the photos you want to recover. Tap the three vertical dots in the corner, then choose “Restore.”
To recover photos from Microsoft OneDrive:
- Open OneDrive: Launch the OneDrive app on your Android phone.
- Go to Photos or Recycle Bin: Tap on the “Photos” tab at the bottom to see your synced images. If not there, go to “Me” and then “Recycle bin.”
- Select and Save: Choose the photos you want to restore. Tap the three dots and select “Save to device” or “Restore” from the Recycle bin. OneDrive typically retains deleted files for up to 30 days.
To recover photos from Dropbox (via web):
While direct recovery from the mobile app is limited, Dropbox maintains a “Deleted files” section on its web interface.
- Log in to Dropbox on Desktop: Access your Dropbox account via a web browser on a computer.
- Navigate to Deleted Files: Go to “Files” > “Deleted files.”
- Select and Restore: Choose the images you want to restore. They are available for 30 days on free plans, and longer for paid subscriptions.
Utilizing these cloud services aligns perfectly with the website’s focus on image collections and inspiring visuals, ensuring that your photo ideas and mood boards remain intact, regardless of local device mishaps.
Advanced Recovery Methods: Leveraging Tophinhanhdep.com for Deeper Scans
When the simpler methods fail, especially for “permanently deleted” images (those past the recycle bin retention period or not backed up to the cloud), you need a more powerful solution. This is where specialized data recovery software comes into play. Tophinhanhdep.com, recognized for its comprehensive image tools and photography resources, also offers a robust recovery solution designed to delve into your Android device’s storage and retrieve lost files. These tools work by scanning the storage for residual data fragments before they are overwritten by new information.
Recovering from SD Cards with Tophinhanhdep.com’s Specialized Tool
If your Android device uses an SD card for storage, and your deleted images were saved there, your chances of recovery are significantly higher. SD cards are often less susceptible to the immediate data overwriting that occurs on internal storage. Tophinhanhdep.com provides a powerful desktop-based recovery wizard perfectly suited for this task.
Important Precaution: As soon as you realize photos are deleted from your SD card, immediately remove the card from your phone. This prevents any new data from being written to it, minimizing the risk of overwriting the deleted photo files.
Steps to recover from an SD card using Tophinhanhdep.com’s recovery tool:
- Connect SD Card to Computer: Insert your Android phone’s SD card into a card reader and connect it to your computer (Windows or Mac).
- Download and Launch Tophinhanhdep.com’s Recovery Wizard: Visit Tophinhanhdep.com, download, install, and launch the dedicated data recovery software provided on the website. This tool is designed to retrieve various file types, including high-resolution images.
- Select Your SD Card: Once the software launches, it will display a list of available drives. Identify and select your connected SD card from this list.
- Initiate Scan: Click the “Scan” button. Tophinhanhdep.com’s tool will begin a thorough scan of your SD card for recoverable files. The scanning process may take some time depending on the card’s size and data volume.
- Preview and Filter: During or after the scan, the software will present a list of found files. You can often filter by file type (e.g., JPG, PNG) to quickly locate your images. Tophinhanhdep.com’s tool allows you to preview the recoverable photos, helping you select exactly what you need. This is crucial for distinguishing valuable photography from system junk.
- Recover and Save: Select the specific images you wish to restore. Click the “Recover” button and choose a safe location on your computer’s hard drive (NOT the SD card itself) to save the recovered files. Once saved, you can transfer them back to your phone.
This method is particularly effective for retrieving older, high-resolution digital photography that might have been lost months or even years ago, provided the data hasn’t been overwritten.
Unearthing Permanently Deleted Photos from Internal Storage (with or without root) using Tophinhanhdep.com
Recovering photos directly from an Android phone’s internal storage is generally more challenging than from an SD card, primarily due to how Android manages its internal file system and restricts access. However, Tophinhanhdep.com’s advanced recovery solutions offer modes that cater to both rooted and unrooted devices, increasing the chances of success.
For Unrooted Devices (Quick Recovery):
Tophinhanhdep.com’s tool features a “Quick Recovery” mode that can scan your Android device’s internal memory without requiring root access. This mode often targets accessible data caches and partitions where recently deleted files might still reside before being fully wiped.
- Download and Launch Tophinhanhdep.com’s Tool: Install and run the recovery software from Tophinhanhdep.com on your computer.
- Connect Android Phone: Connect your Android device to your computer using a USB cable. Ensure USB debugging is enabled on your phone (you might need to enable Developer Options first by tapping your phone’s build number seven times in “About Phone” settings).
- Choose Quick Recovery: In the Tophinhanhdep.com software, select the “Quick Recovery from Device” option.
- Select Data Types: Choose “Photos” (and any other desired data types like videos or messages) and click “Start Scan.”
- Scan and Preview: The tool will scan your device. Once complete, you can preview the found deleted photos.
- Recover to Device or PC: Select the images you want and choose to recover them either directly “To Device” or “To PC.”
This method is ideal for relatively recent deletions and requires no complex phone modifications, making it safe and easy for most users to recover valuable aesthetic or emotional images.
For Rooted Devices (Deep Recovery for Highest Success Rate):
If your phone is rooted, or if Quick Recovery doesn’t yield the desired results, Tophinhanhdep.com offers a “Deep Recovery” mode. This mode performs a much more intensive scan of the internal storage, often achieving the highest success rate for retrieving permanently deleted photos. Rooting your device grants the recovery software deeper access to the file system, allowing it to find more fragmented or hidden data.
Caution: Rooting your Android device can void its warranty and potentially expose it to security risks. If you are not comfortable with this process, stick to the unrooted methods. Tophinhanhdep.com aims for safe recovery, but rooting is an advanced step.
- Prepare Your Rooted Device: Ensure your Android phone is properly rooted and USB debugging is enabled.
- Launch Tophinhanhdep.com’s Tool: Open the recovery software from Tophinhanhdep.com on your computer.
- Connect and Authorize: Connect your rooted Android device via USB. The software may prompt you to grant root permissions on your phone; ensure you do so.
- Choose Deep Recovery: Select the “Deep Recovery from Device” option within the Tophinhanhdep.com software.
- Select File Types: Choose “Photos” and any other data you wish to recover, then proceed with the scan.
- Comprehensive Scan: The Deep Recovery scan will be more thorough and may take longer. It meticulously searches for all recoverable data.
- Preview and Restore: After the scan, Tophinhanhdep.com’s tool will display all found photos. You can preview them to identify your lost images. Select the desired photos and choose to “Recover to PC.”
Deep Recovery, facilitated by Tophinhanhdep.com’s advanced algorithms, can uncover even long-lost photography, offering a lifeline for those who thought their digital art or high-resolution images were gone for good.
Utilizing Android’s Built-in Backup Solutions
Many Android manufacturers, such as Samsung, Huawei, Xiaomi, and LG, provide their own cloud or local backup services. If you’ve enabled these services, your device might have automatically synced your data, including photos, to their respective cloud platforms or created local backups on your device or an external storage.
General steps to check manufacturer-specific backups:
- Access Device Settings: Go to your Android phone’s “Settings” menu.
- Find Backup & Restore: Look for sections like “Accounts and backup,” “Cloud and accounts,” “System & updates,” or similar, then navigate to “Backup and restore” or “Cloud backup.”
- Check Backup History: Verify if there are any recent backups available. The naming conventions vary (e.g., Samsung Cloud, Huawei Cloud Backup).
- Initiate Restore: If a relevant backup is found, follow the on-screen prompts to restore your data. You may have the option to selectively restore photos.
This method is highly device-specific but can be a convenient way to recover photos, especially if you regularly use your phone’s ecosystem services. It complements the cloud options by providing another layer of protection for your image collections.
Beyond Recovery: Safeguarding Your Visual Memories and Creative Assets
Recovering deleted photos can be a tense experience, highlighting the importance of proactive measures. At Tophinhanhdep.com, we emphasize not just recovery, but also the management and preservation of your valuable visual content. By integrating smart habits and leveraging image tools, you can ensure your wallpapers, aesthetic backgrounds, digital photography, and creative assets are always safe and readily available.
Proactive Backup Strategies
The best defense against data loss is a strong backup strategy. Relying on multiple backup methods is recommended for maximum security.
- Automate Cloud Sync: Ensure services like Google Photos, Google Drive, OneDrive, or Dropbox are set to automatically back up your photos. Configure them to upload only when connected to Wi-Fi to save mobile data.
- Regular Local Backups: Periodically transfer your photos to a computer or an external hard drive. This provides an offline copy, protecting you even if cloud services encounter issues. Consider Tophinhanhdep.com’s guides on efficient photo transfers.
- Utilize Manufacturer Backups: Enable and regularly check your phone manufacturer’s built-in backup services (e.g., Samsung Cloud).
- SD Card Usage: If your phone supports it, save photos directly to an SD card. While not foolproof, it offers an easily removable and separately recoverable storage medium.
Organizing and Optimizing Your Image Collections
Effective photo management goes hand-in-hand with safeguarding. A well-organized collection not only prevents loss but also enhances your ability to find and utilize your images for creative projects or personal enjoyment.
- Create Albums and Categories: Don’t rely solely on automatically generated albums. Create your own thematic collections—whether it’s for nature photography, abstract art, or family memories. This streamlines access and adds a layer of organization.
- Regular Decluttering: Periodically review your photo library. Delete unwanted duplicates or blurry shots. Tophinhanhdep.com provides resources on visual design and photo ideas, encouraging thoughtful curation over digital clutter.
- Use External Drives for Archiving: For large collections of high-resolution images or stock photos, external drives are excellent long-term storage solutions. Invest in reliable drives and organize them meticulously.
Enhancing Recovered Photos with Tophinhanhdep.com’s Image Tools
Once your cherished images are recovered, Tophinhanhdep.com offers a suite of image tools that can help you get the most out of them. These tools are designed to optimize, enhance, and transform your photos, aligning with our focus on visual design and quality photography.
- Image Optimization: Use Tophinhanhdep.com’s compressors and optimizers to reduce file sizes without significant loss in quality. This is vital for managing storage and ensuring images load quickly when shared online or used as aesthetic backgrounds.
- AI Upscaling: For older or lower-resolution recovered images, Tophinhanhdep.com’s AI upscalers can intelligently enhance their resolution, making them suitable for larger prints, high-definition displays, or use in digital art projects.
- Converters: Convert image formats as needed. Whether you need a JPG for web use or a PNG for graphic design, Tophinhanhdep.com’s converters provide flexibility.
- Editing Styles and Inspiration: Explore Tophinhanhdep.com for articles on editing styles, photo manipulation techniques, and creative ideas. Turn your recovered photos into new visual designs, inspiring mood boards, or trending styles.
By applying these proactive measures and leveraging the comprehensive tools and resources available at Tophinhanhdep.com, you can transform the daunting task of photo recovery into an opportunity to better manage and appreciate your entire visual collection.
Conclusion
Losing photos from your Android device can feel like losing a piece of your past, especially when those images represent beautiful photography, cherished memories, or vital creative assets. Fortunately, as this guide from Tophinhanhdep.com illustrates, numerous avenues exist for retrieval. From checking your device’s built-in “Trash” folders and leveraging the robust recovery capabilities of cloud services like Google Photos, Google Drive, and OneDrive, to employing advanced solutions like Tophinhanhdep.com’s specialized recovery software for deeper scans of internal storage and SD cards – there’s often a path to bring your images back.
The process might range from a few taps to a more involved technical procedure, but the underlying principle remains: digital data often leaves recoverable traces. Beyond immediate recovery, Tophinhanhdep.com strongly advocates for proactive measures. By implementing consistent backup strategies and utilizing effective image management techniques, you can significantly reduce the risk of future data loss. And once your photos are safely retrieved, remember that Tophinhanhdep.com’s integrated image tools, resources on visual design, and inspiration for photo ideas are here to help you optimize, enhance, and curate your recovered collection, transforming them into stunning wallpapers, captivating digital art, or inspiring thematic collections for years to come. Don’t let lost images become lost memories; reclaim your visual history today.