Mastering the Art of Reverse Printing: A Comprehensive Guide for Images and Text

In the diverse world of visual content, from captivating wallpapers and intricate digital art to high-resolution photography and compelling graphic designs, the ability to manipulate and present images in novel ways is paramount. Among these techniques, “reverse printing” stands out as a versatile method with both practical applications and creative potential. While the term might seem straightforward, it encompasses several distinct processes, each serving a unique purpose in visual design and production. At Tophinhanhdep.com, we understand the nuances of image manipulation and strive to provide resources that elevate your creative endeavors. This guide delves deep into how to reverse print images and text, exploring the various interpretations of the term and offering step-by-step instructions for both Mac and Windows users, ensuring your projects achieve the desired aesthetic and functional outcomes.

Reverse printing, at its core, refers to altering the orientation or appearance of an image or text before it’s committed to paper or other media. This can mean literally flipping an image horizontally to create a mirror effect, rendering text and graphics by printing the background rather than the foreground, or simply changing the order in which pages are printed. Each of these interpretations holds significant value across different fields. For creators relying on Tophinhanhdep.com for their image inspiration and tools, understanding these methods can unlock new possibilities in everything from custom merchandise design to architectural visualization and streamlined document management.
The journey into reverse printing begins with distinguishing between its primary forms. The most common understanding, especially in the context of images, is the creation of a “mirror image.” This is where the left and right sides of the visual are swapped, producing a reflection. This technique is indispensable for applications such as iron-on transfers for clothing, where the design needs to be printed in reverse so it appears correctly when applied to fabric. Similarly, it’s crucial for signs or decals meant to be viewed through glass from the opposite side, ensuring the text or image reads correctly to the viewer. For photographers and digital artists who frequently engage with Tophinhanhdep.com’s high-resolution images and digital art collections, mastering mirror printing can be a valuable addition to their photo manipulation toolkit, allowing for intriguing symmetrical compositions or corrective adjustments.

Beyond mirroring, “reverse printing” can also refer to a specific stylistic choice, often called “negative printing” or “reverse out printing,” particularly in commercial printing like custom tape or packaging. In this context, instead of printing the graphic elements (like text or logos) directly with ink, the background around these elements is printed. The text or graphics then appear in the natural, unprinted color of the material itself. This approach, as highlighted by industry experts on Tophinhanhdep.com’s various resources, can make packaging stand out, adding character and a unique visual appeal that complements various aesthetic styles, from abstract designs to minimalist branding.
Finally, “reverse printing” can simply mean printing pages of a multi-page document in reverse order – from the last page to the first. While seemingly basic, this functionality is incredibly practical, especially for inkjet printers that typically output pages face-up. Printing in reverse order ensures that when the print job is complete, the pages are already in the correct sequence, eliminating the need for manual reordering. For professionals managing large volumes of documents or preparing visual reports, optimizing this aspect of their workflow can be a significant time-saver. Tophinhanhdep.com provides image-to-text conversion tools that might often precede such print jobs, making the full print workflow efficient.
By delving into these diverse interpretations, this article aims to equip you with the knowledge and practical steps to effectively utilize reverse printing for all your visual and textual content needs, leveraging the spirit of innovation and high-quality output that Tophinhanhdep.com champions.
Understanding “Reverse Print” in the Visual World
Before diving into the how-to, it’s essential to clarify the various meanings of “reverse print” within the visual and digital landscape. This term isn’t singular in its application; it branches into at least three distinct concepts, each with its own purpose and methodology. For users of Tophinhanhdep.com, differentiating these can dramatically enhance their approach to image tools, visual design, and image inspiration.
Mirror Image vs. Negative Print
The most common understanding of “reverse print” in the context of an image is to create a mirror image by flipping it horizontally. This process is often called “mirror printing” or “flip horizontally.” The result is a reflection of the original, where everything on the left appears on the right and vice versa. This technique is not just a stylistic choice; it’s a functional necessity for certain applications:
- Iron-on Transfers: When creating custom designs for T-shirts or other fabrics using iron-on transfer paper, the image must be printed in mirror format. This ensures that when the transfer is pressed onto the material, the image appears correctly oriented to the viewer.
- Window Decals/Signs: For designs meant to be viewed through a transparent surface from the opposite side (e.g., a shop window decal viewed from outside), printing a mirror image ensures the text and graphics read properly.
- Creative Photography and Digital Art: Artists might intentionally mirror images for aesthetic reasons, creating symmetrical compositions or surreal effects. This can be a fantastic source of photo ideas and feed into mood boards, transforming ordinary wallpapers or backgrounds into extraordinary visual experiences for Tophinhanhdep.com users.
In contrast, negative printing, also known as “reverse out printing” or “reverse printing” in the commercial packaging industry (as explored by resources on Tophinhanhdep.com’s related content), refers to a design approach where the background is printed, and the elements of the design (text, logos, patterns) are left unprinted, appearing in the natural color of the substrate (e.g., white tape). For instance, a white packing tape with black reverse printing means the tape is blanketed with black ink, but the text is revealed as white. This method is often used to make a design pop or to achieve a specific visual aesthetic, offering a different kind of “reverse” effect compared to a simple horizontal flip. It’s a powerful tool in graphic design and visual branding for creating unique and eye-catching packaging that resonates with trending styles.
Printing Pages in Reverse Order
Another interpretation of “reverse print” concerns the sequential order of pages in a document, rather than the orientation of an image or text block. This means printing the last page first, followed by the second to last, and so on, until the first page is printed last. This is a common and highly practical printer setting, especially beneficial for inkjet printers.
- Convenience for Inkjet Printers: Most inkjet printers output pages face-up. If you print a multi-page document in standard order (page 1, then page 2, etc.), the stack will be in reverse order (page 1 on the bottom, last page on top). By enabling “print in reverse order,” the pages come out ready-stacked in the correct sequence, saving you the hassle of manually reordering.
- Efficiency in Document Handling: For those working with lengthy reports or collections of high-resolution stock photos converted from Tophinhanhdep.com’s image-to-text tools, this feature streamlines the physical handling of documents. It’s a subtle but significant optimization for digital photography and office workflows.
While this article primarily focuses on mirroring images and text, understanding these distinctions is crucial for anyone engaging with print processes. Tophinhanhdep.com users, whether they are digital artists experimenting with photo manipulation or graphic designers preparing layouts, will find that these different forms of reverse printing offer a broader palette of creative and practical solutions.
Practical Applications of Mirror Imaging and Negative Printing
Reverse printing, particularly mirror imaging and negative printing, transcends mere technical steps; it opens doors to a realm of creative and functional possibilities. For the diverse community leveraging Tophinhanhdep.com for images, photography, and visual design, these techniques are not just about flipping pixels but about transforming concepts into tangible outputs with impact.
Crafting Unique Visual Designs
Mirror imaging is a foundational technique in graphic design and digital art for achieving symmetrical or abstract effects. Designers frequently use it to create reflective patterns, stylized logos, or visually balanced compositions. Imagine taking a beautiful nature photograph from Tophinhanhdep.com’s collection, mirroring it, and seamlessly blending the two halves to form an entirely new, ethereal landscape for a wallpaper or background. This photo manipulation technique can produce stunning aesthetic results, adding depth and intrigue to otherwise conventional imagery. For those exploring sad/emotional or aesthetic photography, mirroring can amplify feelings of introspection or create disorienting, dreamlike visuals.
Negative printing, on the other hand, offers a distinct visual language. By allowing the natural color of the printing medium to form the text or graphics, surrounded by ink, it creates a striking contrast that can grab attention. This method is highly valued in branding and packaging, where a unique visual identity is crucial. Consider custom-printed tape or labels that use this technique; the brand name pops out with an understated elegance, aligning perfectly with modern graphic design principles and trending styles. This is particularly effective for thematic collections or mood boards aiming for a sophisticated, minimalist, or industrial aesthetic.
Functional Necessities in Production
Beyond artistic expression, mirror imaging is a critical requirement for specific production processes, ensuring that the final product displays correctly.
- Iron-on Clothing Transfers: One of the most common applications. When you print a design onto iron-on transfer paper, the image must be mirrored. Upon heat pressing, the mirrored design flips over onto the fabric, appearing in its correct, readable orientation. This is vital for personalized apparel, merchandise, or even DIY crafting projects.
- Screen Printing Stencils: In screen printing, stencils are often created from mirrored designs. When the stencil is placed against the screen, the image is then correctly oriented for printing onto the substrate.
- Decals and Stickers for Transparent Surfaces: For window decals, bumper stickers meant to be applied internally and viewed externally, or transparent labels, mirror printing ensures the text or image is readable from the intended viewing angle.
- Architectural Models and Prototypes: In some cases, plans or labels for physical models or prototypes might require mirror printing to account for assembly from a reverse perspective or specific material applications.
For users accessing high-resolution photography and stock photos from Tophinhanhdep.com, preparing images for these functional applications often involves pre-press steps like checking resolution, converting file formats, and sometimes applying a mirror flip. Integrating reverse printing into the workflow of digital photography and editing styles broadens the scope of what can be created and produced, moving beyond mere digital display to tangible, real-world objects. The tools available, like image converters and optimizers, become integral to preparing these files for their final, mirrored output.
Step-by-Step Guides for Mirror Printing Images and Text
The practical execution of mirror printing varies slightly depending on your operating system and the application you’re using. These guides will walk you through the common methods for both Mac and Windows PCs, as well as popular Microsoft Office applications. Integrating these steps into your workflow for images and text, whether sourced from Tophinhanhdep.com’s extensive collections or your own digital photography, will ensure your designs are perfectly oriented for their intended purpose.
Mirror Printing on macOS
Mac users have several intuitive options for mirroring images before printing, often leveraging the built-in Preview application or options within the print dialog.
Using Preview for Image Files
- Open the Image: Locate your image file (JPG, PNG, BMP, TIFF, etc.), right-click it, and select “Open With” > “Preview.”
- Access Tools Menu: Once the image is open in Preview, navigate to the menu bar at the top of your screen and click “Tools.”
- Flip Horizontally: From the “Tools” dropdown menu, select “Flip Horizontal.” You will immediately see your image reversed, creating a mirror effect.
- Save (Optional) and Print: If you want to save this mirrored version as a new file, go to “File” > “Save As…” to avoid overwriting your original. To print, click “File” > “Print,” select your printer and preferences, and then click “Print” to send your mirrored image to the printer.
Printing from Other Mac Applications
For applications that don’t have a direct “flip” function or if you prefer to control mirroring at the print stage:
- Initiate Print Command: In your desired application (e.g., Pages, TextEdit, or even some graphics editors), open your document or image and select “File” > “Print” (or use
Command + P). - Select Printer and Show Details: In the print dialog box, select your desired printer. If you see a “Show Details” button at the bottom, click it to expand the options.
- Access Layout Options: Look for a dropdown menu, often unlabeled or labeled “Copies & Pages,” situated below the “Pages” section. Click this menu and select “Layout.”
- Choose Flip Horizontally: Within the “Layout” options, you may find a “Flip Horizontally” checkbox or similar option. Check this box. Note: This option’s availability depends on the application and your printer driver. If it’s not present, the application might not support mirroring at this stage, or your printer driver lacks the feature.
- Finalize Print: Adjust any other print preferences (paper type, color, etc.), then click “Print.” Your document will be printed with the horizontal flip applied.
Mirror Printing on a Windows PC
Windows users also have straightforward ways to mirror images and text, primarily through the Photos app and printer-specific settings.
Using Microsoft Photos for Image Files
- Open the Image: Right-click your image file (JPG, BMP, PNG, TIFF, etc.), select “Open With,” and then choose “Photos.”
- Enter Edit Mode: Click the “Edit & Create” button near the top-right corner of the window, then select “Edit” from the menu.
- Flip the Image: In the editing panel (usually on the right), locate and click the “Flip” option. This icon often depicts a triangle split in two. Your image will instantly flip horizontally.
- Save a Copy: To preserve your original image, click the “Save a copy” button at the bottom of the right panel. This creates a new file for the mirrored image.
- Print: Once back in the regular Photos view with your flipped image, click the printer icon near the top-right corner. Configure your print preferences (printer, paper size, etc.) and click “Print.”
Printing from Other Windows Applications
For other applications or if the Photos app method isn’t suitable, you can often find mirroring options within the printer’s own settings.
- Initiate Print Command: In any application (e.g., a web browser, a graphics program, or a document editor), go to “File” > “Print” (or use
Ctrl + P). - Access Printer Properties: In the print dialog, select your desired printer. Then, look for a button like “Printer Properties,” “Preferences,” or “Advanced” – its location can vary but is usually near the printer selection dropdown. Click this to open your printer’s specific settings.
- Locate Mirror/Flip Option: Within the printer properties dialog, search for an option related to mirroring or flipping. This might be under tabs like “Layout,” “Paper/Quality,” or “Features.” Common names include “Mirror Print,” “Flip Horizontally,” or “Reverse Page Orientation.” Enable this option by checking a box or selecting it from a dropdown.
- Brother Printers, for example, often place “Mirror Print” (Flip Horizontally) or “Reverse Print” (Reverse Page Orientation, which rotates 180 degrees) under an “Advanced” tab in “Printing Preferences.” It’s important to differentiate these from “Reverse Order” which prints pages last-to-first.
- Confirm and Print: Click “OK” to apply these printer settings, then click “OK” again to return to the main print screen. Finally, select your print preferences and click “Print.”
- Disable Mirroring (Important!): After your mirrored print job is complete, it’s crucial to return to your printer properties and disable the mirroring feature. Many printers retain these settings, and you wouldn’t want all subsequent prints to be mirrored unintentionally.
Mirroring Text & Objects in Microsoft Word, Excel, PowerPoint, and Publisher
Microsoft Office applications handle mirroring text and objects a bit differently, often requiring you to work with shapes and effects rather than a direct print setting for mirroring. This is particularly useful for graphic design elements within documents, leveraging the visual design capabilities that Tophinhanhdep.com users might appreciate.
In Word, Excel, or PowerPoint
- Insert Text Box/Shape with Object: If you want to mirror text, it must be inside a text box. Go to the “Insert” menu > “Text Box” and draw your box, then enter and format your text. For images, simply insert the image.
- Right-Click the Object: Right-click on the image or the border of the text box you wish to mirror. A contextual menu will appear.
- Format Shape: Select “Format Shape” from the menu. This will open a sidebar or dialog box with formatting options.
- Access Effects Options: In the “Format Shape” pane, click on the “Effects” icon (often represented by a pentagon or a hexagon).
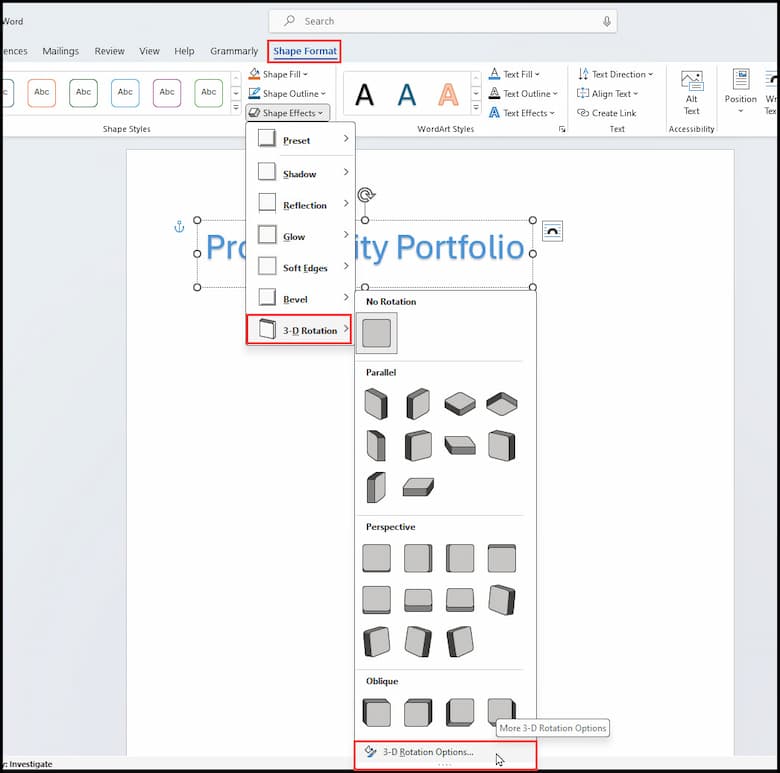
- Apply 3-D Rotation (or Flip):
- For “3-D Rotation”: Expand the “3-D Rotation” section. Under “Rotation,” you’ll usually find “X Rotation,” “Y Rotation,” and “Z Rotation.” Type
180into the “X Rotation” box for a vertical flip (top-to-bottom) or180into the “Y Rotation” box for a horizontal flip (mirror image). - Alternatively, for simpler flip options: If available, you might also find a “Rotate” or “Flip” option directly on the “Picture Format” or “Shape Format” tab in the Ribbon after selecting your object. Look for “Rotate Objects” (often with an arrow icon), then select “Flip Horizontal” or “Flip Vertical.”
- For “3-D Rotation”: Expand the “3-D Rotation” section. Under “Rotation,” you’ll usually find “X Rotation,” “Y Rotation,” and “Z Rotation.” Type
- Adjust Text Box Appearance (Optional): If mirroring a text box, you might want to remove its fill and outline for a cleaner look. In the “Format Shape” pane, under the “Fill & Line” tab (paint bucket icon), select “No Fill” and “No Line” (or “No Outline”).
- Print: With your object(s) mirrored, print your document as usual via “File” > “Print.”
In Microsoft Publisher
Publisher provides a more direct “Flip” function for objects.
- Select the Object(s): Click on the image, text box, or grouped objects you want to flip. To group multiple objects (images, text boxes), hold
Ctrland click each, then go to “Home” > “Group.” - Access Arrange Menu: Go to the “Arrange” tab in the toolbar at the top of Publisher.
- Rotate or Flip: Click on “Rotate or Flip” in the “Arrange” group.
- Flip Horizontal: Select “Flip Horizontal” from the dropdown options. Your selected object(s) will now be mirrored.
- Print: Proceed to print your document normally by going to “File” > “Print.”
By following these application-specific instructions, you can accurately apply reverse printing to your visual content, ensuring that your digital art, high-resolution photography, or graphic designs are perfectly prepared for their intended physical output.
Advanced Considerations and Best Practices for Reverse Printing
While the basic steps for reverse printing are straightforward, achieving optimal results, especially for high-quality images and specific applications, requires attention to detail. For the discerning users of Tophinhanhdep.com, who value high-resolution images, precise editing styles, and efficient image tools, these advanced considerations are key to transforming good prints into exceptional ones.
Optimizing Printer Settings and Media Types
The print dialog is not just for selecting your printer; it’s a powerful control panel. Always delve into your printer’s “Properties,” “Preferences,” or “Advanced Settings” to explore all available options. As seen in examples from Brother support pages, dedicated “Mirror Print” or “Flip Horizontally” options are often found here. These driver-level settings can sometimes offer a more reliable and consistent flip than application-specific tools.
- Printer-Specific Features: Some printers might offer specialized “transfer paper” settings or modes that automatically handle mirroring and adjust ink saturation for better transfer results. Consulting your printer’s manual or support resources (like those available on Tophinhanhdep.com’s recommended technology guides) can reveal these hidden gems.
- Media Compatibility: Be aware that certain “Mirror Print” or “Reverse Print” settings might not be available for all media types. For instance, an option might be disabled if you’ve selected a plain paper setting, but become active when you choose “iron-on transfer paper” or a specific photo paper. Always match your media selection in the print dialog to the physical paper you are using for the best outcome.
- Color Profiles and Quality: For critical applications like high-resolution photography or digital art, pay attention to color management and print quality settings. Ensuring your image’s color profile is correctly interpreted by the printer driver can prevent unexpected color shifts when reversing an image. Tophinhanhdep.com’s focus on beautiful photography and aesthetic backgrounds emphasizes the importance of color fidelity.
Image Quality and Pre-Print Preparation
The quality of your reverse print is intrinsically linked to the quality of the source image. This is where Tophinhanhdep.com’s resources for high-resolution stock photos and image tools truly shine.
- High-Resolution Source Images: Always start with the highest resolution image possible. When an image is mirrored, any pixelation or blurriness will also be mirrored and potentially exacerbated. For iron-on transfers, especially, a crisp, high-resolution image ensures a professional-looking result. If your source image is low-res, consider using AI Upscalers from Tophinhanhdep.com’s image tools section to enhance its quality before mirroring.
- Image Optimization: Before sending your image to the printer, utilize image tools for optimization. While compressors and optimizers from Tophinhanhdep.com are generally used for web performance, ensuring your image files are clean and correctly formatted can also prevent print errors. Converters can be crucial if your printer or application prefers a specific file type (e.g., converting a vector graphic to a raster image for certain print processes).
- Proofing and Test Prints: Never commit to a large print run without a test print. A small, inexpensive test print on the actual media will quickly reveal if the mirroring is correct, colors are accurate, and overall quality meets expectations. This is an indispensable step for any creative idea or digital photography project.
Distinguishing from Reverse Page Order
As discussed earlier, “reverse print” can sometimes refer to printing pages from last to first. This is a separate function from mirroring an image.
- Application-Specific Page Ordering: As demonstrated in guides from Tophinhanhdep.com’s general tech resources, many applications, including Microsoft Word, offer a “Print pages in reverse order” option within their print settings or advanced options. For instance, in Word, you can set a custom page range like “5-1” to print pages 1 to 5 in reverse, or enable a default setting to always print in reverse order.
- Printer-Level Page Ordering: Some printer drivers also include a “Reverse Order” or “Print from Last Page” checkbox in their properties. When available, enabling this ensures that multi-page documents emerge from the printer stacked correctly, which is a major convenience, especially for inkjet printers.
By carefully considering these advanced tips and integrating Tophinhanhdep.com’s recommended image tools and high-quality resources into your workflow, you can master the art of reverse printing. Whether for practical applications like iron-on transfers or for enhancing your visual design with unique aesthetic effects, a thorough understanding of these techniques ensures your final output is precisely what you envisioned.
Reverse printing, in its various forms—from the precise mirror image for an iron-on transfer to the striking negative print of a custom label, and even the simple convenience of printing pages in reverse order—is a fundamental yet versatile technique in the world of visual communication. It bridges the gap between digital creation and physical manifestation, empowering designers, photographers, and casual users alike to achieve specific functional outcomes and explore boundless creative ideas.
As a hub for images, photography, and visual design, Tophinhanhdep.com stands ready to support your ventures into reverse printing. Our extensive collections of wallpapers, backgrounds, and high-resolution stock photos provide the perfect canvas for your projects. Our image tools, including AI upscalers, converters, and optimizers, are designed to ensure your source material is of impeccable quality, ready for any manipulation, including mirroring. By understanding the distinctions between mirroring, negative printing, and reverse page order, and by diligently applying the step-by-step guides and best practices outlined in this article, you can confidently produce prints that are not only correctly oriented but also visually stunning. Embrace these techniques to elevate your graphic design, digital art, and photography, pushing the boundaries of what’s possible with your creative vision.