Mastering Image Rotation in Lightroom: A Comprehensive Guide for Tophinhanhdep.com Users

Adobe Lightroom, a cornerstone for professional and amateur photographers alike, offers a vast array of tools for managing and developing images. For users of Tophinhanhdep.com, who frequently engage with high-resolution images, stunning wallpapers, and diverse aesthetic backgrounds, understanding the intricacies of photo editing software like Lightroom is paramount. Among the most fundamental yet often underestimated adjustments is image rotation. Whether you’re correcting a minor tilt or radically reorienting a photograph for artistic impact, knowing “how to rotate an image in Lightroom” efficiently can dramatically enhance your workflow and the final quality of your visual content.
This comprehensive guide will delve into the various methods Lightroom Classic CC provides for rotating and flipping images, ensuring that every photo you curate for Tophinhanhdep.com collections, digital art projects, or personal galleries is perfectly aligned and aesthetically pleasing. We’ll explore quick 90-degree rotations, precise angle adjustments, and mirroring techniques across both the Library and Develop modules, illustrating how these seemingly simple actions contribute to superior visual design and photographic excellence.
Why Image Rotation is Essential for Your Photography
The need to rotate an image in Lightroom can arise from a multitude of scenarios, ranging from technical camera errors to deliberate creative choices. For photographers contributing to Tophinhanhdep.com’s rich tapestry of images, recognizing these instances is the first step toward producing impeccably polished content.
Correcting Import Errors and Sloping Horizons

One of the most common reasons to rotate an image is due to an incorrect import orientation. Sometimes, despite capturing a photograph in portrait mode, Lightroom might import it with a landscape orientation, rotated clockwise or anticlockwise by 90 degrees. This often happens when metadata isn’t perfectly read or when images originate from diverse camera sources. Such errors are immediately noticeable in the Library Grid View, demanding a quick fix to restore the image’s intended display.
Beyond initial import glitches, a slightly off-kilter horizon or a subtly leaning architectural line can detract significantly from an otherwise compelling photograph. Whether you’re shooting serene nature scenes, dynamic urban landscapes, or intimate wedding photos, a sloping horizon is a classic compositional flaw. Even a minor tilt can disturb the viewer’s sense of balance and professionalism, making precise rotation indispensable. For Tophinhanhdep.com’s collection of nature wallpapers and beautiful photography, this level of precision ensures that every image upholds the highest standards of visual integrity.
Enhancing Visual Composition and Artistic Expression
Rotation isn’t merely about correction; it’s a powerful tool for visual design and artistic expression. Photographers sometimes intentionally capture images at unusual angles to achieve a particular perspective or to fit expansive scenes—like an entire wedding party with its scenic backdrop—within the frame. These unconventional shots may require subsequent rotation to align subjects or create a balanced composition.
Moreover, rotation can transform a conventional image into something abstract or dramatically striking. Flipping an image vertically or horizontally can create fascinating mirror effects, particularly when dealing with reflections in water, leading to unique and thought-provoking abstract images. For graphic designers and digital artists sourcing images from Tophinhanhdep.com, knowing how to manipulate orientation opens up a world of creative ideas, allowing for photo manipulation that can add emphasis, drama, or a fresh perspective to their digital art. This creative flexibility is key for generating trending styles and captivating visual content.
Effortless 90-Degree Rotations in Lightroom’s Library Module
When facing images that are entirely misoriented by 90 degrees, Lightroom’s Library module offers several quick and intuitive methods to correct them. These methods are ideal for rapid batch processing and initial organizational tasks, making them invaluable for anyone managing large image collections for Tophinhanhdep.com.
To begin, ensure you are in the Library module (accessible via the top-right of the interface or by pressing G for Grid View). Here, images are displayed as a grid of thumbnails, allowing for easy identification of misaligned photos.
Quick Thumbnail Controls and Keyboard Shortcuts
Perhaps the fastest way to perform 90-degree rotations is directly from the thumbnail view in the Library module.
-
Thumbnail Icons: When you hover your mouse pointer over an image thumbnail in the Grid View, two small arrow icons will appear in the bottom-left and bottom-right corners.
- Click the left arrow icon to rotate the image anticlockwise (counter-clockwise) by 90 degrees.
- Click the right arrow icon to rotate the image clockwise by 90 degrees. Each click applies a 90-degree rotation. Repeated clicks will cycle the image through a full 360 degrees. This method is incredibly efficient for single image adjustments or for a small group of selected images.
-
Keyboard Shortcuts: For maximum speed, especially when dealing with numerous photos, keyboard shortcuts are indispensable.
- To rotate an image left (counter-clockwise): Press
Cmd + [on a Mac orCtrl + [on a Windows PC. - To rotate an image right (clockwise): Press
Cmd + ]on a Mac orCtrl + ]on a Windows PC. These shortcuts can be applied to a single selected image or multiple selected images simultaneously, making them perfect for quickly correcting entire batches of photos that were imported incorrectly.
- To rotate an image left (counter-clockwise): Press
Leveraging Menu Options for Single and Multiple Images
Lightroom provides traditional menu-based options that offer a clear, step-by-step approach to rotation and are accessible in both the Library and Develop modules.
-
The Photo Menu:
- First, select the image(s) you wish to rotate. In the Library Grid View, you can select multiple images by holding down
Cmd(Mac) orCtrl(Windows) and clicking on each thumbnail. - Go to the top menu bar and click Photo.
- From the dropdown menu, select Rotate Left (Counter-Clockwise) or Rotate Right (Clockwise). This method is straightforward and ensures consistency, working reliably whether you have one image or a hundred selected.
- First, select the image(s) you wish to rotate. In the Library Grid View, you can select multiple images by holding down
-
Right-Click (Context) Menu: Another convenient way to access rotation commands is through the right-click context menu.
- In Library Grid View: Right-click directly on any selected thumbnail. A context menu will appear, offering Rotate Left (CCW) and Rotate Right (CW) options under “Transform.” This applies the rotation to all selected images.
- In Library (Single Image View) or Develop Module (Filmstrip): If you are viewing a single image in the Library or are in the Develop module, you can right-click on the image in the filmstrip (the strip of thumbnails at the bottom of the interface). This also provides the rotation options.
- Toolbar Buttons (Library Module only): In the single-photo view within the Library module, you may also find dedicated rotate left and right buttons directly on the toolbar beneath the image. If the toolbar isn’t visible, press
Tto toggle it. Note that these buttons are not present in the Develop module.
These methods collectively provide robust solutions for managing orientation issues at the initial stage of your photography workflow, ensuring that your high-resolution images are properly aligned before further editing or inclusion in Tophinhanhdep.com’s aesthetic collections.
Precision Rotation and Flipping in the Develop Module
While 90-degree rotations handle gross orientation errors, many images require more subtle adjustments to achieve perfection. Sloping horizons, misaligned architectural elements, or a desire for artistic mirroring call for the finer tools found within Lightroom’s Develop module.
To access these advanced rotation and flipping features, navigate to the Develop module (shortcut D).
Fine-Tuning Angles with the Crop & Straighten Tool
For precise rotational control, the Crop & Straighten tool is your go-to. This tool allows you to correct minor tilts and perfectly level your images, a crucial step for producing professional-grade photos for Tophinhanhdep.com’s diverse backgrounds and photography sections.
-
Accessing the Crop Tool:
- Click on the Crop Overlay icon (resembles a grid/rectangle) in the right-hand panel, usually located just below the Histogram.
- Alternatively, press
Ron your keyboard. Once activated, a crop boundary will appear around your image.
-
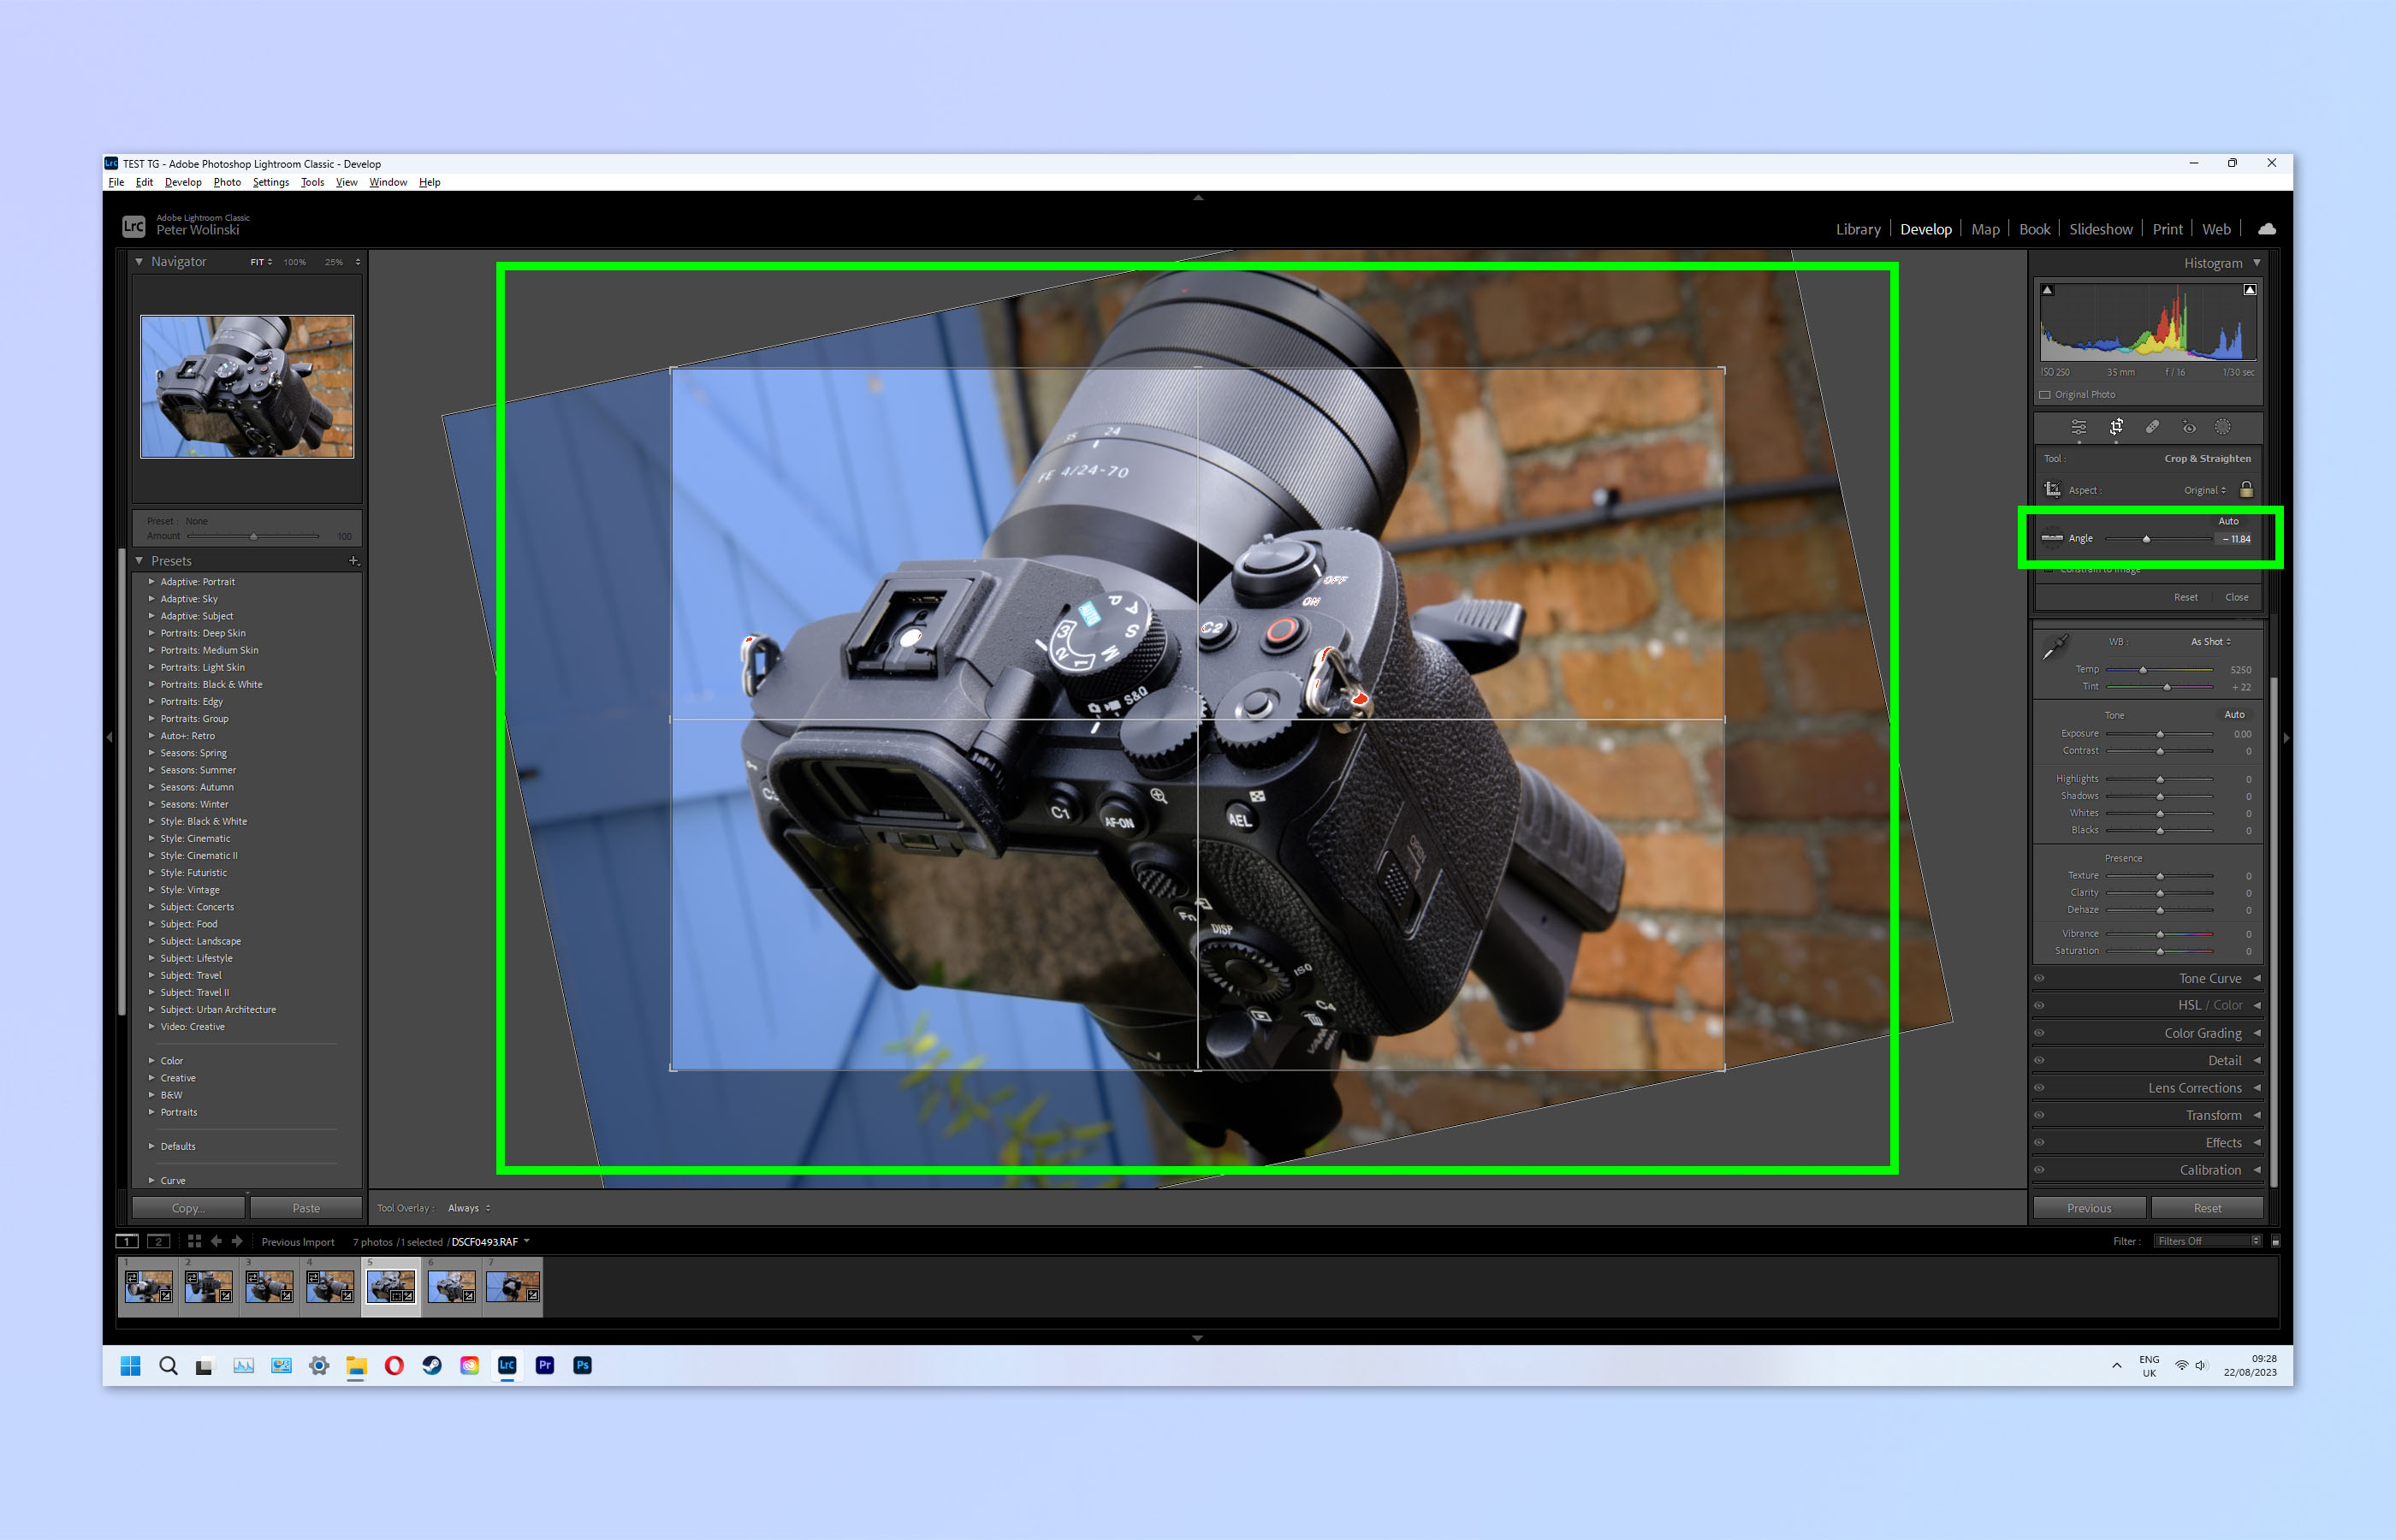
The Angle Slider: Within the Crop & Straighten panel, you’ll find an “Angle” slider.
- Dragging the Slider: Click and drag the slider to the left or right. As you move it, the image in the preview area will rotate. Moving left rotates counter-clockwise, and moving right rotates clockwise. The degree of rotation is displayed numerically, offering immediate feedback.
- Manual Input: For exact adjustments, click on the numerical value next to “Angle” and type in a specific degree. Positive numbers rotate clockwise, while negative numbers rotate counter-clockwise. Press Enter/Return to apply.
- Resetting: To quickly reset the angle to zero, double-click on the word “Angle.”
-
Rotating with Crop Handles: For a more visual approach, interact directly with the crop overlay.
- Once the Crop tool is active, move your cursor slightly outside any of the corner or side crop handles. The cursor will change into a bent, double-headed arrow, indicating rotational capability.
- Click and drag your mouse to freely rotate the image. This method allows for intuitive, on-the-fly adjustments, with a grid appearing to help you visualize alignment.
-
The Precise Straighten (Spirit Level) Tool: This is arguably the most effective tool for leveling horizons or aligning vertical elements.
- Within the Crop & Straighten panel, click on the Spirit Level icon (it looks like a small level with a line).
- Your cursor will transform into a crosshair. Click and drag a line across an element that should be perfectly horizontal or vertical (e.g., the horizon line, the edge of a building).
- Release the mouse button, and Lightroom will automatically rotate the image to make that line perfectly straight. This intelligent feature drastically simplifies horizon correction.
-
Auto Straighten Function: Some Lightroom versions offer an “Auto” button or function within the Crop panel. Clicking this will prompt Lightroom to analyze the image for horizontal lines (like a horizon) and attempt an automatic correction. While often effective, it works best with clearly defined lines.
After making your rotational adjustments, you can finalize the crop by clicking the Crop Overlay icon again or pressing R. Remember, precise rotation through these tools ensures your images are not only corrected but also optimized for high-resolution display on Tophinhanhdep.com.
Crafting Mirror Images with Horizontal and Vertical Flips
Beyond rotation, Lightroom also allows you to flip or mirror an image, either horizontally or vertically. This technique is less about correcting orientation and more about creative manipulation or addressing very specific capture scenarios. For visual designers, photographers experimenting with digital art, or those curating unique mood boards for Tophinhanhdep.com, flipping offers distinct artistic possibilities.
-
Flipping via the Photo Menu:
- Select the image(s) you wish to flip.
- Go to the top menu bar and click Photo.
- From the dropdown menu, choose Flip Horizontal or Flip Vertical.
Flip Horizontalcreates a mirror image across the vertical axis, effectively swapping the left and right sides of the photo. This is great for creative reflections or to alter the implied direction of a subject.Flip Verticalcreates a mirror image across the horizontal axis, effectively turning the image upside down from its original orientation. This is particularly useful if a photo was accidentally taken with the camera inverted, or for artistic effects with reflections.
-
Flipping via the Right-Click (Context) Menu:
- In the Library module (single image view) or the Develop module, right-click on the main image or its thumbnail in the filmstrip.
- Navigate to Transform in the context menu.
- Here, you’ll find Flip Horizontal and Flip Vertical options.
It’s important to note that, unlike 90-degree rotations, there isn’t a dedicated keyboard shortcut for flipping images. When using text overlays or other elements within an image, remember to apply the flip before adding text, as flipping will mirror these elements too, rendering them unreadable. This feature, while niche, adds another layer of versatility to your image manipulation toolkit, contributing to the rich “Image Tools” available through Lightroom for Tophinhanhdep.com content creators.
Integrating Rotation into Your Tophinhanhdep.com Workflow
Mastering image rotation in Lightroom is more than just learning a few clicks; it’s about refining your entire photographic and visual design workflow. For contributors and users of Tophinhanhdep.com, incorporating these techniques seamlessly ensures that every image, from a stunning wallpaper to a nuanced piece of digital art, meets professional standards and effectively communicates its intended message.
Optimizing Images for Various Visual Design Applications
The precision gained from Lightroom’s rotation tools directly translates into higher quality for Tophinhanhdep.com’s diverse image categories.
- Wallpapers and Backgrounds: A perfectly straight horizon in a nature landscape or a level architectural line in an urban shot creates a clean, immersive experience for users looking for aesthetic backgrounds. The subtle adjustments possible in the Develop module are critical here.
- Aesthetic and Beautiful Photography: Whether it’s a portrait needing a slight head tilt adjustment or a product shot demanding perfect alignment, precise rotation enhances the perceived beauty and professionalism of the image. This attention to detail contributes to the “high resolution” and “beautiful photography” standards on Tophinhanhdep.com.
- Digital Photography and Editing Styles: Rotation is an integral part of developing a consistent editing style. Some styles might intentionally incorporate slight angles for dynamic effect, while others prioritize absolute perpendicularity. Lightroom’s tools allow you to apply these stylistic choices consistently across a series of images, an essential aspect of “digital photography” and “editing styles.”
- Image Tools and Optimization: While Tophinhanhdep.com offers converters, compressors, and optimizers, the quality of the source image from Lightroom, including its rotational accuracy, is foundational. A perfectly rotated image reduces the need for extensive cropping or complex manipulation in later stages, making the overall optimization process more efficient.
Elevating Your Image Collections and Creative Ideas
The ability to expertly rotate and flip images impacts not just individual photos, but entire collections and the creative ideas they inspire.
- Mood Boards and Thematic Collections: When curating mood boards or thematic collections for Tophinhanhdep.com, consistent image orientation and alignment are key to visual cohesion. Easily correcting misalignments or applying creative flips ensures that your collection tells a unified story and maintains a professional aesthetic.
- Trending Styles and Photo Manipulation: Explore new trending styles by experimenting with unconventional angles and mirror images. Flipping reflections to create abstract compositions, for example, can lead to unique visual elements for photo manipulation or “digital art” projects. Lightroom’s non-destructive editing means you can experiment freely without altering your original files.
- Organized Photo Library: A well-rotated image is an organized image. When your images are correctly oriented from the start, your “image library” is easier to navigate, reducing time spent searching for and correcting photos later. This organizational efficiency supports the broader goal of effective “image tools” and streamlined workflows.
In conclusion, knowing how to rotate an image in Lightroom, from quick 90-degree adjustments to fine-tuned angle corrections and creative flips, is a fundamental skill for any photographer or visual artist. For those contributing to and utilizing the rich visual resources on Tophinhanhdep.com, this mastery ensures that every uploaded image not only meets technical requirements but also elevates its artistic impact and contributes to a visually stunning and professionally curated online experience. Embrace these powerful Lightroom features, and transform your images from merely good to truly exceptional.