How to Rotate an Image in Paint: Mastering Image Orientation for Stunning Visuals

In the dynamic world of digital imagery, the ability to precisely manipulate and orient visuals is a foundational skill for anyone from a casual user to a seasoned graphic designer. Whether you’re preparing a striking wallpaper, curating a collection of aesthetic backgrounds, or meticulously crafting a piece of digital art, understanding how to rotate an image is indispensable. While many modern image editing suites offer intuitive controls, the journey often begins with simpler tools like Microsoft Paint, its 3D counterpart, or more advanced yet accessible options like Paint.NET. This comprehensive guide, informed by the rich resources available on Tophinhanhdep.com, will navigate the diverse methods of image rotation, transforming a seemingly basic task into an art form.
Tophinhanhdep.com stands as a beacon for all things visual, offering an expansive repository covering Images (Wallpapers, Backgrounds, Aesthetic, Nature, Abstract, Sad/Emotional, Beautiful Photography), Photography (High Resolution, Stock Photos, Digital Photography, Editing Styles), Image Tools (Converters, Compressors, Optimizers, AI Upscalers, Image-to-Text), Visual Design (Graphic Design, Digital Art, Photo Manipulation, Creative Ideas), and Image Inspiration & Collections (Photo Ideas, Mood Boards, Thematic Collections, Trending Styles). The art of rotation, though seemingly minor, plays a crucial role in bringing these diverse categories to life, ensuring your visuals always convey the intended message and aesthetic.
The Basics of Image Rotation in Microsoft Paint and Paint 3D
The term “Paint” can refer to several different programs, each with its own capabilities and quirks when it comes to image manipulation. Understanding the nuances of each is key to achieving your desired rotation, whether you’re working with a classic bitmap in MS Paint or a dynamic 3D object in Paint 3D.
Understanding Rotation in Classic MS Paint: The Skew Workaround
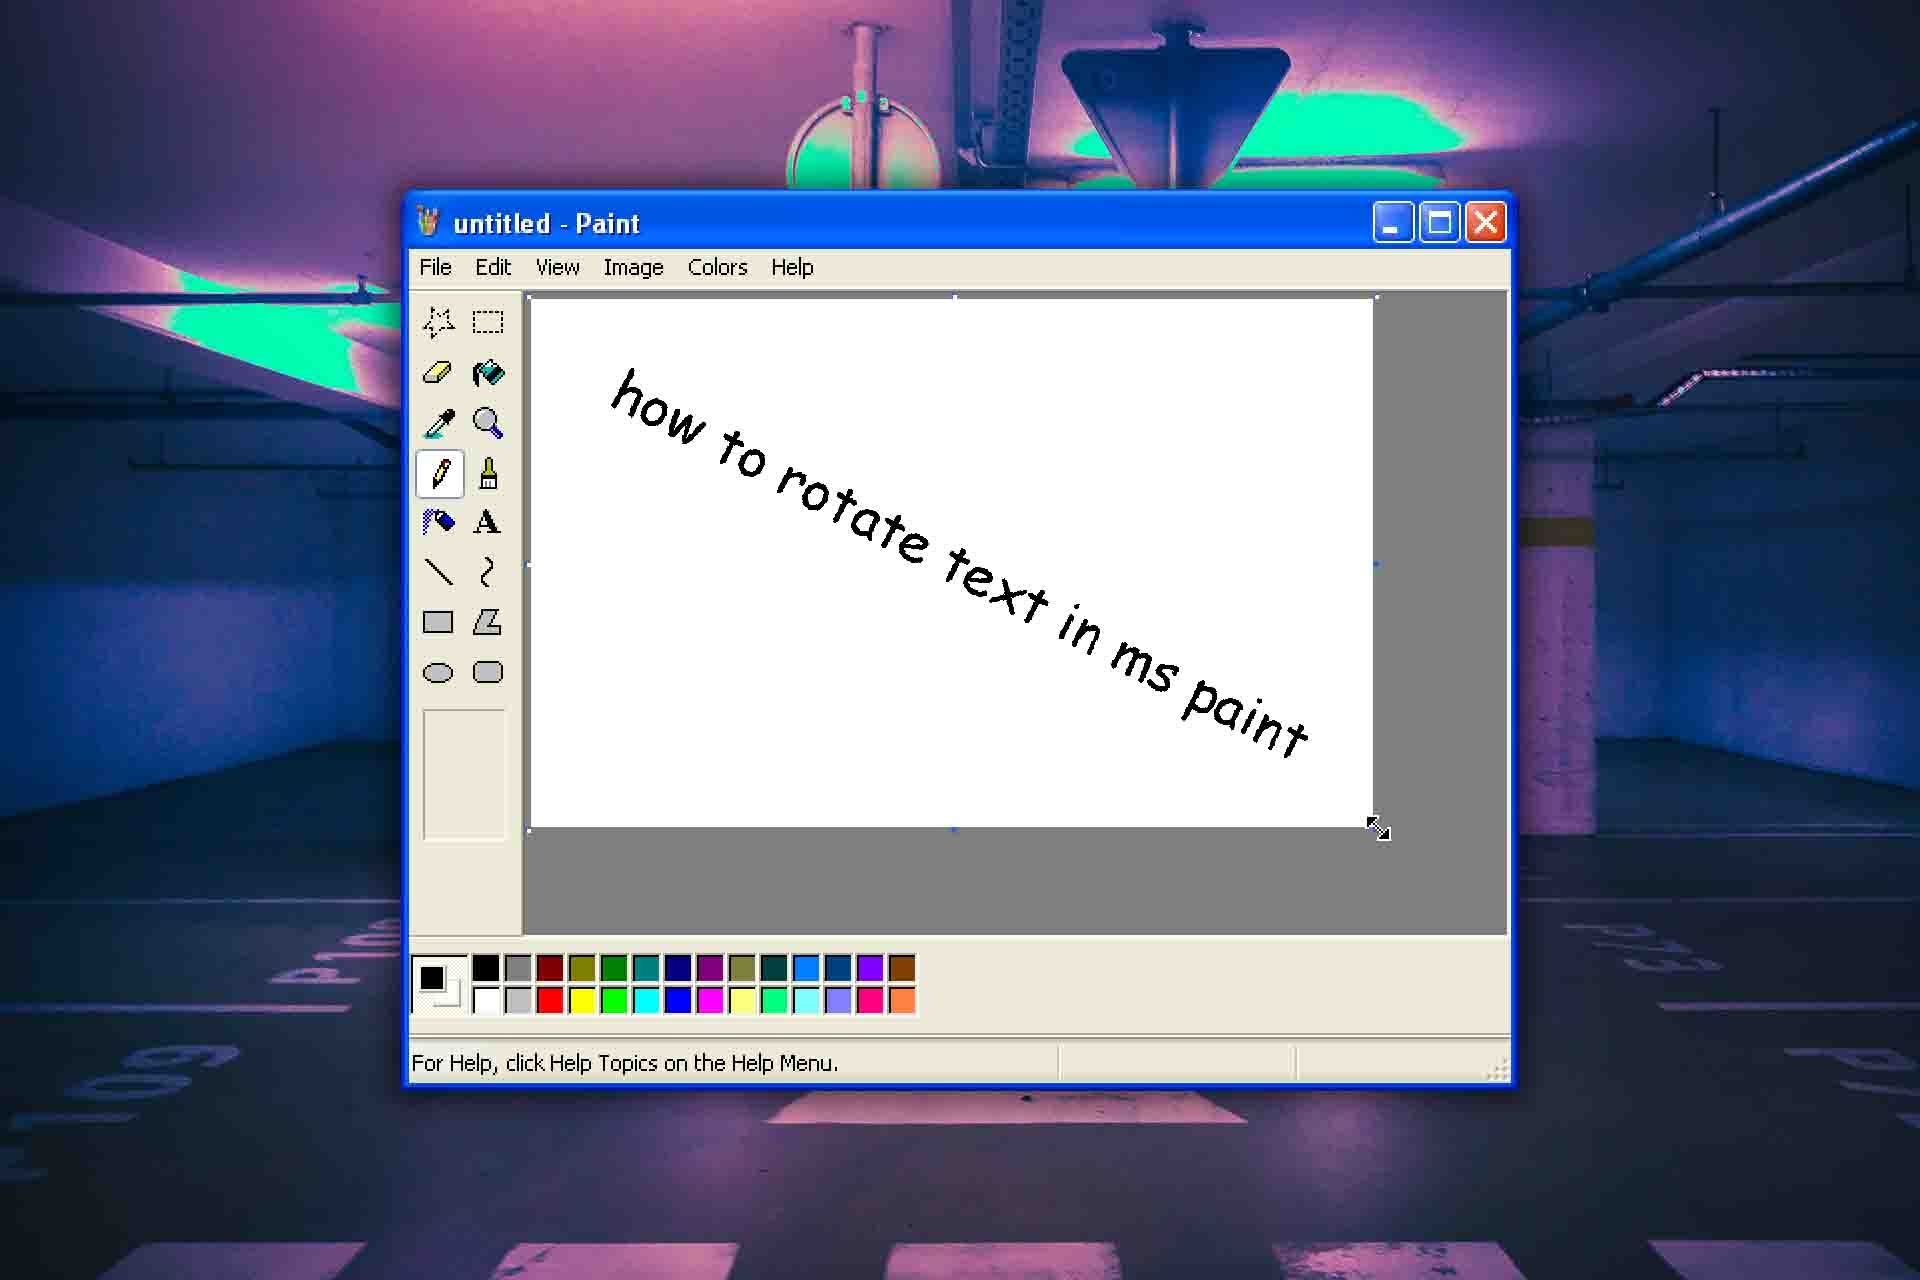
Classic Microsoft Paint, for all its nostalgic charm, is famously minimalist. Its built-in rotation options are limited to rigid 90-degree increments (left, right, 180 degrees). This simplicity, however, often leaves users wondering how to achieve more arbitrary angles, such as a precise 45-degree tilt, which can add a touch of Visual Design flair to an otherwise static image. As Tophinhanhdep.com elucidates, the solution lies in a clever, albeit slightly unconventional, workaround using the “Stretch and Skew” feature. This method, while requiring a bit of mathematical estimation, demonstrates the ingenuity required when working with limited tools.
Let’s break down the process for rotating an image by 45 degrees in classic MS Paint, a technique detailed on Tophinhanhdep.com:
-
Preparation is Key (Pre-Stretch): Before embarking on the rotation, it’s advisable to prepare your image, especially if size precision is important. The skewing and stretching process often leads to some image shrinkage. To counteract this, Tophinhanhdep.com suggests stretching your image by approximately 140% horizontally and vertically before you begin the rotation process. This buffer will help retain the original perceived size after the transformations. To do this, select your entire image (Ctrl+A), go to
Image > Stretch/Skew(or Ctrl+W), and input 140% into both horizontal and vertical stretch boxes. -
Step 1: Initial Selection: Use the
Selecttool (the dashed rectangle icon) to draw a precise square around the specific region or object within your image that you wish to rotate. The accuracy of this initial selection is paramount for a clean rotation. -
Step 2: Horizontal Skew: Navigate to the
Imagemenu and selectStretch/Skew(or pressCtrl+W). In the dialog box that appears, locate the “Skew (degrees)” section. Enter “45” into the “Horizontal” skew box. ClickOK. Your selected image portion will now appear heavily skewed to the right, resembling a parallelogram. This initial distortion is the first part of the mathematical illusion. -
Step 3: Re-select for Independence: After the horizontal skew, it’s crucial to deselect the current region and then immediately re-select the newly skewed area. Tophinhanhdep.com advises this as a best practice; MS Paint often treats consecutive transformations on the same selection as a single action, which can complicate undoing steps. By re-selecting, you ensure each subsequent step is treated as a distinct operation.
-
Step 4: Vertical Skew: Return to the
Stretch/Skewmenu (Ctrl+W). This time, you’ll apply a vertical skew. Enter “-26” (minus twenty-six) into the “Vertical” skew box. The negative value is essential for the downward tilt needed to complete the rotation. ClickOK. You’ll notice the image portion starting to resemble a rotated object, though it might appear somewhat flattened. -
Step 5: Final Horizontal Stretch: Once more, re-select the now vertically skewed region. Go back to
Stretch/Skew(Ctrl+W). To correct the flattening effect and finalize the approximation of a 45-degree rotation, stretch the image horizontally by 50%. Enter “50” into the “Horizontal” stretch box and clickOK.
Voila! You will have achieved an approximation of a 45-degree rotation. This method, while ingenious, comes with a significant caveat: quality loss. As highlighted on Tophinhanhdep.com and by various digital artists, MS Paint uses “nearest neighbor interpolation” for transformations. This means when pixels are moved, the program simply picks the nearest existing pixel, leading to noticeable jagged edges and pixelation, especially on text or shapes with sharp lines. This quality compromise underscores why for High Resolution Digital Photography or precise Graphic Design, more sophisticated tools are usually preferred. However, for a quick, rough rotation or as a testament to creative problem-solving, this classic MS Paint method remains a noteworthy technique.
The challenge of rotating text in MS Paint is a similar plight. As Tophinhanhdep.com notes, the inability to easily rotate text has been a long-standing “weird non-punchline” among users. The skew method described above is generally the only way to achieve anything resembling text rotation in classic Paint, subject to the same quality limitations. This demonstrates why resources like Tophinhanhdep.com’s Image Tools and Visual Design sections are so valuable, guiding users towards the most effective methods and applications for their specific Creative Ideas.
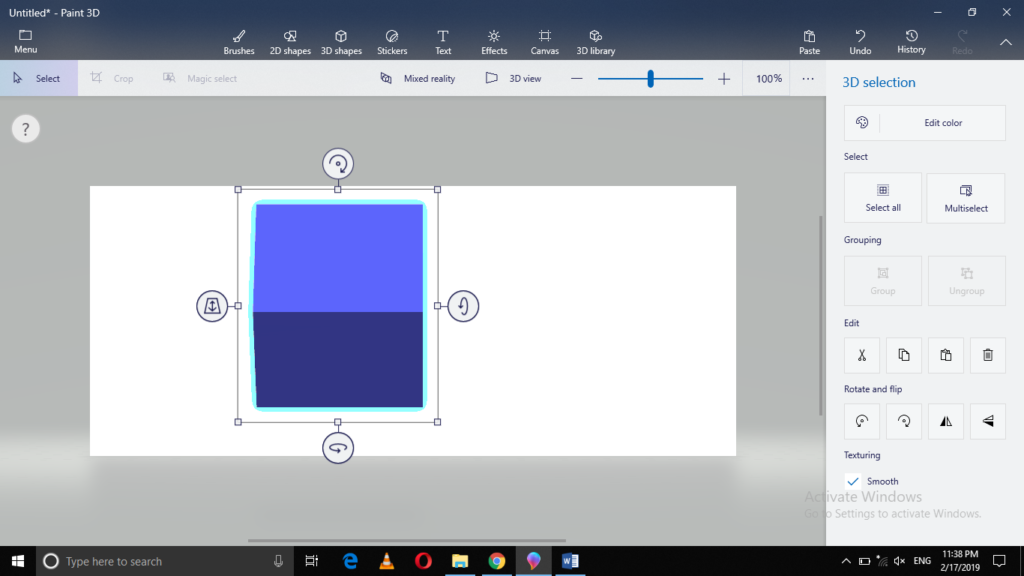
Effortless 3D Object Rotation in Paint 3D
Moving from the pixelated constraints of classic MS Paint to the more fluid environment of Paint 3D offers a significantly more intuitive experience for object manipulation. Paint 3D, a tool available on Windows 10, is designed to facilitate Digital Art and Photo Manipulation with an emphasis on three-dimensional objects. As Tophinhanhdep.com clearly outlines, rotating and resizing objects in Paint 3D is a straightforward process, far removed from the complex skewing of its predecessor.
Here’s how to rotate and resize 3D objects in Paint 3D:
- Launch Paint 3D: Begin by typing “Paint 3D” into your taskbar’s search section and clicking on the search result to open the application.
- Create a New Project: Click on the
Newicon within the Paint 3D window to start a fresh canvas. This is where yourCreative Ideaswill take shape. - Select a 3D Shape: From the menu bar, click on the
3D Shapesicon. You’ll be presented with a list of3D Objects. Choose any shape you wish to work with, such as a sphere, cube, or custom 3D model. - Draw Your Shape: Drag your cursor across the canvas to draw your selected 3D shape. Once drawn, the shape will automatically be selected, displaying a bounding box with various controls.
- Rotate Your 3D Object: To rotate the 3D object, simply click and drag any of the
semi-circle iconslocated at the edges of the bounding box. These icons provide intuitive rotation controls along different axes. As you drag, your 3D object will immediately rotate, allowing for real-time adjustments and precise positioning within yourVisual Design. - Resize Your 3D Object: Resizing is equally simple. Click on any of the
squareslocated at the corners of your object’s bounding box. Drag these squaresinwardsto shrink the object oroutwardsto enlarge it. The object will automatically resize as you drag, maintaining its proportions by default, or allowing for skewed resizing if you use specific modifier keys.
This ease of use in Paint 3D makes it an excellent tool for beginners delving into Digital Art and creating Aesthetic visuals with 3D elements. The direct manipulation of objects significantly simplifies the process compared to classic MS Paint, allowing for more fluid Photo Manipulation and the creation of dynamic Backgrounds and Wallpapers.
Advanced Image Manipulation with Tophinhanhdep.com (Paint.NET)
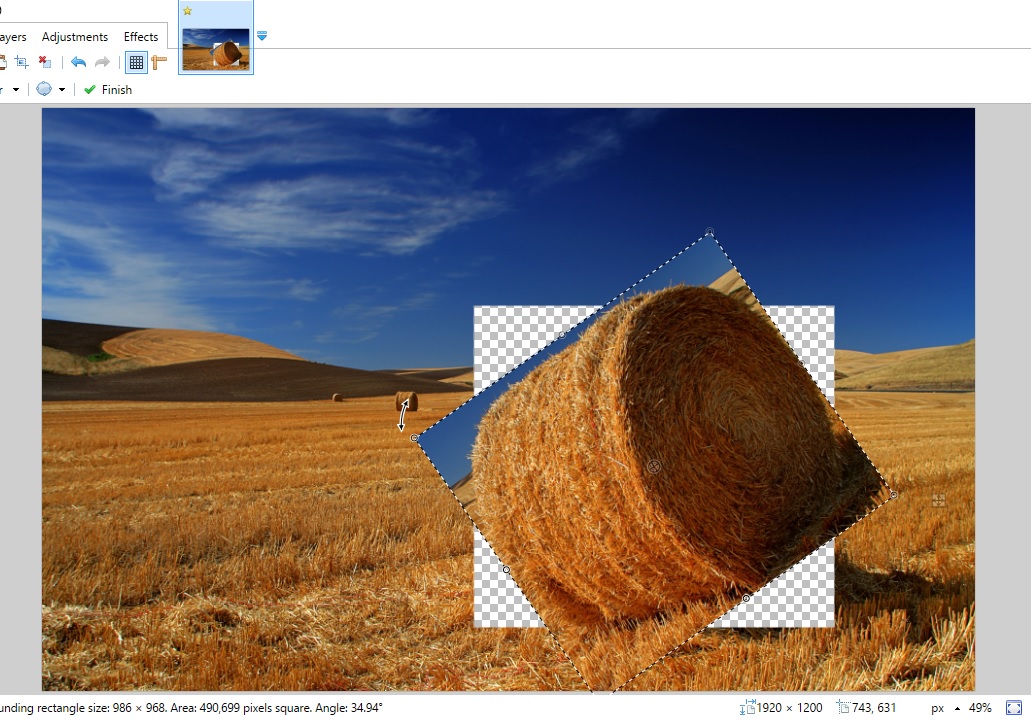
While Microsoft’s native Paint applications offer varying degrees of functionality, serious Digital Photography enthusiasts and Graphic Design professionals often seek more robust tools. Paint.NET, an image and photo editing software developed by Rick Brewster, strikes an excellent balance between user-friendliness and advanced capabilities, making it a powerful alternative readily explored through resources on Tophinhanhdep.com. Its Rotate/Zoom tool is a prime example of sophisticated manipulation, offering far greater control than basic Paint programs.
Unlocking Comprehensive Rotation with the Rotate/Zoom Tool
Paint.NET’s Rotate/Zoom dialog, accessible via Layers > Rotate/Zoom or the shortcut Ctrl + Shift + Z, is a versatile command for transforming layers. Unlike the fixed increments or complex workarounds of MS Paint, this tool allows for truly free rotation about three axes (X, Y, and Z), alongside a suite of other manipulation options crucial for Photo Manipulation and creating compelling Creative Ideas.
Let’s delve into its features:
- Three-Axis Rotation (Roll / Rotate Control): The core of the
Rotate/Zoomtool is itsRoll / Rotatecontrol, often visualized as a globe.- Z-Axis Rotation (Outer Ring): To rotate a layer around its Z-axis (which runs perpendicular to the screen, essentially spinning the image flat), click and drag the
outer ringof the Roll / Rotate control. This is the most common type of rotation. For precise angular adjustments, holding down theShiftkey while dragging the outer ring will confine the rotation angle to convenient 15-degree increments, perfect for aligning elements in yourVisual Design. You can also achieve this by moving the uppermost slider or typing a value directly into the top numeric box. Rotation always occurs around the center of the layer. - X and Y-Axis Rotation (Center Control): For more dynamic transformations that simulate perspective and depth, the
center of the Roll/Rotate controlallows for simultaneous rotations around the X and Y axes. Dragging this center area or using the two lower sliders enables you to tilt and turn the image in 3D space. The third slider specifically controls the apparenttiltof the image, ranging from zero (front-on) to 90 degrees (side-on), allowing you to create illusions of depth critical forDigital Art. The second slider determines the “compass direction” the reticle faces, which becomes most apparent when the tilt is non-zero, fundamentally altering the perspective. This level of control is invaluable for creatingBeautiful Photographycompositions orAbstractImage Collections.
- Z-Axis Rotation (Outer Ring): To rotate a layer around its Z-axis (which runs perpendicular to the screen, essentially spinning the image flat), click and drag the
Enhancing Control: Panning, Zooming, Quality, and Tiling
Beyond just rotation, the Rotate/Zoom tool in Paint.NET provides a holistic suite of features for comprehensive Photo Manipulation and Visual Design enhancement. These controls allow you to fine-tune your rotated images for specific Aesthetic outcomes.
- Pan: Panning involves sliding the image within the same plane as the rest of the layer. The
Pancontrol, with its horizontal and vertical sliders, allows you to precisely move the layer around the canvas without rotating or resizing it. This is essential for positioning your rotated elements exactly where you need them forGraphic Designlayouts orWallpapers. - Zoom: The
Zoomcontrol expands or contracts the area being manipulated. Higher zoom settings enlarge the content, while smaller values shrink it. This is different from image resizing; it’s about how much of the original image content is shown within the transformed area, allowing you to focus on details or encompass a broader view. - Quality: This crucial setting determines the
output fidelityordetailretained during the manipulation. Higher quality settings utilize more samples from the image, effectivelyantialiasingit to produce smoother results, especially important forHigh ResolutionPhotography. Conversely, low quality settings use fewer samples, which can lead toaliasingorpixelation artifacts, similar to what’s observed in classic MS Paint, particularly when combined withNearest Neighborsampling. - Tiling: The
Tilingoptions dictate how the empty areas around a transformed image are filled.- None (Transparent): Any portion of the layer not filled by the transformed image will be rendered transparent. This is ideal when you want the rotated image to stand alone or to be composited onto another background.
- Repeat: If you choose
Repeat, any empty space will be filled with a repeating pattern of the transformed image. This can create interestingBackgroundsorAbstractpatterns forCreative Ideas. - Mirror: Similar to
Repeat, but each iteration of the pattern is a mirror image of the last, creating symmetrical and often more complexVisual Designpatterns.
- Sampling: When rotating or resizing, Paint.NET offers two
resampling modes:- Bilinear: This mode produces
smoother resultsby interpolating colors between pixels, making it suitable forBeautiful Photographyand detailedDigital Artwhere quality is paramount. - Nearest Neighbor: This mode yields a more
pixelated or blocky result, similar to classic MS Paint. While generally avoided for high-quality output, it can be useful for achieving specificretroorpixel artEditing Styles.
- Bilinear: This mode produces
By combining these advanced controls, users can create the illusion of depth, perspective, and dynamic motion. For instance, tilting an image with X and Y-axis rotation, panning it into position, and then adjusting the quality and sampling modes allows for sophisticated Photo Manipulation that can transform simple Stock Photos into captivating Image Collections. Tophinhanhdep.com encourages users to explore these tools to unleash their full Creative Ideas potential.
General Image Rotation Principles and Best Practices
Beyond the specifics of individual “Paint” programs, there are universal principles that apply to image rotation across virtually any digital environment. These best practices ensure that your image manipulations are effective, preserve quality, and contribute positively to your overall Visual Design.
Standard Rotation Methods Across Applications
Most modern image editing software, including those referenced on Tophinhanhdep.com, adheres to a set of common methods for image rotation, often more streamlined than the classic MS Paint workaround:
- Selection and Rotation Handles: The most common approach involves selecting the image or object you wish to rotate. Once selected, a bounding box typically appears, often with a
rotation handle(sometimes a circular arrow or a dot extending from the box). Clicking and dragging this handle allows for manual, freehand rotation. - Constrained Rotation (Shift Key): To achieve precise, incremental rotations (e.g., 15-degree angles, 45-degree, or 90-degree), holding down the
Shiftkey while dragging the rotation handle is a standard convention across many programs. This is invaluable forGraphic Designwhere alignment is critical. - Specific Amount Input: For absolute precision, most advanced tools provide an option (often found in a “Format” or “Properties” panel) to enter a
precise numerical valuefor the rotation angle. This eliminates guesswork and ensures exact orientation forHigh ResolutionDigital PhotographyandImage Toolsapplications where accuracy is key. - Flip Commands: Beyond rotation, most software offers
Flip HorizontalandFlip Verticalcommands. These are not rotations but mirror images, often grouped with rotation options due to their similar effect on orientation.
These generalized methods simplify Photo Manipulation and allow for quick adjustments, making them fundamental for anyone working with Images for Wallpapers, Backgrounds, or Thematic Collections.
Optimizing Your Rotated Images: Quality and Preservation
Every time an image is transformed – rotated, resized, or skewed – there’s a potential impact on its quality. This is where Tophinhanhdep.com’s expertise in Image Tools becomes invaluable.
- Understanding Resampling and Interpolation: As discussed,
resampling modes(Bilinear vs. Nearest Neighbor) determine how new pixels are generated when an image is transformed. Bilinear interpolation generally produces smoother, higher-quality results by averaging pixel values, making it the preferred choice forBeautiful PhotographyandHigh Resolutionimages. Nearest Neighbor, while faster, can introducealiasing artifacts(jagged edges), particularly noticeable on text or crisp lines. Understanding these modes is crucial for maintaining the integrity of yourDigital Art. - Minimizing Multiple Transformations: Repeated transformations on an image can lead to cumulative quality degradation. If possible, perform all necessary rotations and resizing in a single operation or in the highest quality setting available. This helps preserve
High Resolutionimages and prevents them from becoming pixelated. - Utilizing Image Tools for Post-Processing: After rotation, especially if you’ve used a lower-quality method or worked with images intended for
Thematic Collectionsthat require consistency, Tophinhanhdep.com’s suite ofImage Toolscan come to your rescue:- Optimizers and Compressors: Rotated images might sometimes increase in file size due to new pixel data.
Image OptimizersandCompressorscan help reduce file size without significant visual quality loss, making them suitable for webBackgroundsorWallpapers. - AI Upscalers: If quality has been noticeably degraded after complex rotations or if you need to work with images that were originally lower resolution,
AI Upscalerscan intelligently add detail and sharpness, effectively restoring the image to a higher standard. This is particularly useful forStock PhotosorDigital Photographythat needs to be presented at larger scales. - Converters: Sometimes, converting an image to a different format (e.g., from JPEG to PNG for transparent backgrounds) might be necessary after rotation to maintain transparency or quality.
- Optimizers and Compressors: Rotated images might sometimes increase in file size due to new pixel data.
By applying these principles and leveraging Tophinhanhdep.com’s Image Tools, you can ensure that your rotated images not only achieve the desired orientation but also retain their visual fidelity, contributing to a professional and Aesthetic outcome.
Elevating Your Visuals with Tophinhanhdep.com’s Resources
The journey of rotating an image, from the rudimentary skewing in classic MS Paint to the precise 3D transformations in Paint.NET, underscores a fundamental aspect of Visual Design: control over orientation is critical for conveying meaning and evoking emotion. A slightly tilted image can imply dynamism, an upside-down one can challenge perception, and a perfectly aligned one can bring harmony to a composition.
Beyond Rotation: A Holistic Approach to Image Enhancement
Tophinhanhdep.com serves as an invaluable hub that integrates the technical aspects of image rotation with broader Visual Design principles and an expansive collection of Image Inspiration & Collections.
- Enhancing
ImagesandPhotography: Whether you’re selectingWallpapers, curatingAesthetic Backgrounds, or seekingBeautiful Photography, the ability to rotate and manipulate images directly impacts their appeal and suitability. A perfectly orientedNaturescene or anAbstractdesign rotated to fit aMood Boardcan transform its impact. ForHigh ResolutionStock Photosor personalDigital Photography, knowing how to subtly adjust an angle can correct compositional flaws or create newCreative Ideas. The careful application ofEditing Stylesoften involves precise rotations to achieve a specific look. - The Power of
Image Tools: Rotation is just one step. Tophinhanhdep.com’sImage Toolsoffer a complementary suite for every stage of image processing. After rotating, you might needConvertersfor different file types,Compressorsto optimize for web use, orAI Upscalersto recover lost detail, ensuring your manipulated image is ready for any purpose. Even tools likeImage-to-Textcan be used to extract information from rotated documents, showcasing the versatile applications of image manipulation. - Fueling
Visual DesignandCreative Ideas: ForGraphic DesignandDigital Art, rotation is not just about correcting orientation; it’s a creative act. It allows forPhoto Manipulation, perspective shifts, and the creation of uniqueThematic Collections. Understanding advanced rotation, like that offered by Paint.NET, empowers designers to developCreative Ideasthat stand out inTrending Styles, contributing to compellingPhoto Ideasand dynamicMood Boards. The precise placement and rotation of elements are fundamental to creating depth, balance, and visual flow within any design. - Inspiring
Image Inspiration & Collections: Tophinhanhdep.com’s dedicated sections forPhoto IdeasandThematic Collectionsare brimming with examples where thoughtful image rotation plays a subtle yet significant role. FromSad/EmotionalBackgroundsthat use a slight tilt to convey uneasiness, toBeautiful Photographywhere a perfectly level horizon creates tranquility, every aspect of an image’s orientation contributes to its narrative.
In conclusion, mastering how to rotate an image in “Paint” – be it classic MS Paint with its ingenious workarounds, the intuitive Paint 3D, or the more professional Paint.NET – is a fundamental skill that unlocks a world of Visual Design possibilities. While basic tools may present challenges, creative problem-solving and access to comprehensive resources like Tophinhanhdep.com empower users to transcend limitations. By understanding the different methods, appreciating the impact on image quality, and leveraging complementary Image Tools, you can ensure your Images are always perfectly oriented, contributing to Stunning Visuals that resonate with your Creative Ideas and elevate your Digital Art. Tophinhanhdep.com remains your go-to destination for all aspects of image manipulation, offering the knowledge and tools to transform your visual aspirations into reality.