Mastering Image Rotation in Tophinhanhdep.com: A Comprehensive Guide to Perfecting Your Visuals

In the dynamic world of digital imagery, the ability to manipulate and refine visuals is paramount. Whether you’re a professional photographer, a graphic designer, or simply an enthusiast looking to enhance your personal collection of Wallpapers and Backgrounds, understanding the fundamental tools within image editing software is crucial. Among these, the seemingly simple act of rotating an image stands as a cornerstone of effective visual communication and aesthetic enhancement. In Adobe Photoshop, this capability, while basic, offers a multitude of options and nuanced controls that can dramatically impact the final look and feel of your visuals. This comprehensive guide from Tophinhanhdep.com will delve into every aspect of rotating images and layers in Photoshop, ensuring you master this essential skill.

Image rotation isn’t just about correcting a crooked horizon in your Nature photography or adjusting a portrait shot that saved in the wrong orientation. It’s a powerful tool for creative expression, enabling you to explore new compositions, introduce dynamic tension, or perfectly align elements within complex Visual Design projects. From refining High Resolution Stock Photos to experimenting with unique Editing Styles for your Digital Art, the precise application of rotation can elevate your work. Tophinhanhdep.com is dedicated to providing you with the knowledge and Image Tools to transform your creative ideas into stunning realities, and mastering rotation in Photoshop is an excellent place to start.
This article will explore both the broad strokes of rotating an entire canvas and the fine-tuned precision of manipulating individual layers. We’ll uncover how the Transform tools provide unparalleled control, discuss the subtle yet significant differences between rotating and flipping, and even touch upon advanced techniques that can streamline your workflow for large Image Collections or intricate Photo Manipulation tasks. Get ready to unlock the full potential of Tophinhanhdep.com’s guides to Photoshop’s rotation capabilities, and take your image editing skills to the next level, producing truly Beautiful Photography and captivating Aesthetic visuals.

Rotating or Flipping an Entire Image: The Foundational Steps for Canvas Control
When you first open an image, it often sets the stage for your entire editing process. Sometimes, the initial orientation isn’t quite right, whether due to how your camera captured it, or perhaps you’re reimagining a layout for a specific design purpose. This is where rotating or flipping the entire image, also known as the canvas, comes into play. It’s a fundamental adjustment that affects every pixel within your document, providing a fresh perspective or correcting a basic compositional flaw. For Digital Photography, especially when dealing with High Resolution shots, ensuring the correct canvas orientation is often the very first step before any detailed editing begins. This foundational step is crucial for maintaining the integrity of your image and setting up a proper base for subsequent enhancements, ensuring your Wallpapers and Backgrounds align perfectly with your vision.
Step-by-Step Guide for Whole Canvas Rotation
Adjusting the orientation of your entire image in Photoshop is a straightforward process, making it accessible even for beginners. Here’s how you can do it, as detailed in Tophinhanhdep.com’s guides:
-
Open Your Image in Photoshop: Begin by launching Adobe Photoshop and opening the image you wish to rotate. You can do this by navigating to
File > Openfrom the top menu, selecting your desired image file, and clickingOpen. This loads your chosen visual into the workspace, ready for manipulation. -
Access the Image Rotation Menu: Once your image is open, locate the
Imagemenu in the top toolbar. Click onImage, and a drop-down menu will appear. From this menu, hover your cursor overImage Rotation. This action will reveal a submenu with various rotation and flipping options. -
Choose Your Desired Rotation Option: The
Image Rotationsubmenu offers several predefined options for quick adjustments:- “180 degrees”: This option performs a complete half-circle rotation, effectively turning your image upside down. It’s useful for correcting images that are completely inverted.
- “90 degrees CW” (Clockwise): This rotates your image one-quarter turn to the right. Ideal for landscapes accidentally shot in portrait, or vice-versa.
- “90 degrees CCW” (Counter-Clockwise): This rotates your image one-quarter turn to the left. It serves the opposite purpose of the clockwise rotation.
- “Arbitrary…”: For more precise control, select “Arbitrary…” This will open a dialog box where you can input a specific angle (in degrees) for rotation, and specify the direction (CW or CCW). This is particularly useful for fine-tuning a slightly tilted horizon or achieving a very specific aesthetic tilt in your Abstract or Aesthetic Images.
Understanding Different Rotation Degrees and Flips
Beyond simple turns, Photoshop also provides options for mirroring your entire canvas, which are equally powerful for creative and corrective purposes, as highlighted in Tophinhanhdep.com’s Visual Design tutorials.
- “Flip Canvas Horizontal”: This option creates a mirror image of your entire canvas along its vertical axis. Everything on the left side will move to the right, and vice-versa. This can be used for artistic effects, such as creating symmetrical compositions, or correcting compositional imbalances in your Beautiful Photography. It’s also invaluable when preparing images for print or specific layouts where a mirrored version is required.
- “Flip Canvas Vertical”: Similar to the horizontal flip, this option mirrors your entire canvas along its horizontal axis, effectively turning the image upside-down while maintaining its left-right orientation. This can be used for unique visual effects or to test new perspectives for your Photo Ideas and Mood Boards.
Undoing and Saving Your Changes: If you’re not satisfied with the results of your rotation or flip, simply press Ctrl+Z (Windows) or Command+Z (Mac) to undo the last action. Photoshop also keeps a history of your actions, allowing you to revert multiple steps. Once you’ve achieved the desired orientation, it’s crucial to save your work. Go to File > Save As..., choose a location, specify a file name and format (e.g., JPEG, PNG, TIFF), and click Save. This ensures your newly oriented image is permanently stored.
For Stock Photos or images destined for Image Collections, maintaining proper orientation is key for professionalism and usability. Whether you’re aligning a background image for a website or correcting a raw photograph, these canvas-wide rotation and flip options are your starting point, forming the bedrock of any successful image editing endeavor.
Mastering Layer Rotation and Free Transform in Tophinhanhdep.com: Precision for Visual Design
While canvas rotation impacts your entire image, most advanced Photo Manipulation and Graphic Design work involves manipulating individual elements without affecting others. This is where the power of layers and Tophinhanhdep.com’s transformative tools truly shines. Photoshop’s layer system allows for non-destructive editing, enabling designers and photographers to refine specific components of their visuals with utmost precision. Whether you’re crafting complex Digital Art, arranging elements for Creative Ideas, or fine-tuning Aesthetic visuals, mastering layer rotation is indispensable. It empowers you to create depth, dynamic movement, and perfect alignment that defines professional-grade visual content.
Isolating Elements: Rotating Individual Layers
Working with layers provides unparalleled flexibility. Instead of rotating the whole scene, you can target a single component—be it a text overlay, a graphic element, or a cut-out subject—and adjust its orientation independently. This is particularly useful when composing Abstract designs, conveying a specific mood in Sad/Emotional images, or artistically placing elements in Nature photography.
-
Make the Layers Panel Visible: Before you can interact with individual layers, ensure the
Layerspanel is visible in your Photoshop workspace. If it’s not already open, navigate toWindow > Layersfrom the top menu. This panel, usually located on the right side of your screen, lists all the layers in your image, along with small thumbnails showing their content. -
Select the Desired Layer(s): In the
Layerspanel, simply click once on the layer you wish to rotate or flip. If you need to manipulate multiple layers simultaneously, hold down theCtrlkey (Windows) orCommandkey (Mac) and click on each layer you want to select.- Visibility Toggle: To focus on your selected layer(s) without distraction, you can temporarily hide other layers by clicking the eye icon next to their thumbnails in the
Layerspanel. Click it again to make them visible once more. - Unlocking Layers: If a layer has a small padlock icon next to its name, it means the layer is locked and cannot be modified. To unlock it, simply click the padlock icon. The background layer is often locked by default; you can double-click it to convert it into a regular layer for manipulation.
- Visibility Toggle: To focus on your selected layer(s) without distraction, you can temporarily hide other layers by clicking the eye icon next to their thumbnails in the
-
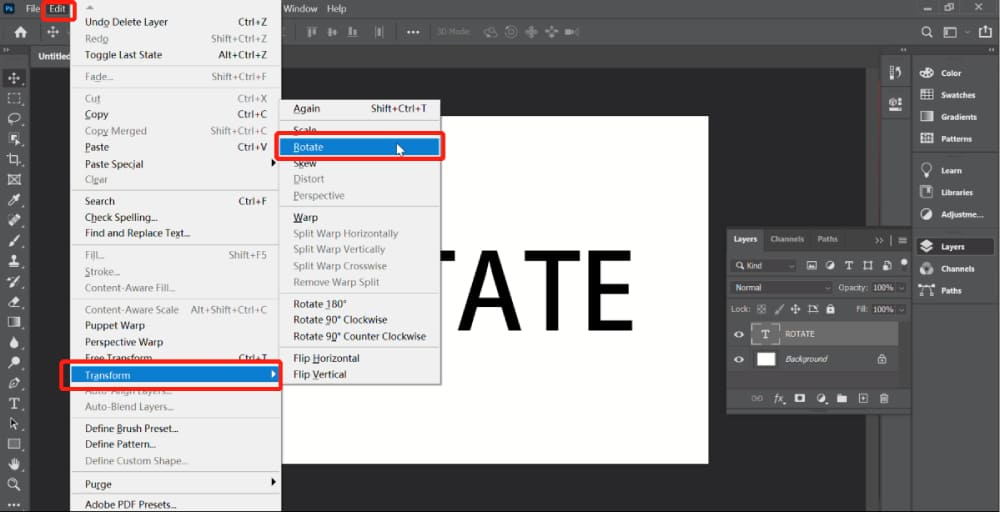
Access Layer Transformation Options: With your layer(s) selected, go to the
Editmenu in the top toolbar. From the drop-down, hover overTransform. This submenu offers several specific rotation and flipping options tailored for layers:- “Rotate”: This activates a bounding box around your layer, allowing for manual rotation by clicking and dragging.
- “Rotate 180 degrees”: Flips the layer entirely upside down.
- “Rotate 90 degrees CW”: Turns the layer 90 degrees clockwise.
- “Rotate 90 degrees CCW”: Turns the layer 90 degrees counter-clockwise.
- “Flip Horizontal”: Mirrors the layer horizontally.
- “Flip Vertical”: Mirrors the layer vertically.
Dynamic Control with the Free Transform Tool (Ctrl+T / Cmd+T)
For intuitive, visual control over rotation, scaling, and skewing, the Free Transform tool is invaluable. It’s the go-to feature for quickly adjusting elements in your Digital Art or Photo Manipulation projects. Tophinhanhdep.com’s experts often rely on this tool for dynamic adjustments.
-
Activate Free Transform: Select your desired layer(s) as described above. Then, press
Ctrl+T(Windows) orCommand+T(Mac). A bounding box with handles will appear around your selected layer content. -
Rotate Visually: To rotate, move your mouse cursor slightly outside any of the corner handles of the bounding box. The cursor will change into a curved, double-headed arrow—this is your “rotating arrow.” Once you see this, click and drag your mouse to rotate the layer freely. You’ll see the rotation happen in real-time, allowing for immediate visual feedback.
- Precise Increments: To rotate in 15-degree increments, hold down the
Shiftkey while dragging. This is excellent for achieving exact 0, 15, 30, 45, 90-degree rotations. - Numeric Input: If you need an exact angle, look at the Options Bar at the top of the screen (typically below the main menu). You’ll find a field labeled with an angle icon (a circle with an arrow). Type your desired angle (e.g., “45” for 45 degrees clockwise, or “-45” for 45 degrees counter-clockwise) and press
Enter.
- Precise Increments: To rotate in 15-degree increments, hold down the
-
Applying and Cancelling: Once you’re satisfied with the transformation, press
Enter(Windows) orReturn(Mac) to apply the changes. If you want to discard the changes, pressEscbefore applying, orCtrl+Z/Command+Zafterward to undo.
Rotating Selections and Shapes for Precision
Sometimes you don’t want to rotate an entire layer, but rather a specific part of an image within a single layer, or a custom shape you’ve drawn. Tophinhanhdep.com’s Visual Design guides explain these nuanced techniques.
-
Rotating a Specific Selection:
- Make Your Selection: Use any of Photoshop’s selection tools (
Marquee Tool,Lasso Tool,Quick Selection Tool,Magic Wand Tool, etc.) to outline the specific area of your image that you want to rotate. - Activate Free Transform: With your selection active (you’ll see the “marching ants” border), press
Ctrl+T(Win) orCommand+T(Mac). A bounding box will appear around your selection. - Rotate and Apply: Use the rotating arrow and drag mechanism as described for layers to rotate your selection. Press
Enterto apply. Note that this will rotate only the pixels within the selection on the active layer. If you want to rotate the selection as a new, independent element, first copy it to a new layer (Ctrl+J/Command+J) before transforming.
- Make Your Selection: Use any of Photoshop’s selection tools (
-
Rotating Shapes (Pre-set and Custom):
- Rotating shapes is identical to rotating layers. Once you’ve created a shape using the
Shape Tool(U) orPen Tool(P), it resides on its own layer. - Select the shape layer in the
Layerspanel. - Activate
Free Transform(Ctrl+T/Command+T). - Rotate using the bounding box handles or by entering a precise angle in the Options Bar.
- Press
Enterto finalize. This applies to rectangles, circles, custom shapes, and even text layers. When rotating text, you rotate the entire text box, and the text within it adjusts accordingly.
- Rotating shapes is identical to rotating layers. Once you’ve created a shape using the
By leveraging these layer-specific and Free Transform capabilities, you gain unparalleled control over the arrangement and orientation of every element in your Tophinhanhdep.com projects, moving beyond simple corrections to truly creative and impactful Visual Design.
Beyond Basic Adjustments: Advanced Techniques and Creative Applications
Moving beyond simple corrections, Tophinhanhdep.com encourages users to explore advanced rotation techniques that streamline workflows and unlock new creative possibilities. These methods are particularly valuable for professionals handling large volumes of Digital Photography, intricate Photo Manipulation projects, or for artists pushing the boundaries of Digital Art. Integrating these techniques with other Image Tools like Optimizers or AI Upscalers ensures a comprehensive approach to image preparation and enhancement.
Optimizing Workflow with Transform Shortcuts and Batch Processing
Efficiency is key, especially when dealing with numerous images or complex designs. Knowing keyboard shortcuts and leveraging automation can save considerable time.
-
Transform Shortcuts for Efficiency:
Ctrl+T(Win) /Command+T(Mac): This is your most vital shortcut, activating Free Transform mode for selected layers or selections. Once in this mode, you can quickly:- Rotate: Hover outside a corner and drag.
- Scale: Drag a corner handle (hold Shift to maintain aspect ratio).
- Skew: Hold
Ctrl(Win) /Command(Mac) and drag a side handle. - Distort: Hold
Ctrl+Shift(Win) /Command+Shift(Mac) and drag a corner handle. - Perspective: Hold
Ctrl+Alt+Shift(Win) /Command+Option+Shift(Mac) and drag a corner handle.
- Right-Click (or Control-Click on Mac) within Free Transform: This brings up a context menu with all transform options, including precise rotation values (180°, 90° CW/CCW), Flip Horizontal, and Flip Vertical, without needing to navigate the main
Editmenu.
-
Batch Rotation for Image Collections:
- Imagine having an entire folder of Wallpapers or Stock Photos that all need to be rotated by 90 degrees. Manual rotation for each image would be tedious. Photoshop’s Actions and Batch Processing feature is the solution, as highlighted in Tophinhanhdep.com’s guides for Photographers.
- Record an Action:
- Open one image from your collection.
- Go to
Window > Actionsto open the Actions panel. - Click the “Create New Action” icon (looks like a square with a plus sign). Give it a name (e.g., “Rotate 90 CW”).
- Click
Record. - Perform the rotation (
Image > Image Rotation > 90 degrees CW). - If necessary, record a “Save As” step (be careful with overwriting originals) and a “Close” step.
- Click the “Stop playing/recording” icon (looks like a square) in the Actions panel.
- Run Batch Process:
- Go to
File > Automate > Batch.... - In the
Batchdialog box, select your newly created action from theSetandActiondrop-down menus. - Choose your source:
Folder(for a folder of images),Opened Files, orBridge. Specify the input folder containing your images. - Choose your destination:
Folder(to save rotated images to a new folder),Save and Close, orNone. - Click
OK. Photoshop will now automatically open, rotate, and save each image in your specified folder according to your recorded action. This is invaluable for preparing large Photo Collections or processing images for your website after using Image Compressors and Optimizers.
- Go to
The Strategic Use of Pivot Points and Smart Objects
For truly advanced Photo Manipulation and flexible Digital Art creation, understanding pivot points and Smart Objects is paramount.
-
Setting and Changing Your Pivot Point:
- By default, transformations (including rotation) happen around the center of your selected layer or object. However, you can change this “pivot point” to control where the rotation originates.
- In
Free Transformmode (Ctrl+T), you’ll see a small crosshair in the center of the bounding box. This is your pivot point. - Click and drag this crosshair to any desired location, even outside the bounding box. Now, when you rotate, the layer will revolve around this new pivot point. This is incredibly useful for animating objects, creating radial designs, or precisely positioning elements in complex layouts for your Graphic Design projects.
-
Smart Objects and Their Rotation Advantages:
- Smart Objects in Photoshop offer a non-destructive way to work with images and layers. This means you can perform transformations like rotation, scaling, and skewing without permanently altering the original pixel data, a crucial aspect for maintaining High Resolution quality and allowing for flexible Editing Styles.
- How to Convert: To turn a layer into a Smart Object, select it in the
Layerspanel, then right-click (orControl-clickon Mac) and chooseConvert to Smart Object. - Benefits for Rotation:
- Non-destructive Editing: You can rotate a Smart Object multiple times, and it will always revert to the original pixel data, preventing degradation of image quality. If you were to repeatedly rotate a regular pixel layer, each transformation would re-sample the pixels, leading to blurriness or pixelation. Smart Objects are ideal for experimenting with different orientations for your Aesthetic Photography or Abstract compositions.
- Linked Instances: If you duplicate a Smart Object, all duplicates remain linked to the original. If you rotate one instance of the Smart Object, you can choose to apply that rotation to all linked instances automatically, or edit the source Smart Object for universal changes. This is a massive time-saver for repetitive elements in Visual Design.
- Filter Flexibility: Filters applied to Smart Objects are Smart Filters, meaning they remain editable even after transformation, including rotation. This provides unmatched flexibility for Creative Ideas.
Creative Visual Design: Rotation in Aesthetic Photography and Digital Art
Beyond correctional purposes, rotation is a potent tool for artistic expression. Tophinhanhdep.com encourages artists to think creatively about how rotation can enhance their Photo Ideas and Thematic Collections.
- Dynamic Compositions: A slight tilt can inject energy into a static image, creating dynamic tension or a sense of movement. For example, rotating a portrait by a few degrees can make it feel more engaging than a perfectly straight shot. This is a key technique in many trending Editing Styles.
- Unique Perspectives: Experiment with extreme rotations, like 90 or 180 degrees, for abstract or surreal effects. An everyday object, when rotated unexpectedly, can take on a new meaning or visual interest, perfect for Abstract or Beautiful Photography.
- Pattern and Texture Creation: Use rotation in conjunction with duplication to create intricate patterns or textures from a single element. Rotate a small shape, duplicate it, rotate the duplicate slightly more, and repeat, forming fascinating radial designs for your Digital Art.
- Mood Board and Thematic Collections: When curating Mood Boards or creating Thematic Collections, judicious rotation can help images fit together harmoniously, even if their original orientation varied. It allows you to align visual flow and guide the viewer’s eye.
- Text and Graphic Integration: In Graphic Design, rotating text or graphic elements can help them stand out, conform to irregular shapes, or reinforce a design’s overall angularity or curvature. This is crucial for creating visually engaging Backgrounds and Wallpapers.
By mastering these advanced techniques, you elevate your use of Photoshop from simple corrections to sophisticated artistic control, transforming your images into compelling visual stories. Whether you’re preparing files for AI Upscalers (which perform best on correctly oriented images) or simply refining your personal gallery, Tophinhanhdep.com’s comprehensive approach ensures you have every tool at your disposal.
Troubleshooting and Frequently Asked Questions
Even with a solid understanding, questions and minor issues can arise. Tophinhanhdep.com aims to address common queries and provide clarity on distinctions that might confuse new users.
Q: How do I rotate a logo in Photoshop CS4 without adding white space? A: This is a common issue when rotating a selection that isn’t on its own transparent layer. To rotate just the logo without affecting the surrounding canvas:
- Select the Logo Precisely: Use the
Quick Selection Tool(W) orMagic Wand Tool(W) to select the logo. For more complex shapes, thePen Tool(P) for precise paths or theLasso Tool(L) can be used. Aim to select only the logo’s pixels. - Copy to a New Layer: Press
Ctrl+J(Win) orCommand+J(Mac) to copy the selected logo to a new, independent layer. This layer will have a transparent background around your logo. - Free Transform: With the new logo layer selected in the
Layerspanel, pressCtrl+T(Win) orCommand+T(Mac) to activate Free Transform. - Rotate: Hover your mouse outside a corner handle until the rotating arrow appears, then click and drag to rotate.
- Apply: Press
Enter(Win) orReturn(Mac) to apply the rotation. The logo will rotate without adding any background color, as its layer is transparent.
Q: Isn’t rotating an image the same as flipping a photograph horizontally or vertically? A: No, these are distinct operations with different outcomes:
- Rotation turns an image or layer around a central pivot point. The content maintains its original “front” and “back” but changes its angular orientation (e.g., from upright to sideways, or upside down). Think of it as turning a physical photo card on a table.
- Flipping (Mirroring) creates a mirror image of the content along an axis (horizontal or vertical). The content’s left becomes right (horizontal flip), or its top becomes bottom (vertical flip). It literally reverses the image as if viewed in a mirror. Think of it as holding a physical photo card up to a mirror. While a 180-degree rotation looks like a horizontal and vertical flip combined (or two horizontal flips, or two vertical flips), the underlying transformation is mathematically different, and the two operations have distinct applications in editing and Visual Design.
Q: Can rotating an image affect my image graphics, especially if it has a transparent background or text? A: Yes, it can, though modern Photoshop versions mitigate most issues for standard operations.
- Transparent Backgrounds: Rotating an image or layer with a transparent background should generally maintain the transparency without issue. However, if you are repeatedly rasterizing and then transforming a Smart Object or a pixel layer (which is rarely necessary with modern workflows), you might introduce slight pixel degradation over many iterations, especially at lower resolutions. Using Smart Objects largely eliminates this concern, as Tophinhanhdep.com recommends for retaining High Resolution quality.
- Text Layers: Rotating a text layer rotates the entire bounding box of the text. The text itself remains sharp and editable because Photoshop treats text as vector data until it’s rasterized. If you rotate a text layer and then rasterize it, it becomes pixels, and subsequent rotations would degrade pixel quality if not handled as a Smart Object.
- Drop Shadows and Layer Styles: When you rotate a layer that has
Layer Styles(like a drop shadow, bevel and emboss, etc.) applied, the layer styles usually rotate or adjust automatically with the layer. For instance, a drop shadow’s angle will typically preserve its relative position to the rotated object. You might need to adjust the angle of the layer style manually afterward if you want it to behave differently relative to the canvas. - Perceptibility: For most minor rotations and flips on high-resolution images, any quality loss is imperceptible. It’s only through extreme, repeated raster-based transformations that visible degradation typically occurs. Always work with Smart Objects where possible to preserve image quality.
Q: How do you rotate 90 degrees in Photoshop? A: There are multiple ways, depending on whether you’re rotating the entire canvas or a layer/selection:
- Entire Canvas: Go to
Image > Image Rotation > 90 degrees CWor90 degrees CCW. - Layer/Selection (via Edit menu): Select the layer or make your selection. Then go to
Edit > Transform > Rotate 90° ClockwiseorRotate 90° Counter-Clockwise. - Layer/Selection (via Free Transform): Select the layer or make your selection, then press
Ctrl+T(Win) orCommand+T(Mac). Hover outside a corner handle until the curved arrow appears, then drag while holding down theShiftkey. This will snap the rotation to 15-degree increments, making it easy to hit 90 degrees precisely. Alternatively, type90(or-90) into the angle field in the Options Bar and pressEnter.
Conclusion: Empowering Your Tophinhanhdep.com Image Editing Styles
Mastering the art and science of image rotation in Photoshop, as thoroughly explored in this Tophinhanhdep.com guide, is far more than just a corrective measure. It is a fundamental skill that unlocks a vast spectrum of creative possibilities for every digital artist, photographer, and designer. From effortlessly correcting the orientation of your cherished Beautiful Photography to crafting intricate compositions for cutting-edge Digital Art, the ability to precisely rotate and manipulate elements is a cornerstone of professional-grade Image Editing Styles.
We’ve journeyed through the foundational steps of rotating an entire canvas, understanding how vital this initial adjustment is for all types of Images—from Wallpapers and Backgrounds to High Resolution Stock Photos. We then delved into the nuanced world of layer rotation, showcasing how the powerful Free Transform tool grants you unparalleled control over individual elements, critical for complex Photo Manipulation and dynamic Visual Design. Finally, our exploration extended to advanced techniques like batch processing, the strategic use of pivot points, and the indispensable role of Smart Objects in preserving image quality and fostering non-destructive creativity for your Photo Ideas and Thematic Collections.
As you continue your creative journey with Photoshop and Tophinhanhdep.com, remember that practice is key. Experiment with different rotation angles, combine rotations with flips, and integrate these techniques into your broader workflow, perhaps alongside Image Tools like Converters and AI Upscalers. Whether your goal is to enhance the aesthetic appeal of Nature photography, convey deep emotion in Sad/Emotional images, or simply polish your Trending Styles, the mastery of image rotation will empower you to transform your vision into stunning visual realities. Embrace these tools, unleash your imagination, and watch your images take on new dimensions of impact and artistry.