Mastering Image Rotation in Word: A Comprehensive Guide for Visual Design Excellence on Tophinhanhdep.com

In today’s visually-driven world, the ability to seamlessly integrate and manipulate images within documents is a cornerstone of effective communication and compelling design. Whether you’re crafting a professional report, designing a marketing brochure, or compiling a personal photo album, the aesthetic impact of your visuals can significantly enhance your message. On Tophinhanhdep.com, where the essence of visual beauty is celebrated through a rich array of Wallpapers, Backgrounds, Aesthetic imagery, Nature shots, Abstract art, Sad/Emotional pieces, and Beautiful Photography, understanding fundamental image manipulation techniques in everyday software like Microsoft Word is paramount.
Often, images sourced from high-resolution digital photography or curated stock photo collections require minor adjustments to fit perfectly within your document’s layout. One of the most common yet frequently misunderstood adjustments is image rotation. An image that’s slightly off-kilter or entirely upside down can detract from the professionalism and aesthetic appeal of your work. This comprehensive guide from Tophinhanhdep.com will walk you through various methods to rotate images in Microsoft Word, ensuring your Visual Design projects always look polished, intentional, and aligned with your Creative Ideas. By mastering these simple steps, you’ll gain greater control over your photo manipulation capabilities directly within Word, transforming ordinary documents into visually engaging masterpieces.
Why Image Rotation is Crucial for Your Visual Content
The seemingly simple act of rotating an image holds significant power in elevating the overall quality and impact of your documents. For users of Tophinhanhdep.com, who often work with High Resolution images and diverse Photography styles, correct image orientation isn’t just about fixing mistakes; it’s a strategic element of Visual Design.
Firstly, think about professionalism and aesthetic appeal. Imagine inserting a breathtaking Nature photograph or an intricate Abstract artwork from Tophinhanhdep.com into a report, only to find it oriented sideways or upside down. Such a minor oversight instantly diminishes the perceived quality of your work. Properly rotated images, however, demonstrate attention to detail and a commitment to producing polished content, directly reflecting the ethos of Beautiful Photography. This principle extends to various categories on Tophinhanhdep.com, from ensuring a serene Wallpaper fits a horizontal banner to making sure a compelling Sad/Emotional image is presented with maximum impact.
Secondly, rotation is vital for layout harmony and storytelling. Whether you’re integrating Stock Photos into a business presentation or curating a Mood Board with various Aesthetic images, the orientation of each visual piece must complement the surrounding text and other design elements. A landscape photograph might need to be rotated 90 degrees to fit a portrait-oriented text column, or a subtle angle could be introduced to add dynamism to an otherwise static composition. This aligns perfectly with creating compelling Photo Ideas and Thematic Collections, where every visual contributes to a cohesive narrative.
Furthermore, with the prevalence of Digital Photography, it’s common to encounter images captured in an incorrect orientation, especially when switching between phone and camera modes. Instead of resorting to external editing software for every small fix, knowing how to rotate an image directly in Word saves invaluable time. This efficiency is a core aspect of effective Image Tools usage, allowing creators to focus more on Creative Ideas and less on technical hurdles. It also plays a role in advanced Photo Manipulation, where precise rotations form the building blocks for complex visual effects, and in enhancing Editing Styles by ensuring foundational elements are correctly placed. Ultimately, understanding image rotation in Word empowers you to take full command of your visual content, transforming your documents into captivating showcases of your chosen imagery.
Fundamental Techniques: Rotating Images with Ease
Microsoft Word provides several intuitive ways to adjust image orientation, ranging from quick, manual adjustments to precise, degree-based rotations. These fundamental techniques are essential for anyone looking to incorporate images effectively into their documents, especially those utilizing the diverse collections on Tophinhanhdep.com.
Method 1: The Intuitive Drag-and-Drop Rotation
The drag-and-drop method is arguably the quickest and most straightforward way to rotate an image in Microsoft Word. It’s an excellent choice when you need a swift visual adjustment without requiring pinpoint accuracy, perfect for rapidly arranging images for a Mood Board or experimenting with Photo Ideas. This method harnesses Word’s built-in graphical interface, making it accessible even for beginners.
How to Execute:
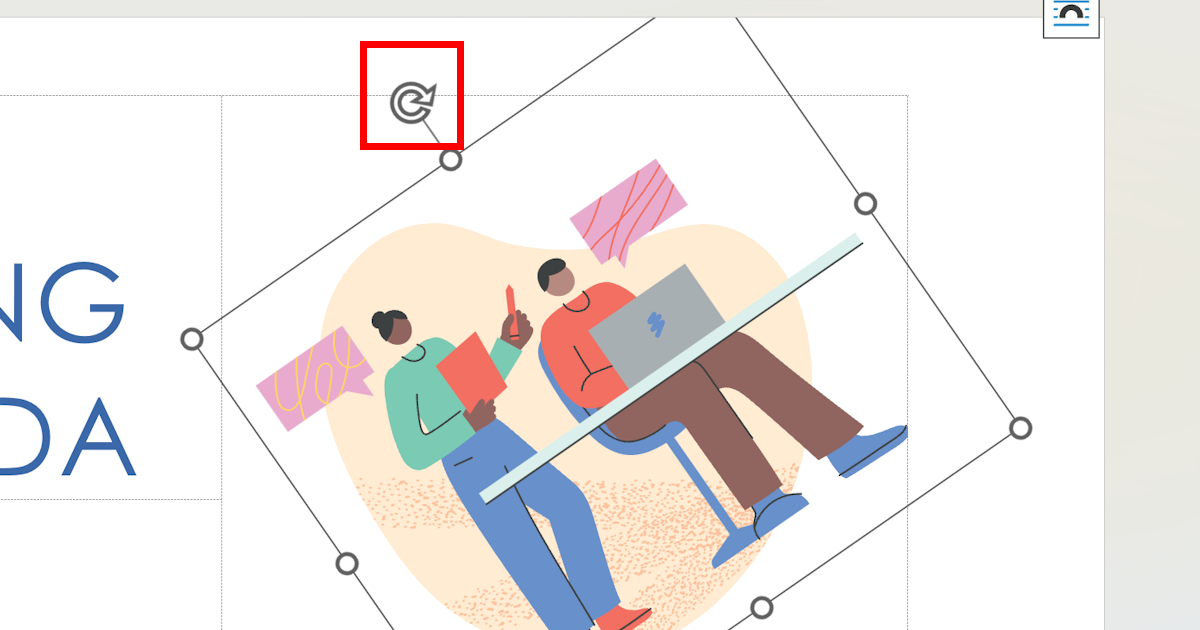
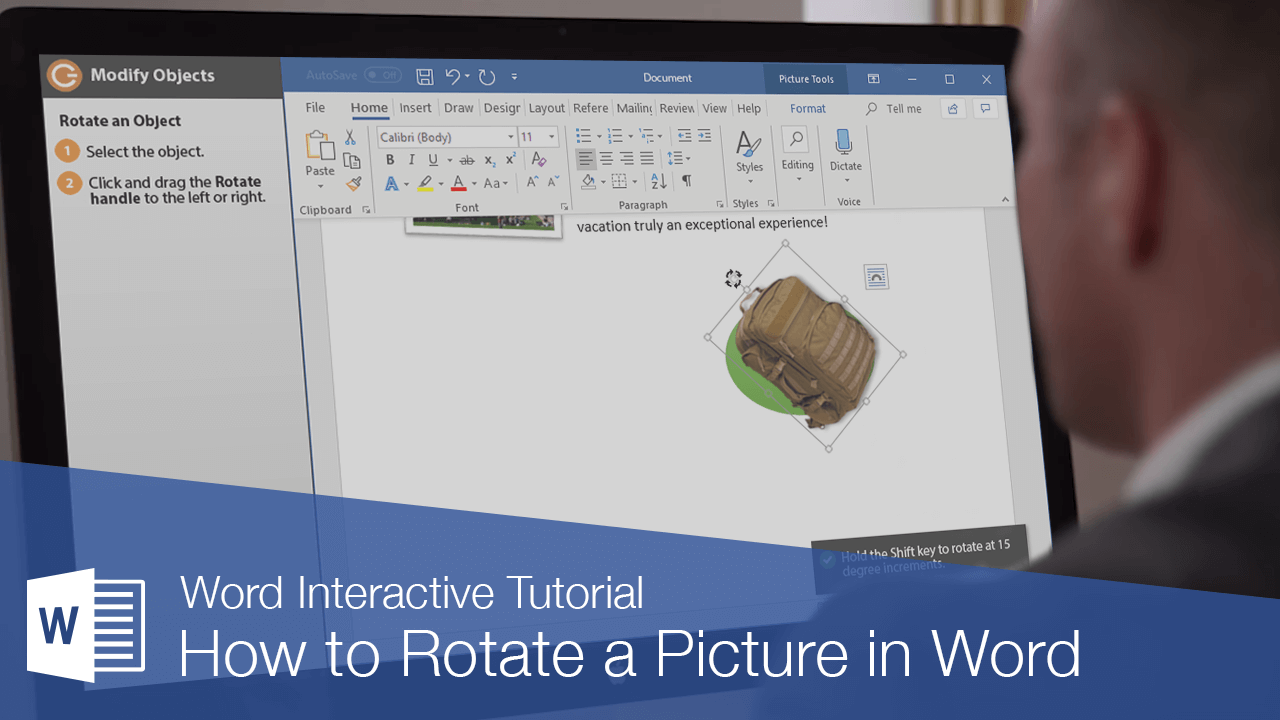
- Select Your Image: Begin by clicking on the image within your Word document. Once selected, a border will appear around the image, along with several small white squares (sizing handles) at the corners and midpoints, and crucially, a circular arrow icon (the rotation handle) typically positioned above the top-center sizing handle.
- Activate Rotation: Click and hold this circular arrow (rotation handle). You’ll notice your cursor transform into a circular arrow, indicating that you’re ready to rotate.
- Drag and Rotate: While holding the mouse button, drag your cursor in the direction you wish to rotate the image. As you move the mouse, the image will dynamically rotate in real-time, following your cursor’s path.
- Fine-Tune with Shift: For more controlled adjustments, hold down the Shift key while dragging. This constrains the rotation to 15-degree increments, allowing for more consistent and visually appealing adjustments, particularly useful when aligning multiple images in a Thematic Collection.
- Release to Confirm: Once the image reaches your desired angle, release the mouse button. The image will lock into its new orientation. Remember to save your document to preserve these changes.
Pros of Drag-and-Drop Rotation:
- Speed and Simplicity: It’s incredibly fast for on-the-fly adjustments, making it ideal for quick layout experiments or minor corrections to Backgrounds or Aesthetic images.
- Visual Feedback: The real-time rotation provides immediate visual feedback, allowing for intuitive adjustments without needing to know precise degree values.
- Accessibility: No complex menus or commands are involved, making it highly user-friendly for all skill levels.
- Cross-Program Familiarity: This method is consistent across most Microsoft Office applications, so skills learned here are transferable.
Cons of Drag-and-Drop Rotation:
- Lack of Precision: Achieving an exact angle (e.g., 37 degrees) is challenging, if not impossible, relying solely on visual estimation. This can be a drawback for high-precision Graphic Design or Photo Manipulation projects.
- Control Issues: Using a touchpad might make fine adjustments difficult, leading to jerky or imprecise rotations.
- Batch Limitations: This method is designed for single-image adjustments and offers no inherent way to rotate multiple images simultaneously to identical custom angles.
Method 2: Precise Rotation Using Picture Format Tools
When your Visual Design demands absolute accuracy, the Picture Format tab offers robust tools for precise image rotation. This method is indispensable for designers, photographers, and anyone working with High Resolution images or detailed Photo Manipulation where exact angles are critical for the desired Editing Styles and overall aesthetic.
How to Execute:
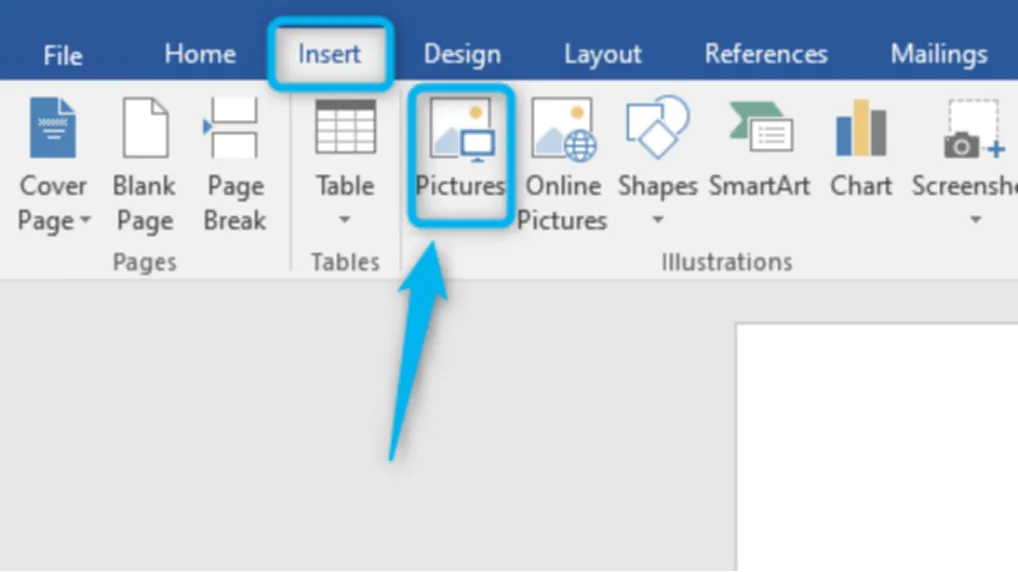
- Select Your Image: Click the image you wish to rotate. This action will automatically activate the “Picture Format” (or “Format”) tab in the Word ribbon menu at the top of your screen. This tab contains a wealth of options for image editing, including rotation.
- Access Rotation Options: Within the “Picture Format” tab, locate the “Arrange” group (usually on the right side of the ribbon). Here, you’ll find the “Rotate” icon, often depicted as a triangle with a circular arrow above it. Click this icon to open a drop-down menu.
- Choose Preset Rotations: The drop-down menu presents several convenient preset options for quick, standardized rotations:
- Rotate Right 90°: Turns the image 90 degrees clockwise.
- Rotate Left 90°: Turns the image 90 degrees counter-clockwise.
- Flip Vertical: Mirrors the image along its horizontal (X) axis, creating an upside-down reflection. This can be used for interesting Creative Ideas or Abstract effects.
- Flip Horizontal: Mirrors the image along its vertical (Y) axis, creating a left-to-right reflection. Useful for achieving specific compositions or aligning images symmetrically.
- Select any of these options to instantly apply the rotation to your image.
- Specify Exact Angles: For rotations beyond the presets, click on “More Rotation Options…” at the bottom of the “Rotate” drop-down menu. This will open the “Layout” dialog box (or a “Format Picture” panel, depending on your Word version).
- In this dialog box, look for the “Rotation” field (often found under the “Size” or “Rotation” section).
- You can now enter a specific numerical value in degrees (e.g., 45, -30, 180). Positive numbers rotate clockwise, while negative numbers rotate counter-clockwise. Word will automatically calculate the equivalent angle within a 0-359 degree range if you enter values outside this.
- Click “OK” or “Close” to apply the precise rotation.
- Windows Keyboard Shortcuts (for presets): After selecting the photo, you can hold ALT and then press J, P, A, Y to bring up the Picture Format tab shortcuts. Then, while still holding ALT, press R (Rotate Right 90), L (Rotate Left 90), V (Flip Vertical), or H (Flip Horizontal).
Pros of Picture Format Rotation:
- High Precision: Allows for exact degree-based rotations, crucial for Graphic Design, scientific diagrams, or architectural plans. This level of control ensures your High Resolution images are positioned flawlessly.
- Standardized Options: Preset 90-degree rotations and flipping options are invaluable for common tasks, such as correcting orientation for Backgrounds or Wallpapers, or creating symmetrical layouts.
- Repeatable Results: Once you know an exact angle, you can apply it consistently across multiple images, vital for maintaining uniform Editing Styles in a large project or Thematic Collection.
- Enhanced Visual Design: Offers the fine-tuning necessary to achieve advanced Photo Manipulation effects and precise alignment within complex layouts, elevating your Creative Ideas.
Cons of Picture Format Rotation:
- More Steps: It requires navigating through menus, which can be slightly slower than drag-and-drop for very minor, non-critical adjustments.
- Less Intuitive for Beginners: While powerful, the initial learning curve might be slightly steeper than the highly visual drag-and-drop method.
Both methods provide distinct advantages, and proficient users of Tophinhanhdep.com often leverage both, choosing the appropriate technique based on the specific demands of their Visual Design project and the desired level of precision.
Advanced Visual Manipulation: 3D Rotation and Layout Harmony
Beyond simple 2D rotations, Microsoft Word offers advanced options for adding depth and dynamic movement to your images, particularly through 3D rotation. Integrating these manipulated visuals seamlessly into your document’s text flow is equally important for achieving a sophisticated Visual Design, especially when working with Aesthetic images, Digital Art, or complex Photo Manipulation.
Exploring 3D Rotation for Dynamic Visuals (Word 2007 & Up)
3D rotation in Word allows you to tilt your image along three axes – X, Y, and Z – giving the illusion of depth and perspective. This feature is particularly useful for creating more dynamic layouts, adding artistic flair to Abstract imagery, or enhancing Digital Photography within Creative Ideas for your documents.
How to Apply 3D Rotation:
- Right-Click Your Image: Select the image you want to apply 3D rotation to, then right-click on it. From the context menu, choose “Format Picture…” (or “Format Object…” in some versions). This action will open a “Format Picture” panel, usually on the right side of your Word window. (On a Mac, if you don’t have a right-click mouse, use Ctrl-click.)
- Navigate to Effects: In the “Format Picture” panel, look for the “Effects” icon. This icon often resembles a pentagon or a small hexagon, indicating visual effects options. Click on it to expand the menu.
- Find 3-D Rotation: Scroll down within the “Effects” options until you find the “3-D Rotation” section. Expand this section to reveal its settings.
- Choose a Preset: Word provides a selection of “Presets” for 3-D rotation. Click on the drop-down menu next to “Presets” to preview and select from various common 3D orientations (e.g., “Perspective Relaxed,” “Oblique Top Left”). These can serve as quick starting points for your Visual Design.
- Manually Adjust X, Y, and Z Rotation: For precise control, use the “X Rotation,” “Y Rotation,” and “Z Rotation” input fields, along with their up/down arrows. Each axis affects the image’s orientation differently:
- X-Rotation: Tilts the image backward or forward, as if you are rotating it around a horizontal axis running through its center. This creates a “head-nodding” motion, useful for subtle perspective shifts in Beautiful Photography.
- Y-Rotation: Tilts the image left or right, as if you are rotating it around a vertical axis. This creates a “head-shaking” motion, ideal for showing the side of an object or creating dynamic angles for Digital Art.
- Z-Rotation: Rotates the image clockwise or counter-clockwise on its flat plane, similar to the 2D rotation discussed earlier. This is like spinning the image on a table.
- Experiment with positive and negative degree values to achieve the desired effect.
- Adjust Perspective (Optional): Some versions of Word may also offer a “Perspective” slider or input field. Increasing perspective can make the 3D effect more pronounced, giving the illusion that the image is receding into the distance or coming closer. This adds depth, enhancing the Creative Ideas behind your Photo Manipulation.
Benefits of 3D Rotation:
- Dynamic Visuals: Transforms flat images into dynamic elements, adding a sense of depth and movement that can significantly enhance Graphic Design and Digital Art projects.
- Creative Expression: Opens up new avenues for Creative Ideas and Photo Manipulation, allowing you to craft unique visual compositions and Abstract effects.
- Emphasis and Focus: A subtly rotated 3D image can draw the viewer’s eye to specific content or create a focal point within a complex layout.
Integrating Rotated Images Seamlessly into Document Layouts
Rotating an image is only half the battle; the other half is ensuring it coexists harmoniously with your text and other document elements. Proper integration is key to a professional Visual Design, preventing text from overlapping awkwardly or images from disrupting the flow of information, especially important for High Resolution or Stock Photos.
Here are expert tips from Tophinhanhdep.com for achieving layout harmony:
-
Master Text Wrapping Options: This is the most crucial setting for how an image interacts with text. Right-click your rotated image, then select “Wrap Text” from the context menu. Experiment with these options:
- Square / Tight: Text flows closely around the image, conforming to its general shape (or its actual shape for “Tight”). Ideal for images that need to sit within text blocks, like a small Nature photo in a newsletter.
- Through: Text fills the empty spaces within the image itself (if transparent regions exist), useful for complex Photo Manipulation.
- Top and Bottom: Text stops above and restarts below the image, leaving clear space on the sides. Great for separating paragraphs with a full-width Beautiful Photography piece.
- Behind Text: The image sits behind the text. Perfect for creating subtle Backgrounds, Watermarks, or Aesthetic overlays without obscuring the content.
- In Front of Text: The image hovers over the text, useful for highlights, annotations, or Digital Art elements that are meant to stand out without affecting text flow.
- Choose the option that best serves your Visual Design and the readability of your content.
-
Align with Gridlines for Precision: For meticulous Graphic Design or when arranging multiple images in a precise Thematic Collection, use Word’s gridlines. Go to the “View” tab in the ribbon, then in the “Show” group, check “Gridlines.” This overlay helps you align rotated images to exact positions and maintain consistent spacing, ensuring your High Resolution images are perfectly balanced.
-
Group Multiple Rotated Images: If you have several images that need to be rotated and moved as a single unit (e.g., a collage for a Mood Board or a sequence of Sad/Emotional images), group them. Select all desired images by holding down the Ctrl key and clicking each one. Then, right-click on any selected image, go to “Group,” and choose “Group” again. Now, you can rotate, resize, and move them collectively, preserving their relative positions and angles.
-
Utilize Position Settings for Exact Placement: For pixel-perfect placement, use the “Position” options. With your image selected, go to the “Picture Format” tab, and in the “Arrange” group, click “Position.” You can select from various predefined page positions or click “More Layout Options…” to input exact horizontal and vertical measurements, anchoring the image to a specific spot relative to the page, margin, or paragraph. This is essential for professional documents featuring Stock Photos or intricate Digital Art.
-
Employ a Drawing Canvas for Complex Layouts: For truly intricate layouts involving multiple rotated images, text boxes, and shapes (especially in Digital Art or Photo Manipulation), consider inserting a “Drawing Canvas.” Go to the “Insert” tab, click “Shapes,” and choose “New Drawing Canvas” at the bottom of the menu. This creates a dedicated area where you can freely arrange, group, and manipulate all elements without them affecting the main document text. It’s like having a mini design board within your Word document, providing unparalleled control for your Creative Ideas.
By diligently applying these advanced techniques and layout strategies, your rotated images—whether they’re vibrant Wallpapers, subtle Backgrounds, or powerful Beautiful Photography—will seamlessly integrate into your Microsoft Word documents, creating a professional, aesthetically pleasing, and highly effective Visual Design that truly stands out.
Beyond Word: Enhancing Image Preparation with External Tools
While Microsoft Word offers commendable functionality for rotating and basic manipulation of individual images, its capabilities for batch processing and advanced image optimization are naturally limited. For dedicated users of Tophinhanhdep.com, who frequently deal with extensive Image Collections, High Resolution photography, and diverse Editing Styles, preparing images before importing them into Word can dramatically streamline the workflow and elevate the final visual quality. This is where specialized Image Tools become invaluable.
Imagine needing to process hundreds of Nature photographs or Abstract backgrounds, all requiring a specific rotation, cropping, or even AI Upscaling to fit a new project. Performing these adjustments one-by-one in Word would be prohibitively time-consuming. Instead, Tophinhanhdep.com recommends leveraging external software for these preparatory steps, ensuring that your images are perfectly primed before they even touch your document.
Tophinhanhdep.com’s Recommended Image Preparation Workflow:
-
Batch Rotation for Image Collections: For large sets of images, a dedicated image editor or batch processor is a game-changer. These tools, often part of broader “Image Tools” suites, allow you to apply the same rotation (e.g., 90 degrees clockwise) or a custom angle to dozens or even hundreds of photos simultaneously. This is particularly useful for:
- Correcting Camera Orientation: Quickly fixing an entire folder of Digital Photography taken in the wrong orientation.
- Standardizing Thematic Collections: Ensuring all images in a curated set (like Wallpapers or Backgrounds) have a consistent orientation before use.
- Preparing for Mood Boards: Getting all visual elements aligned for a consistent aesthetic without manual individual adjustments.
- Instead of naming specific software, consider a hypothetical tool like “Tophinhanhdep.com’s Batch Image Editor” or a generic description like “advanced image processing software.” These tools typically offer intuitive interfaces where you can:
- Import Multiple Files: Easily drag and drop an entire folder of images.
- Select Batch Operations: Choose “Rotate” and specify the angle (e.g., 90°, 180°, custom degrees).
- Apply and Export: Process all images and save them in your desired format (e.g., JPG, PNG, TIFF), often with options for output quality and file size.
-
Preprocessing for Quality and Performance: Beyond rotation, external Image Tools offer a suite of functionalities crucial for optimal document performance and visual fidelity:
- Image Converters: If your images are in formats not ideally suited for Word or need to be standardized, converters can change them (e.g., HEIC to JPG, PSD to PNG).
- Image Compressors: High Resolution images, while stunning, can significantly bloat document file sizes, leading to slow loading and sharing. Compressors reduce file size without noticeable loss of visual quality, making your documents more efficient.
- Image Optimizers: These tools further refine images for specific uses, balancing quality and file size for web or print, and can include features like metadata stripping.
- AI Upscalers: For older or lower-resolution images you wish to incorporate, AI Upscalers (a cutting-edge category of Image Tools) can intelligently enhance resolution, making them suitable for print or larger displays within your document, ensuring they meet the standards of Beautiful Photography.
-
Advanced Editing Styles and Photo Manipulation: For complex visual effects, sophisticated color grading, or intricate Photo Manipulation, dedicated graphic design software offers far greater control than Word. Think about applying specific Editing Styles, merging multiple Sad/Emotional images, or creating intricate Digital Art compositions. These operations are best done externally, saving the final, polished image for insertion into Word.
By embracing this two-stage approach – leveraging powerful external Image Tools for initial preparation and then using Word’s layout capabilities for integration – users of Tophinhanhdep.com can ensure their visual content is always presented at its absolute best. This workflow maintains the integrity of High Resolution images, optimizes performance, and provides the creative freedom necessary to execute any Visual Design or Creative Idea with precision and impact.
Conclusion
Mastering how to rotate an image in Microsoft Word is a foundational skill that significantly contributes to the overall polish and professional appeal of your documents. As showcased on Tophinhanhdep.com, where the visual narrative is paramount, every detail in your imagery, from a striking Wallpaper to a subtle Background, matters. Whether you opt for the quick, intuitive drag-and-drop method for minor adjustments or delve into the precise, degree-based controls within the Picture Format tools for meticulous Graphic Design, understanding these techniques empowers you to take full command of your visual content.
Furthermore, for those engaging in advanced Photo Manipulation, incorporating Digital Art, or working with intricate Aesthetic compositions, exploring Word’s 3D rotation capabilities can unlock new dimensions of Creative Ideas, adding depth and dynamism to your visuals. Crucially, aligning these manipulated images seamlessly within your text layout through smart text wrapping, gridline alignment, and strategic positioning ensures that your documents maintain a harmonious and professional Visual Design, regardless of whether you’re featuring vibrant Nature photography or poignant Sad/Emotional imagery.
Beyond Word’s internal functionalities, Tophinhanhdep.com encourages users to consider the advantages of preprocessing images with external Image Tools. For large Image Collections, High Resolution photography, or specific Editing Styles, batch rotators, compressors, and AI Upscalers can save invaluable time and maintain optimal visual quality, ensuring your images are perfectly prepared before they even enter your document.
Ultimately, the ability to effectively rotate and integrate images in Word is more than just a technical skill; it’s an art form that transforms ordinary documents into engaging visual experiences. By applying the strategies outlined in this guide, you can confidently craft documents that not only convey information but also captivate and inspire, reflecting the high standards of Beautiful Photography and Visual Design championed by Tophinhanhdep.com. Continue to explore Tophinhanhdep.com for endless Image Inspiration & Collections to elevate all your creative endeavors.