How to Rotate an Image in GIMP: A Comprehensive Guide for Stunning Visuals

In the vast and ever-evolving world of digital imagery, the ability to manipulate and refine photographs is paramount for photographers, graphic designers, and casual enthusiasts alike. Whether you’re a seasoned professional crafting intricate visual designs or an amateur looking to enhance your personal collection of “Beautiful Photography,” understanding the fundamental tools of image editing software is crucial. GIMP, the GNU Image Manipulation Program, stands out as a powerful, free, and open-source alternative to proprietary software, offering a robust suite of features for everything from basic adjustments to complex “Photo Manipulation.”
Among the most common and essential adjustments any image might require is rotation. Often, photos captured with digital cameras or smartphones end up incorrectly oriented, or a specific creative vision demands a dynamic angle to transform an ordinary shot into an “Aesthetic” masterpiece. This comprehensive guide, brought to you by Tophinhanhdep.com, will walk you through every aspect of rotating images in GIMP, from the simplest methods to more advanced techniques, ensuring your visuals always tell the story you intend. We’ll explore how simple rotations can refine your “High Resolution” images, contribute to striking “Visual Design,” and perfect your “Digital Art.”

The process of rotating an image in GIMP is remarkably straightforward, yet it offers layers of control that allow for both quick fixes and precise artistic adjustments. From adjusting a slightly tilted horizon in a “Nature” shot to completely reorienting an “Abstract” composition for a fresh perspective, GIMP’s rotation capabilities are a cornerstone of effective “Image Tools.” By the end of this article, you’ll be able to confidently apply various rotation techniques, transforming your “Wallpapers” and “Backgrounds” into perfectly aligned and visually compelling assets.
Mastering the Basics: GIMP’s Fundamental Rotate Tool
At the heart of GIMP’s transformation capabilities lies the dedicated Rotate tool, designed to give users immediate and intuitive control over image orientation. This tool is accessible through multiple avenues, catering to different workflow preferences, making it an indispensable part of your “Image Tools” arsenal. Understanding its basic functionality is the first step towards achieving professional-grade edits.

1. Freehand Rotation for Quick Adjustments
The most direct and interactive way to rotate an image in GIMP is by using the freehand rotation method. This is ideal for making quick, visual adjustments where precise numerical input isn’t strictly necessary, or when you’re simply trying to find the most appealing angle for a “Photo Idea” or “Mood Board.”
Step-by-Step Guide to Freehand Rotation:
- Open Your Image: Begin by launching GIMP. Once the software is open, navigate to
Filein the top menu bar, then selectOpen...(or use the keyboard shortcutCtrl+O/Cmd+Oon Mac). Browse to the location of the image you wish to rotate, select it, and clickOpen. This could be any image from your collection – a vibrant “Nature” shot, an expressive “Sad/Emotional” portrait, or a dynamic “Abstract” piece that needs a new perspective. - Select the Rotate Tool: Look for the
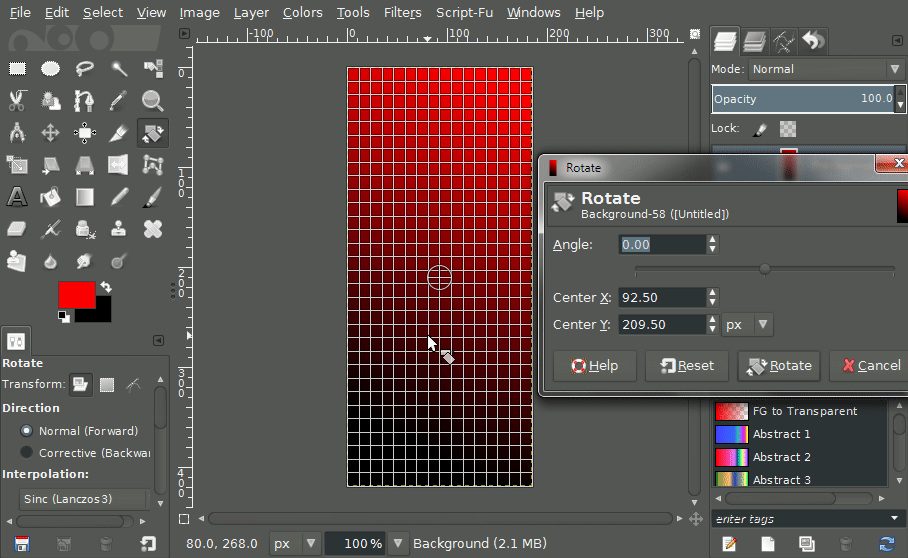
Rotate Toolicon in the GIMP Toolbox, typically located on the left side of your screen. It often looks like a square with a curved arrow indicating rotation. Alternatively, for a faster workflow, you can activate it directly using the keyboard shortcutShift + R. - Initiate Freehand Rotation: With the Rotate tool active, simply click and drag your mouse anywhere on the image canvas. As you drag, you’ll see a preview of your image rotating in real-time, following your mouse movements. This interactive feedback is incredibly useful for visually gauging the perfect angle. Notice a dialog box, the “Rotate Information” window, will appear, providing real-time numerical feedback on the current angle of rotation and the center point.
- Observe the Rotation Center: As you rotate, you’ll notice a circular crosshair appear on your image, usually in the center. This is the “rotation center” or pivot point. By default, the image rotates around this center. However, you have the flexibility to click and drag this crosshair to a different location on or even outside the canvas. This allows for creative rotations around a specific focal point, adding depth to your “Visual Design” or “Photo Manipulation.”
- Confirm Your Adjustment: Once you’ve achieved the desired rotation angle, either visually or by watching the numerical value in the dialog, simply click the
Rotatebutton within the “Rotate Information” dialog. Alternatively, pressing theEnterkey on your keyboard will also finalize the transformation.
This freehand method is excellent for initial adjustments and for developing an intuitive feel for image orientation. It’s often the fastest way to correct slightly skewed photos or experiment with “Creative Ideas” for your imagery.
2. Utilizing Precision: Inputting Specific Angles and Centers
While freehand rotation is great for quick visual adjustments, sometimes you need absolute precision. For instance, if you’re working on “Graphic Design” elements that require perfect alignment, or if you need to reverse a known rotation angle, GIMP offers the ability to input exact numerical values.
Achieving Numerical Precision:
- Access the Rotate Tool: As before, open your image and select the
Rotate Tool(or useShift + R). - Open the Rotate Information Dialog: Clicking on the image with the Rotate tool active will bring up the “Rotate Information” dialog window. If it’s already open from a previous freehand rotation, it will update with the current values.
- Input the Angle: Within this dialog, you’ll find an
Angleinput field. This is where you can type in the precise degree of rotation you need. Values can range from -180° to +180°, allowing for full 360-degree control. A positive value typically rotates clockwise, while a negative value rotates counter-clockwise. For example, typing90will rotate the image 90 degrees clockwise.- Tip for Increment Control: While dragging to rotate, holding down the
Ctrlkey (orCmdon Mac) will constrain the rotation to 15-degree increments. This is incredibly useful for snapping to common angles like 0°, 15°, 30°, 45°, 90°, etc., without needing to type them in manually, bridging the gap between freehand and numerical precision.
- Tip for Increment Control: While dragging to rotate, holding down the
- Adjust the Rotation Center (Center X/Y): Below the
Anglefield, you’ll seeCenter XandCenter Yinput fields. These allow you to precisely define the pivot point of your rotation using pixel coordinates (or other units, selectable from a dropdown).- Graphical vs. Numerical Center Adjustment: As mentioned, you can drag the crosshair on the canvas to move the center graphically. However, for utmost precision, especially in “Digital Art” or “Photo Manipulation” where specific alignments are critical, inputting exact X and Y coordinates ensures that your rotation originates from the perfect spot.
- Resetting the Center: If you’ve moved the rotation center and wish to return it to the exact middle of the image, simply click the
Readjustbutton within the Rotate dialog. This is a handy shortcut to restore the default pivot point.
- Apply the Rotation: Once your angle and center are set to your exact specifications, click the
Rotatebutton in the dialog or pressEnterto apply the transformation.
Using these precise controls, you can ensure that your images are not just rotated, but rotated with the exact alignment required for any demanding “Visual Design” project or “High Resolution” image preparation.
Advanced Techniques: Unleashing Creative Potential with GIMP Rotation
Beyond basic rotation, GIMP offers additional methods that can streamline your workflow or unlock more complex “Photo Manipulation” possibilities. These techniques cater to different scenarios, from quick, fixed-angle rotations to achieving effects that mimic 3D transformations.
1. Streamlined Rotations via Menu Commands
For common fixed-angle rotations, GIMP provides quick access through its Image menu. This method is particularly useful when you need to correct the orientation of an entire image, such as when a landscape photo was taken in portrait mode.
How to Use Menu Commands for Rotation:
- Open Your Image: As always, start by opening the desired image in GIMP.
- Access the Transform Menu: Navigate to the top menu bar, click on
Image, then hover overTransform. - Choose a Rotation Option: Within the
Transformsubmenu, you’ll find several predefined rotation options:Rotate 90° clockwise: Turns the image 90 degrees in the direction of a clock’s hands.Rotate 90° counter-clockwise: Rotates the image 90 degrees against the direction of a clock’s hands.Rotate 180°: Flips the image upside down, rotating it a full 180 degrees.
- Apply and Observe: Simply click on the desired rotation, and GIMP will immediately apply the transformation to your entire image.
Important Considerations for Menu Rotations:
- Whole Image Transformation: This method rotates the entire image, including the canvas and all its layers. If you only want to rotate a single layer, it’s recommended to use the dedicated
Rotate Toolas described in the previous section. For rotating individual layers, navigate toLayer > Transform > Arbitrary Rotation...which essentially opens the Rotate Tool for the active layer. - Fixed Increments: These menu options only allow for 90 or 180-degree rotations. If you need a custom angle (e.g., 27 degrees), you must use the
Rotate Toolwith numerical input. - Efficiency: Despite these limitations, for simple orientation corrections, this is often the quickest and most efficient method. It’s perfect for instantly fixing a “Wallpaper” or “Background” that was scanned or captured sideways.
2. Exploring “X and Y Axis Rotation” Concepts for 3D-like Effects (Clarifying GIMP’s Approach)
The idea of “rotating an image on its X and Y axes” often brings to mind 3D transformations, where an object turns in three-dimensional space. While GIMP’s standard Rotate Tool primarily handles 2D rotation (around a single Z-axis perpendicular to the image plane), the X and Y inputs within the Rotate Information dialog refer to the center of rotation, not separate rotation angles on those axes. This is a crucial distinction for precision.
However, GIMP does offer other Transform Tools that can create effects resembling rotations around X or Y axes, enabling you to add a sense of depth or perspective to your “Visual Design” and “Digital Art”:
- Perspective Tool (
Shift + P): Found underTools > Transform Tools > Perspective. This tool allows you to manipulate the perspective of an image, making it appear as if it’s receding into the distance or tilted in space. By dragging the corners, you can create a pseudo-3D rotation, where parts of the image appear closer or further away. This is excellent for creating realistic composites in “Photo Manipulation” or giving “Abstract” images a dynamic feel. - Shear Tool (
Shift + S): Located atTools > Transform Tools > Shear. The Shear tool skews an image along either the horizontal (X) or vertical (Y) axis. While not a true rotation, it can create effects that mimic an image being tilted or seen at an angle, particularly useful for “Graphic Design” elements that need to appear slanted.
Clarifying the “X and Y” in the Rotate Tool:
When you see “Center X” and “Center Y” in the Rotate Information dialog, these specify the coordinates of the pivot point around which your 2D rotation occurs.
- Center X: Determines the horizontal position of the rotation pivot.
- Center Y: Determines the vertical position of the rotation pivot.
By carefully placing this center, you can achieve very specific and often creative rotation effects. For example, rotating a clock face around its actual center point, or orbiting a planet image around a sun image by placing the rotation center precisely. Understanding this distinction is key to effectively using GIMP’s transform capabilities for both straightforward corrections and complex “Creative Ideas.”
The Art of Orientation: Why Image Rotation is Essential for Visual Storytelling
Image rotation is far more than just a technical adjustment; it’s a powerful narrative tool that can profoundly influence how a viewer perceives your “Images.” Its importance spans across all categories of visual content, from casual snapshots to professional “Stock Photos.”
- Correcting Orientation: The most obvious use of rotation is to correct the orientation of an image. Whether your phone captured a “Beautiful Photography” scene on its side, or a scanner presented a document upside down, a simple 90 or 180-degree rotation restores the image to its intended view. This ensures professionalism for “High Resolution” images destined for print or online “Wallpapers.”
- Creative Composition and Visual Impact: Rotation can be a potent creative choice. Tilting an image slightly can introduce dynamism, leading the viewer’s eye along a diagonal path, or breaking the monotony of a perfectly horizontal/vertical composition.
- For “Nature” photography, a subtle tilt can emphasize the slope of a mountain or the flow of a river.
- In “Abstract” art, rotating an element can entirely change its relationship to other components, creating new patterns and focal points.
- Designers often rotate text or graphical elements in “Graphic Design” to create visual interest or direct attention, crafting “Aesthetic” layouts.
- Experimenting with angles can turn a standard shot into a compelling “Photo Idea” for your “Thematic Collections.”
- Refining “Visual Design” and “Photo Manipulation”: In more advanced projects, precise rotation is indispensable. When compositing multiple images in “Photo Manipulation,” layers often need to be rotated to match the perspective or angle of other elements seamlessly. For “Digital Art,” artists might rotate brush strokes, textures, or imported elements to achieve specific artistic effects or alignments within their composition.
- Enhancing “Aesthetic” and “Emotional” Resonance: A simple rotation can dramatically alter the mood of an image. A slightly tilted horizon, while technically an error, can sometimes evoke a sense of unease or instability, which might be precisely what you want for a “Sad/Emotional” piece. Conversely, a perfectly level horizon brings a sense of calm and stability. Understanding these subtle impacts allows you to fine-tune the “Aesthetic” qualities of your visuals.
- Preparation for Other “Image Tools”: Often, rotation is a preliminary step before applying other “Image Tools” like cropping, scaling, or applying filters. Ensuring the image is correctly oriented first makes subsequent edits more straightforward and effective.
By consciously employing rotation, you move beyond mere technical correction and harness its power to craft more engaging, expressive, and aesthetically pleasing visuals for any purpose on Tophinhanhdep.com.
Finalizing Your Work: Saving and Exporting Rotated Images in GIMP
Once you’ve meticulously rotated your image to perfection, the final crucial step is to save or export your work. GIMP offers several options, each with its own implications, particularly concerning file formats, quality, and preserving your original image. Understanding these options is essential for managing your “High Resolution” images and ensuring they are optimized for their intended use.
1. Saving Directly (Overwriting the Original)
The simplest way to save your rotated image is to overwrite the original file. This is generally recommended only if you are confident you no longer need the unrotated version of the image.
How to Save Directly:
- Navigate to
Filein the top menu bar. - Click
Save(or useCtrl+S/Cmd+S).
If the image was previously saved, GIMP will overwrite that file with your rotated version. If it’s a new image that hasn’t been saved yet, it will prompt you with the Save Image dialog, essentially acting like Save As.
When to Use:
- For quick, non-critical edits where the original is disposable.
- When you’re certain you won’t need to revert to the original orientation.
- For personal “Wallpapers” or “Backgrounds” where a single version is sufficient.
2. Saving as a New File (Preserving the Original)
To avoid overwriting your original image – a best practice for “Digital Photography” and professional “Visual Design” – you should save your rotated image as a new file. This preserves your original and gives you a new version with the applied rotation.
How to Save as a New File:
- Go to
Filein the top menu bar. - Select
Save As...(or useShift+Ctrl+S/Shift+Cmd+S). - In the
Save Imagedialog box that appears:- Name: Give your rotated image a new, descriptive name (e.g.,
my_photo_rotated.xcf). - Location: Choose where you want to save the new file.
- File Format: GIMP’s default save format is
.xcf, which is GIMP’s native format. This format preserves all layers, selections, and other GIMP-specific data, making it ideal if you plan to do further “Photo Manipulation” edits later.
- Name: Give your rotated image a new, descriptive name (e.g.,
- Click
Save.
When to Use:
- Always, if you want to keep the original unedited image.
- For “High Resolution” images where you might experiment with different rotations.
- When creating “Mood Boards” or “Thematic Collections” and you need variations.
3. Exporting Your Image (for Web, Print, and Different File Types)
The Export As function is crucial when you want to convert your GIMP project into a widely compatible image format (like JPEG, PNG, TIFF) for sharing online, printing, or using in other applications. This is especially important for “Image Tools” like “Image Compressors” or “Optimizers,” and for tailoring your image for specific uses.
How to Export Your Image:
- Go to
Filein the top menu bar. - Select
Export As...(or useShift+Ctrl+E/Shift+Cmd+E). - In the
Export Imagedialog box:- Name and Location: Set the filename and choose the destination.
- Select File Type: Crucially, at the bottom of the dialog, click
Select File Type (By Extension)orSelect File Type (By Name)and choose your desired format from the extensive list (e.g., JPEG, PNG, GIF, TIFF). - Specific Export Options: Once you select a file type, a new dialog will appear, offering specific options for that format.
- JPEG: Ideal for “Beautiful Photography,” “Wallpapers,” and general web use. It uses lossy compression, so you can adjust the
Qualityslider to balance file size and visual fidelity. Lower quality means smaller files, good for “Image Compressors” and faster loading “Backgrounds.” - PNG: Best for “Digital Art,” “Graphic Design” elements, and “Backgrounds” that require transparency. It uses lossless compression, preserving image quality perfectly.
- TIFF: Often used for high-quality print or professional archiving of “High Resolution” “Stock Photos” due to its versatility and lossless nature.
- JPEG: Ideal for “Beautiful Photography,” “Wallpapers,” and general web use. It uses lossy compression, so you can adjust the
- Configure the specific options for your chosen format, then click
Export.
When to Use:
- When preparing images for online use (
JPEGfor photos,PNGfor graphics with transparency). - For printing (
TIFFor high-qualityJPEG). - When sending images to clients or collaborators who don’t use GIMP (as
.xcffiles are GIMP-specific). - To ensure your image meets the requirements for “Image Optimizers” or specific platform uploads.
By mastering these saving and exporting techniques, you ensure that your perfectly rotated images are not only preserved but also presented in the most suitable format for any purpose, contributing to a high standard of “Visual Design” and “Digital Photography” management on Tophinhanhdep.com.
Conclusion
The ability to rotate an image in GIMP is a fundamental skill that underpins nearly every aspect of digital image manipulation. As we’ve explored, GIMP offers a flexible array of tools and techniques for rotation, catering to every need from quick, intuitive adjustments to precise, numerically controlled transformations. Whether you’re correcting a camera’s oversight, experimenting with “Creative Ideas” for “Abstract” art, or fine-tuning elements for complex “Graphic Design” projects, GIMP’s rotation capabilities provide the control you need.
Beyond the technical steps, understanding why and when to rotate an image elevates your work. It’s about more than just straightening a horizon; it’s about composition, visual flow, emotional resonance, and ultimately, telling a more compelling story with your “Images.” By integrating these rotation techniques into your workflow, you enhance your skills as a photographer and designer, transforming raw captures into refined “Beautiful Photography” and stunning “Visual Design.”
Tophinhanhdep.com is dedicated to empowering creators with the knowledge and tools to bring their visual ideas to life. Master the art of image rotation in GIMP today, and unlock a new dimension of creative possibilities for your “Wallpapers,” “Backgrounds,” “Digital Art,” and every “Photo Idea” you embark upon. Keep exploring, keep creating, and let your images shine with perfect orientation and impactful design.