How to Rotate an Image in GIMP: A Comprehensive Guide

GIMP (GNU Image Manipulation Program) stands as a beacon in the world of digital image editing – a free, open-source powerhouse that rivals many commercial alternatives. For enthusiasts and professionals alike, GIMP provides a robust suite of tools for transforming ordinary images into extraordinary visual statements. At Tophinhanhdep.com, we understand the importance of mastering fundamental editing techniques to achieve stunning results, whether you’re curating wallpapers, crafting aesthetic backgrounds, or perfecting high-resolution stock photos. One such essential technique is image rotation, a seemingly simple operation that holds immense power in correcting, aligning, and creatively manipulating your visual content.
This comprehensive guide will walk you through every aspect of rotating images within GIMP, from basic adjustments to advanced controls. We’ll explore the various methods available, delve into the nuances of rotating specific layers versus entire canvases, and provide practical tips to ensure your rotated images maintain optimal quality and aesthetic appeal. By the end of this article, you’ll be able to confidently employ GIMP’s rotation capabilities to enhance your photography, refine your graphic designs, and unleash your creative ideas.

Introduction to GIMP’s Rotation Capabilities
GIMP’s “Rotate” functionality is more than just flipping an image; it’s a versatile transformational tool that allows for precise angular adjustments. Whether you’re correcting a crooked horizon in a beautiful nature photograph or angling an abstract element for a compelling visual design, GIMP offers the flexibility you need. This powerful feature is integrated within GIMP’s “Transform Tools,” providing options for fixed-angle rotations, freehand adjustments, and numerical precision.
The ability to rotate images is critical in various contexts relevant to Tophinhanhdep.com’s focus areas:
- Photography Correction: Digital cameras sometimes capture images at awkward angles. A quick 90° rotation can instantly correct an incorrectly oriented portrait or landscape shot. For subtle misalignments, precise custom angle rotations are invaluable for straightening horizons or architectural lines, ensuring your beautiful photography looks its best.
- Visual Design and Graphic Art: In graphic design and digital art, rotation is a creative cornerstone. It allows for dynamic layouts, precise alignment of text and graphics, and the creation of unique patterns or abstract compositions. Manipulating the orientation of elements is key to achieving a desired visual flow and aesthetic, making it an indispensable part of any creative ideas workflow.
- Image Manipulation and Photo Ideas: When compositing images or creating intricate photo manipulations, individual elements often need to be rotated to blend seamlessly or to achieve a specific artistic vision. This tool enables users to experiment with different orientations, fostering creative ideas and allowing for the development of captivating mood boards and thematic collections.
GIMP’s rotation tools empower you to:
- Perform Fixed-Angle Rotations: Quickly turn an image by common increments like 90°, 180°, or 270°.
- Execute Freehand Rotations: Manually drag and adjust the image to any desired angle, offering intuitive control.
- Apply Custom Angular Rotations: Input exact numerical values for precise adjustments, crucial for detailed work.
- Target Specific Elements: Choose to rotate only a selected layer, a defined selection, or the entire image canvas.
When using the rotation feature, you can also combine it with other transform tools like Scale or Perspective to fine-tune your images further. GIMP provides options that allow users to control image quality after rotation, ensuring the picture remains sharp and free from distortion. This commitment to quality makes GIMP an excellent choice for maintaining the high resolution and clarity of your images, which is a core value at Tophinhanhdep.com.
Activating and Utilizing the Rotate Tool
The primary gateway to image rotation in GIMP is the dedicated Rotate Tool. This tool is part of GIMP’s suite of “Transform Tools” and offers the most comprehensive control over rotation parameters. Understanding how to activate it and its various options is key to achieving both quick adjustments and highly precise transformations.

Activating the Rotate Tool
There are several convenient ways to activate the Rotate Tool, catering to different workflow preferences:
- Keyboard Shortcut: The quickest and most common method for power users is to press Shift + R on your keyboard. This instantly selects the Rotate Tool, bringing up its associated options dialog.
- Toolbox Icon: In GIMP’s main Toolbox (typically located on the left side of the screen), look for the “Rotate” icon. It usually depicts an arrow curving around a central point. Clicking this icon will activate the tool.
- Menu Navigation: For those who prefer menu-driven commands, you can access the Rotate Tool by navigating through:
Tools > Transform Tools > Rotate.
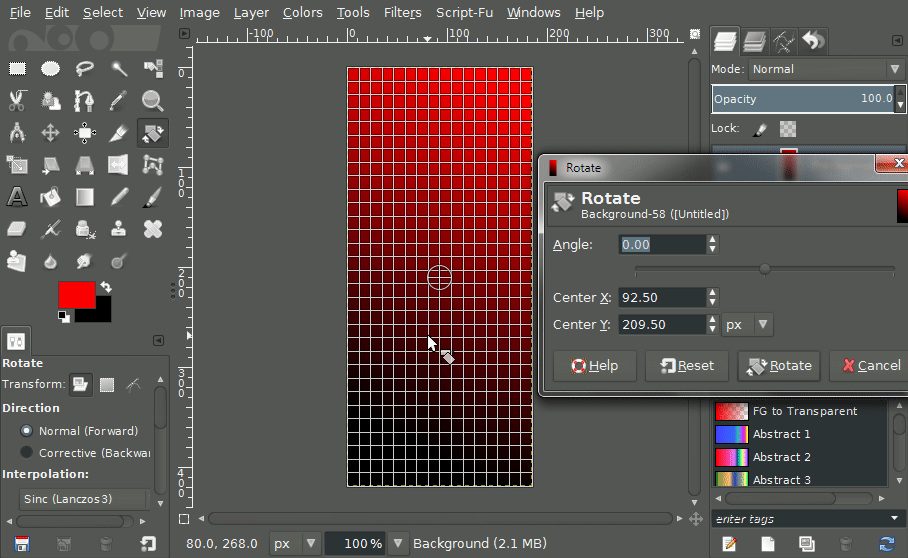
Once activated, a “Rotation Information” dialog window will appear, along with a grid overlay on your image, indicating the rotation center. This dialog is your control panel for precise adjustments.
Freehand Rotation and Custom Angles
For intuitive and visual adjustments, freehand rotation is often the go-to method. This allows you to “feel out” the correct angle, making it perfect for aesthetic tweaks or quick corrections in beautiful photography.
Steps for Freehand Rotation:
- Activate the Rotate Tool: Use
Shift + R, the Toolbox icon, or the menu path as described above. - Click and Drag: With the Rotate Tool active, click anywhere on your image (or the layer you intend to rotate) and drag your mouse. You’ll see the image or layer rotate in real-time, following your mouse movement.
- Constrain Rotation (Optional): While dragging, hold down the Ctrl key. This will constrain the rotation angle to 15-degree increments, allowing for easier alignment to common angles like 0°, 15°, 30°, 45°, etc. This is particularly useful when you need to make a subtle, yet precise, angular adjustment without numerical input.
- Observe Real-time Feedback: As you rotate, the “Rotation Information” dialog (or a similar overlay in the top-right corner of the GIMP window) will display the current angle in real-time. This feedback is invaluable for fine-tuning your rotation.
- Finalize the Rotation: Once you’re satisfied with the angle, release the mouse button. To apply the transformation, click the “Rotate” button in the dialog window or simply press the Enter key on your keyboard. If you’re not happy with the result, the dialog typically offers a “Reset” button to revert to the original state.
This method offers a highly visual approach, ideal for tasks where exact numerical precision isn’t paramount, but rather a pleasing visual alignment or dynamic aesthetic is desired, such as when arranging elements for a creative mood board or designing abstract backgrounds.
Precision Rotation with Numerical Values
While freehand rotation is excellent for visual adjustments, there are many instances where absolute precision is required. For example, when aligning elements in graphic design, ensuring perfect symmetry, or replicating a specific angle from another project. GIMP’s Rotate Tool facilitates this through numerical input.
Steps for Numerical Rotation:
- Activate the Rotate Tool: Begin by activating the Rotate Tool using
Shift + R, the Toolbox icon, or theTools > Transform Tools > Rotatemenu option. The “Rotation Information” dialog will appear. - Input the Angle: In the “Rotation Information” dialog, locate the “Angle” input field. Here, you can directly type in the desired rotation angle. GIMP typically accepts values from -180° to +180°, allowing for a full 360-degree range. A positive value usually signifies a clockwise rotation, while a negative value indicates a counter-clockwise rotation.
- Adjust Center of Rotation (Optional): Below the angle input, you’ll find “Center X” and “Center Y” fields. These control the exact pixel coordinates of the rotation center. By default, this center is usually placed in the middle of your image or layer. You can manually input new X and Y coordinates to define a precise pivot point for the rotation. We will elaborate on the rotation center in a later section.
- Preview and Confirm: As you input values, GIMP often provides a live preview of the transformation on your canvas. Once the desired angle is set, click the “Rotate” button in the dialog or press Enter to apply the change.
This numerical approach is crucial for tasks requiring exact measurements and consistency, helping designers maintain pixel-perfect alignment in their digital art and photo manipulations.
Rotating Layers vs. Entire Images
One of GIMP’s strengths lies in its layer-based editing system, which offers unparalleled flexibility. When it comes to rotation, understanding the distinction between rotating an entire image (canvas) and rotating individual layers is fundamental for effective visual design and photo manipulation.
Rotating the Entire Image and Canvas
Sometimes, you need to reorient the entire document. This includes the canvas size itself and all layers within it. This is often the case when correcting the orientation of a raw digital photograph (e.g., a landscape photo accidentally taken in portrait orientation).
Method 1: Using the Image Menu (Fixed Angles) For quick, fixed-angle rotations of the entire image, GIMP offers dedicated menu options:
- Navigate to
Image > Transform. - From the submenu, choose one of the following options:
Rotate 90° clockwiseRotate 90° counter-clockwiseRotate 180°
Key Considerations:
- Impact: This method rotates the entire canvas along with all its contents (all layers, selections, paths, etc.).
- Fixed Angles Only: You are limited to 90-degree and 180-degree increments. For custom angles of the entire image, you would typically resize the canvas first and then rotate a merged layer, or use a workaround involving the Rotate Tool on a flattened image.
- Use Case: Ideal for correcting the fundamental orientation of a photograph or a finished graphic design where the entire composition needs to be flipped. This aligns with Tophinhanhdep.com’s focus on curating correctly oriented wallpapers and backgrounds.
Method 2: Using the Rotate Tool (with specific settings)
While the Rotate Tool primarily works on the active layer or selection, you can use it to effectively rotate the visible image by ensuring all layers are either merged or grouped, or by selecting the “Image” option in the Tool Options if available for a specific GIMP version. However, the Image > Transform menu is generally simpler for whole-canvas rotations.
Rotating Individual Layers or Selections
More frequently, in advanced photo manipulation and graphic design, you’ll need to rotate only a single element (a layer) without affecting the rest of the composition. This allows for complex layering and dynamic arrangements, vital for creating sophisticated digital art or thematic collections.
Steps for Rotating a Layer or Selection:
- Open GIMP and Load Image: Open your image in GIMP (File > Open).
- Select the Target Layer: In the “Layers” panel (usually on the right side of the screen), click on the specific layer you wish to rotate. If you want to rotate a specific part of a layer, make a selection first. The Rotate Tool will then operate only within that selection on the active layer.
- Activate the Rotate Tool: Use
Shift + R, the Toolbox icon, orTools > Transform Tools > Rotate. - Perform Rotation:
- Freehand: Click and drag on the canvas to visually adjust the layer’s angle.
- Numerical: Input the desired angle into the “Angle” field in the “Rotation Information” dialog.
- Adjust Rotation Center (Crucial for Layers): The rotation center (represented by a circular crosshair) is particularly important when rotating individual layers. By default, it might be in the center of the layer’s boundaries, not necessarily the center of the canvas. You can click and drag this crosshair to move the pivot point of the rotation to any location – even outside the layer itself. This granular control is essential for precise alignment and creative effects in photo manipulation.
- Confirm: Click “Rotate” or press Enter to apply the transformation.
Key Advantages for Layers:
- Non-destructive Editing: Rotating individual layers keeps other parts of your image intact, allowing for endless experimentation without committing to irreversible changes on the entire composition. This aligns perfectly with the iterative process of creative design and exploring new photo ideas.
- Precise Element Placement: Enables you to fine-tune the orientation of specific visual elements, ensuring they fit perfectly into your overall visual design.
- Complex Compositions: Essential for building intricate digital art where multiple elements at various angles interact.
By mastering the distinction and appropriate application of these rotation methods, users of Tophinhanhdep.com can unlock advanced possibilities in their image editing workflows, leading to more refined and impactful visual content.
Advanced Considerations and Best Practices
While the core mechanics of rotation are straightforward, achieving professional-quality results in GIMP often involves understanding subtle nuances and employing best practices. These considerations are vital for maintaining the high standards expected for stock photos, high-resolution imagery, and polished graphic design.
Understanding the Rotation Center
The “center of rotation” or “pivot point” is a critical concept that dictates where the image or layer rotates around. By default, GIMP usually places this point in the center of the active layer or selection. However, the ability to reposition this center offers significant creative and corrective flexibility.
Manipulating the Rotation Center:
- Visual Dragging: When the Rotate Tool is active, you’ll see a small circular crosshair on your canvas. This is the rotation center. You can simply click and drag this crosshair to any desired location, even outside the visible boundaries of your layer or image. This is particularly useful for:
- Aligning Objects: Rotating an object around an external anchor point.
- Creating Circular Patterns: Duplicating a layer and rotating each copy around a central point to form a radial design.
- Correcting Perspective: Rotating a building or element around its base.
- Numerical Input: In the “Rotation Information” dialog, the “Center X” and “Center Y” input fields allow you to define the rotation center with pixel-level precision. This is invaluable when you need exact positioning, perhaps based on a grid or guide in your visual design.
- Resetting the Center: If you’ve moved the rotation center and want to quickly revert it to the default central position, many GIMP versions offer a “Reset” or “Readjust” button within the Rotate Tool options, or you can click the center box in a grid representation often found in the dialog.
Understanding and actively manipulating the rotation center is a hallmark of advanced GIMP users, enabling them to achieve complex transformations and precise alignments that elevate their digital art and photo manipulation projects.
Maintaining Image Quality During Rotation
A common concern with any image transformation, including rotation, is the potential degradation of image quality. GIMP employs interpolation methods to mitigate this, but it’s essential to be aware of how they work to preserve the high resolution of your images.
Interpolation Methods: When an image is rotated, GIMP has to calculate the color values for new pixel positions. This process is called interpolation. GIMP offers several interpolation methods, which can usually be found in the “Tool Options” panel for the Rotate Tool:
- None (Nearest Neighbor): Fastest, but can result in jagged edges and a pixelated look, especially with large rotations or scaling. Rarely recommended for quality work.
- Linear: Offers a smoother result than “None” but can still introduce some blurriness.
- Cubic: Generally provides the best balance of smoothness and sharpness for rotations, minimizing aliasing and preserving detail. This is often the default and recommended setting for most applications, especially for high-resolution images.
- NoHalo: (Specific to some GIMP versions/tools) Designed to reduce “halo” artifacts around sharp edges, which can sometimes appear with other methods.
Best Practices for Quality Preservation:
- Work on Original Resolution: Always perform transformations on the highest resolution version of your image. Scaling or rotating a low-resolution image will exacerbate quality issues. This is particularly important for stock photos and digital photography intended for print or large displays.
- Choose Appropriate Interpolation: For most rotations, especially those involving subtle angles or detailed imagery, select “Cubic” interpolation. For quick previews or rough edits, “Linear” might suffice.
- Limit Multiple Transformations: Repeatedly rotating, scaling, and re-rotating an image can cumulatively degrade quality. Try to perform transformations in as few steps as possible. If you need to experiment, use
Edit > Undoor work on a duplicate layer until you’re satisfied with the transformation, then apply it once. - Smart Objects/Layers (Concept): While GIMP doesn’t have “Smart Objects” in the same way Photoshop does, working on layers and applying transformations before merging them gives you similar flexibility to revert or adjust individual components without affecting the overall image.
- Preview Carefully: Always utilize GIMP’s live preview feature to assess the impact of your rotation on image quality before committing to the transformation. Look closely at fine details and edges.
By minding these advanced considerations, particularly the role of the rotation center and the impact of interpolation, users of Tophinhanhdep.com can ensure their images retain their aesthetic quality and professional appeal, whether for wallpapers, backgrounds, or detailed photo manipulation projects.
The Broader Impact of Image Rotation in Visual Design
Beyond mere correction, image rotation is a fundamental tool for visual design, graphic art, and creative expression. Its strategic application can dramatically alter the perception and impact of an image, contributing significantly to the aesthetic and narrative of any visual piece. At Tophinhanhdep.com, we champion the use of such tools to inspire creativity and elevate digital content across our diverse categories.
Enhancing Visual Dynamics and Composition:
- Creating Movement and Energy: Rotating an object slightly off-axis can introduce a sense of dynamism and movement, preventing a static or dull composition. This is often used in abstract art or to make specific elements “pop” in a graphic design.
- Achieving Balance and Harmony: Sometimes, a composition feels off-balance. Subtle rotations can help realign elements, creating a more harmonious and visually pleasing arrangement. This is particularly relevant when curating mood boards or thematic collections where every element contributes to the overall feeling.
- Perspective and Depth: Rotating elements in combination with other transform tools like perspective and scaling can create illusions of depth and three-dimensionality, adding richness to digital art and photo manipulations.
Fostering Creativity and Exploring New Styles:
- Abstract and Experimental Art: Rotation is a cornerstone of abstract design. By repeating and rotating elements, artists can generate complex patterns, mandalas, and visually arresting abstract images. These techniques contribute to the vast array of abstract wallpapers and backgrounds available.
- Creative Photo Ideas: Experimenting with the rotation of photographic elements can lead to unexpected and compelling results. A familiar object, when rotated and placed in an unusual orientation, can spark new photo ideas and creative narratives. This encourages a fresh perspective on digital photography and editing styles.
- Graphic Design Principles: In graphic design, rotation can be used to direct the viewer’s eye, emphasize text, or create visually interesting overlaps and relationships between different design components. Whether designing logos, banners, or social media graphics, strategic rotation plays a crucial role.
Integration with Tophinhanhdep.com’s Offerings:
- Wallpapers and Backgrounds: The ability to precisely rotate images ensures that wallpapers fit screens perfectly, and backgrounds can be subtly angled to create unique aesthetic vibes.
- Nature and Beautiful Photography: Corrective rotation helps professional photographers fix minor alignment issues, enhancing the overall quality of their high-resolution nature and landscape shots.
- Digital Art and Photo Manipulation: For those engaged in digital art, GIMP’s rotation capabilities are indispensable for creating intricate compositions, blending elements, and achieving specific artistic visions, contributing to sophisticated photo manipulation.
By offering a comprehensive understanding of GIMP’s rotation features, Tophinhanhdep.com aims to empower its users to move beyond basic image adjustments and truly master the art of visual design. This skill, coupled with GIMP’s other powerful tools, transforms editing from a technical task into a creative endeavor, enabling the production of stunning, high-quality images that resonate with aesthetic appeal and imaginative flair.
Conclusion
GIMP, as a robust and free image manipulation program, offers a comprehensive and intuitive set of tools for image rotation, catering to a wide spectrum of user needs from simple corrections to intricate visual design. As explored in this guide, whether you need to quickly reorient a digital photograph by 90 degrees, meticulously align elements in a complex graphic design, or artistically angle components for an abstract masterpiece, GIMP provides the means.
We’ve delved into the various methods available: the straightforward menu-based options for whole-image transformations, the tactile freedom of the Rotate Tool for freehand adjustments, and the precision offered by numerical input for exacting specifications. Crucially, we’ve highlighted the distinction between rotating entire images versus individual layers, a fundamental concept for non-destructive editing and sophisticated photo manipulation. Furthermore, understanding the impact of the rotation center and selecting appropriate interpolation methods are key advanced considerations that ensure your work maintains the high resolution and aesthetic quality desired for professional-grade images, be they stock photos, wallpapers, or digital art.
At Tophinhanhdep.com, we believe that mastering tools like GIMP’s Rotate feature is essential for anyone passionate about visual content. It’s not just about fixing a crooked line; it’s about unlocking creative potential, perfecting photographic compositions, and realizing imaginative visual ideas. By leveraging these versatile capabilities, both beginners and seasoned professionals can efficiently and effectively transform their images, making every project a testament to precision and artistic vision. Embark on your GIMP journey and discover how this powerful, free software can elevate your digital photography and visual design endeavors to new heights.