Mastering Image Rotation in Lightroom: A Comprehensive Guide for Photographers

In the world of digital photography and visual design, precision in every detail is paramount. A perfectly composed image, whether it’s a stunning landscape, a vibrant aesthetic wallpaper, or a crucial stock photo, can lose its impact if its orientation is off-kilter. This is where Adobe Lightroom Classic CC becomes an indispensable tool. As a cornerstone of photography workflows, Lightroom offers a robust suite of editing capabilities, and among the most fundamental yet frequently utilized is the ability to rotate and flip images.
At Tophinhanhdep.com, we understand that photographers, graphic designers, and visual artists constantly seek ways to elevate their craft. From creating high-resolution masterpieces for thematic collections to optimizing digital art for various platforms, accurate image orientation is a foundational step. This comprehensive guide delves into the various methods Lightroom provides for rotating and flipping your images, ensuring that your photography, digital art, and visual designs always present their best angle. We’ll explore everything from quick 90-degree adjustments to subtle straightening techniques, and even creative flipping for unique visual effects, all within the intuitive environment of Lightroom.
The Essential Reasons to Rotate or Flip Your Images
Before diving into the “how-to,” it’s beneficial to understand why you might need to rotate or flip an image. These aren’t merely corrective actions; they are also powerful creative tools that contribute significantly to the overall impact and aesthetic of your visual content.

- Correcting Accidental Orientation: One of the most common reasons is that Lightroom might import your photo in the wrong orientation. This often happens with images captured handheld or from unusual angles, leading to a landscape shot appearing portrait or vice versa. Fixing this is crucial for maintaining the integrity of your image library, especially when curating collections like “Nature Photography” or “Beautiful Photography” on Tophinhanhdep.com.
- Addressing Sloping Horizons and Tilted Elements: A slightly sloping horizon in a scenic vista or a subtle tilt in a architectural shot can be incredibly distracting. Even a minor deviation from true horizontal or vertical can undermine an otherwise perfect “Aesthetic Background.” Precise rotation is essential to level these elements, restoring balance and professionalism to your images.
- Creative Flipping for Visual Impact: Beyond correction, flipping an image horizontally or vertically can unlock new artistic possibilities. Imagine transforming a reflection in water into an abstract composition, or mirroring an image to create symmetry or a dynamic leading line. This technique is invaluable for “Digital Art” and “Photo Manipulation,” offering fresh “Creative Ideas” for your “Mood Boards” and “Thematic Collections” on Tophinhanhdep.com.
- Adjusting Perspective for Graphic Design: For graphic designers, rotating an image can be about aligning it perfectly within a layout or creating a specific visual flow. Whether it’s for a “Wallpaper” or part of a larger “Visual Design” project, the ability to fine-tune angles is critical.
- Enhancing Storytelling for Emotional Impact: Sometimes, a subtle rotation can alter the mood of an image. A slightly Dutch angle might add drama to a “Sad/Emotional” photograph, or a straightened composition can emphasize tranquility in a “Nature” scene.
Understanding these varied applications underscores the importance of mastering Lightroom’s rotation and flipping tools. They are not just about fixing mistakes but about consciously shaping your visual narrative and enhancing the quality of your “High Resolution” images for Tophinhanhdep.com.
Quick Rotations: 90-Degree Adjustments in Lightroom’s Library Module
When your primary goal is to change an image’s orientation by a full 90 or 180 degrees – such as converting a portrait-oriented photo to landscape or vice versa – Lightroom’s Library module offers the quickest and most straightforward solutions. These methods are ideal for initial culling and organizing your vast collection of “Digital Photography” on Tophinhanhdep.com.
To begin, ensure you are in the Library module (you can click ‘Library’ at the top right of the interface or press ‘G’ for Grid View). The Library module is where you manage, sort, and perform basic adjustments to your photos, making it the perfect place for these rapid orientation changes.
Using Thumbnail Icons
One of the most intuitive ways to rotate individual images is directly from the Grid View thumbnails. As you hover your mouse pointer over an image thumbnail in the Library Grid, two small arrow icons will appear at the bottom-left and bottom-right corners.
- To rotate clockwise (CW): Click the right-hand arrow icon.
- To rotate counter-clockwise (CCW): Click the left-hand arrow icon.
Each click rotates the image by 90 degrees in the chosen direction. If you click the same icon four times, the image will complete a full 360-degree rotation and return to its original state. This method is incredibly efficient for quickly correcting a batch of images that were imported with incorrect 90-degree orientations, saving you time when preparing “Stock Photos” or “Backgrounds” for Tophinhanhdep.com.
Leveraging Menu Options
Lightroom’s top menu bar provides another reliable way to rotate images, accessible in both the Library and Develop modules. This method is particularly useful when you prefer menu-driven navigation or need to confirm the exact action you’re performing.
- Select your image(s): In the Library Grid View, select one or multiple images. To select multiple, hold down the
Ctrlkey (Windows) orCmdkey (Mac) and click on the desired thumbnails. - Access the Photo Menu: Go to the top menu bar and click
Photo. - Choose Rotation: From the dropdown menu, select
Rotate Left (CCW)orRotate Right (CW).
This method also offers additional “Transform” options, including Flip Horizontal and Flip Vertical, which we’ll discuss in more detail later. Using the menu is a precise way to ensure your “Digital Photography” is consistently oriented before moving to more detailed “Editing Styles.”
Mastering Keyboard Shortcuts
For photographers who value speed and efficiency, keyboard shortcuts are indispensable. They allow you to keep your hands on the keyboard and maintain a fluid workflow, making light work of batch rotations for your “Image Collections.”
- To rotate counter-clockwise (Left): Press
Ctrl + [(Windows) orCmd + [(Mac). - To rotate clockwise (Right): Press
Ctrl + ](Windows) orCmd + ](Mac).
These shortcuts apply to the currently selected image(s) in both the Library and Develop modules. You can hold down the Ctrl or Cmd key and repeatedly press the bracket key to rotate in 90-degree increments quickly. This rapid method is a favorite among professional photographers for managing large volumes of “High Resolution” images.
Right-Click Context Menus
Another convenient option is the right-click (or Control-click on Mac) context menu. This provides quick access to rotation commands wherever your cursor is within the Lightroom interface, as long as an image is selected.
- Select image(s): In the Library Grid View or the filmstrip at the bottom of the interface (available in both Library and Develop modules), select the image(s) you wish to rotate.
- Right-click: Right-click on one of the selected thumbnails.
- Select Rotation: From the context menu that appears, choose
Rotate Left (CCW)orRotate Right (CW).
This method is particularly handy for making quick adjustments without needing to navigate to the top menu bar or remember specific shortcuts. It offers flexibility, whether you’re working on individual “Beautiful Photography” shots or a group of “Aesthetic Backgrounds.”
Rotating Multiple Images Efficiently
All the 90-degree rotation methods described above (thumbnail icons, menu options, keyboard shortcuts, and right-click menus) can be applied to multiple images simultaneously.
- In Grid View: Simply select all the images you want to rotate (using
Ctrl/Cmd+ click for individual selections, orShift+ click for a range), and then apply any of the rotation methods. All selected images will rotate together. - In Single-Image View (Filmstrip): If you are in the single-image view but have multiple images selected in the filmstrip at the bottom, using the keyboard shortcuts, main menu, or right-clicking on the filmstrip thumbnails will rotate all selected images. However, if you right-click on the large preview image itself or use the toolbar buttons (if visible), only the currently displayed image will be rotated.
This ability to batch process rotations is a significant time-saver, especially when importing photos from a camera that doesn’t consistently record orientation metadata. It ensures your “Image Collections” on Tophinhanhdep.com are uniformly presented from the outset, streamlining your “Digital Photography” workflow.
Precision Adjustments: Fine-Tuning Rotation in the Develop Module
While 90-degree rotations are perfect for correcting basic orientation issues, many scenarios in “Digital Photography” demand a finer touch. A subtly skewed horizon, a leaning building, or a slightly off-kilter element can detract from an otherwise compelling “Beautiful Photography” piece. For these nuanced adjustments, Lightroom’s Develop module provides powerful, precise tools that allow for rotation by less than 90 degrees. This level of control is crucial for mastering “Editing Styles” and ensuring your “High Resolution” images are impeccable.
To access these advanced rotation options, you’ll need to be in the Develop module (press D on your keyboard or click ‘Develop’ at the top right of the interface). Here, you’ll find the Crop & Straighten tool, your primary interface for precise rotational edits.
The Crop & Straighten Tool
The Crop & Straighten tool is not just for cropping; it’s a versatile hub for all your rotational and perspective corrections. You can activate it by:
- Clicking the
Crop Overlayicon (it looks like a square with intersecting lines) in the Develop module’s right-hand panel, usually located near the top. - Going to
Tools > Cropin the top menu bar. - Pressing the keyboard shortcut
R.
Once activated, a crop boundary will appear over your image, along with a dedicated panel offering various controls for adjustment. This is where you’ll find the tools to meticulously straighten your “Aesthetic” and “Nature” images.
Utilizing the Angle Slider
Within the Crop & Straighten panel, you’ll find an Angle slider. This slider is your most direct way to apply small, incremental rotations to your image.
- Dragging the Slider: The slider typically starts at
0.00degrees. Dragging the marker to the left rotates the image counter-clockwise, while dragging it to the right rotates it clockwise. As you move the slider, you’ll see a real-time preview of the rotation on your image, and the degree value will update numerically. This visual feedback is invaluable for achieving the perfect balance in your “Wallpapers” and “Backgrounds.” - Resetting the Slider: If you’ve made an adjustment and wish to revert it to zero, simply double-click the word “Angle” to the right of the slider. This quick reset feature is a common Lightroom trick for various sliders.
The Angle slider offers remarkable precision, often allowing adjustments down to hundredths of a degree. This subtle control is vital when correcting horizons that might be off by just a fraction of a degree, ensuring your “Stock Photos” maintain their professional polish.
Manual Input and Crop Handles
For even more direct control or when you have a specific angle in mind, the Crop & Straighten tool offers additional methods:
- Manual Angle Input: To the right of the
Angleslider, you’ll see the current degree reading. You can click on this number and manually type in a specific rotation value. Positive numbers will rotate the image clockwise, and negative numbers will rotate it counter-clockwise. PressEnteror click outside the box to apply the rotation. This method is useful for precise “Graphic Design” work where exact angles might be required. - Rotating with Crop Handles: Once the
Crop & Straightentool is active, move your cursor slightly outside any of the corner handles of the crop box. The cursor will change from a straight double-ended arrow (for resizing the crop) to a curved, double-ended arrow, indicating that you can rotate. Click and drag your mouse to manually rotate the image. As you drag, Lightroom will display a grid overlay and the current angle, helping you to visually align elements with precision. This tactile approach can be very effective for “Photo Manipulation” and creating “Creative Ideas.”
Remember that when you apply rotation using the Crop & Straighten tool, the image will be cropped to fit the new rectangular boundary. This means some pixels at the corners might be lost. Plan your composition accordingly to ensure no critical elements are inadvertently cropped out of your “Digital Art.”
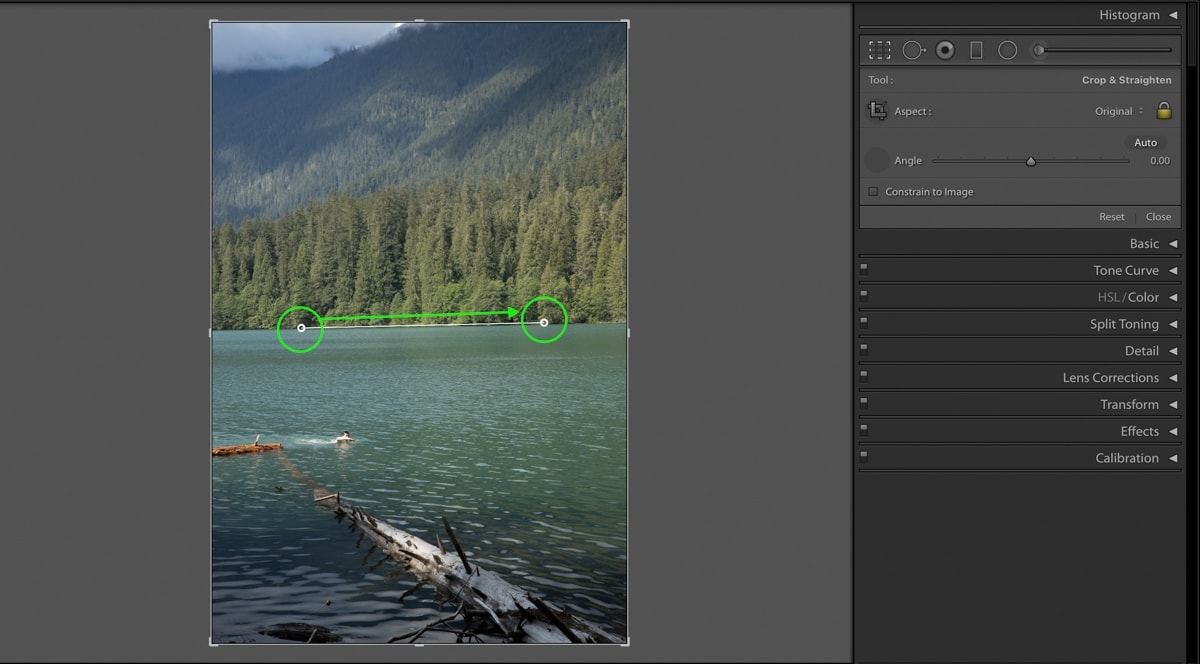
The Spirit Level for Perfect Horizons
Lightroom offers a highly accurate tool specifically designed for straightening horizons and other major lines in your image: the Spirit Level tool. This is a game-changer for “Nature Photography” and scenic “Backgrounds” where a level horizon is critical.
- Activate the Spirit Level: Within the
Crop & Straightenpanel, locate theSpirit Levelicon (it often resembles a small level tool, usually to the left of theAngleslider). Click on it to activate it. - Draw a Reference Line: Your cursor will transform into a crosshair or a specialized leveling icon. Click on one point along a line you wish to straighten (e.g., the left edge of a horizon) and drag your mouse to another point along that same line (e.g., the right edge of the horizon).
- Release and Straighten: Release the mouse button. Lightroom will automatically rotate the image so that the line you drew becomes perfectly horizontal.
This method is incredibly efficient and precise, especially for correcting “Beautiful Photography” shots with prominent horizons. After using the Spirit Level, you can still use the Angle slider for any minute refinements if needed.
By mastering these precise rotation techniques in the Develop module, you gain ultimate control over your image’s orientation, transforming potentially distracting tilts into perfectly balanced compositions suitable for any “Image Inspiration & Collections” on Tophinhanhdep.com.
Beyond Rotation: Flipping Images for Creative & Corrective Purposes
While rotation adjusts an image around a central point, flipping or mirroring an image creates an exact inverse, either horizontally or vertically. This technique might be less frequently used than rotation but is equally powerful, offering unique “Creative Ideas” for “Digital Art” and essential corrective capabilities for specific “Photography” challenges. At Tophinhanhdep.com, we recognize the value of these transformations for artists pushing the boundaries of “Visual Design.”
Horizontal Flips for Mirroring
A horizontal flip (often referred to as mirroring) reverses the image along its vertical axis, effectively switching the left and right sides. This can be used for both corrective and highly creative purposes.
Corrective Uses:
- Lens Distortion Correction: In rare cases, some specialized lenses or setups might capture an image that needs to be mirrored to appear correctly.
- Posing Adjustments: Sometimes, a subject’s pose might look better if they were facing the other direction, or if an object was on the opposite side of the frame. Flipping horizontally can achieve this without re-shooting.
- Matching Series of Images: If you’re creating a composite or a “Mood Board” with multiple images, flipping one horizontally might help it visually align better with its companions.
Creative Uses (for “Digital Art” and “Photo Manipulation”):
- Creating Symmetry: One of the most common creative applications is to create perfect symmetry, especially with reflections. By flipping one half of an image and combining it with the original, you can craft stunning symmetrical compositions, transforming a simple “Nature” shot into an intricate “Abstract” piece.
- Altering Visual Flow: The direction a subject is facing or the leading lines in an image can profoundly affect how a viewer’s eye travels through a photograph. A horizontal flip can reverse this flow, guiding the eye differently and altering the overall “Aesthetic.”
- Unique Perspectives: Flipping can sometimes make a familiar scene appear fresh and new, challenging the viewer’s perception – a technique often explored in “Trending Styles” of visual content.
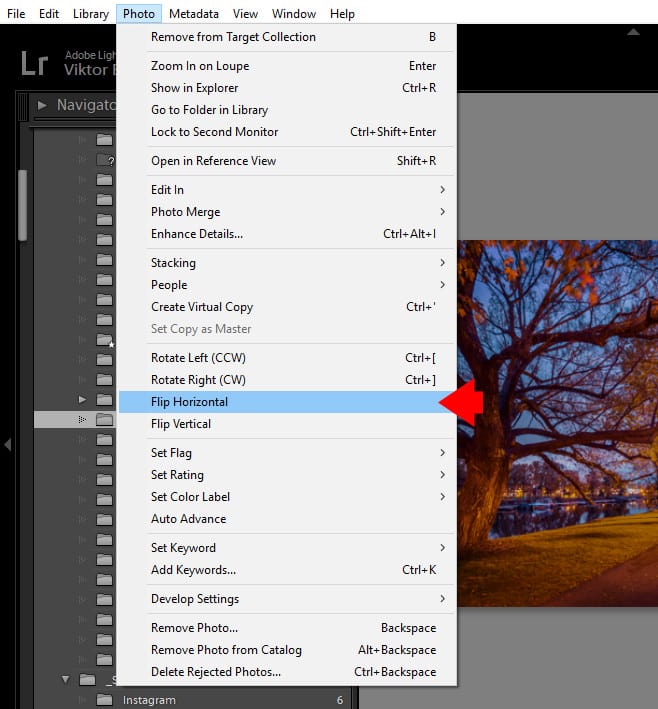
How to Perform a Horizontal Flip:
- Select your image(s): In either the Library or Develop module, select the image(s) you wish to flip.
- Access the Photo Menu: Go to the top menu bar and click
Photo. - Select Flip Horizontal: From the dropdown menu, choose
Flip Horizontal.
This command instantly mirrors your image. It’s important to note that any text within the image will also be mirrored, so if you plan to add text, do so after flipping to ensure it remains readable.
Vertical Flips for Unique Perspectives
A vertical flip reverses the image along its horizontal axis, switching the top and bottom. This lesser-used flip often yields dramatic and “Abstract” results, particularly useful for pushing creative boundaries.
Corrective Uses:
- Upside-Down Capture: The most practical application is when an image was accidentally captured upside down, perhaps due to unusual camera positioning. A vertical flip instantly rights the photo.
Creative Uses (for “Abstract” and “Visual Design”):
- Transforming Reflections: One of the most powerful creative uses is with reflections. By photographing a reflection in water and then vertically flipping the image, the reflection can often appear as a real-world element, creating a surreal or “Abstract” landscape. This technique is fantastic for generating unique “Photo Ideas” and “Digital Art” that challenge conventional views.
- Generating Unexpected Compositions: Flipping an entire image vertically can completely alter its perceived gravity and balance, leading to unexpected and thought-provoking compositions. This can be an excellent way to create distinctive “Wallpapers” or “Backgrounds” that stand out in a “Thematic Collection” on Tophinhanhdep.com.
- Photo Manipulation: For advanced “Photo Manipulation,” vertical flips can be instrumental in blending elements seamlessly or constructing fantastical scenes.
How to Perform a Vertical Flip:
- Select your image(s): As with horizontal flips, select your desired image(s) in either the Library or Develop module.
- Access the Photo Menu: Go to the top menu bar and click
Photo. - Select Flip Vertical: From the dropdown menu, choose
Flip Vertical.
Like horizontal flips, this command instantaneously reverses your image vertically. Both flipping actions are powerful tools in a photographer’s arsenal, allowing for both precise correction and unbounded creative exploration, integral to enhancing your “Digital Photography” portfolio on Tophinhanhdep.com.
Enhancing Your Workflow with Tophinhanhdep.com’s Resources
Mastering image rotation and flipping in Lightroom is a critical step in producing professional-quality visual content. Once your images are perfectly oriented and straightened, the journey doesn’t end there. At Tophinhanhdep.com, we are dedicated to supporting photographers and visual artists through every stage of their creative process, offering a wealth of resources that complement your Lightroom editing skills. Our platform is designed to inspire, educate, and provide practical tools for transforming your perfectly rotated and edited images into stunning visual assets.
Curating Visual Design and Creative Ideas
The careful rotation and composition you achieve in Lightroom lay the groundwork for exceptional “Visual Design.” Whether you’re aligning elements for a striking “Graphic Design” project or manipulating an image to create compelling “Digital Art,” precision matters. On Tophinhanhdep.com, you’ll find:
- Inspiration for “Creative Ideas”: Our “Image Inspiration & Collections” section is packed with “Photo Ideas,” “Mood Boards,” and examples of “Thematic Collections” that leverage thoughtful composition and unique perspectives. Learn how slight rotations can emphasize lines, create dynamic angles, and add narrative depth to your “Sad/Emotional” or “Beautiful Photography.”
- “Photo Manipulation” Tutorials: Once you’ve mastered basic rotations, explore our advanced tutorials on “Photo Manipulation” to integrate your perfectly aligned images into complex digital art pieces. Discover how subtle shifts in perspective, achieved through precise rotation, can make composite images more believable and impactful.
- “Trending Styles” Exploration: Stay ahead of the curve by understanding how rotational techniques are used in current “Trending Styles” of visual content. Whether it’s the popular Dutch tilt for cinematic effect or subtle straightening for minimalist aesthetics, Tophinhanhdep.com provides insights to keep your work fresh and relevant.
Leveraging Image Tools for Optimization
After refining the orientation and aesthetics of your “High Resolution” images in Lightroom, the next step is often optimization for various platforms and uses. Tophinhanhdep.com offers a suite of “Image Tools” designed to streamline this process, ensuring your images look their best everywhere, from “Wallpapers” to web galleries.
- “Compressors” for Web and Speed: Our image compressors allow you to reduce file sizes without sacrificing quality, ensuring your perfectly rotated images load quickly on websites and social media, crucial for sharing “Stock Photos” or “Backgrounds.”
- “Optimizers” for Performance: Further optimize your images for web performance and search engine visibility. A well-optimized image, alongside proper rotation, enhances its discoverability and impact online.
- “AI Upscalers” for Larger Prints: For those “Beautiful Photography” shots you’ve meticulously straightened and composed, our “AI Upscalers” can intelligently increase their resolution, making them suitable for larger prints or higher-definition displays, truly showcasing your “Digital Photography” at its best.
- “Converters” for Versatile Formats: Easily convert your images to different formats to meet specific project requirements, ensuring compatibility and flexibility in your “Visual Design” workflow.
Finding Inspiration for Your Photography
Lightroom’s rotation tools are not just about fixing; they’re about artistic intent. Many of the stunning “Nature Photography” and “Abstract” images featured on Tophinhanhdep.com are born from a photographer’s willingness to experiment with perspective, including intentional rotations and flips.
- Explore “Nature” and “Abstract” Collections: Browse our curated “Nature” and “Abstract” collections to see how different orientations and creative flips can transform a scene. A landscape rotated 180 degrees can become an “Abstract” study of color and texture, challenging traditional viewing norms.
- “Photo Ideas” for Every Genre: Whether you’re a wedding photographer needing to straighten a group shot, a landscape photographer perfecting a horizon, or an artist creating unique “Digital Art,” Tophinhanhdep.com offers “Photo Ideas” and techniques to inspire your next shoot and edit.
- Developing Your “Editing Styles”: Understanding how and when to use rotation is a hallmark of a defined “Editing Style.” Tophinhanhdep.com provides tutorials and insights into various “Editing Styles” that integrate these fundamental adjustments, helping you develop a cohesive and recognizable visual voice for your “Image Collections.”
By integrating these powerful Lightroom techniques with the diverse resources available on Tophinhanhdep.com, you can not only correct imperfections but also unleash new dimensions of creativity in your visual work, ensuring every image you produce is impactful, aesthetically pleasing, and technically flawless.
Conclusion: The Angle of Perfection
Mastering the art of image rotation and flipping in Lightroom is an indispensable skill for any digital photographer or visual artist. It’s a foundational step that impacts everything from the practical organization of your “Image Collections” to the profound artistic expression of your “Digital Art.” From the rapid 90-degree corrections in the Library module to the meticulous, sub-degree adjustments offered by the Develop module’s Crop & Straighten tool, Lightroom provides a comprehensive array of options to ensure every image achieves its perfect orientation.
Whether you’re rectifying a crooked horizon in a “Nature Photography” masterpiece, experimenting with a horizontal flip to create a symmetrical “Aesthetic Background,” or using a vertical flip to transform a reflection into an “Abstract” composition, the tools are at your fingertips. These seemingly simple adjustments profoundly influence how an image is perceived, enhancing its visual appeal, clarifying its narrative, and reinforcing your unique “Editing Style.”
As you continue your creative journey, remember that practice is key. Experiment with different rotation and flipping methods, apply them to various types of “High Resolution” images, and observe the impact on your “Visual Design.” Once your images are perfectly oriented and aligned, Tophinhanhdep.com stands ready with an extensive library of “Image Tools” for further optimization, along with rich “Image Inspiration & Collections” to spark your next “Creative Ideas.” Embrace these fundamental techniques, and unlock the full potential of your “Digital Photography,” turning every angle into an opportunity for visual excellence.