How to Rotate Images in Microsoft Word: A Comprehensive Guide for Stunning Visual Documents on Tophinhanhdep.com

In the dynamic world of digital content creation, the visual appeal of your documents is paramount. Whether you’re crafting a professional report, designing a captivating presentation, or compiling a personal photo album, images play a crucial role in conveying your message and capturing attention. However, simply inserting an image into a Microsoft Word document isn’t always enough. Often, these visuals need a little adjustment – specifically, rotation – to achieve the perfect orientation and integrate seamlessly with your text and overall design.
For many users, navigating the intricacies of image manipulation within Word can feel like a daunting task. An image that’s slightly off-kilter or entirely sideways can disrupt the flow of your document, diminish its professionalism, and detract from the beauty of your carefully selected photography. At Tophinhanhdep.com, we understand the power of perfectly presented visuals. Our platform is dedicated to providing inspiration, tools, and guidance for everything related to stunning imagery, from high-resolution wallpapers and aesthetic backgrounds to advanced photography techniques and visual design principles. This guide, tailored to the Tophinhanhdep.com ethos, will empower you to effortlessly adjust the orientation of your images in Microsoft Word, transforming ordinary documents into visually striking masterpieces.
From simple drag-and-drop rotations for quick fixes to precise degree adjustments and even sophisticated 3-D effects, mastering image rotation in Word is a fundamental skill for anyone committed to visual excellence. We’ll explore various methods, delve into the subtle nuances of each, and offer expert tips to ensure your rotated images not only fit but also enhance the aesthetic and thematic coherence of your document. Let’s embark on a journey to unlock the full potential of your visual storytelling within Microsoft Word, guided by the principles of Tophinhanhdep.com.
The Art of Visual Alignment: Fundamental Rotation Techniques in Word
The ability to accurately rotate images is a cornerstone of effective visual communication in any document. Microsoft Word provides several robust methods to achieve this, catering to different levels of precision and creative intent. Whether you need a quick flip or a nuanced angle, understanding these techniques is crucial for anyone engaging with digital photography, graphic design, or simply striving for professional-looking documents. At Tophinhanhdep.com, we emphasize the importance of these foundational skills to bring your aesthetic vision to life.
Method 1: Intuitive Mouse Rotation – Quick Adjustments for Visual Harmony
For those moments when you need a swift, visual adjustment without delving into menus, Word’s intuitive mouse rotation is your go-to method. This technique is highly visual and offers immediate feedback, making it ideal for experimental placements or fine-tuning the balance of an image within a dynamic layout. It’s especially useful when integrating vibrant nature photography or expressive abstract images where a slight tilt can dramatically alter the mood or impact.
Steps to Rotate with the Mouse:
-
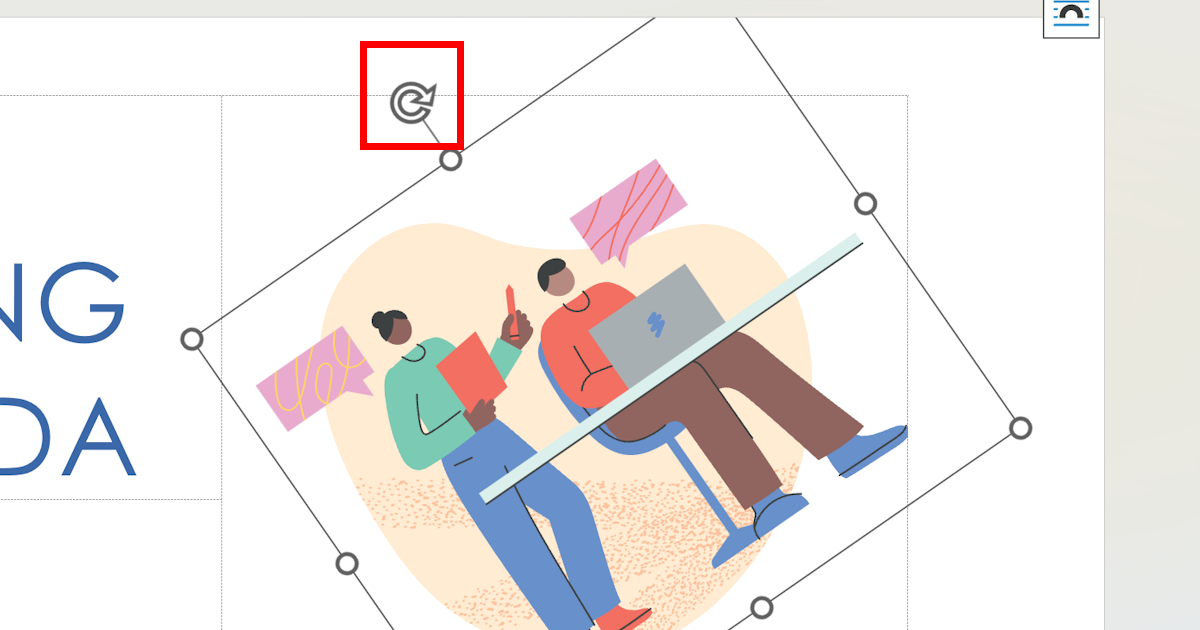
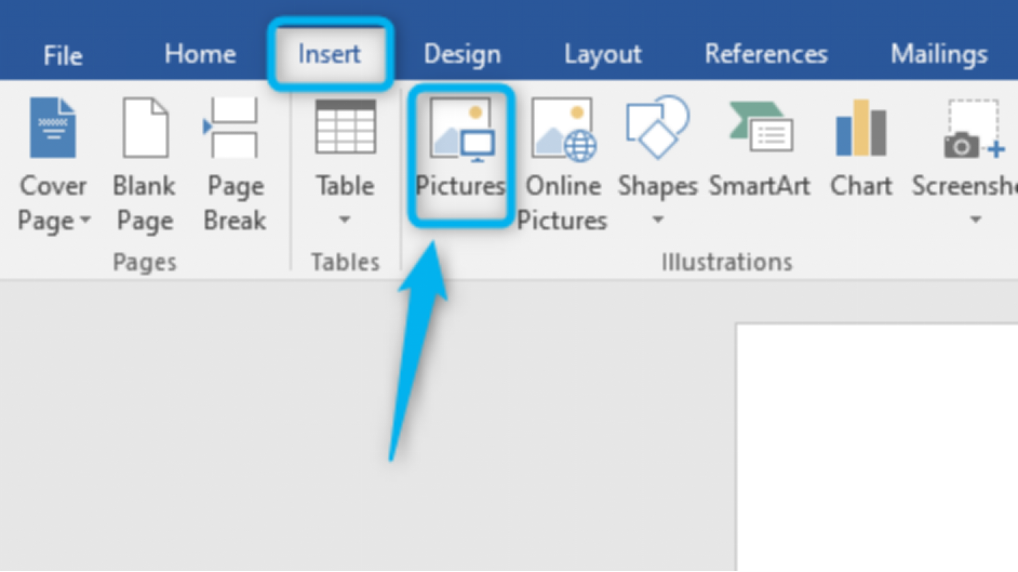
Open Your Document and Select the Image: Begin by opening your Microsoft Word document. If you haven’t already, insert the image you wish to rotate. Once the image is in place, simply click on it. You’ll notice a border appearing around the image, typically with small squares or circles at the corners and midpoints, indicating it’s selected. Crucially, a distinct circular arrow icon, known as the “rotation handle,” will appear usually at the top or near the top-center of the selected image.
-
Engage the Rotation Handle: Position your mouse cursor directly over this circular arrow. When your cursor transforms into a similar circular arrow, click and hold down the left mouse button.
-
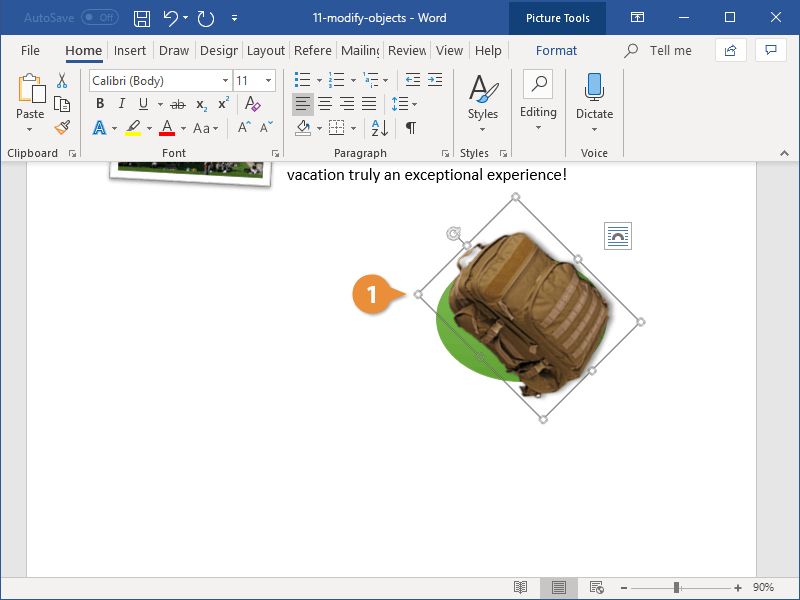
Drag and Rotate: While still holding the mouse button, drag your cursor in the direction you want the picture to rotate. As you move your mouse, the image will dynamically follow its movement, rotating around its central axis. This immediate visual feedback allows you to gauge the rotation in real-time.
-
Refine with Precision (Optional): For a more controlled rotation, especially when aiming for consistent angles, hold down the Shift key on your keyboard while dragging the rotation handle. This clever shortcut constrains the rotation to 15-degree increments, allowing for easier alignment to common angles like 45, 90, or 180 degrees. This can be particularly helpful for maintaining a structured aesthetic in documents featuring multiple images, such as a collection of high-resolution stock photos or a themed photo essay.
-
Release to Confirm: Once the image reaches your desired angle, simply release the mouse button. The rotation will be applied, and the image will settle into its new orientation. Remember to save your document regularly to preserve these changes.
This drag-and-drop method is perfect for quick adjustments to beautiful photography or for arranging dynamic compositions that benefit from a natural, less rigid alignment. It embodies the “creative ideas” aspect of visual design, allowing you to quickly iterate and find the perfect visual balance.
Method 2: Precision through Degrees – Achieving Exact Angles for Professional Documents
While the mouse rotation offers speed and intuitive control, sometimes your document demands absolute precision. For professional reports, detailed graphic design layouts, or when working with high-resolution digital photography that requires exact alignment, rotating by specific degrees is indispensable. This method utilizes Word’s built-in “Picture Format” tools to provide granular control over orientation, ensuring your visuals meet the highest standards of accuracy. It’s a core technique for achieving polished “editing styles” in your digital photography within a document.
Steps to Rotate by Degrees:
-
Select the Image to Activate Format Tools: Just like with mouse rotation, click on the image you wish to rotate. This action is key, as it dynamically activates the “Picture Format” tab (or simply “Format” in some versions) in the ribbon menu at the top of your Word window. This tab is your gateway to a suite of powerful image editing tools.
-
Navigate to the Rotate Option: Within the “Picture Format” tab, locate the “Arrange” group (in Word for Windows) or a similar section on the right side of the menu near the “Selection Pane” button (in Word for Mac). Here, you’ll find the “Rotate” icon, often depicted as a triangle with an arrow above it. Click this icon to reveal a drop-down menu of rotation options.
-
Utilize Preset Rotations: The drop-down menu offers several handy preset options that cover the most common rotation needs:
- Rotate Right 90°: Turns the image 90 degrees clockwise.
- Rotate Left 90°: Turns the image 90 degrees counter-clockwise.
- Flip Vertical: Mirrors the image along its horizontal (X) axis, effectively turning it upside down if it was upright. This is excellent for creating symmetrical reflections or unique visual effects, perhaps with abstract images or sad/emotional photography.
- Flip Horizontal: Mirrors the image along its vertical (Y) axis, creating a mirrored left-to-right reflection. Useful for reversing orientations without changing the top-to-bottom aspect, perfect for aligning images facing each other.
-
Enter Exact Angles with “More Rotation Options”: For unparalleled precision, select “More Rotation Options…” from the bottom of the “Rotate” drop-down menu. This will open a dialog box, often part of the “Layout” or “Size and Position” settings. Within this box, locate the “Rotation” header.
- You can then directly type a specific degree value into the “Rotation” input field or use the up/down arrows to adjust it incrementally.
- Positive numbers (e.g., 45, 135) will rotate the image clockwise (to the right).
- Negative numbers (e.g., -45, -135) will rotate the image counter-clockwise (to the left).
- Any rotation exceeding 360 degrees (e.g., 370 degrees) will simply loop back to its equivalent angle (e.g., 10 degrees), as 360 degrees returns the image to its original orientation.
-
Apply and Confirm: After entering your desired degree, click “OK” or press Enter to apply the precise rotation to your image.
Keyboard Shortcuts for Windows (Advanced Tip for Efficiency): For even faster execution of preset rotations (especially useful for users who prefer keyboard navigation), select the photo, then hold ALT and press J, P, A, Y. After this sequence, you can then hold ALT and press:
- R for Rotate Right 90
- L for Rotate Left 90
- V for Flip Vertical
- H for Flip Horizontal
This method, with its emphasis on exact measurements, is foundational for graphic design and ensures that your high-resolution nature photography or carefully composed beautiful photography maintains its intended integrity and professional presentation.
Method 3: Exploring 3-D Rotation – Adding Depth and Dynamic Angles (Word 2007 & Up)
For those looking to push the boundaries of document aesthetics and introduce a dynamic, three-dimensional quality to their visuals, Microsoft Word (versions 2007 and newer) offers powerful 3-D rotation capabilities. This feature moves beyond simple 2-D planar rotation, allowing you to tilt, pivot, and turn images as if they exist in space. It’s an advanced technique that aligns perfectly with the “digital art,” “photo manipulation,” and “creative ideas” aspects promoted by Tophinhanhdep.com, enabling you to craft truly unique visual narratives.
Steps to Apply 3-D Rotation:
-
Access “Format Picture”: Right-click directly on the image you wish to manipulate. From the contextual menu that appears, select “Format Picture…” (On a Mac without a right-click mouse, use Ctrl-click). This action will open a dedicated “Format Picture” panel, typically appearing on the right side of your Word window.
-
Locate “3-D Rotation”: Within the “Format Picture” panel, you’ll see several tabs or categories of options. Look for the “Effects” tab, often represented by a pentagon icon. Click on this tab. Scroll down the list of effects until you find “3-D Rotation.” Expand this section to reveal its options.
-
Choose a Preset: Word provides a selection of “Presets” for 3-D rotation. These pre-configured effects offer a quick way to apply common 3-D angles without manual input. Click the icon next to “Presets” to browse the gallery and select one that catches your eye. These presets can be a great starting point for showcasing trending styles or thematic collections in a dynamic way.
-
Manually Enter Degrees for Custom Control: For the ultimate control, you can bypass the presets and manually input specific degrees for rotation along three distinct axes:
-
X-Rotation: This controls rotation around the horizontal (X) axis. Imagine your image is on a table, and you’re tilting its top edge away from you or towards you. Increasing the X-Rotation will make the top of the image appear to recede, while decreasing it brings it closer. This is excellent for creating perspective or a subtle “peeking” effect, perfect for abstract or aesthetic photography.
-
Y-Rotation: This governs rotation around the vertical (Y) axis. Picture turning the image over, as if rotating it horizontally on a pivot. Increasing the Y-Rotation turns the image to face more to the right, while decreasing it turns it left. This can create a dynamic “page-turning” effect or show the “side” of a flat image, ideal for photo manipulation or digital art compositions.
-
Z-Rotation: This is the most familiar rotation, controlling movement around the Z-axis (which runs perpendicular to the image plane). This is analogous to spinning the image clockwise or counter-clockwise on a flat surface. It provides the same 2-D rotation as Method 2 but within the 3-D context, allowing you to combine flat spin with depth effects.
Enter your desired degree values into the input fields next to “X-Rotation,” “Y-Rotation,” and “Z-Rotation” or use their respective arrow controls.
-
-
Observe and Refine: As you adjust these values, Word provides a live preview of the 3-D effect on your image. Experiment with different combinations to achieve unique angles and perspectives. This feature is particularly powerful for creating engaging “visual design” elements, such as tilted frames for beautiful photography or dynamic displays for sad/emotional images that need to convey depth and introspection.
3-D rotation in Word empowers you to add significant depth and artistic flair to your documents, turning standard images into compelling visual statements. It opens up avenues for sophisticated photo ideas and can elevate your content to the level of true digital art.
Beyond Basic Rotation: Enhancing Your Visuals with Tophinhanhdep.com’s Philosophy
At Tophinhanhdep.com, we believe that every image tells a story, and its presentation within a document is critical to that narrative. Beyond the mechanical act of rotation, lies the art of integration – ensuring that every rotated image serves a purpose, enhances aesthetics, and contributes to the overall thematic collection of your work. The techniques discussed above are not merely technical adjustments; they are tools for visual design, allowing you to meticulously craft your digital canvas.
Integrating Rotated Images with Aesthetic and Thematic Collections
The judicious use of image rotation can profoundly impact how various types of photography and imagery are perceived in your documents. Consider our diverse categories at Tophinhanhdep.com:
- Wallpapers and Backgrounds: When using high-resolution wallpapers or custom backgrounds, rotation can align them perfectly with page orientation or create dynamic, abstract backdrops. A subtly rotated abstract background can add depth and intrigue, transforming a static page into a visual experience.
- Aesthetic and Nature Photography: A breathtaking landscape photo might need a slight counter-clockwise rotation to correct horizon lines, ensuring visual balance. Similarly, a piece of aesthetic photography, when carefully tilted, can draw the eye to a specific focal point, reinforcing its artistic intent.
- Abstract and Sad/Emotional Images: These categories often thrive on unconventional presentations. A dramatic rotation can enhance the disorientation of an abstract image or amplify the emotional weight of a poignant photograph, allowing the visual to resonate more deeply with the viewer.
- Beautiful Photography: Regardless of the subject, beautiful photography deserves to be presented immaculately. Correct rotation ensures that every element of the composition, from leading lines to subject alignment, is optimized for maximum impact within your document.
Using Word to create “Mood Boards” or “Thematic Collections” becomes an immersive experience when you can precisely control each image’s orientation. Imagine curating a collection of “photo ideas” where each image, through careful rotation and placement, contributes to a cohesive visual story. This attention to detail elevates your document from a mere collection of files to a curated exhibition of visual inspiration.
The Photographer’s Edge: Precision and Style in Digital Photography
For photographers, whether amateur or professional, the journey of an image doesn’t end after it’s captured or edited in specialized software. Its presentation in a document is a critical final step. Rotation in Word becomes an extension of your “editing styles” and commitment to “high-resolution” quality.
- High-Resolution and Stock Photos: These images are often chosen for their crisp detail and professional composition. Misalignment, even minor, can undermine their quality. Precise rotation ensures that the integrity of your high-resolution image is maintained, whether it’s a detailed product shot or a sweeping panoramic landscape. When incorporating stock photos, correct orientation helps them blend seamlessly into your document’s layout, rather than appearing as an afterthought.
- Digital Photography and Editing Styles: Many contemporary “editing styles” leverage unconventional angles or dynamic tilts to create visual interest. Implementing these styles within your Word document means applying rotations that align with the original artistic intent. This could involve rotating a portrait slightly to create a more engaging diagonal composition or flipping an image to balance a two-page spread. The goal is to ensure your digital photography retains its artistic merit and polished look, even within a word processing environment.
In essence, mastering image rotation in Microsoft Word is more than just a technical skill; it’s an integral part of Tophinhanhdep.com’s broader vision for visual excellence. It empowers creators to present their “Images” and “Photography” with intentionality, professionalism, and artistic flair, transforming documents into captivating visual experiences.
Streamlining Your Workflow: Advanced Tools and Tips for Image Management
While Microsoft Word offers excellent individual image rotation capabilities, handling a large volume of images, each requiring specific adjustments, can quickly become tedious. Imagine preparing a catalogue with dozens of product shots, or compiling a comprehensive report filled with data visualizations – adjusting each image one by one is a significant time drain. This is where Tophinhanhdep.com advocates for a more streamlined approach, integrating external “Image Tools” for efficiency and providing “Visual Design” tips for seamless document integration.
Batch Rotation for Efficiency: Leveraging Tophinhanhdep.com’s Recommended Image Tools
Word’s inherent design focuses on document layout, not extensive batch image processing. If you’re dealing with a folder full of sideways smartphone photos, or a collection of high-resolution stock images all needing the same rotation before they even touch your document, a dedicated image editor is invaluable. Tophinhanhdep.com recommends leveraging powerful external “Image Tools” for this purpose, such as UniConverter (as a representative example of a versatile image processing tool). These tools complement Word by preparing your visuals efficiently, allowing you to focus on document content and layout once the images are perfectly oriented.
Why Use External Tools for Batch Rotation?
- Massive Time Savings: Process dozens, even hundreds, of images simultaneously, applying the same rotation with a single command. This saves hours compared to rotating each image individually in Word.
- Consistent Application: Ensure uniform rotation across an entire collection, which is crucial for thematic collections, professional photo ideas, or extensive digital photography projects.
- Maintain Image Quality: Many dedicated image tools are designed to perform operations like rotation with minimal loss of quality, preserving the crispness of your high-resolution photography.
- Versatile Format Support: Handle a wide array of image formats (JPG, PNG, TIFF, GIF, BMP, etc.) that might later be inserted into Word, ensuring broader compatibility.
- Integration with Other Optimizations: Batch rotation can be combined with other essential image preparation steps, such as compression (reducing file size for faster loading), conversion (changing formats for compatibility), or even AI upscaling (enhancing resolution for print), which are all part of a comprehensive image workflow supported by Tophinhanhdep.com’s toolkit philosophy.
Example Steps to Batch Rotate Images with a Tool like UniConverter:
- Launch the Image Editor: Download and install your chosen batch image editor. Open the program and navigate to its batch image editing or conversion module.
- Import Your Images: Use an “Add Files” or “Add Folder” option to import all the images you intend to rotate. You can select multiple files or an entire directory.
- Define Rotation Parameters: Within the editor, look for adjustment options, often under “Rotate” or “Transform.” You can typically choose a preset (e.g., Rotate 90° Clockwise, Flip Horizontal) or enter a custom angle.
- Apply and Export: Apply the chosen rotation to all selected images. Then, specify an output folder and format (e.g., maintain original format, convert to JPG for web use). Initiate the batch export.
- Seamless Word Integration: Once exported, your entire collection of images will be uniformly rotated and ready for insertion into your Word document, eliminating the need for further orientation adjustments within Word itself.
By integrating batch processing into your workflow, you not only save time but also ensure that your images, whether they are abstract wallpapers or beautiful photography, are consistently prepared to the highest standard before they become part of your “visual design” in Word.
Pro Tips for Seamless Integration: Aligning Rotated Images with Text Layouts
After rotating images in Word, the next challenge is often getting them to coexist harmoniously with your text. A perfectly rotated image can still look out of place if it’s not correctly integrated into the document’s layout. These “Visual Design” tips are essential for ensuring that your creative ideas and photo manipulation efforts translate into a polished, readable document.
-
Master Text Wrapping Options: This is perhaps the most critical tip. Right-click on your rotated image, select “Wrap Text,” and explore the various options:
- Square: Text wraps around the image’s bounding box.
- Tight: Text wraps closely around the actual contours of the image (if it’s not a perfect rectangle). Ideal for organic shapes or aesthetic images.
- Through: Similar to Tight, but allows text to flow through transparent areas of the image.
- Top and Bottom: Text stops above and starts below the image, leaving clear space on the sides.
- Behind Text / In Front of Text: Useful for backgrounds or overlays, perhaps with abstract images or subtle branding.
- In Line with Text: Treats the image as a large character in the text flow, often limiting flexibility but ensuring predictable placement. Experiment with these to find the best fit for your “graphic design” goals.
-
Utilize Gridlines and Guides for Precise Placement: For pixel-perfect alignment, especially when arranging multiple rotated elements or aiming for a structured “mood board” look, activate Word’s gridlines (Go to the “View” tab > “Show” group > check “Gridlines”). You can also enable “Guides” or “Rulers” for visual assistance. These tools help you align the edges or centers of your rotated images with precision, ensuring visual balance and order.
-
Group Multiple Rotated Images: If you have several images that you want to move, resize, or rotate collectively – perhaps a collage of nature photography or a complex visual design – group them. Select all desired images by holding down the Ctrl key (or Command on Mac) and clicking each one. Then, right-click on any selected image and choose “Group” > “Group.” Now, you can manipulate them as a single unit, maintaining their relative positions and rotations. This is invaluable for complex “photo manipulation” compositions.
-
Leverage Position Settings for Exact Measurements: For ultimate control over where your rotated image sits on the page, use the “Position” feature. Select the image, go to “Picture Format” > “Position.” Here, you can specify exact horizontal and vertical measurements relative to the page, margin, or paragraph. This is essential for ensuring that high-resolution photography is placed with exacting precision, meeting the standards of professional publications.
-
Adjust the Text Anchor Point: Each image inserted into Word has an “anchor” that ties it to a specific point in your document (usually a paragraph). By default, if the text moves, the image might move too. To control this, right-click the image, go to “More Layout Options…” (from “Wrap Text” menu), and in the “Position” tab, check “Lock anchor.” This keeps the image tethered to its original anchor point, reducing unexpected shifts when editing text. For dynamic “digital photography” layouts, this ensures your image stays where you want it.
-
“Fix position on page” for Static Layouts: For background images or elements that should never move, even if you add or delete text, select the image and check “Fix position on page” within the “Picture Format” options (often found under the “Wrap Text” dropdown). This is perfect for images that serve as fixed “backgrounds” or foundational elements in a “creative ideas” layout.
-
Create a Drawing Canvas for Complex Designs: For highly intricate layouts involving multiple rotated images, shapes, and text boxes, consider inserting a “Drawing Canvas” (Go to “Insert” tab > “Shapes” group > “New Drawing Canvas”). This creates a dedicated container where you can arrange and rotate elements freely without interference from the main document text flow. It’s a powerful feature for advanced “graphic design” and “photo manipulation” within Word, allowing you to build complex visual compositions from scratch.
By applying these advanced tips, your efforts in rotating images will culminate in documents that are not just visually appealing but also structurally sound and easy to navigate. Tophinhanhdep.com believes that a thoughtful approach to layout and integration transforms good visuals into truly great presentations.
Elevating Your Documents: The Tophinhanhdep.com Vision for Visual Excellence
Mastering how to rotate images in Microsoft Word is more than just a technical skill; it’s a gateway to elevating your documents from mundane text-heavy pages to engaging visual narratives. Through intuitive mouse rotations, precise degree adjustments, and even dynamic 3-D effects, you gain the power to perfectly orient any image, ensuring it contributes harmoniously to your document’s aesthetic and thematic purpose.
At Tophinhanhdep.com, we champion the belief that every visual element matters. The ability to precisely rotate an image ensures that your high-resolution photography, aesthetic wallpapers, and inspiring thematic collections are presented with the clarity and impact they deserve. This fundamental skill underpins all aspects of effective visual design, from basic graphic design principles to advanced photo manipulation and the generation of truly creative ideas.
By combining Word’s built-in rotation features with smart workflow strategies – such as leveraging external image tools for batch processing and applying expert tips for seamless text integration – you can transform your document creation process. You’ll not only save time but also achieve a level of polish that distinguishes your work. Whether you’re curating a mood board of trending styles, compiling a report with compelling digital photography, or simply ensuring your beautiful nature photography is perfectly aligned, the techniques learned here will serve you invaluable.
Embrace these skills as an extension of your creative toolkit. Explore the vast resources on Tophinhanhdep.com for further image inspiration, discover new photography techniques, and delve deeper into the world of visual design. With perfectly rotated images, your Microsoft Word documents will no longer just communicate information; they will captivate, inspire, and visually impress.