How to Rotate Image on GIMP: A Comprehensive Guide to Enhancing Your Visuals with Tophinhanhdep.com

In the dynamic world of digital imagery, the ability to manipulate and refine visual content is paramount. Whether you’re a professional photographer, a budding graphic designer, or simply someone looking to perfect a personal image, tools like GIMP (GNU Image Manipulation Program) offer a powerful, free, and open-source solution. GIMP stands as a cornerstone for countless creative endeavors, allowing users to perform everything from basic touch-ups to complex photo manipulations. At Tophinhanhdep.com, we understand the critical role such tools play in transforming raw visuals into stunning “Wallpapers,” captivating “Backgrounds,” or “Aesthetic” masterpieces. This guide will dive deep into one of the most fundamental yet versatile operations in GIMP: image rotation.
Image rotation might seem like a simple task, but mastering its nuances can significantly impact the final look and feel of your visuals. From correcting a crooked horizon in a “Nature” photograph to creating artistic angles for “Abstract” designs, or precisely aligning elements for “Graphic Design” projects, the ability to rotate images effectively is indispensable. This article will provide you with a detailed, step-by-step walkthrough, covering various methods of rotating images in GIMP, from quick fixes to advanced, precise adjustments. We’ll explore how these techniques empower you to enhance your “Digital Photography,” explore new “Editing Styles,” and bring your “Creative Ideas” to life, all while leveraging the vast resources and inspiration available on Tophinhanhdep.com.

Getting Started with GIMP: Essential Steps for Image Rotation
GIMP is designed to be user-friendly, yet its depth offers immense potential for those willing to explore. Before you can begin rotating, you need to set up your workspace and load the image you wish to edit. This section covers the fundamental steps for initiating image rotation, ensuring that whether you’re working with “High Resolution” stock photos or a cherished piece of “Beautiful Photography,” you can begin your editing journey smoothly.
Basic Image Rotation using the Rotate Tool
The Rotate Tool is your primary gateway to manipulating the orientation of your images within GIMP. It offers intuitive control, allowing for both freehand adjustments and precise numerical input. This method is perfect for quick adjustments, such as leveling a slightly tilted landscape shot or giving a subtle dynamic tilt to a design element.
Step-by-Step Guide to Basic Rotation:
-
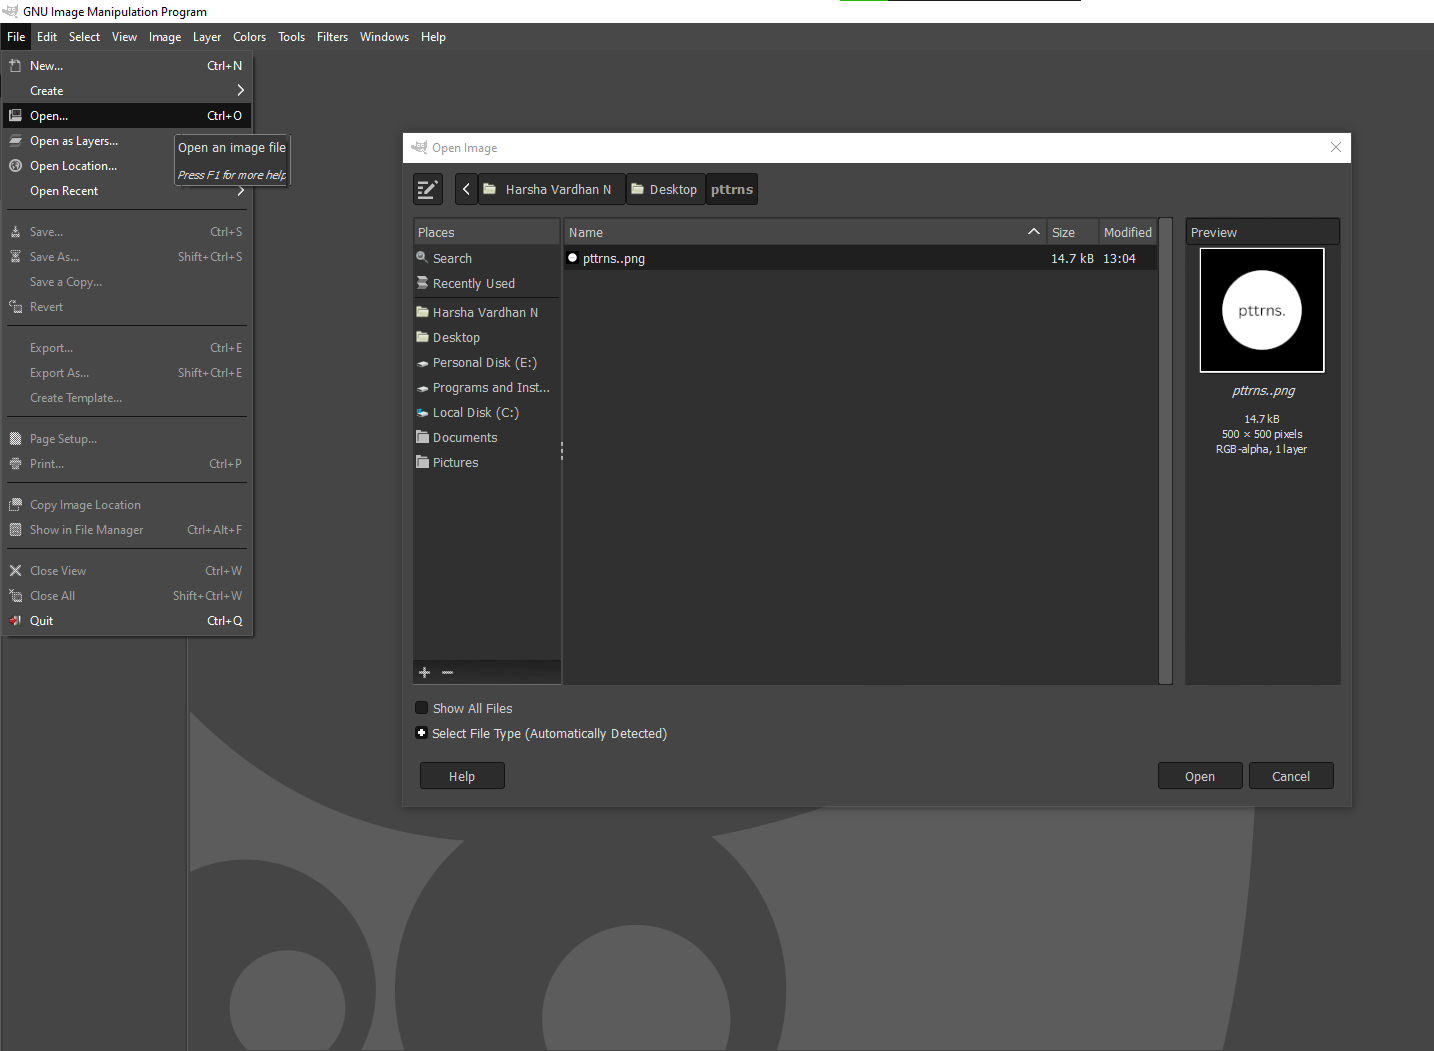
Open GIMP and Load Your Image: First, launch GIMP on your computer. Navigate to
File > Openand select the image you intend to rotate. Whether you’ve sourced a breathtaking “Nature” image from Tophinhanhdep.com’s “Image Collections” or are working on your own “Digital Photography,” getting it into GIMP is the first crucial step. A properly opened image sets the stage for any subsequent “Photo Manipulation” or “Visual Design.” -
Select the Rotate Tool: On GIMP’s Toolbox (usually located on the left side of your screen), locate and click on the Rotate Tool icon. It often resembles a square with a circular arrow. Alternatively, for a quicker workflow, you can use the keyboard shortcut
Shift + R. This immediately activates the tool, preparing your canvas for rotation. -
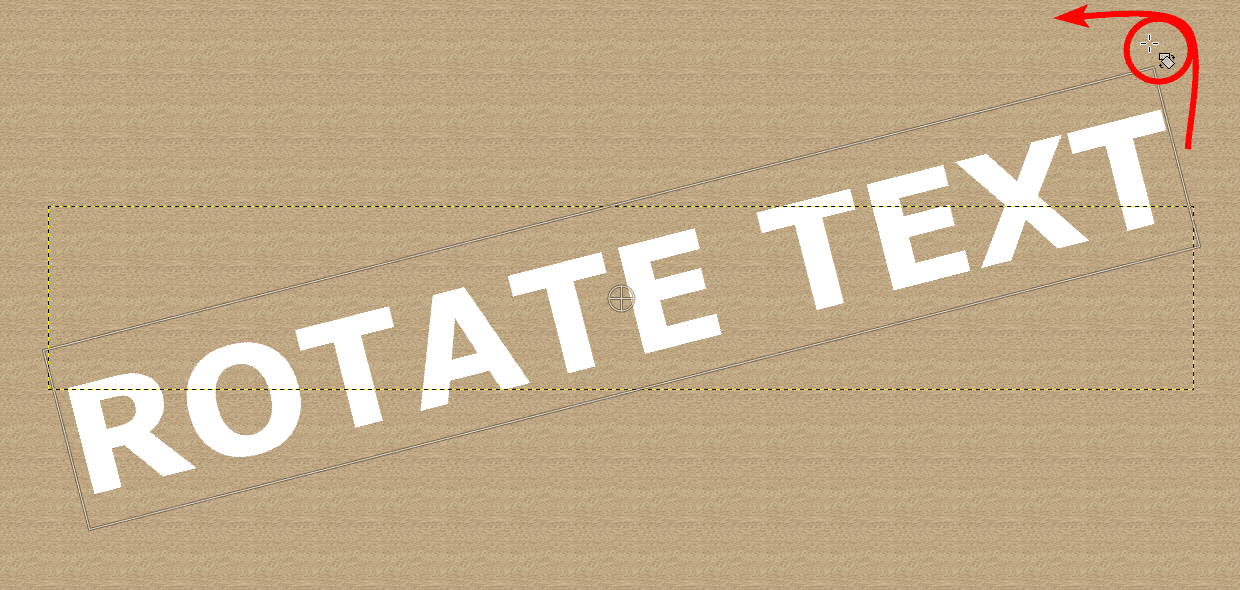
Perform the Rotation: Once the Rotate Tool is active, click directly on your image. A
Rotate Informationdialog box will appear, and a grid will overlay your image.- Freehand Rotation: Click and drag your mouse anywhere on the image. As you drag, you’ll see the image rotate in real-time. This method is excellent for visual adjustments where precise angles aren’t strictly necessary but a general orientation change is desired. You can observe the
Anglevalue in the dialog box updating as you rotate. - Numerical Rotation: For more precise control, you can directly input a numerical value (in degrees) into the
Anglefield within theRotate Informationdialog box. For instance, entering “90” will rotate the image 90 degrees. This is particularly useful when you have a specific angle in mind for your “Graphic Design” or “Digital Art” projects.
- Freehand Rotation: Click and drag your mouse anywhere on the image. As you drag, you’ll see the image rotate in real-time. This method is excellent for visual adjustments where precise angles aren’t strictly necessary but a general orientation change is desired. You can observe the
-
Confirm the Changes: Once you’ve achieved the desired rotation, either by dragging or inputting a value, click the
Rotatebutton in theRotate Informationdialog box. This applies the transformation to your image. If you’re working on a “Sad/Emotional” image and want to convey a particular mood through a subtle tilt, this confirmation locks in your artistic choice. -
Save Your Rotated Image: After applying the rotation, it’s essential to save your work. Go to
File > Saveto overwrite the original image, orFile > Save Asto save it as a new file (highly recommended to preserve your original). We’ll cover saving options in more detail later, but for now, ensure your newly rotated “Aesthetic” image or “Beautiful Photography” is safely stored.
With these simple steps, you can easily adjust the orientation of any image. This fundamental skill is a building block for more complex “Editing Styles” and is essential for preparing images for any “Image Tools” like “Compressors” or “Optimizers” that you might use later on Tophinhanhdep.com.
Precision Rotation via Menu Commands
While the Rotate Tool offers great flexibility, GIMP also provides a set of predefined rotation commands accessible through its menu system. These commands are ideal for standard rotations (like 90 or 180 degrees) that need to be applied to the entire image and all its layers simultaneously. This method is particularly efficient when dealing with “High Resolution” images or “Stock Photos” that were simply captured or scanned in the wrong orientation.
Step-by-Step Guide to Menu-Based Rotation:
-
Open Your Image in GIMP: As always, begin by opening the image you wish to rotate. Whether it’s a “Wallpaper” you plan to use or a photo for a “Thematic Collection,” ensure it’s loaded into your GIMP workspace.
-
Access the Transform Menu: Look at the top menu bar in GIMP. Click on
Image, then hover overTransform. This submenu contains various options for altering the orientation and perspective of your entire image. -
Select a Predefined Rotation Angle: Within the
Transformsubmenu, you’ll find several direct rotation options:- Rotate 90° clockwise: This will turn your entire image 90 degrees to the right. Perfect for photos that are simply sideways.
- Rotate 90° counter-clockwise: This will turn your entire image 90 degrees to the left.
- Rotate 180°: This will flip your image completely upside down, a quick fix for images that are inverted.
Simply click on the option that matches your desired rotation. The image will instantly update. This method is incredibly straightforward and removes the guesswork associated with freehand rotation. It’s a quick way to prepare images for “Mood Boards” or “Photo Ideas” where standard orientations are key.
-
Important Considerations for Menu Rotation: It’s crucial to understand that these menu commands apply the rotation to the entire image, including the canvas and all its layers. If you only need to rotate a single layer or a specific selection, you should opt for the Rotate Tool (as described in the previous section) or the more advanced techniques discussed next. This distinction is vital for complex “Photo Manipulation” projects where you might have multiple elements on different layers.
-
Save Your Work: Once the rotation is complete, remember to save your image using
File > SaveorFile > Save As. This ensures that your efforts in aligning that “Beautiful Photography” or preparing that “Abstract” background are not lost.
Using menu commands for rotation is a quick and effective way to handle universal orientation issues, especially when working with “High Resolution” images for “Trending Styles” or simply correcting a common capture error.
Advanced Rotation Techniques for Creative Visual Design
Beyond basic rotations, GIMP offers sophisticated controls that allow for intricate adjustments, enabling advanced “Visual Design” and “Digital Art.” These techniques are invaluable when you need precise control over the rotation angle, the pivot point, or even want to simulate three-dimensional effects within your two-dimensional canvas. Tophinhanhdep.com encourages experimentation, and these advanced methods are perfect for pushing the boundaries of your “Creative Ideas.”
Mastering the Rotate Tool: Custom Angles and Rotation Centers
The Rotate Tool, while introduced for basic operations, truly shines when you delve into its advanced features, particularly custom angle input and the manipulation of the rotation center. This level of control is fundamental for achieving specific “Editing Styles” and for nuanced “Photo Manipulation.”
Advanced Usage of the Rotate Tool:
-
Accessing the Rotate Tool (Again): As before, activate the Rotate Tool via the Toolbox or
Shift + R. TheRotate Informationdialog will appear, giving you granular control. -
Inputting Specific Numerical Angles: Instead of dragging, directly type your desired angle into the
Anglefield. This allows for rotations like 27 degrees, -10 degrees, or any fractional value, providing exact precision for your “Graphic Design” projects. GIMP automatically understands these as degrees. This is far more accurate than trying to hit a specific angle by eye. -
Understanding and Changing the Rotation Center (Pivot Point): By default, an image rotates around its geometric center. This center is represented by a circular crosshair on your canvas.
- Drag the Center: You can click and drag this crosshair anywhere on your canvas, even outside the image boundaries. Once moved, your image (or selected layer) will rotate around this new pivot point. This is incredibly powerful for “Digital Art” where you might want to rotate an object around an external anchor, or for creating dynamic compositions in “Photo Ideas.”
- Numerical Center Adjustment: In the
Rotate Informationdialog, you’ll findCenter XandCenter Yfields. These allow you to numerically define the exact pixel coordinates for your rotation center. This precision is critical for aligning elements in complex “Visual Design” or ensuring consistency across a “Thematic Collection.” Clicking theReadjustbutton will snap the center back to the image’s default middle.
-
Constraining Rotation for Controlled Increments: When performing freehand rotation, holding down the
Ctrlkey will constrain the rotation angle to 15-degree increments. This is useful for quickly achieving common angles without needing to type in exact values, offering a balance between freeform and precise movement. This feature can speed up workflows for “Backgrounds” or “Wallpapers” that require standard angular shifts. -
Corrective Rotation for Skewed Images: GIMP’s Rotate Tool also includes a
Transform Directionoption, which often defaults toNormal. However, it also offers aCorrective Rotationmode. This mode is primarily used to straighten images that are slightly askew (e.g., a photo taken with a tilted camera). Instead of trying to guess the correction angle, you can use corrective rotation to visually align a reference line within the image (e.g., a horizon) with a straight guide. The tool then calculates and applies the necessary inverse rotation to straighten the image. This is a game-changer for photographers looking to perfect their “Nature” shots or “Beautiful Photography.”
These advanced features of the Rotate Tool provide the flexibility and precision needed for professional “Graphic Design” and complex “Photo Manipulation,” allowing you to refine every detail of your “Image Inspiration” from Tophinhanhdep.com.
Exploring 3D Effects: Conceptualizing Rotation Along X and Y Axes
While GIMP’s primary Rotate tool operates in a 2D plane, the concept of “rotating along X and Y axes” as mentioned in some contexts, particularly for the Rotate tool, often refers to defining the precise Center X and Center Y coordinates for your rotation point. This level of spatial awareness, even in 2D, lays the groundwork for creating compelling visual depth and perspective, crucial for advanced “Visual Design” and “Digital Art” effects. For true 3D perspective manipulation, GIMP offers other powerful tools like the Perspective Tool, but understanding the axis of rotation in a 2D context is foundational.
Conceptualizing Axis-Based Rotation (2D context):
-
Open Your Image and Select the Rotate Tool: Begin by loading your image into GIMP and activating the Rotate Tool (
Shift + R). TheRotate Informationdialog will appear. -
Define Rotation Center Using X and Y Coordinates: Within the dialog, you’ll see the
Center XandCenter Yinput fields. These represent the horizontal (X) and vertical (Y) coordinates on your canvas where the rotation axis is anchored.- By modifying these values, you are effectively telling GIMP where the image should pivot. For instance, moving the
Center Xto the far left of the image and then rotating creates a different effect than rotating around the image’s center. This control is vital for “Photo Manipulation” when you want an element to swing as if hinged. - Think of
Center XandCenter Yas defining the point where a virtual pin holds your image to the canvas, and then you rotate the image around that pin. This allows for complex motion and placement within your “Creative Ideas.”
- By modifying these values, you are effectively telling GIMP where the image should pivot. For instance, moving the
-
Preview and Confirm: As you adjust the
Angleand theCenter X/Ycoordinates, GIMP provides a live preview of the transformation. This allows you to fine-tune your settings until the effect is precisely what you envision for your “Digital Art” project. Once satisfied, clickRotateto apply.
While this tool doesn’t create true 3D models, precise control over the rotation point and angle can simulate depth, especially when combined with other GIMP tools for shadows, highlights, and layering. This method is a stepping stone for designers looking to integrate elements seamlessly into new “Backgrounds” or create dynamic “Thematic Collections” with a sense of depth and movement.
Saving Your Masterpiece: Preserving Rotated Images
After diligently rotating your images to perfection, the final and equally critical step is to save your work. GIMP offers several saving and exporting options, each with distinct implications for file integrity, format, and future use. Understanding these options is vital to ensure your refined “Beautiful Photography” or innovative “Graphic Design” is preserved correctly, ready for display, sharing, or further “Image Tools” processing on Tophinhanhdep.com.
Understanding GIMP’s Save and Export Options
Saving your work correctly is as important as the edits themselves. An improperly saved file could mean losing your original, reducing image quality, or saving in an incompatible format.
Detailed Guide to Saving and Exporting in GIMP:
-
File > Save(Overwrite Original):- Function: This option saves your current work directly over the original file you opened.
- Use Case: Use this only if you are absolutely certain you want to replace the original image with your rotated version and do not need the unedited original anymore. It’s typically used for minor, non-destructive edits on duplicate files, or when the original is already backed up.
- Caution: This action is permanent and cannot be easily undone (unless you have a robust undo history or a backup system). For valuable “High Resolution” images or “Stock Photos,” overwriting is generally discouraged.
-
File > Save As(Save as a New File):- Function: This is the recommended option for most editing tasks. It allows you to save your rotated image under a new name, in a new location, and sometimes in a different format, leaving your original file untouched.
- Steps:
- Go to
File > Save As. - A dialog box will appear. Enter a new descriptive name for your rotated image (e.g., “NaturePhoto_Rotated.jpg”).
- Choose a destination folder to store the new file.
- Select File Format: Below the file name field, there’s usually a “Select File Type (By Extension)” dropdown. Here, you can choose the desired image format:
- XCF (GIMP’s Native Format): Saves the image with all its layers, paths, and GIMP-specific data. Ideal if you plan to continue editing in GIMP later. It’s like saving your “Digital Art” project with all its raw components.
- JPEG: A popular format for photographs, offering good compression with some loss of quality. Excellent for web use, “Wallpapers,” and “Backgrounds” on Tophinhanhdep.com where file size is a concern.
- PNG: A lossless format, great for images with transparent backgrounds or sharp edges, like “Graphic Design” elements or “Digital Art” with text.
- Other Formats: GIMP supports many other formats like TIFF, BMP, GIF, etc., suitable for various specialized needs.
- Go to
- Recommendation: Always save a new version. This protects your original “Beautiful Photography” and provides a version history for your “Visual Design” projects.
-
File > Export As(For Specific Output Needs):- Function: This option is specifically designed for converting your GIMP project into various image formats for external use, such as web publishing, print, or sharing. It often provides more granular control over compression and quality settings than
Save As. - Steps:
- Go to
File > Export As. - Similar to
Save As, you’ll name your file and choose a destination. - The key difference is the export dialog that follows. For formats like JPEG, you’ll get options to adjust quality, compression levels, and metadata. For PNG, you might control compression and transparency options.
- Go to
- Use Case: Ideal when preparing “High Resolution” images for specific platforms, optimizing “Aesthetic” images for fast loading on websites (linking with “Image Tools” like “Optimizers” and “Compressors”), or creating images for “Trending Styles” that require specific output characteristics. This is particularly useful when preparing images for
Tophinhanhdep.com’s diverse content categories, from “Thematic Collections” to “Mood Boards.”
- Function: This option is specifically designed for converting your GIMP project into various image formats for external use, such as web publishing, print, or sharing. It often provides more granular control over compression and quality settings than
By understanding and utilizing these saving and exporting options, you ensure that your efforts in “Photo Manipulation” and “Creative Ideas” are not only preserved in their intended quality but also formatted correctly for their next destination. This also prepares your images for other “Image Tools” such as “AI Upscalers” or “Image-to-Text” conversion, maximizing their utility and impact.
Why Image Rotation Matters for Tophinhanhdep.com Users
Image rotation in GIMP is far more than a simple technical adjustment; it’s a fundamental aspect of “Visual Design” that underpins countless creative and practical applications. For users of Tophinhanhdep.com, mastering this skill unlocks a new level of control over the “Images” they create, share, and consume, directly impacting the quality and professionalism of their “Photography” and “Digital Art.”
Enhancing Your Images: Every image has an optimal orientation. A “Nature” photograph might need a slight adjustment to correct a tilted horizon, transforming it from amateur to professional. A “Beautiful Photography” portrait might benefit from a subtle angle to add dynamism or evoke a specific emotion. GIMP’s rotation tools provide the precision needed to achieve these subtle yet impactful changes, ensuring that every image, whether it’s a “Wallpaper” or a “Background” for your device, is presented perfectly. This attention to detail is what elevates ordinary visuals to “Aesthetic” statements.
Impact on Photography and Editing Styles: For photographers, precise rotation is integral to “Digital Photography.” It’s not just about fixing errors but also about artistic expression. Experimenting with rotation can lead to unique “Editing Styles,” turning a standard shot into something “Abstract” and compelling. Whether you’re curating “High Resolution” images for a portfolio or preparing “Stock Photos” for commercial use, GIMP’s flexible rotation capabilities ensure your images meet the highest standards of presentation and composition.
Integration with Image Tools: A well-rotated image is the perfect foundation for other “Image Tools.” Before you send an image to an “AI Upscaler” to boost its resolution, or use an “Image-to-Text” tool to extract information, ensuring it’s correctly oriented is crucial for optimal results. Similarly, properly rotated images are more efficiently handled by “Compressors” and “Optimizers,” leading to smaller file sizes without compromising visual integrity for web use. Tophinhanhdep.com’s focus on comprehensive image solutions means understanding how each tool complements the others.
Fueling Visual Design and Creative Ideas: In “Graphic Design” and “Digital Art,” rotation is a core transformation tool. Creating logos, manipulating text, compositing multiple layers in “Photo Manipulation,” or building complex scenes—all rely on the ability to rotate elements with precision. The advanced features of GIMP’s Rotate tool allow designers to realize intricate “Creative Ideas” and build “Mood Boards” with perfectly aligned and angled components, pushing the boundaries of what’s possible in digital art.
Inspiring Image Collections and Trending Styles: For those creating “Image Inspiration” boards or curating “Thematic Collections,” consistency in orientation and aesthetic is key. GIMP’s rotation features enable you to harmonize diverse images, ensuring that your collections flow seamlessly. Furthermore, keeping up with “Trending Styles” often involves creative use of angles and perspectives, a skill directly honed through mastering GIMP’s rotation functionalities.
In conclusion, GIMP’s versatile image rotation tools are indispensable for anyone involved with digital imagery. From basic corrections to advanced artistic transformations, they provide the necessary control to perfect your visuals. As a hub for “Beautiful Photography,” “Visual Design,” and powerful “Image Tools,” Tophinhanhdep.com is dedicated to empowering you with the knowledge and resources to make the most of your creative journey. By understanding and applying the techniques outlined in this guide, you’re not just rotating pixels; you’re shaping narratives, enhancing aesthetics, and bringing your unique vision to life. Dive into GIMP, experiment with rotation, and discover how these simple yet profound adjustments can dramatically elevate your visual content.