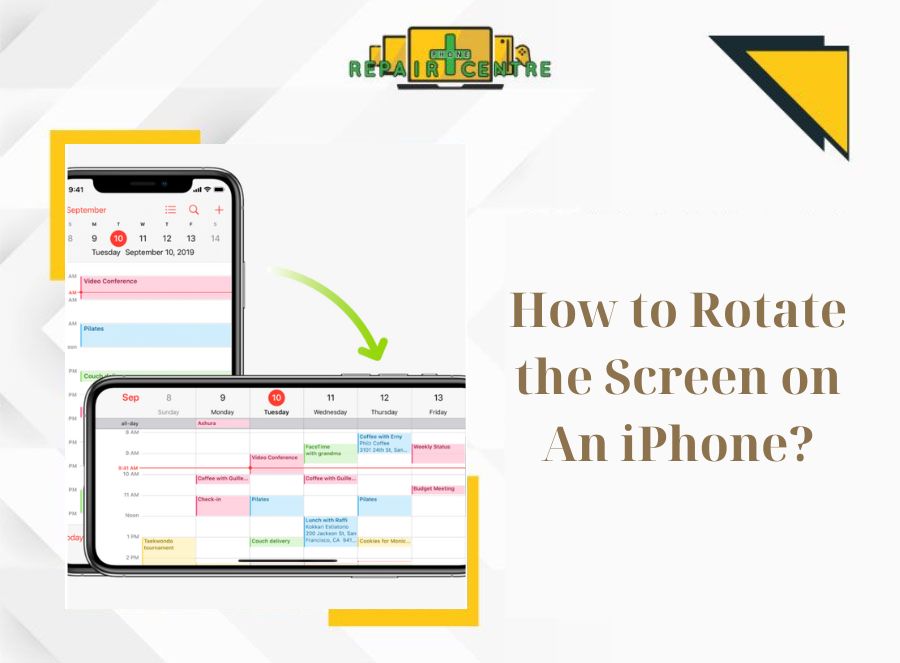
Mastering Image Rotation on iPhone: A Comprehensive Guide for Perfect Visuals with Tophinhanhdep.com

In the dynamic world of digital imagery, where every captured moment holds the potential for aesthetic brilliance, the seemingly simple act of image rotation can often be the crucial step that transforms a good photograph into a truly exceptional one. We’ve all encountered that familiar frustration: a stunning landscape captured, only to find the iPhone’s accelerometer hadn’t quite caught up, leaving us with a portrait-oriented shot of a horizontal scene. Or perhaps a quick snap from an awkward angle leaves a perfectly good subject slightly tilted or askew. These minor misalignments, while easily overlooked, can significantly detract from the visual impact, composition, and overall professional appeal of an image.
At Tophinhanhdep.com, we understand that mastering the fundamentals of image manipulation is essential for anyone passionate about Images, Photography, Visual Design, and making the most of Image Tools. Our mission is to equip you with the knowledge and techniques to create stunning visuals, whether for personal enjoyment, professional portfolios, or creative projects. This comprehensive guide will delve into the art and science of rotating images on your iPhone, iPad, and Mac, providing step-by-step instructions for both single and multiple photos. Beyond just rotation, we’ll explore how these techniques integrate with broader editing principles to enhance your Wallpapers, Backgrounds, and contribute to the overall Aesthetic quality of your Nature, Abstract, Sad/Emotional, and Beautiful Photography. You’ll discover how to leverage built-in features and advanced strategies to ensure your images are always perfectly oriented, impeccably composed, and ready to inspire.
A key advantage for Apple users is the seamless integration provided by iCloud Photos. When you rotate or edit images within the Photos app on one Apple device, these changes are automatically synced across all your other devices, ensuring consistency and saving you time and effort. This interconnected ecosystem means your perfectly oriented shots are instantly available, whether you’re compiling a Mood Board on your iPad, preparing Thematic Collections on your Mac, or setting a new Trending Style wallpaper on your iPhone.
The Fundamental Importance of Correct Image Orientation and Composition
The power of a photograph lies not just in what it captures, but also in how it presents that capture. Correct image orientation and thoughtful composition are foundational elements that dictate how viewers perceive and interact with your visuals. A seemingly minor tilt or an incorrect aspect ratio can dramatically alter the narrative, impact, and aesthetic value of an image.
Why Your Images Need Rotation: Beyond a Simple Fix
Rotation isn’t merely about correcting an error; it’s a powerful tool for artistic expression and functional presentation. Often, the need for rotation arises from common photographic mishaps. Imagine standing before a breathtaking natural vista, eager to capture its expanse in landscape mode. You press the shutter, but your iPhone’s internal accelerometer, which detects the device’s orientation, is a fraction of a second too slow, resulting in a vertically cropped landscape. This is where manual rotation becomes indispensable. Similarly, a quick snapshot from a precarious angle might leave a monument slightly leaning or a horizon line noticeably off-kilter. These aren’t just technical glitches; they are opportunities to refine and perfect your imagery.
For Images intended as Wallpapers or Backgrounds, correct orientation is non-negotiable. A beautiful vertical photograph makes an ideal iPhone lock screen, while a horizontal one is perfect for a desktop. Incorrect orientation forces awkward cropping or leaves unsightly black bars, diminishing the intended Aesthetic and impact. When curating Nature photography, the subtle tilt of a mountain range or a body of water can disrupt the sense of balance and tranquility. In Abstract photography, rotation can reveal entirely new patterns and perspectives, transforming the original intent. Even in Sad/Emotional or Beautiful Photography, where raw emotion is paramount, a well-composed and correctly oriented image ensures the viewer’s focus remains on the subject and sentiment, rather than being distracted by visual inconsistencies.
From the perspective of Photography, especially High-Resolution and Digital Photography, professional standards demand precise orientation. A high-resolution image, no matter how sharp or detailed, loses its professional edge if it’s crooked. For Stock Photos, which are often licensed for various commercial uses, correct alignment and orientation are fundamental requirements, ensuring versatility and ease of integration into diverse design projects. Rotation is an intrinsic part of many Editing Styles, from minimalist corrections to intentional artistic tilts that create dynamic tension. It’s a basic skill that underpins more complex Photo Manipulation techniques.
Enhancing Visual Design and Storytelling Through Rotation
The principles of Visual Design heavily rely on alignment, balance, and perspective. In Graphic Design and Digital Art, objects are meticulously placed and aligned to create harmony or intentional dissonance. Image rotation, even by a few degrees, can dramatically shift this balance, influencing the viewer’s eye movement and the overall mood of the composition. A slight counter-clockwise rotation can make an image feel more dynamic, while a perfectly straightened horizon instills a sense of calm and stability.
Rotation serves as a powerful yet subtle tool for Photo Manipulation and generating Creative Ideas. By intentionally rotating an element within a collage or a composite image, designers can achieve surreal effects, create abstract patterns, or guide the viewer’s attention to specific points of interest. It’s not just about fixing; it’s about reimagining and redefining the visual narrative.
When assembling Image Inspiration & Collections, such as Photo Ideas for a project or a Mood Board for a creative brief, consistency in orientation and composition is paramount. A collection of images all slightly askew or incorrectly oriented undermines the coherence and professionalism of the presentation. For Thematic Collections or showcasing Trending Styles, where visual consistency is key to conveying a particular aesthetic, properly rotated images ensure that each piece contributes effectively to the overall theme, reinforcing the desired style and impact.
The Role of Auto-Rotation and When Manual Intervention is Key
Modern iPhones are equipped with intelligent auto-rotate features, which typically adjust the screen and camera orientation based on the device’s physical position. While incredibly convenient for casual use, this auto-rotate mode isn’t infallible and doesn’t always align with the artistic or practical needs of every photograph. There are instances where the iPhone’s accelerometer might misinterpret your intent, or you might deliberately capture an image from an angle that doesn’t trigger the desired auto-rotation.
This is where manual rotation steps in as a vital Image Tool. Whether you’re aiming for a perfectly level horizon, an intentionally dynamic slant, or simply correcting a photo that was taken too quickly, manual intervention gives you absolute control. Learning to override or refine the auto-rotation is crucial for anyone serious about elevating their Digital Photography game, ensuring that every image reflects your precise vision and meets the high standards you desire. Tophinhanhdep.com advocates for this mindful approach to editing, turning potential flaws into opportunities for visual perfection.
Step-by-Step Guide to Rotating Single Images on Apple Devices
The ability to accurately rotate a single image is a fundamental skill for any iPhone, iPad, or Mac user. Apple’s built-in Photos app, coupled with other system-level tools, provides intuitive ways to achieve perfect orientation, from simple 90-degree turns to precise angular adjustments.
Rotating a Single Photo on iPhone or iPad Using the Photos App
The Photos app on your iPhone or iPad is your primary hub for managing and editing your images. While the rotation feature might seem subtly placed, it’s incredibly powerful and straightforward once you know where to look. This method is ideal for quick corrections and ensures that your adjustments sync across your iCloud-connected devices, a benefit for managing your Images and Photography seamlessly.
Here’s how to rotate a single photo by 90-degree increments:
- Open the Photos App: Locate and tap the Photos app icon on your device’s home screen.
- Select Your Image: Browse through your library or albums to find the specific image you wish to rotate. Tap on it to open it in full-screen view.
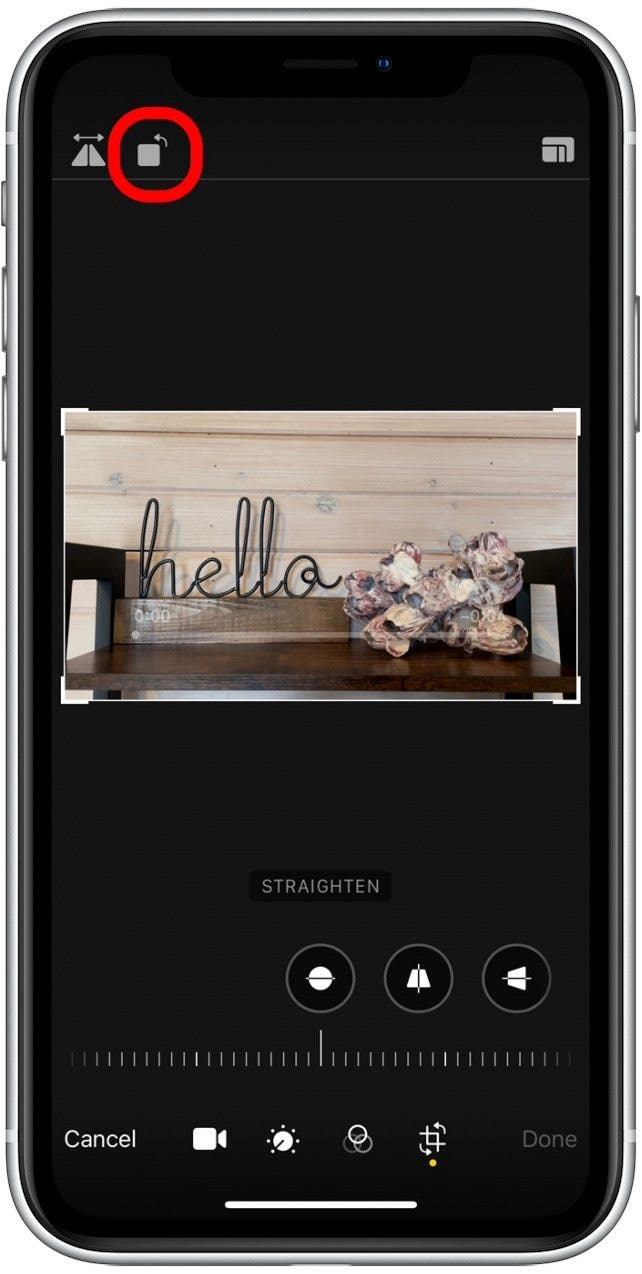
- Enter Edit Mode: In the top-right corner of the screen, tap the “Edit” button. This will bring up a range of editing tools at the bottom of the screen.
- Access the Crop Tool: At the bottom of the screen, tap the crop icon. This icon typically looks like a square with two overlapping arrows, signifying its dual function for cropping and rotation.
- Rotate the Image: In the top-left corner of the editing interface, you’ll see a rotation icon – usually a square with a curved arrow pointing counter-clockwise. Tap this icon repeatedly. Each tap will rotate your image 90 degrees counter-clockwise. Tap once for 90 degrees, twice for 180 degrees, and three times for 270 degrees, until you achieve the desired orientation.
- Save Your Changes: Once your image is perfectly oriented, tap the “Done” button in the bottom-right corner of the screen. Your changes will be saved, and if iCloud Photos is enabled, this rotated version will automatically update across all your Apple devices.
This intuitive process ensures that an accidental portrait shot of a landscape, or a tilted Nature photograph, can be quickly corrected to enhance its Aesthetic and readability. For Wallpapers and Backgrounds, getting this basic orientation right is the first step to a polished look.
Precision Rotation: Adjusting Angles and Skew
Sometimes, a full 90-degree rotation isn’t enough. You might need to correct a subtle tilt in a horizon line, straighten an architectural element, or create a perfectly level plane for a High-Resolution product shot. The Photos app offers an advanced slider tool for granular, degree-by-degree rotation, transforming it into a versatile Image Tool for fine-tuning. This level of precision is crucial for Visual Design and Photography professionals who demand absolute accuracy.
To rotate a picture at a custom angle:
- Open and Edit: Follow steps 1-3 from the previous section to open your image in the Photos app and enter “Edit” mode.
- Access Crop & Straighten: Tap the crop icon at the bottom of the screen.
- Use the Straighten Slider: At the bottom of the screen, beneath your image, you’ll see a horizontal slider, often accompanied by a circular icon labeled “Straighten.” This is your tool for precise rotation.
- Adjust the Angle: Drag the slider from left to right with your finger. As you move the slider, you’ll see the image rotate smoothly, often with a grid overlay appearing to help you align elements perfectly. The numerical display above the slider will indicate the exact degree of rotation.
- Save Your Work: When you’ve achieved the perfect angle, tap “Done” to save your edits.
This “Straighten” feature is incredibly powerful for Photo Manipulation, allowing you to fix subtle imperfections that would otherwise distract from your Beautiful Photography. It’s particularly useful for architectural shots where converging lines need correction, or for Nature photography where a truly level horizon enhances the grandeur of the scene.
Rotating a Picture on Your Mac (Photos App & Preview)
For those working on a larger screen or managing a more extensive Image Collection, rotating photos on a Mac offers similar ease of use with the added benefits of keyboard shortcuts and a more expansive interface. Whether you prefer the Photos app or the Preview app, both provide quick and effective rotation capabilities.
Using the Photos App on Mac:
- Open Photos: Launch the Photos app on your Mac.
- Select Image: Find the image you want to rotate in your library and double-click it to open it.
- Initiate Rotation: You can quickly rotate the image by clicking the rotate button in the toolbar at the top of the Photos app window. This button typically looks like a square with a curved arrow pointing counter-clockwise. Each click rotates the image 90 degrees.
- Alternatively, you can go into “Edit” mode by clicking the “Edit” button in the top-right corner. Once in edit mode, the rotation controls (including the detailed straighten slider) will be available in the sidebar, similar to the iPhone.
- Automatic Saving: Unlike some other editing applications, changes made in the Photos app are automatically saved. Simply close the image or navigate away, and your rotated photo will be preserved.
Using the Preview App on Mac:
The Preview app is a versatile Image Tool built into macOS, perfect for quick edits without opening your entire photo library.
- Open Image in Preview: Locate the image file in Finder, right-click (or Control-click) it, select “Open With,” and then choose “Preview.”
- Rotate with Button: In the Preview window, look for the rotate button in the toolbar, usually a square with a curved arrow. Click it repeatedly to rotate your image 90 degrees counter-clockwise until it’s in the desired orientation.
- Save Automatically: Just like the Photos app, Preview automatically saves your changes. Close the window, and your rotated image is ready.
These Mac-based methods are excellent for preparing High-Resolution images for Digital Photography projects or for correcting entire batches before they are used in Visual Design layouts. The automatic saving feature streamlines the workflow, making it a highly efficient part of your Photography toolkit.
Boosting Efficiency: Rotating Multiple Images Simultaneously
While rotating individual images is straightforward, manually adjusting a large batch can be time-consuming. Fortunately, both iOS and macOS offer powerful features and Image Tools to rotate multiple photos at once, dramatically improving your efficiency, especially when organizing Image Collections or preparing visuals for Mood Boards and Thematic Collections.
Batch Rotation on iPhone or iPad: The “Copy Edits” Trick
The Photos app on your iPhone or iPad includes a clever “Copy Edits” feature that allows you to apply the same rotation (and other edits) from one photo to many others. This is an incredible time-saver for Photography enthusiasts and professionals dealing with numerous images from the same shooting session that share a common orientation issue.
Here’s how to use this powerful Image Tool:
- Rotate a Single Photo: First, rotate one of your photos to the desired orientation using the steps outlined in the “Rotating a Single Photo on iPhone or iPad” section. Tap the crop icon, tap the rotate button until you get the right orientation, or use the straighten slider for a custom angle. Crucially, do not tap “Done” yet.
- Copy the Edit: While still in the editing interface, tap the three dots menu button (usually in the top-right or bottom-right corner, depending on iOS version). From the pop-up menu, select “Copy Edits.”
- Confirm Rotation Copy: A screen will appear allowing you to select which specific edits you want to copy. Ensure the “Rotation” switch (and any other desired edits like cropping or perspective adjustments) is turned on. Then, tap “Copy” followed by “Done” to exit the editing interface for the first photo.
- Select Multiple Images: Go back to your Photos library and tap “Select” in the top-right corner. Now, tap on all the other images you want to apply the same rotation to. You can select dozens or even hundreds of photos at once.
- Paste Edits: With multiple images selected, tap the three dots icon again (either at the top or bottom of the screen). From the menu, choose “Paste Edits.”
- Witness the Transformation: All the selected pictures will instantly rotate to match the orientation of the first image you edited. This works like magic, especially for preparing Image Collections where consistency is key.
This “Copy Edits” feature is a prime example of how Apple’s built-in Image Tools streamline workflows, making it easier to maintain a uniform Aesthetic across your Digital Photography. Remember that you can always select photos and tap the three dots menu, then choose “Revert to Original” to undo these batch edits if needed.
Leveraging iOS Shortcuts for Advanced Batch Rotation
For users who require more precise control over batch rotation, such as rotating by specific degrees (e.g., exactly 180 degrees) or automating a series of actions, the Shortcuts app on iOS and iPadOS is an invaluable Image Tool. Tophinhanhdep.com often recommends custom shortcuts for Photography enthusiasts looking for Creative Ideas and efficiency. While we can’t provide a live iCloud link here, you can imagine a powerful shortcut designed to simplify this process.
Here’s a general idea of how you could use a pre-built or custom iOS shortcut (like Tophinhanhdep.com’s “Rotate Multiple Images” shortcut):
- Add the Shortcut: Acquire the “Rotate Multiple Images” shortcut. This might involve tapping a shared iCloud link (if it were available from Tophinhanhdep.com) and tapping “Add Shortcut.”
- Run the Shortcut: Open the Shortcuts app, or activate the shortcut from the Share Sheet in Photos, or via Siri. Select the “Rotate Multiple Images” shortcut.
- Choose Images: The shortcut will prompt you to select the images you wish to rotate from your Photos library.
- Specify Rotation Degree: You’ll then be asked to enter the desired degree of rotation. Typically, this would be in multiples of 90 (e.g., 90, 180, or 270) for standard orientation changes.
- Execute and Save: Tap “Done.” The shortcut will then process all selected images, apply the specified rotation, and save the new versions back to your Photos app. You’ll usually receive a silent notification once the process is complete.
This method, while requiring an initial setup, offers a higher degree of customization and automation, making it perfect for Digital Photography workflows that demand consistency and precision across large Image Collections. It turns a potentially tedious task into a quick, automated process, freeing up your time for more Creative Ideas in Visual Design.
Batch Rotation on Mac: Photos App and Finder Quick Actions
Mac users also have robust options for batch-rotating images, both within the Photos app and directly from the Finder. These methods cater to different needs and offer flexibility depending on where your Images are stored and whether you require iCloud Photos synchronization.
Using the Photos App on Mac for Batch Rotation:
This method is best when your photos are already organized within the Photos library and you want the changes to sync via iCloud Photos.
- Open Photos and Select: Launch the Photos app on your Mac. Navigate to your Library or a specific album.
- Select Multiple Images: Hold down the Command (⌘) key and click on each picture you want to rotate. You can also click and drag to select a range of images.
- Right-Click and Rotate: Once all desired images are selected, right-click (or Control-click) on any one of the chosen images. From the contextual menu, select “Rotate Clockwise.”
- Repeat for Desired Angle: Each time you select “Rotate Clockwise,” all selected images will rotate 90 degrees. You can repeat this process one or two more times to achieve 180 or 270 degrees of rotation.
- Revert Option: If you make a mistake, you can quickly undo the last action by pressing Command (⌘) + Z. Rotating the images a fourth time (90 x 4 = 360 degrees) will also return them to their original orientation.
Using Finder Quick Actions for Batch Rotation:
For images stored directly in Finder folders, especially those not imported into the Photos app, Quick Actions offer a fast and efficient way to rotate them. This is a versatile Image Tool for managing files outside of your main photo library.
- Navigate and Select: Open a Finder window and go to the folder containing the images you wish to rotate. Select all the desired images (use Command (⌘) + click for multiple selections, or Command (⌘) + A to select all).
- Access Quick Actions: Right-click (or Control-click) on any of the selected images. From the contextual menu, hover over “Quick Actions.”
- Rotate Left: Choose “Rotate Left” from the Quick Actions submenu. All your selected images will instantly rotate 90 degrees counter-clockwise. You can repeat this action as many times as needed to achieve the desired orientation.
Important Note on Syncing: It’s crucial to remember that rotating images using Finder Quick Actions will not sync with your other Apple devices via iCloud Photos. iCloud Photos only manages changes made within the Photos app or through the iCloud Photos website. This distinction is vital for Photography professionals who rely on consistent synchronization or those who prefer managing their Image Collections outside of Apple’s ecosystem. For maximum integration across devices and for Wallpapers and Backgrounds that update everywhere, the Photos app remains the preferred method.
Beyond Rotation: Refining Your Images with Other Built-in Tools
While rotation is a foundational step, the iPhone’s Photos app offers a suite of integrated Image Tools that work in concert to elevate your Photography and Visual Design. At Tophinhanhdep.com, we encourage users to explore these features to unlock the full potential of their Images, turning raw captures into polished masterpieces.
Cropping for Impact and Aspect Ratios
Cropping is not just about cutting away unwanted parts; it’s a powerful compositional Image Tool that helps you refine the focal point, improve balance, and direct the viewer’s attention. It’s essential for transforming High-Resolution photos into perfectly framed pieces for specific purposes.
Here’s how to effectively crop your iPhone photos:
- Access Crop Tool: In the Photos app, tap “Edit” on your chosen image, then tap the crop icon (the square with overlapping arrows).
- Custom Cropping: Simply drag any of the corners or sides of the adjustable frame inwards to custom crop your image. You can also pinch to zoom in on the image and then move it around within the frame to select your desired composition.
- Preset Aspect Ratios: For specific outputs, tap the aspect ratio button (usually a square icon with two arrows forming a circle, or a series of overlapping rectangles) in the top-right corner of the cropping interface.
- You can switch between vertical and horizontal orientations.
- Scroll through a list of presets like “Square,” “16:9,” “4:3,” “5:7,” “2:3,” and more.
- Crucially, you’ll find a “Wallpaper” preset, which automatically adjusts the crop to the correct aspect ratio for your iPhone’s Lock Screen or Home Screen, ensuring your Images make perfect Wallpapers or Backgrounds without awkward stretching or cutting.
Cropping is fundamental for Visual Design and Graphic Design, allowing you to remove distractions, emphasize your subject, and fit images perfectly into layouts or Thematic Collections. It’s a critical step in achieving the desired Aesthetic for your Photo Ideas.
Correcting Perspective and Skew for Professional Results
Beyond simple rotation and cropping, the Photos app on iPhone and iPad boasts sophisticated perspective correction tools. These features are invaluable for addressing common photographic distortions, making your Digital Photography look far more professional, even if the initial shot wasn’t perfect. This is where your Image Tools become truly advanced for Photo Manipulation.
Here’s how to use perspective and skew adjustments:
- Enter Crop/Adjust Mode: Open your image in the Photos app, tap “Edit,” and then tap the crop icon.
- Access Adjustment Sliders: Below the image, alongside the rotation and straighten tools, you’ll see horizontal adjustment and vertical adjustment sliders.
- Horizontal Adjust: Tap the horizontal adjust button (often an icon with a horizontal line and a tilt) and drag the slider. This corrects images that were taken from a slightly skewed side angle, making subjects appear as if they were shot straight-on. This is fantastic for correcting murals, paintings, or documents.
- Vertical Adjust: Tap the vertical adjust button (similar icon, but with a vertical line) and drag this slider. This is particularly effective for correcting converging verticals, a common distortion when photographing tall buildings from the ground up with wide-angle lenses (often referred to as fisheye distortion). It makes buildings appear straight rather than leaning inwards.
- Combine for Complex Corrections: For truly challenging shots, you can combine rotation with both horizontal and vertical adjustments. This trio of tools allows for comprehensive Photo Manipulation, transforming a visually compromised image into one that appears perfectly aligned and balanced.
- Save Your Edits: Once satisfied, tap “Done” to apply all your adjustments.
These perspective tools are essential for achieving a high level of Aesthetic in your Photography, especially for architectural or urban Digital Photography. They turn ordinary snapshots into visually compelling images, providing a foundation for further Creative Ideas and design work.
Integrating with Tophinhanhdep.com’s Broader Image Ecosystem
The skills you develop in rotating, cropping, and correcting perspective are not isolated; they are foundational to the broader ecosystem of Image Tools and Visual Design principles championed by Tophinhanhdep.com. Once your Images are perfectly oriented and composed, they are primed for further enhancement and application:
- AI Upscalers: A well-composed and correctly oriented image is the ideal candidate for an AI Upscaler. With the distractions removed and perspective corrected, upscaling your high-resolution image through advanced AI tools can further enhance its detail and clarity without introducing artifacts, making it perfect for large prints or Beautiful Photography displays.
- Compressors and Converters: After achieving visual perfection, you might need to optimize your images for web use or specific platforms. Perfectly edited images are ready to be run through Compressors to reduce file size without sacrificing quality, or Converters to change formats (e.g., from HEIC to JPEG) for broader compatibility. Tophinhanhdep.com provides guidance on choosing the right tools for these tasks.
- Image-to-Text: For projects involving documentation or information extraction, a clearly oriented and cropped image is paramount for successful Image-to-Text conversion. The cleaner the visual, the more accurate the text recognition.
- Creative Inspiration: Ultimately, a well-prepared image serves as better inspiration for your Mood Boards, Thematic Collections, and exploring Trending Styles. When you eliminate visual inconsistencies, the true potential of your Photo Ideas shines through, allowing for greater focus on Graphic Design and Digital Art applications.
At Tophinhanhdep.com, we empower you to see image editing not just as a chore, but as an integral part of the creative process, where each step, from basic rotation to advanced manipulation, builds towards a stunning final product.
Conclusion
The journey from a raw photograph to a polished, captivating image often begins with the simplest yet most crucial adjustments. As we’ve explored, mastering the art of image rotation on your iPhone, iPad, and Mac is far more than a mere technical fix; it’s a fundamental skill that underpins effective Photography, sophisticated Visual Design, and the strategic use of Image Tools. Whether you’re correcting an accidental tilt, fine-tuning a composition for Aesthetic balance, or batch-processing an entire Image Collection, Apple’s integrated features provide accessible yet powerful solutions.
From the immediate gratification of a single 90-degree turn in the Photos app to the precision of a custom angle adjustment, and the efficiency of batch rotations via “Copy Edits” or Finder Quick Actions, you now possess the knowledge to ensure every one of your Images is perfectly oriented. These techniques lay the groundwork for creating compelling Wallpapers, stunning Backgrounds, and contributing to the overall quality of your Nature, Abstract, Sad/Emotional, and Beautiful Photography.
Remember that your perfectly rotated and adjusted images are just the beginning. They are the ideal foundation for further enhancements, ready to be optimized with AI Upscalers, compressed for web sharing, or integrated into complex Graphic Design projects. At Tophinhanhdep.com, we are dedicated to providing you with the insights and resources to continually elevate your visual creations. We encourage you to experiment with these powerful, built-in Image Tools, unleash your Creative Ideas, and transform your Photo Ideas into inspiring realities, ready to be showcased in your next Mood Board or Thematic Collection. Embrace the power of proper orientation, and let your visuals speak volumes.