Mastering Image Rotation in Photoshop: A Comprehensive Guide by Tophinhanhdep.com

In the vibrant world of digital photography and visual design, the ability to manipulate images with precision is paramount. Whether you’re a professional photographer refining a high-resolution landscape, a graphic designer crafting an intricate digital art piece, or simply an enthusiast seeking to enhance your aesthetic backgrounds and wallpapers, Adobe Photoshop stands as an indispensable tool. Among its foundational functionalities, rotating and flipping images or individual layers might seem like a basic task, but its mastery unlocks a vast array of creative possibilities, from correcting a crooked horizon in a nature shot to completely reimagining a photo manipulation project.
At Tophinhanhdep.com, we understand that every pixel tells a story, and sometimes, that story needs a different perspective. Incorrect orientations can detract from even the most beautiful photography, while intentional rotations can inject dynamic energy into abstract compositions or thematic collections. This comprehensive guide, brought to you by Tophinhanhdep.com, will demystify the process of image rotation and flipping in Photoshop, covering everything from whole canvas adjustments to intricate layer manipulations. We’ll delve into both quick, straightforward methods and more advanced techniques, ensuring that whether you’re working on stock photos for a new project or curating emotional images for a mood board, your visual content is always perfectly aligned with your artistic vision. Get ready to elevate your editing styles and transform your creative ideas into stunning realities with Photoshop’s powerful rotation tools.
The Fundamentals: Rotating Your Entire Canvas or Image
When you first import a beautiful high-resolution image into Photoshop – perhaps a serene nature scene or an abstract wallpaper that needs a fresh perspective – you might find its orientation isn’t quite right. Sometimes, a photograph taken in landscape mode saves incorrectly as portrait, or you might simply want to see how an entire composition looks from a different angle for a new creative idea. Rotating or flipping the entire image is often the first step in rectifying such issues or exploring new aesthetic possibilities. Tophinhanhdep.com emphasizes that understanding these fundamental, whole-canvas transformations is crucial for any digital artist or photographer.
Understanding Image Rotation Options
To begin, open your chosen image in Adobe Photoshop. This could be any digital photograph, a piece of graphic design, or a complex digital art project you wish to reorient. Once your image is open, navigate to the Image menu at the top of your Photoshop interface. From there, hover over Image Rotation to reveal a submenu packed with essential options:
- 180 degrees: This option rotates your entire image halfway around a complete circle. It’s perfect for completely inverting a perspective, useful for creative ideas involving reflections or inverted worlds, common in abstract and emotional imagery.
- 90 degrees CW (Clockwise): Rotates the image a quarter turn to the right. This is frequently used to correct photos taken in portrait orientation that have been saved as landscape, a common necessity for high-resolution images from various cameras.
- 90 degrees CCW (Counter-Clockwise): Rotates the image a quarter turn to the left. Similar to clockwise rotation, this helps correct orientation issues, particularly when dealing with digital photography that might have been accidentally skewed.
These predefined rotations are quick and efficient, ideal for immediate adjustments to backgrounds, wallpapers, or stock photos that just need a standard reorientation.
Flipping Your Canvas for Aesthetic Appeal
Beyond simple rotations, Photoshop also offers options to flip your entire canvas, creating a mirror image. This can be a powerful tool for visual design, helping you balance compositions or create compelling symmetric effects for aesthetic images or photo manipulation projects.
- Flip Canvas Horizontal: This option creates a mirror image of your entire canvas, flipping it along a vertical axis. It’s incredibly useful for achieving compositional balance, correcting perceived “left-heavy” or “right-heavy” images, or exploring unique visual design concepts. Imagine flipping a beautiful landscape to see if a different flow appeals to your mood board.
- Flip Canvas Vertical: This flips the entire image upside-down along a horizontal axis. While less common for corrective purposes, it can be a creative tool for abstract art, generating unique visual effects, or even for preparing images for specific print layouts.
Flipping can dramatically alter the perception of a photograph, often providing fresh inspiration for how an image can be used within thematic collections or creative projects.
Precision with Arbitrary Angles and Saving Your Work
Sometimes, a simple 90 or 180-degree rotation isn’t enough. You might need a subtle tilt to straighten a slightly off-kilter horizon in a nature shot or a very specific angle to integrate an element into a complex digital art piece. This is where the Arbitrary rotation option comes into play.
- Arbitrary: Selecting this opens a dialogue box where you can specify an exact angle (in degrees) for your rotation. You can also choose the direction: Clockwise (CW) or Counter-Clockwise (CCW). This level of precision is invaluable for detailed photo manipulation and graphic design, ensuring that every element, from text overlays to intricate visual details, is perfectly aligned. For instance, if you’re aligning elements in a creative banner, precise arbitrary rotation ensures everything looks polished and professional.
After performing any rotation or flip, it’s essential to preview your changes. If you’re not satisfied, Tophinhanhdep.com recommends using the universal undo shortcut: Ctrl+Z (Windows) or ⌘ Command+Z (Mac). This allows you to quickly revert the last action and experiment freely without fear of permanent mistakes.
Once you are happy with the rotation, remember to save your image. Go to File > Save As, and choose a location and format for your newly oriented image. This ensures that your valuable creative work, be it high-resolution photography or carefully curated aesthetic backgrounds, is preserved in its perfected form. For artists working on multiple variations or digital photography projects, Tophinhanhdep.com suggests saving iterations with descriptive names to keep track of your editing styles and creative ideas.
Advanced Control: Rotating Individual Layers and Objects
While rotating the entire canvas is essential for foundational adjustments, much of Photoshop’s power in visual design and photo manipulation comes from its ability to manipulate individual components without affecting others. This is where layers become your best friends. Tophinhanhdep.com frequently emphasizes the importance of layer-based editing for complex creative ideas, digital art, and refining beautiful photography.
Navigating the Layers Panel for Targeted Adjustments
For precise control over your image elements – whether you’re adjusting a subject in a stock photo, a text overlay in a graphic design project, or a specific detail in an abstract composition – understanding and utilizing the Layers panel is paramount.
To make sure you have access to this critical tool, open the Window menu at the top of Photoshop and select Layers. This panel typically appears as a floating window or docked on the side, displaying a list of all layers within your current image. Each layer is accompanied by a thumbnail preview, giving you a quick visual reference of its content.
- Selecting a Single Layer: To isolate an element for rotation, simply click once on its corresponding layer in the Layers panel. This highlights the layer, indicating it’s now active for editing.
- Selecting Multiple Layers: For coordinated transformations, you can select multiple layers. Hold down Ctrl (Windows) or ⌘ Command (Mac) and click on each layer you wish to include in the rotation. This is particularly useful when you have a group of related elements, such as text and an icon, that need to be rotated together while leaving the background untouched.
- Managing Layer Visibility: If you find other layers distracting while working on a specific element, click the eye icon next to a layer’s thumbnail in the Layers panel. This hides the layer, allowing you to focus. Click the empty box again to make it visible. This technique is invaluable for complex photo manipulation, helping you maintain clarity and control.
- Unlocking Layers: Occasionally, a layer might appear with a padlock icon to the right of its name. This indicates a locked layer, which cannot be modified. Common for background layers, a quick click on the padlock icon will unlock it, granting you full editing capabilities. Tophinhanhdep.com reminds designers that locked layers are a protective measure, but easily bypassed when intentional changes are needed.
By mastering the Layers panel, you gain unparalleled control, enabling you to refine your images with precision, whether you’re adjusting a minor detail in a high-resolution image or undertaking a complete visual overhaul for aesthetic appeal.
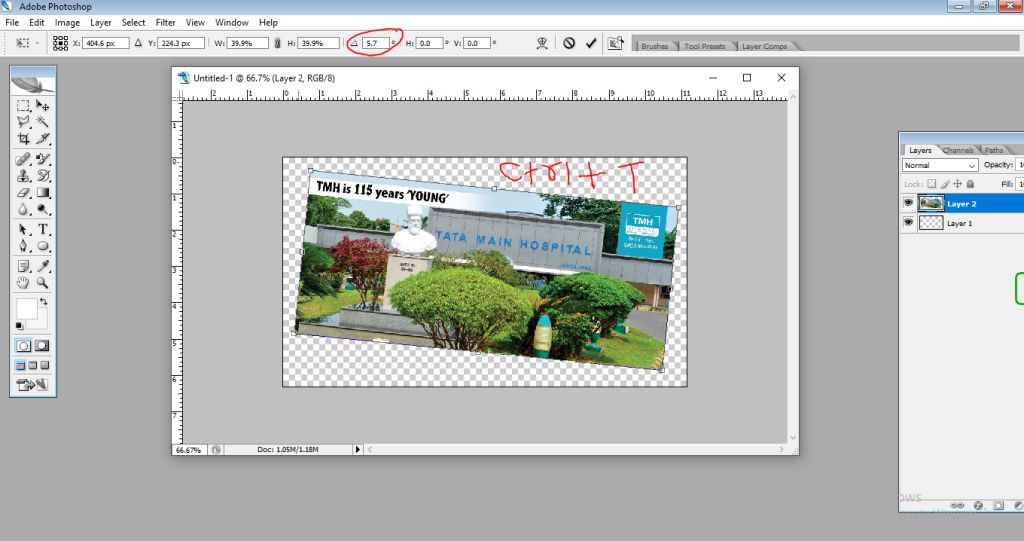
Unleashing the Power of the Free Transform Tool (Ctrl+T/Cmd+T)
The Free Transform tool is arguably one of Photoshop’s most versatile features, allowing you to not only rotate but also scale, skew, distort, and warp layers or selected objects. For dynamic and interactive rotation, especially when you have a specific creative idea in mind, this tool is indispensable. Tophinhanhdep.com recommends every digital artist get comfortable with Free Transform for its flexibility in photo manipulation and digital art.
To activate the Free Transform tool:
- Select your target layer(s) from the Layers panel.
- Go to the Edit menu and choose Transform > Rotate. Alternatively, and more commonly, use the powerful keyboard shortcut: Ctrl+T (Windows) or ⌘ Command+T (Mac).
Once activated, a bounding box will appear around your selected layer(s). This box is your gateway to visual transformation.
- Interactive Rotation: To rotate visually, move your mouse cursor slightly outside any of the corner handles of the bounding box. The cursor will change into a curved, double-headed arrow. This “rotating arrow” indicates you can now click and drag your mouse. Dragging up or down, left or right, will rotate the layer dynamically. This method is ideal for quickly finding the right angle for an aesthetic background or adjusting the tilt of an element in a spontaneous digital art project.
- Precise Increments: For more controlled rotations, hold down the Shift key while dragging. This constrains the rotation to 15-degree increments, making it easier to achieve common angles like 45, 90, or 180 degrees. This is invaluable for maintaining geometric precision in graphic design or aligning elements perfectly within a high-resolution image.
- Numerical Precision: For absolute accuracy, look at the Options bar at the top of your Photoshop window. When Free Transform is active, you’ll see a field labeled with a rotation icon (often a circular arrow). Here, you can directly type in a specific angle in degrees (e.g., “30” for 30 degrees clockwise, or “-45” for 45 degrees counter-clockwise). This is perfect for fine-tuning photo manipulation elements or ensuring exact alignment in complex visual designs.
- Applying and Cancelling: Once you’ve achieved your desired rotation, press Enter (Windows) or Return (Mac) to apply the transformation. If you change your mind and want to discard the changes, press Esc on your keyboard.
The Free Transform tool, with its intuitive visual controls and precise numerical input, offers an unparalleled level of freedom and accuracy for rotating individual elements, making it a cornerstone for advanced image editing, creative ideas, and refined editing styles championed by Tophinhanhdep.com.
Selecting and Rotating Specific Elements within Layers
Sometimes, your creative vision for photo manipulation or digital art demands a level of precision that goes beyond rotating an entire layer. What if you only want to rotate a small object within a larger layer, leaving the rest of the layer untouched? This is where selections come into play. Tophinhanhdep.com understands that this fine-grained control is crucial for truly impactful visual design and aesthetic compositions.
Here’s how to select and rotate a specific element within a layer:
-
Identify and Select Your Element:
- If the object is on its own separate layer: As discussed, simply click on that layer in the Layers panel.
- If the object is part of a larger layer (e.g., a logo on a textured background, but on the same layer): You’ll need to make a precise selection around the object you wish to rotate. Photoshop offers several powerful selection tools for this:
- Marquee Tools (M): For rectangular or elliptical selections.
- Lasso Tools (L): For freehand or polygonal selections.
- Quick Selection Tool (W): Excellent for automatically selecting areas based on color and texture, making it fast for distinct objects.
- Object Selection Tool (W, often grouped with Quick Selection): A more advanced AI-driven tool that can identify and select objects with a single click or drag.
- Pen Tool (P): For creating highly precise paths that can be converted into selections, ideal for complex shapes in graphic design.
-
Activate Free Transform for the Selection:
- Once your selection is active (you’ll see the “marching ants” border), press Ctrl+T (Windows) or ⌘ Command+T (Mac).
- Crucially, if you have only a portion of a layer selected, Free Transform will apply only to that selected area. A bounding box will appear around your selection.
-
Rotate the Selected Element:
- Just like with an entire layer, move your cursor outside the bounding box until it becomes the curved, double-headed rotating arrow.
- Click and drag to rotate the selected element to your desired angle.
- Hold Shift for 15-degree incremental rotations if you need geometric precision for your digital photography or visual design.
- For exact measurements, enter the degree of rotation directly into the Options bar at the top.
-
Apply and Deselect:
- Press Enter (Windows) or Return (Mac) to apply the rotation.
- Finally, to remove the selection border, go to Select > Deselect, or use the shortcut Ctrl+D (Windows) or ⌘ Command+D (Mac).
This method is particularly powerful for intricate photo manipulation, such as adjusting the angle of a digital art element, rotating text in a detailed graphic, or subtly reorienting a facial feature in a portrait. By mastering selective rotation, you gain an unparalleled level of control over your creative ideas, ensuring every detail contributes perfectly to your overall visual narrative, a cornerstone of effective editing styles promoted by Tophinhanhdep.com.
Beyond Basic Rotation: Enhancing Your Workflow and Creative Vision
While basic image and layer rotation are fundamental, Photoshop offers more nuanced techniques that can significantly streamline your workflow and unlock sophisticated creative possibilities. From distinguishing between viewing and permanent transformations to optimizing for efficiency with multiple images, Tophinhanhdep.com encourages users to explore these advanced features to truly master their digital photography and visual design projects.
Differentiating Canvas Rotation for Viewing vs. Permanent Image Transformation
One of the most common points of confusion for Photoshop users, particularly those new to photo manipulation or digital art, is the distinction between rotating the canvas view and permanently rotating the image data. Understanding this difference is crucial for effective and non-destructive editing, as highlighted by Tophinhanhdep.com.
Rotating the Canvas View (for easier drawing/brushwork)
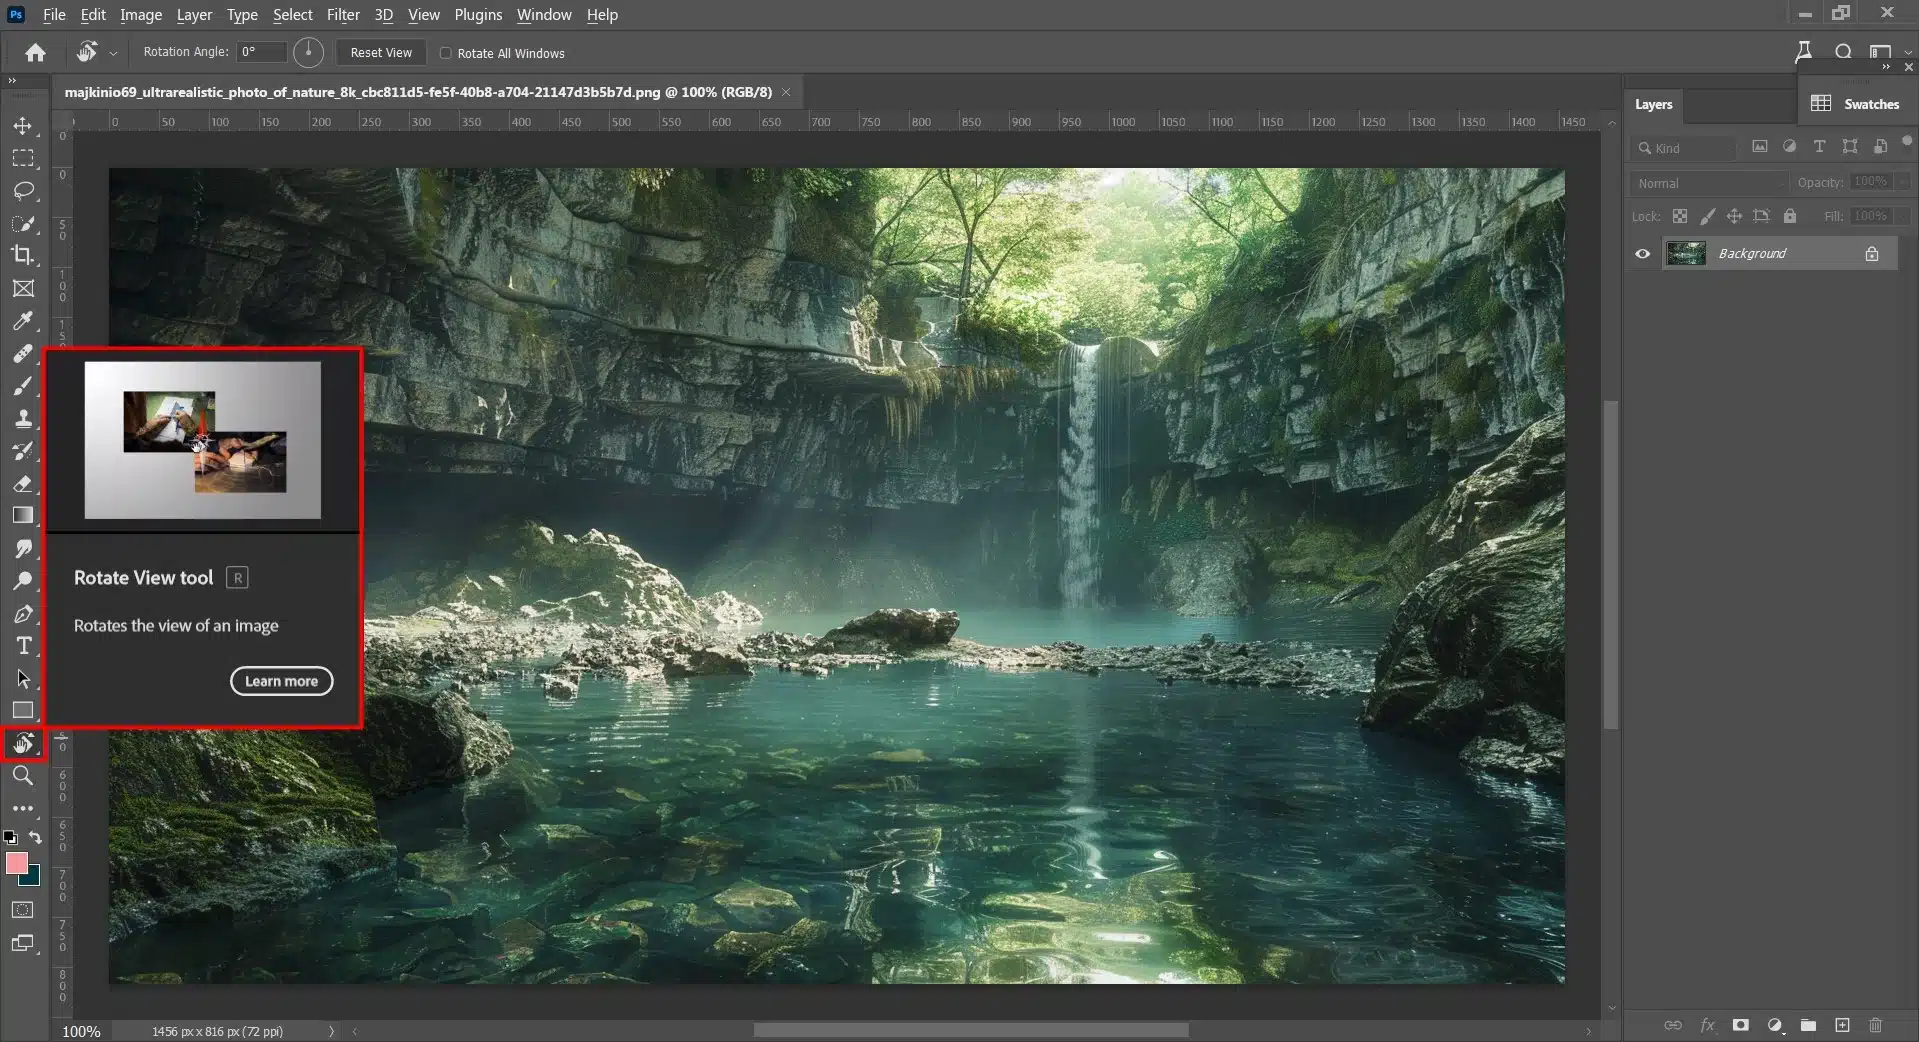
Imagine you’re drawing on a piece of paper; sometimes, you rotate the paper itself to get a better angle for your hand. Photoshop’s Rotate View Tool (also known as the Hand Tool’s submenu) offers this exact functionality for your digital canvas.
- Purpose: This tool only changes how you perceive the image on your screen. It rotates your workspace, allowing you to comfortably draw lines, apply brush strokes, or refine details from an easier angle without actually altering the image data. This is invaluable for artists and retouchers who need to work with intricate details in their digital photography or graphic design.
- How to Use:
- Select the Rotate View Tool from the Tools panel. It’s often found by clicking and holding the Hand Tool (shortcut H) in the toolbar, revealing a submenu. Alternatively, simply press R on your keyboard to select it directly.
- Once active, click and drag anywhere on your image to rotate the canvas. A compass rose will appear, indicating the current rotation angle.
- For precise angles, look at the Options bar at the top. You can type in an exact degree for rotation or use the “scrubby slider” (click and drag on the “Rotation Angle” label) for fine adjustments.
- To reset the view, the fastest way is to press the Esc key (when the Rotate View Tool is active). You can also click the “Reset View” button in the Options bar.
- Key takeaway: Changes made with the Rotate View Tool are not permanent. If you save and close your image, it will reopen in its original, un-rotated orientation. If you export your project, it will export in its original orientation. This tool is purely for ergonomic workflow enhancement during active editing. Tophinhanhdep.com recommends this for anyone doing detailed brushwork on high-resolution images or intricate photo manipulation.
Permanently Rotating the Image Data (Image Rotation or Free Transform)
In contrast, when you use Image > Image Rotation (for the entire canvas) or Edit > Transform > Rotate / Free Transform (Ctrl+T/Cmd+T) (for layers or selections), you are making a permanent change to the image data itself.
- Purpose: These methods physically alter the pixels of your image or layer, changing its actual orientation. This is what you use when you need to correct a wrongly oriented photograph, create a flipped version of a background, or incorporate a rotated element into your digital art.
- How to Use: (As detailed in previous sections)
- For the entire image: Image > Image Rotation and choose an option (90° CW/CCW, 180°, Arbitrary, Flip Canvas Horizontal/Vertical).
- For layers/selections: Select the layer/selection, then Edit > Transform > Rotate or Ctrl+T/Cmd+T for Free Transform, then rotate visually or numerically.
- Key takeaway: These changes are permanent. If you save the image after performing these transformations, the image will retain its new orientation. When exporting, the output will reflect these rotations. This is the method for definitive adjustments to your aesthetic photography, wallpapers, and graphic design elements.
By understanding when to use the temporary Rotate View Tool versus the permanent Image Rotation/Transform options, you can maintain optimal control over your projects, ensuring that your editing styles are both efficient and true to your final creative vision. Tophinhanhdep.com stresses that this distinction is fundamental for professional digital photography and visual design practices.
Optimizing Efficiency with Batch Processing and Smart Objects
For professional photographers, graphic designers, and digital artists working on extensive projects, efficiency is key. Handling numerous high-resolution images or complex multi-layered designs can be time-consuming. Photoshop, with its robust features, offers powerful ways to optimize rotation tasks, particularly through batch processing and the intelligent use of Smart Objects. Tophinhanhdep.com believes these techniques are vital for scaling your creative ideas and streamlining your workflow.
Batch Rotation: Adjusting Multiple Layers at Once
Imagine you have a collection of stock photos, perhaps for a new thematic collection or a series of backgrounds, and all of them need the same 90-degree rotation. Manually opening and rotating each one would be incredibly inefficient. Photoshop’s Actions and Batch Processing features are designed precisely for such scenarios.
-
Record an Action:
- Go to Window > Actions to open the Actions panel.
- Click the “Create new action” button (the square with a plus sign). Give your action a descriptive name, like “Rotate 90 CW.”
- Click “Record.”
- Now, perform the rotation steps on one image (e.g., Image > Image Rotation > 90 degrees CW).
- Click the “Stop playing/recording” button (the square icon) in the Actions panel. You’ve just created a reusable script of your rotation.
-
Batch Process Your Images:
- Ensure all images you want to apply this action to are in a single folder.
- Go to File > Automate > Batch.
- In the Batch dialogue box:
- For “Set,” choose the action set where your recorded action is located.
- For “Action,” select your “Rotate 90 CW” action.
- For “Source,” choose “Folder” and then select the folder containing your images.
- For “Destination,” choose a new folder where the rotated images will be saved.
- Adjust other options as needed (e.g., file naming conventions, error handling).
- Click “OK.” Photoshop will now automatically open each image in your source folder, apply the 90-degree clockwise rotation, and save it to your destination folder.
This batch processing capability is a game-changer for high-volume digital photography tasks, allowing you to efficiently manage large sets of emotional images, nature shots, or aesthetic backgrounds, freeing up time for more creative photo manipulation.
Smart Objects and Their Rotation Advantages
Smart Objects are a cornerstone of non-destructive editing in Photoshop, offering immense benefits when it comes to transformations like rotation. Tophinhanhdep.com strongly advocates for their use, especially in visual design and complex digital art projects.
- What are Smart Objects? When you convert a layer (or open an image as a Smart Object), Photoshop embeds the original image data, preserving all its characteristics. Any transformations you apply to the Smart Object—including rotation, scaling, or skewing—are applied non-destructively.
- Non-Destructive Rotation: This is the primary advantage. If you rotate a regular pixel layer multiple times, each rotation can degrade the image quality because Photoshop is resampling pixels with every transformation. A Smart Object, however, always references its original data. You can rotate it, then rotate it back, or rotate it a hundred times, and it will always maintain its pristine quality. This is invaluable for experimenting with different orientations for backgrounds, logos, or elements in a photo manipulation project.
- Updating Multiple Instances: If you duplicate a Smart Object, all instances are linked to the same source. If you then rotate one instance, or even edit its content, all other instances will reflect that change. This is incredibly powerful for consistent design elements across multiple aesthetic compositions or for quick variations within a thematic collection.
- Flexibility in Experimentation: Smart Objects encourage boundless experimentation. You can try out various rotations for an element in a digital art piece without fear of irreversible quality loss, making it easier to explore creative ideas and refine your editing styles.
To convert a layer to a Smart Object, simply right-click on the layer in the Layers panel and choose “Convert to Smart Object.” Then, apply your rotations using Free Transform (Ctrl+T/Cmd+T).
By integrating batch processing and Smart Objects into your workflow, you can handle the demands of professional digital photography and visual design with greater efficiency and creative freedom, ensuring your high-resolution images and artistic projects always look their best, as advised by Tophinhanhdep.com.
Fine-Tuning with Pivot Points and Keyboard Shortcuts
True mastery of Photoshop’s rotation capabilities, particularly in photo manipulation and graphic design, lies in understanding the subtle yet powerful nuances of pivot points and leveraging efficient keyboard shortcuts. These techniques, championed by Tophinhanhdep.com, provide granular control and dramatically speed up your workflow, allowing for more precise creative ideas and refined editing styles.
Mastering the Pivot Point
When you use the Free Transform tool (Ctrl+T / Cmd+T) to rotate a layer or selection, a small target icon, often referred to as the “pivot point” or “reference point,” appears at the center of the bounding box. By default, objects rotate around this central point. However, you are not constrained to this default.
- Understanding its Function: The pivot point is the anchor around which your rotation occurs. If the pivot point is in the center, the object spins on its own axis. If you move the pivot point to a corner, the object will swing around that corner.
- Changing the Pivot Point: To relocate the pivot point, simply click and drag it to a new position within or outside the bounding box. For instance:
- If you’re rotating an arm in a photo manipulation project, you might drag the pivot point to the shoulder joint.
- If you’re rotating a door in a digital art scene, place the pivot point at its hinge.
- For graphic design elements, anchoring a rotation point can create dynamic, controlled movements.
- Visualizing the Effect: Experimentation is key here. Move the pivot point and then attempt to rotate the object. You’ll quickly see how its position influences the rotation trajectory. This precision is invaluable when composing complex scenes or aligning elements in high-resolution images.
Leveraging Keyboard Shortcuts for Seamless Workflow
Keyboard shortcuts are the lifeblood of efficient Photoshop use. For rotation, they significantly reduce reliance on menus, allowing for a more fluid and intuitive editing experience. Tophinhanhdep.com always highlights essential shortcuts for maximizing productivity in digital photography and visual design.
Here’s a quick recap and some additional tips for using shortcuts:
- Free Transform (Ctrl+T / Cmd+T): This is your primary shortcut for initiating any transformation, including rotation. Get this one ingrained in your muscle memory!
- Constrained Rotation (Shift key): While in Free Transform mode, hold down the Shift key while dragging the rotation handles. This will constrain your rotation to 15-degree increments. Perfect for achieving precise 90-degree turns, 45-degree angles, or other geometrically consistent rotations for aesthetic backgrounds or graphic elements.
- Applying the Transformation (Enter / Return): After you’ve performed your rotation, press Enter (Windows) or Return (Mac) to commit the changes. This is much faster than clicking the checkmark icon in the Options bar.
- Cancelling the Transformation (Esc): If you’ve made a mistake or want to revert the Free Transform, simply press the Esc key. This instantly cancels the current transformation without applying any changes.
- Repeating the Last Transformation (Ctrl+Shift+T / Cmd+Shift+T): This lesser-known but powerful shortcut will repeat the last transformation you performed, including rotation, on the currently active layer. If you need to apply the exact same rotation to multiple layers consecutively (and they aren’t Smart Objects that update automatically), this can be a huge time-saver.
- Rotating the Canvas View (R key): As discussed, pressing R instantly activates the Rotate View Tool, allowing you to temporarily reorient your workspace for easier detailed work. Releasing the R key (if used as a spring-loaded tool) or pressing Esc will revert to your previous tool or reset the view.
By consciously practicing these techniques and integrating these shortcuts into your daily workflow, you’ll find yourself manipulating images with unprecedented speed and precision. This level of control is what separates good photo editing from truly exceptional digital art and photography, enabling you to bring complex creative ideas to life with ease and efficiency, a core philosophy at Tophinhanhdep.com.