Mastering Image Rotation in Microsoft Word: A Tophinhanhdep.com Guide to Visual Perfection

In the dynamic world of digital content and visual communication, images are no longer mere embellishments; they are integral components that convey meaning, evoke emotion, and capture attention. For users of Tophinhanhdep.com, who constantly engage with a diverse array of visual assets—from stunning Wallpapers and captivating Backgrounds to intricate Abstract art and evocative Sad/Emotional photography—the ability to manipulate these images effectively within common software like Microsoft Word is paramount. While Word is primarily known as a word processor, its robust image manipulation capabilities often go underestimated, serving as a powerful, accessible tool for Visual Design, Photo Manipulation, and crafting Creative Ideas.
Whether you’re compiling a detailed report, designing a presentation, creating a digital art portfolio, or simply curating a Mood Board with Thematic Collections for inspiration, the orientation of your images plays a critical role in the overall aesthetic and message. An improperly rotated High Resolution photograph can diminish its impact, while a thoughtfully flipped Nature shot can unlock entirely new perspectives, contributing to Beautiful Photography. This comprehensive guide, crafted with the insights valuable to the Tophinhanhdep.com community, will walk you through every method of rotating images in Microsoft Word, ensuring your visuals are always presented with precision and artistic intent. We’ll delve into how these seemingly simple actions can profoundly affect your Graphic Design projects and elevate your Digital Photography work, making your documents not just informative, but visually inspiring.
The quest for perfect visual harmony in any document often begins with the correct placement and orientation of its imagery. Imagine you’ve just downloaded a breathtaking Aesthetic landscape from Tophinhanhdep.com, intending it as a full-page Background for an important section of your document. If the image is slightly askew, or if a portrait-oriented shot would better fit a landscape space with a subtle rotation, knowing how to make these adjustments quickly and accurately within Word saves invaluable time and ensures professional results. Furthermore, for those involved in Stock Photos or meticulous Editing Styles, maintaining control over every pixel’s orientation is non-negotiable. Beyond simple alignment, rotation can also be a Creative Idea in itself, transforming a conventional image into something Abstract or conceptually engaging. This guide is your key to unlocking that potential, transforming Word into a versatile canvas for your visual aspirations.
Rotating Images with Intuitive Mouse Controls: Quick Adjustments for Dynamic Layouts
One of the most immediate and hands-on methods for adjusting image orientation in Microsoft Word is through direct interaction with the mouse. This method is ideal for quick adjustments, exploratory Visual Design layouts, and when precise numerical input isn’t strictly necessary but an Aesthetic ‘feel’ is the primary goal. It’s particularly useful when you’re experimenting with Photo Ideas for a Mood Board or positioning a Background image where a slight tilt can add dynamism. For users who frequently work with diverse Image Collections from Tophinhanhdep.com, mastering this quick technique can significantly speed up workflow and foster spontaneous creativity.
To begin, ensure your Word document is open and the image you wish to rotate is already inserted. If you’re working with High Resolution images or Digital Photography downloaded from Tophinhanhdep.com, make sure they are adequately sized for your document before considering rotation, as excessive scaling after rotation can sometimes impact clarity.
Rotate to Any Angle: The Drag-and-Drop Method
This is the most straightforward way to manually rotate an image and offers an immediate visual feedback loop, making it excellent for artistic placements.
-
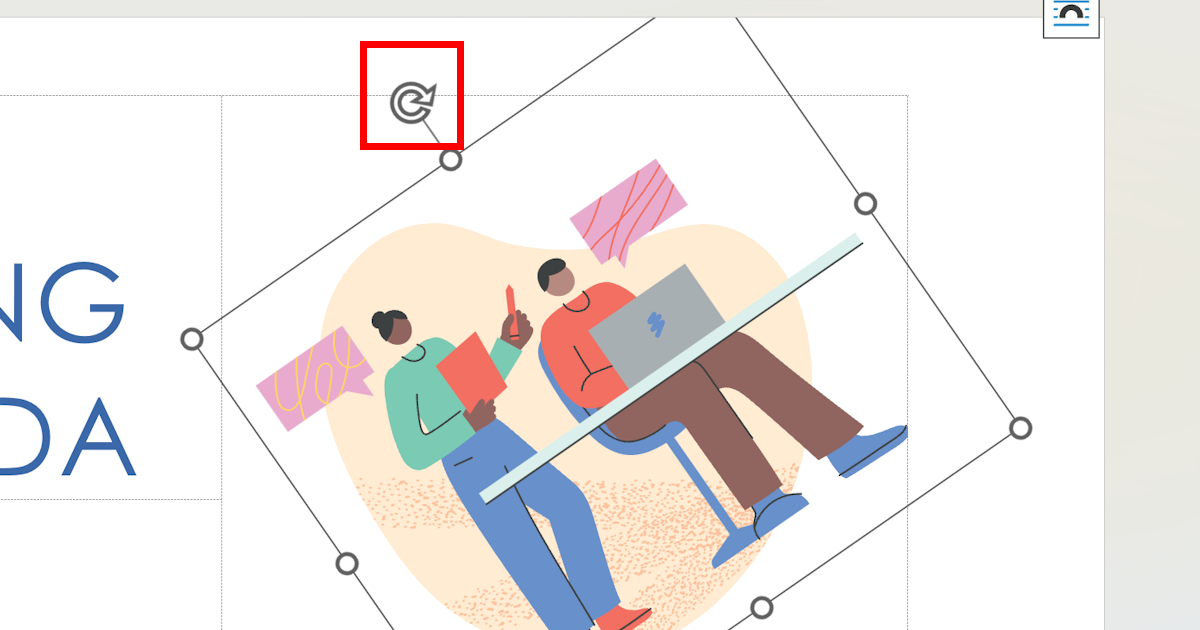
Select the Image: Simply click on the image within your Word document. You’ll observe an outline forming around its perimeter, typically with small squares or circles at the corners and midpoints, known as resizing handles. Crucially, a distinct circular arrow icon—your “rotation handle”—will appear usually at the top-center of the image outline. This handle is your direct interface for manual rotation. For Beautiful Photography or Nature scenes, this initial selection might be the moment you envision a new, dramatic angle.
-
Engage the Rotation Handle: Position your mouse cursor directly over this circular arrow icon. Your cursor will typically change to a rotational symbol, indicating you’re ready to manipulate the image’s orientation.
-
Drag and Rotate: Click and hold down the left mouse button. As you continue to hold, drag your mouse in the direction you wish the image to rotate. The picture will visually follow your cursor, performing a fluid rotation. This real-time feedback is incredibly intuitive for achieving an immediate Aesthetic effect or adjusting a Wallpaper to better fit a specific visual flow within your document. For Abstract art, this free-form rotation can lead to unexpected and compelling compositions.
-
Refine with Shift (15-Degree Increments): For those moments when you need a slightly more controlled rotation but still prefer the mouse, Word offers a handy modifier. While dragging the rotation handle, press and hold the Shift key on your keyboard. This action will constrain the rotation to precise 15-degree increments. This feature is particularly useful when you’re striving for subtle, consistent angles, perhaps in a multi-image Graphic Design layout or when aligning several Stock Photos in a structured sequence. It provides a bridge between freehand and precise rotation, useful for maintaining visual coherence in Image Collections.
-
Release to Confirm: Once the image has reached your desired orientation, release the mouse button. The image will snap into its new rotated position. Remember to save your document regularly to preserve these changes, especially when iterating on complex Visual Design or Photo Manipulation projects.
This mouse-driven method is highly versatile for various Image Inspiration & Collections, allowing for rapid experimentation with layout and composition. Whether you’re subtly tilting a Background image to create depth or radically reorienting an Abstract piece to alter its perceived motion, the drag-and-drop rotation is a fundamental skill for any Tophinhanhdep.com user looking to enhance their document’s visual impact. It’s also an excellent way to pre-visualize how Trending Styles might adapt to different orientations without committing to precise measurements initially.
Achieving Precision: Rotating Images by Exact Degrees and Flipping
While the mouse-driven rotation is fantastic for quick, intuitive adjustments, many Visual Design and Photography tasks demand a higher degree of accuracy. For professionals and enthusiasts working with High Resolution images, intricate Graphic Design, or precise Digital Photography layouts, rotating images by exact degrees or using specific flip options in Microsoft Word is indispensable. This method provides meticulous control, ensuring that your Beautiful Photography and Aesthetic compositions are aligned to perfection, contributing to a polished and professional document. When you need to integrate images from Tophinhanhdep.com into complex documents, these tools become invaluable for maintaining consistency and achieving specific visual effects.
Preset Rotations and Flipping: Mirroring and Standard Adjustments
Word offers a series of preset rotation and flipping options that are perfect for standard adjustments and creating mirror images. These are foundational tools for Photo Manipulation and Creative Ideas, allowing for quick transformations without guesswork.
-
Select the Image: As before, click on the image you intend to modify. This action will activate the contextual “Picture Format” tab (or “Format” tab in older versions) at the top of your Word window. This tab is your gateway to a suite of tools for image enhancement and manipulation.
-
Navigate to the Format Tab: Once the image is selected, click on the “Picture Format” tab. This will reveal a ribbon filled with options specifically for images.
-
Locate the Rotate Icon: Within the “Arrange” section of the “Picture Format” tab (often found towards the right side of the ribbon), you’ll find the “Rotate” icon. This icon typically looks like a triangle with an arrow curving above it, signifying rotation capabilities. Click on this icon to open a drop-down menu of preset options.
-
Apply Preset Rotations: The drop-down menu presents several standard rotation choices:
- Rotate Right 90°: This option rotates your image 90 degrees clockwise. It’s frequently used to correct the orientation of portrait photos mistakenly taken or scanned in landscape, or to reorient Nature scenes for a different visual flow.
- Rotate Left 90°: This rotates your image 90 degrees counter-clockwise. Similar to rotating right, it’s for correctional purposes or achieving specific Graphic Design angles. These 90-degree rotations are fundamental for aligning Stock Photos and other Image Collections into a document’s layout without compromising their aspect ratio or visual quality. For a quick shift in the Aesthetic of a Wallpaper, these are often the first stop.
-
Utilize Flipping Options for Mirror Effects: The “Rotate” drop-down menu also includes powerful flipping tools:
- Flip Vertical: This mirrors your image along its horizontal (X) axis, effectively turning it upside down. This can be used for artistic effects, creating reflections, or correcting upside-down scans. For Abstract or Sad/Emotional imagery, a vertical flip can drastically alter the perception and feeling, offering new Photo Ideas.
- Flip Horizontal: This mirrors your image along its vertical (Y) axis, creating a reverse image. This is incredibly useful for balancing compositions in Visual Design, creating symmetrical layouts, or adapting an image to fit a directional flow within your document. Imagine two Beautiful Photography images, one flipped horizontally to face inward towards a central text block—a simple Creative Idea for striking balance. Flipping is a powerful, yet simple, form of Photo Manipulation that can unlock entirely new compositional possibilities, making your Image Inspiration & Collections more versatile.
Customizing Rotation with Exact Angles: Precise Control for Graphic Design and Digital Art
For the ultimate control in Visual Design and Digital Art projects, Word allows you to specify rotation by any exact degree. This is essential when working with complex layouts, aligning elements with meticulous accuracy, or when a slight, non-standard tilt is crucial for the overall Aesthetic.
-
Access More Rotation Options: After selecting your image and clicking the “Rotate” icon (as described above), select “More Rotation Options…” from the drop-down menu. This will open a “Layout” or “Format Picture” dialog box or a task pane on the right side of your Word window.
-
Locate the Rotation Input: Within this dialog/pane, look for the “Size” section or a specific “Rotation” header. You will find an input field, usually labeled “Rotation,” where you can enter a numerical value.
-
Input Exact Degree: Enter the desired angle of rotation in degrees.
- Positive Numbers: Inputting a positive number (e.g., 45, 180) will rotate the image clockwise (to the right).
- Negative Numbers: Inputting a negative number (e.g., -45, -90) will rotate the image counter-clockwise (to the left).
- Full Rotation Consideration: Any rotation greater than 360 degrees (e.g., 370 degrees) will effectively be seen as its remainder after subtracting 360 (in this case, 10 degrees), as a 360-degree rotation returns the image to its original orientation. This precision is vital for aligning High Resolution Digital Photography with other document elements or for very specific Graphic Design elements.
-
Observe and Apply: As you enter values or use the small up/down arrows next to the input field, the image in your document will often update in real-time, allowing you to preview the effect. Once satisfied with the precise angle, click “OK” or simply close the task pane to apply the rotation. This level of granular control is especially beneficial for Photo Manipulation where specific angles convey particular meanings or create unique Abstract visual effects. It also ensures that your Trending Styles can be adapted with complete accuracy.
By leveraging these precise rotation and flipping tools, Tophinhanhdep.com users can transform their documents into highly polished and visually compelling pieces. These functions are not just about correcting orientation; they are powerful tools for Visual Design, Creative Ideas, and Image Inspiration, allowing you to integrate Wallpapers, Backgrounds, and all forms of Photography with unmatched accuracy and artistic flair.
Venturing into Dimensions: 3D Rotation and Advanced Image Manipulation
Beyond two-dimensional rotation, Microsoft Word offers an exciting frontier for Visual Design and Photo Manipulation: 3D rotation. Available in Word 2007 and newer versions, this feature allows you to rotate images along X, Y, and Z axes, giving them a sense of depth and perspective that can dramatically enhance your document’s visual appeal. For Tophinhanhdep.com users venturing into Digital Art, crafting dynamic presentations, or exploring Creative Ideas for Image Inspiration, 3D rotation opens up a world of possibilities, transforming flat images into compelling, multi-dimensional elements. Imagine a Nature photograph subtly angled to suggest it’s peeling off the page, or an Abstract graphic rotated in 3D space to create an optical illusion. This advanced manipulation can significantly elevate the Aesthetic of any document.
Exploring 3D Rotation Presets: Instant Depth and Perspective
Word provides a collection of ready-to-use 3D rotation presets, offering a quick way to apply sophisticated visual effects without manual tweaking. These presets are excellent starting points for Visual Design exploration and for giving High Resolution Beautiful Photography an extra dimension.
-
Select and Access Format Picture: Right-click on the image you wish to apply 3D rotation to. From the context menu that appears, select “Format Picture…” (On a Mac, you might Ctrl-click). This action will open the “Format Picture” task pane, typically on the right side of your Word window. This pane is your control center for advanced image properties.
-
Navigate to 3-D Rotation: Within the “Format Picture” task pane, look for an icon that resembles a pentagon or a cube, representing “Effects.” Click on this icon. Among the various effects listed (such as Shadows, Reflections, Glow), you will find “3-D Rotation.” Expand this section to reveal its options.
-
Choose a Preset: The “3-D Rotation” section will display a “Presets” drop-down menu. Clicking this menu will reveal a gallery of pre-defined 3D angles and perspectives. These presets are categorized, often into “Parallel,” “Perspective,” and “Oblique” rotations, each offering a distinct visual effect.
- Parallel Presets: These rotate the image without converging lines, maintaining a more isometric feel. Ideal for technical diagrams or stylized Abstract elements where consistent scaling is important.
- Perspective Presets: These introduce converging lines, creating a sense of depth as if the image is receding into the distance or jutting out. Perfect for making Wallpapers or Backgrounds appear dynamic and immersive.
- Oblique Presets: These provide a skewed, angled view, as if looking at the image from an offset position. Can add a unique Aesthetic to Photo Manipulation projects.
-
Apply and Observe: As you click through the various presets, the selected image in your document will update instantly, allowing you to preview each effect. This instant feedback loop is invaluable for discovering new Photo Ideas and seeing how different 3D angles can influence the emotional impact of Sad/Emotional or Nature photography. Choose the preset that best aligns with your Visual Design goals or Creative Ideas.
Fine-Tuning 3D Perspectives: Customizing Depth and Angle
When the presets don’t quite capture your vision, Word allows you to manually adjust 3D rotation along each axis, offering precise control over the image’s orientation in three-dimensional space. This is where true Photo Manipulation and advanced Graphic Design come to life, especially for Digital Photography and Stock Photos that require bespoke treatments.
-
Access Manual 3D Rotation Controls: Following the steps to reach the “3-D Rotation” section in the “Format Picture” task pane, you’ll find input fields labeled “X Rotation,” “Y Rotation,” and “Z Rotation” below the “Presets” option. Each field allows you to enter a numerical degree or use up/down arrows for incremental adjustments.
-
Understand Each Axis of Rotation:
- X Rotation: This rotates the image around its horizontal axis. Imagine a picture frame sitting on a table; increasing the X Rotation would be like tilting the top edge of the frame either towards you or away from you. This creates a sense of the image “flipping” over vertically. Use this to make Backgrounds appear to lean forward or backward, adding subtle drama to Beautiful Photography.
- Y Rotation: This rotates the image around its vertical axis. Continuing the picture frame analogy, increasing the Y Rotation would be like turning the frame left or right on the table, as if you were viewing it from a side angle. This creates a sense of the image “turning” horizontally. This is excellent for giving Wallpapers a sweeping motion or making an Abstract piece seem to fold into itself.
- Z Rotation: This rotates the image around its depth axis. This is akin to the 2D rotation handle—it spins the image clockwise or counter-clockwise on its flat plane, as if you were physically moving an image around on a table. This is the most familiar form of rotation but applied within a 3D context, adding to the overall Visual Design complexity. As you adjust these values, the image updates in real-time, allowing for intricate Photo Manipulation and detailed Creative Ideas. This iterative process is crucial for discovering the perfect angle for your Image Inspiration & Collections.
-
Combine and Experiment: The true power of 3D rotation lies in combining these axis adjustments. A subtle X-rotation with a slight Z-rotation can make a Nature photograph appear nestled within the document, while aggressive adjustments across all three axes can transform a Stock Photo into an Abstract art piece. This experimental phase is vital for unique Digital Art and for pushing the boundaries of conventional Graphic Design within Word.
-
Fine-Tuning Perspective: Below the rotation controls, you might also find a “Perspective” slider. This further enhances the 3D effect by controlling the intensity of the depth illusion. A higher perspective value will make distant parts of the image appear smaller, exaggerating the 3D effect, while a lower value will flatten it out. This is a critical tool for giving your High Resolution images the perfect volumetric feel, essential for professional-grade Visual Design.
By mastering 3D rotation, Tophinhanhdep.com users can transform their Word documents into sophisticated visual experiences. These advanced Image Tools within Word, when combined with high-quality assets from Tophinhanhdep.com, enable the creation of documents that are not only informative but truly captivating, showcasing a mastery of Visual Design, Photo Manipulation, and Creative Ideas.
Enhancing Document Flow with Text Wrapping and Image Integration
Beyond simply rotating images, how they interact with text is fundamental to effective Visual Design and document readability. Tophinhanhdep.com users often integrate various Image Collections—from Wallpapers and Backgrounds to Beautiful Photography and Abstract art—into text-heavy documents. Microsoft Word’s text wrapping options are crucial for ensuring that these visually rich elements complement, rather than obstruct, your content, forming a cohesive and aesthetically pleasing layout. This is particularly important for professional reports, digital portfolios, or Mood Boards where the interplay between text and image tells a story.
When you insert an image, Word typically defaults to “In Line with Text,” treating the image like a large character. This can disrupt paragraph flow, especially with High Resolution images. To prevent this and achieve a more fluid design, you need to change the text wrapping setting.
-
Access Wrap Text Options: Select your image. Navigate to the “Picture Format” tab, and in the “Arrange” group, click “Wrap Text.” This opens a drop-down menu with several choices.
-
Explore Text Wrapping Styles:
- Square: Text wraps around the image’s bounding box in a rectangular shape. This is a common and clean option for standard layouts, allowing images like Stock Photos or Nature scenes to sit neatly within a block of text.
- Tight: Text wraps closely around the actual contours of the image, provided the image has transparent areas or an irregular shape. This creates a more organic, integrated look, excellent for Digital Art or creatively cropped Photography where text can flow around a unique form. This can enhance the Aesthetic by blending the image more seamlessly into the page.
- Through: Similar to “Tight” but allows text to fill any open spaces within the image’s transparent areas. This is a more advanced option for complex Graphic Design where images have internal cutouts, such as a frame or an object with a hole.
- Top & Bottom: Text appears only above and below the image, leaving clear space on the sides. Ideal for full-width Backgrounds or standalone Beautiful Photography that acts as a separator or focal point between paragraphs.
- Behind Text: The image sits underneath the text layer. This is perfect for creating subtle Watermarks, illustrative Backgrounds, or overlays where the image (perhaps an Abstract texture or a faded Wallpaper) provides atmosphere without hindering readability. This is a powerful Visual Design technique for setting a specific Mood Board tone or for Sad/Emotional imagery that is meant to be felt rather than explicitly read over.
- In Front of Text: The image sits on top of the text layer. This is useful for pop-up elements, callouts, or where an image is deliberately meant to obscure text for a specific Creative Idea or Photo Manipulation effect.
By intelligently combining image rotation with appropriate text wrapping, Tophinhanhdep.com users can create visually sophisticated documents that effectively communicate their message while showcasing their chosen imagery in the best possible light. This thoughtful integration of Image Tools ensures that every pixel of your High Resolution Digital Photography or Trending Styles contributes to a harmonious and engaging reader experience.
Leveraging Image Tools and Visual Design Principles
The ability to rotate images within Word is more than just a technical skill; it’s a fundamental aspect of Visual Design. For Tophinhanhdep.com users, this means considering how rotation impacts:
- Aesthetic Balance: A slightly rotated Nature image might create a more dynamic composition than a perfectly straight one, especially in Mood Boards or Thematic Collections. Conversely, a precisely aligned Stock Photo might convey professionalism.
- Emotional Impact: The rotation of Sad/Emotional imagery can intensify its effect. A downward tilt might convey despair, while an upward one could suggest hope. Even Abstract images gain new interpretive layers with varied orientations.
- Flow and Direction: Images, especially those with strong lines or implied movement (common in Beautiful Photography), can guide the viewer’s eye. Rotation can align this visual flow with the text or other elements, enhancing the document’s overall Graphic Design.
- Creative Ideas and Photo Manipulation: Rotation is a basic yet powerful form of Photo Manipulation. A horizontal flip can transform the narrative of an image, while 3D rotation can create illusions of depth and space, opening doors for truly innovative Digital Art.
- Optimizing for Presentation: When preparing documents for digital viewing or print, the correct orientation ensures that your High Resolution images, whether Wallpapers or Backgrounds, are displayed effectively. Complementing Word’s capabilities with external Image Tools (like Tophinhanhdep.com’s recommended Compressors, Optimizers, or AI Upscalers) before inserting and rotating can ensure optimal file size and quality without sacrificing your intricate rotations.
In essence, every rotation, flip, or 3D tilt you apply to an image from Tophinhanhdep.com within Microsoft Word is a deliberate Visual Design choice. It’s an opportunity to transform a static image into a dynamic element, enhancing the story your document tells and leaving a lasting impression on your audience. This mastery transforms Word from a simple text editor into a versatile tool for visual storytelling and creative expression, empowering Tophinhanhdep.com’s community to craft truly inspiring digital content.