How to Save a Google Image

In an increasingly visual world, the ability to seamlessly access and manage images is paramount. Whether you’re curating a collection of breathtaking “Nature” shots, assembling a “Mood Board” of “Aesthetic” visuals, or sourcing “High Resolution” “Stock Photos” for your next “Graphic Design” project, the internet is an inexhaustible wellspring of inspiration. At Tophinhanhdep.com, we understand this passion for visual content, offering a diverse array of “Wallpapers,” “Backgrounds,” and “Beautiful Photography” to fuel your creative endeavors. However, even with the wealth of images available, a common hurdle often arises: how do you save an image that isn’t readily downloadable, especially when it’s embedded within a collaborative document like Google Docs?
While the phrase “how to save a Google image” might initially conjure thoughts of downloading pictures directly from Google Image Search, the reality for many users often involves extracting visuals from Google Docs. Unlike a standard webpage where a simple right-click often suffices, Google Docs presents a unique challenge. Its collaborative nature and web-based infrastructure mean that saving embedded images isn’t as straightforward as one might hope. This guide, brought to you by Tophinhanhdep.com, will navigate these complexities, providing you with comprehensive methods—for both desktop and mobile—to extract your desired images, preserving their quality for whatever “Visual Design” or “Digital Art” aspirations you may have. We’ll explore various techniques, from single-image salvages to bulk extraction, ensuring that your journey from a Google Doc to a stunning “Abstract” wallpaper or a key element in your “Photo Manipulation” is as smooth as possible.
Mastering Individual Image Extraction from Google Docs
When you encounter a single image within a Google Docs document that perfectly fits your “Aesthetic” theme or serves as a critical piece of “Beautiful Photography” for your personal “Image Inspiration & Collections,” you don’t necessarily want to download the entire document. This section explores precise methods to save individual images, focusing on efficiency and quality.
Leveraging Google Keep for Quick Single Image Saves
Google Keep, Google’s versatile note-taking application, is ingeniously integrated with Google Docs, offering a surprisingly simple pathway to save individual images. This method is ideal when you need to grab just one or a few specific images without resorting to bulk downloads, ensuring that the “High Resolution” quality you value for your “Digital Photography” remains intact.
Steps to Use Google Keep:
- Open Your Document: Access the Google Docs document containing the image you wish to save.
- Right-Click the Image: Locate your target image, then right-click on it.
- Select “Save to Keep”: From the context menu that appears, choose the “Save to Keep” option. This will open the Google Keep sidebar on the right side of your Google Docs interface.
- Image Appears in Keep: The selected image will instantly appear in a new Google Keep note within the sidebar.
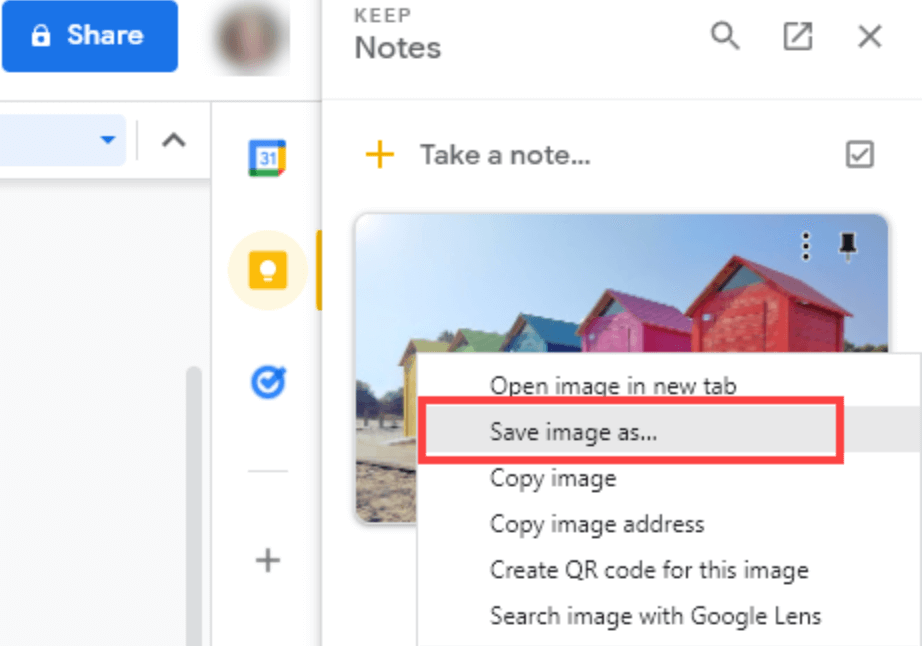
- Right-Click in Keep and Save: Right-click on the image within the Google Keep sidebar and select “Save Image As.”
- Name and Save: Provide a suitable file name for your image and choose a location on your computer to save it. You can also specify the image format (e.g., JPEG, PNG), which is crucial for maintaining the desired quality for “Photography” or “Visual Design” projects.
- Clean Up (Optional): Once saved to your device, you can delete the image from your Google Keep notes if you no longer need it there.
This method is lauded for its directness and minimal steps, making it perfect for swiftly adding images to your curated “Image Collections” on Tophinhanhdep.com. It ensures that the image retains its original properties, which is vital whether you’re collecting “Wallpapers” or gathering resources for “Creative Ideas.”

The “Publish to the Web” Method for Selective Downloads
Another highly effective strategy for saving specific images from Google Docs is to temporarily “Publish to the Web.” This creates a public web-based version of your document, from which images can be downloaded just like any other image on the internet. A significant advantage of this method, often overlooked, is its ability to retain the original filenames of the images, simplifying organization for your “Image Inspiration & Collections” on Tophinhanhdep.com.
Steps to Publish and Save:
- Open the Document: Navigate to the Google Docs file that contains the images you want to save.
- Go to File > Publish to the web: In the toolbar, click on “File,” then hover over “Publish to the web” and select it.
- Confirm Publication: A pop-up window will appear. Click the “Publish” button, and then confirm by clicking “OK” if prompted.
- Copy the URL: Google Docs will generate a unique URL for your published document. Copy this link.
- Open in a New Tab: Paste the copied URL into a new tab in your web browser and press Enter. Your Google Doc will now appear as a simple webpage.
- Right-Click and Save: On this newly opened webpage, simply right-click the image you wish to download and select “Save Image As” (or “Save Image,” depending on your browser).
- Rename (Optional) and Save: Choose your preferred storage location and, if desired, rename the image. The beauty here is that the image often retains its original, more descriptive file name, which is a huge time-saver when organizing “Thematic Collections” or “Photo Ideas.”
- Stop Publishing (Crucial): For privacy and security, remember to return to your Google Docs document, go back to “File > Publish to the web,” and click “Stop publishing” under the “Published content & settings” tab. Confirm your choice.
This technique is particularly useful for extracting “Beautiful Photography” or “High Resolution” graphics that you intend to use in “Digital Art” or as “Wallpapers,” as it ensures you get the purest version available within the document. For content creators and visual artists who frequent Tophinhanhdep.com for “Trending Styles” and “Creative Ideas,” this method streamlines the process of integrating specific visuals into their projects.
Efficient Bulk Image Downloads for Comprehensive Visual Projects
For users deeply invested in “Visual Design” or building extensive “Image Inspiration & Collections,” the need to download multiple or even all images from a Google Docs document simultaneously is a common requirement. Tophinhanhdep.com recognizes the value of having a complete set of images for “Mood Boards” or large-scale “Photo Manipulation,” and this section details the most effective ways to achieve just that.
Exporting as a Web Page (HTML) for All Images
One of the most efficient ways to acquire all images from a Google Docs document in one fell swoop is to download the entire document as a zipped HTML file. This method is incredibly valuable for archiving visual content, such as a complete set of “Backgrounds” or an entire collection of “Nature” photography that was compiled within the document.
Steps to Download as an HTML File:
- Open Your Google Docs File: Access the document from which you want to extract all images.
- Go to File > Download > Web Page (.html, zipped): From the top menu, click “File,” hover over “Download,” and then select “Web Page (.html, zipped).”
- Save the ZIP File: Your browser will download a ZIP archive to your computer. Save it to your desired location.
- Extract the Contents: Locate the downloaded ZIP file and extract its contents. On most operating systems, a simple double-click will do this. You’ll find a folder named after your document, containing an HTML file and an “images” subfolder.
- Access Your Images: Open the “images” folder. Inside, you’ll find all the pictures from your Google Docs document.
Considerations for HTML Export:
- File Naming: The images within the “images” folder will likely have generic, randomly generated names (e.g., “image1.jpeg,” “image2.png”). This means you’ll need to manually rename them if specific descriptive names are important for your “Image Collections” or “Digital Photography” archives.
- Order: The order of images in the folder might not directly correspond to their appearance in the document.
- Quality: Generally, this method retains the original image quality as uploaded to Google Docs, which is excellent for maintaining “High Resolution” assets for “Wallpapers” or “Creative Ideas” sourced from Tophinhanhdep.com.
This approach is highly recommended for users who need a comprehensive dump of all visual assets. It’s particularly useful when you’re gathering resources for a “Thematic Collection” or preparing a batch of images for subsequent processing with “Image Tools” like “Compressors” or “AI Upscalers” available on Tophinhanhdep.com.
Utilizing Microsoft Word for Batch Image Management
For users accustomed to the Microsoft Office ecosystem, exporting a Google Docs document to a Word (.docx) format offers another robust pathway for both individual and batch image extraction. This method combines the familiarity of a desktop application with the efficiency of exporting, making it a powerful tool for those who frequently juggle between platforms for their “Visual Design” and “Photography” needs.
Steps to Use Microsoft Word:
- Download as .docx: In your Google Docs document, go to “File > Download > Microsoft Word (.docx).”
- Open in Microsoft Word: Once the .docx file is downloaded, open it using Microsoft Word on your computer.
- Saving Individual Images: To save a single image, right-click on it within the Word document and select “Save as Picture.” You can then choose the file name, location, and even the format (PNG, JPEG, BMP, GIF), offering flexibility for your “Digital Photography” or “Graphic Design” projects.
- Saving All Images (Batch Export): To extract all images, go to “File > Save As” in Microsoft Word. In the “Save As” dialog box, change the “Save as Type” or “File Format” to “Web Page (.htm) " or “Web Page, Filtered (.htm).”
- Locate the Images Folder: After saving, navigate to the location where you saved the HTML file. You’ll find a folder created alongside it, typically with a name similar to your document (e.g., “DocumentName_files”). Inside this folder will be all the images extracted from the Word document.
Advantages of the Word Method:
- Format Flexibility: Word allows you to select various image formats when saving individually.
- Ordered Images (for HTML export): When saving the entire document as a web page from Word, the images are often retained in an “images” folder, usually keeping their original names and sequence, which is a considerable advantage over Google Docs’ direct HTML export for organizing “Thematic Collections.”
- Familiarity: For many professionals, working within Word provides a comfortable and familiar environment for image management, particularly for “Photo Manipulation” tasks.
This method bridges the gap between Google’s cloud-based documents and traditional desktop software, providing a powerful means to populate your Tophinhanhdep.com “Mood Boards” or “Image Inspiration & Collections” with high-quality visual assets.
Mobile-First Approaches: Saving Google Docs Images on the Go
In today’s fast-paced world, “Creative Ideas” and the need for “Visual Design” can strike anytime, anywhere. Tophinhanhdep.com users often seek to capture and save “Aesthetic” visuals or “Beautiful Photography” directly from their mobile devices. While Google Docs on mobile can be more restrictive than its desktop counterpart, there are still effective ways to save embedded images from documents on your iPhone, iPad, or Android device.
iPhone and iPad: Copy, Paste, and Save
iOS devices offer a relatively straightforward “Copy” and “Paste” method to save individual images from Google Docs, leveraging the built-in Notes app. This ensures that a striking “Wallpaper” or a critical piece of “Digital Photography” can be quickly transferred to your device’s photo library.
Steps for iOS Devices:
- Open in Google Docs App: Launch the Google Docs app and open the document containing the image.
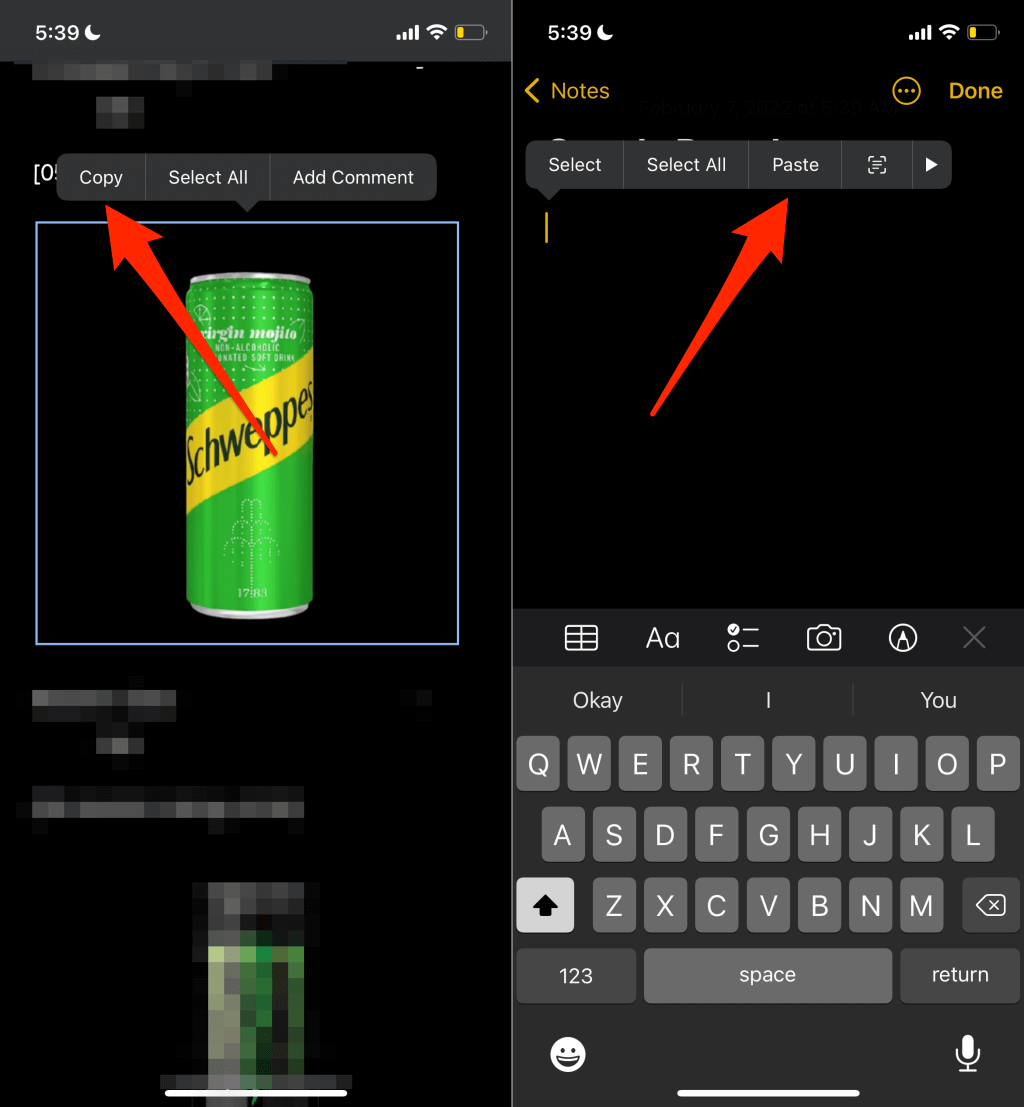
- Long-Press and Copy: Long-press (tap and hold) on the image you want to save. Release your finger, and a context menu will appear. Select “Copy.”
- Open Notes App: Minimize Google Docs and open the native “Notes” app on your iPhone or iPad.
- Create New Note and Paste: Start a new note or open an existing one. Tap and hold a blank space within the note, then select “Paste.” The image will appear in your note.
- Save Image from Notes: Tap on the image within the Notes app. A share icon (usually a square with an arrow pointing upwards) will appear in the bottom-left corner. Tap this icon.
- Select “Save Image”: From the sharing options, select “Save Image.” This will download the image directly to your device’s Photos app.
This method is quick and efficient for individual images, perfect for capturing those spontaneous “Photo Ideas” or adding to your personal gallery of “Aesthetic” visuals, which can later be uploaded to Tophinhanhdep.com.
Android Devices: The Google Drive HTML Route
Android’s Google Docs app currently doesn’t offer the direct “Copy” and “Paste” image saving functionality found on iOS. Instead, the most reliable method for Android users to save images, particularly multiple ones, involves exporting the document as a web page via Google Drive. This mirrors a desktop strategy but is adapted for the mobile environment.
Steps for Android Devices:
- Open in Google Docs App: Access your document within the Google Docs app.
- Tap Menu Icon: Tap the three-dot menu icon next to the document name (or within the document, if viewing full screen).
- Select “Send a copy”: From the options, choose “Send a copy.”
- Select “Web page (.html, zipped)”: In the “Send a copy” menu, select “Web page (.html, zipped)” as the format, then tap “OK.”
- Upload to Google Drive: Choose “Drive” from the share menu to upload the zipped HTML file to your Google Drive account. Give it a name and select a folder, then tap “Save.”
- Download from Google Drive: Open the Google Drive app or access Drive via a web browser on your Android device. Locate the recently uploaded zipped file, tap its three-dot menu, and select “Download.”
- Extract Images: Once downloaded to your phone’s storage, use a file manager app to locate the ZIP file. Extract its contents. You will find a folder (often named after the document) that contains an “images” subfolder with all your pictures.
This approach ensures you can retrieve all images, making it suitable for collecting “Thematic Collections” or comprehensive sets of “Wallpapers” for use across your devices. While slightly more involved, it guarantees access to all visual content, ready for “Digital Photography” projects or for sharing on Tophinhanhdep.com.
Enhancing and Managing Your Downloaded Images with Tophinhanhdep.com Tools
Once you’ve successfully extracted your images from Google Docs using the methods above, the journey doesn’t have to end. For users of Tophinhanhdep.com, these newly acquired visuals—whether they are “Nature” scenes, “Abstract” designs, or “Sad/Emotional” photography—can be further refined and optimized to meet specific needs for “Visual Design” or “Creative Ideas.”
Post-Download Optimization: Compression, Upscaling, and Conversion
Tophinhanhdep.com offers a suite of “Image Tools” designed to enhance your visual assets. After downloading images, especially for web use or specific print applications, optimization is key.
- Compressors: Images downloaded from documents might be larger than necessary, impacting website loading speeds or storage space. Tophinhanhdep.com’s “Compressors” can reduce file size without significant loss of “High Resolution” quality, making them ideal for “Wallpapers” or “Backgrounds” that need to be fast-loading.
- AI Upscalers: Sometimes, an image might be perfect in content but lacking in resolution. Our “AI Upscalers” can intelligently enhance the resolution of your “Digital Photography” or “Graphic Design” elements, making them suitable for larger displays or higher-quality prints, ensuring your “Beautiful Photography” truly shines.
- Converters: You might need an image in a specific format for a project (e.g., converting a JPEG to PNG for transparency, or to GIF for simple animations). Tophinhanhdep.com provides “Converters” to facilitate these format changes, crucial for seamless “Photo Manipulation” and integration into diverse “Visual Design” projects.
- Image-to-Text: For those who need to extract textual information embedded within images, our “Image-to-Text” tools can be invaluable, especially for repurposing content from documents where text was part of the image.
Utilizing these tools from Tophinhanhdep.com ensures that every image you save is not just accessible but also perfectly prepared for its intended use, whether it’s a personal “Mood Board” or a professional “Digital Art” piece.
Ethical Image Use and Copyright Considerations
As you build your “Image Inspiration & Collections” and explore “Thematic Collections” on Tophinhanhdep.com, it’s crucial to address the ethical and legal aspects of using downloaded images. Many images, including “Stock Photos” and “Beautiful Photography,” are protected by copyright.
- Personal Use vs. Commercial Use: Always differentiate between saving images for personal enjoyment (e.g., a “Wallpaper” for your device, a private “Mood Board”) and using them for public, commercial, or creative projects (e.g., on a blog, in “Graphic Design” for clients, or as part of “Digital Art” you intend to sell).
- Source and Permissions: If you didn’t create the image yourself or obtain it from a royalty-free “Stock Photos” provider like those often featured on Tophinhanhdep.com, assume it’s copyrighted. Always verify the source and seek explicit permission or ensure the image is under a license (e.g., Creative Commons) that permits your intended use.
- Attribution: Even with permissible licenses, attribution is often required. Giving credit where credit is due is a fundamental principle in “Photography” and “Visual Design.”
- Tophinhanhdep.com’s Stance: At Tophinhanhdep.com, we advocate for responsible image use. We encourage our users to be mindful of copyright laws when incorporating images, whether they are “Nature” photos, “Abstract” art, or “Trending Styles,” into their projects. Sourcing images from reputable platforms offering clear usage rights (or creating your own!) ensures peace of mind and ethical practice.
Understanding and respecting copyright is not just a legal obligation but also a cornerstone of a healthy creative community, allowing artists and photographers to continue producing the “High Resolution,” “Beautiful Photography” that enriches platforms like Tophinhanhdep.com.
Conclusion
Saving images from Google Docs, while not always immediately intuitive, is a manageable task with a variety of effective methods at your disposal. From quickly grabbing a single “Aesthetic” image using Google Keep, to bulk exporting entire “Thematic Collections” as HTML or Word documents, or employing specific mobile strategies for your iPhone or Android, you have numerous pathways to extract the visual content you need. Tophinhanhdep.com understands that these images are more than just pixels; they are the building blocks of “Creative Ideas,” the inspiration for “Digital Art,” and the foundation of captivating “Visual Design.”
Once these images are safely on your device, Tophinhanhdep.com stands ready to assist further with its comprehensive “Image Tools” – whether you need to compress them for web optimization, upscale them to “High Resolution” for stunning “Wallpapers,” or convert them into different formats for specific “Photo Manipulation” tasks. We are dedicated to providing the resources that empower your visual creativity.
Remember to always consider the ethical implications of image use, respecting copyright and intellectual property, especially for “Stock Photos” and “Beautiful Photography” found online. By mastering these saving techniques and utilizing the complementary tools and resources offered by Tophinhanhdep.com, you can seamlessly integrate Google Docs images into your workflow, enriching your “Image Inspiration & Collections” and elevating your “Photography” and “Visual Design” projects to new heights. Explore, create, and share your vision with the world, knowing you have the means to manage your digital assets effectively.