How to Save an Image on Mac: A Comprehensive Guide to Curating Your Digital Visuals

In today’s visually-driven world, images are more than just pixels on a screen; they are sources of inspiration, tools for creativity, and windows into aesthetic appreciation. Whether you’re a professional photographer, a graphic designer, an artist, or simply someone who appreciates beautiful visuals, knowing how to efficiently save images to your Mac is a fundamental skill. Tophinhanhdep.com, with its rich repository of Wallpapers, Backgrounds, Aesthetic, Nature, Abstract, Sad/Emotional, and Beautiful Photography, understands the paramount importance of image collection and management. This guide will walk you through various methods of saving images on your Mac, ensuring you can seamlessly integrate stunning visuals into your digital life, whether for personal enjoyment, a creative project, or simply to build a diverse collection.
From capturing a breathtaking high-resolution landscape for a new desktop wallpaper to grabbing an abstract design for your next digital art piece, your Mac offers intuitive ways to store these digital treasures. Unlike the often-misunderstood “right-click” functionality of Windows PCs, Macs employ an equally efficient, albeit slightly different, approach that prioritizes user experience. We’ll explore these methods, ensuring you can save, organize, and eventually leverage your saved images using advanced Image Tools like Converters, Compressors, Optimizers, and AI Upscalers, or incorporate them into your Visual Design and Image Inspiration & Collections.

Understanding Mac’s Intuitive Approach to Image Saving
Before diving into the “how-to,” it’s worth understanding the core philosophy behind image interaction on a Mac. Apple’s macOS is designed for simplicity and efficiency, offering multiple pathways to achieve the same goal. While Windows users are accustomed to a dedicated “right-click” button on their mouse, Mac users typically employ a “Control-click” or a two-finger tap on their trackpad, which serves the identical function of bringing up a contextual menu. This menu is your gateway to a host of options, including saving images.
Beyond the contextual menu, the Mac’s drag-and-drop functionality is a powerful and often faster alternative for quick saves. This direct manipulation method allows you to visually move an image from its source directly to your desired location, bypassing menus altogether. Both methods are invaluable, and mastering them will significantly enhance your workflow, especially when dealing with the diverse range of images found on Tophinhanhdep.com, from stunning digital photography examples to evocative emotional imagery.
Why Every Image Matters: Curating Your Visual Design & Inspiration
For users deeply invested in Visual Design, Graphic Design, or Digital Art, saving images is not merely an act of archiving; it’s a foundational step in the creative process. A saved image might become the background for your next project, a texture for photo manipulation, or a core element in a mood board. Imagine stumbling upon a captivating piece of Abstract art on Tophinhanhdep.com – saving it instantly allows you to retain that creative spark for future reference. Similarly, a beautiful Nature photograph could serve as vital inspiration for color palettes or compositional ideas.
The act of saving images directly contributes to building robust Image Inspiration & Collections. Whether you’re assembling thematic collections for a client presentation, gathering photo ideas for an upcoming shoot, or tracking trending styles, your saved images form the bedrock of these resources. High-resolution images, particularly those sourced for Stock Photos or professional Digital Photography, demand organized saving practices to maintain their quality and accessibility for future editing styles or projects.
Core Methods for Saving Images on Your Mac

Your Mac provides several straightforward methods for saving images, catering to different scenarios and user preferences. We’ll explore the two primary techniques: using the contextual menu and the drag-and-drop functionality, followed by specific application-based saving options.
Utilizing the Context Menu (Right-Click) for Precise Saving
The contextual menu, often referred to as “right-clicking,” is the most versatile method for saving images, offering options beyond a simple download. This is particularly useful when you want to rename a file, choose a specific folder, or even add the image directly to your Photos library.
Steps to Save an Image Using the Context Menu:
-
Locate Your Image: Navigate to the message, document, or web page that displays the image you wish to save. This could be a breathtaking Landscape Wallpaper from Tophinhanhdep.com or a High-Resolution image sent via email.
- Pro Tip: If you’re on a website with thumbnail previews (like a Google Images search result or a gallery page on Tophinhanhdep.com), always click the image first to open it in its full-size view. Saving a thumbnail will result in a low-resolution image, which might not be suitable for your Digital Photography or Visual Design needs. Be mindful of images that act as links; if clicking an image takes you to another page, use your browser’s “Back” button to return.
-
Position Your Cursor: Place your mouse pointer directly over the image you intend to save.
-
Open the Context Menu:
- Using a Mouse: Press and hold the Control (⌃) key on your keyboard, then click the image. Release the Control key. A pop-up menu will appear on or near the image.
- Using a Trackpad: Either perform a two-finger tap on the trackpad or, on some MacBooks, press the right side of the trackpad button. A pop-up menu will appear.
- Alternative: Some images may also display the contextual menu if you click and hold the picture for a moment.
-
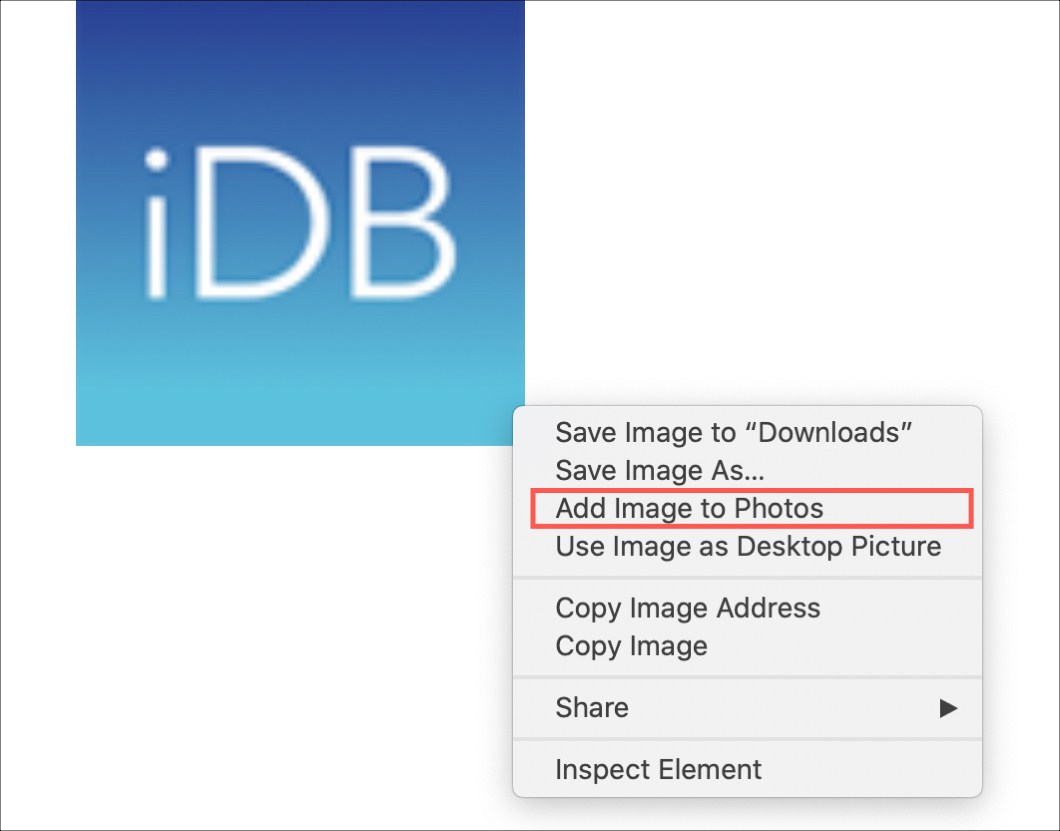
Select Your Saving Option: From the contextual menu, you’ll see several options related to saving:
- “Save Image to ‘Downloads’”: This is the quickest option for a default save. It will immediately download the image to your Mac’s default “Downloads” folder, typically located in your Finder sidebar. This is ideal for quickly grabbing an Aesthetic Background or a new Wallpaper.
- “Save Image As…”: This option gives you more control. Clicking it will open a dialog box where you can:
- Rename the file: Essential for organizing thematic collections or Photo Ideas. Give it a descriptive name, e.g., “Nature_ForestWaterfall_HighRes.”
- Choose a specific location: You’re not restricted to the “Downloads” folder. You can navigate to an existing folder (e.g., your “Wallpapers” folder, a “Graphic Design Assets” folder, or a “Mood Boards” directory) or even create a new folder directly from this dialog. This is crucial for maintaining an organized collection for Visual Design and Image Inspiration.
- Select a file format (if applicable): While not always an option for web images, some contexts may allow you to choose between formats like JPEG, PNG, or TIFF, which can be beneficial for specific Photography or Digital Art projects.
- “Add Image to Photos”: This convenient option, often found when saving from Safari or Mail, directly imports the image into your Apple Photos application. This is excellent for personal photography collections, creating digital albums, and ensuring photos are synced across your Apple devices via iCloud, especially for Beautiful Photography.
- “Use Image as Desktop Picture”: A quick way to set an image as your Mac’s wallpaper. macOS will automatically scale or stretch the image to fit your screen. Be mindful of the original image’s resolution; a low-resolution image stretched across a high-resolution display can look pixelated. Tophinhanhdep.com offers many High Resolution options perfect for this purpose.
-
Confirm Your Save: Once you’ve selected your desired option and location (if applicable), click “Save” or “Done” to finalize the process.
Streamlining Saves with Drag-and-Drop
For speed and simplicity, especially when you want to save an image to your desktop or an open folder, the drag-and-drop method is unparalleled. It’s a highly visual and intuitive way to manage your image collection.
Steps to Save an Image Using Drag-and-Drop:
- Locate Your Image: Find the image you want to save, whether it’s an Abstract piece for Digital Art or a striking Sad/Emotional image for a thematic collection.
- Open in Full-Size View (if necessary): As with the contextual menu, ensure the image is displayed in its full resolution, not as a thumbnail.
- Prepare Your Destination: For optimal use of drag-and-drop, it helps to have your desktop visible or the target folder open and accessible. You might need to resize your browser or application window by clicking the yellow minimize button in the upper-left corner of the window.
- Click and Hold the Image: Place your mouse pointer over the image, then click and hold down your mouse button or trackpad button.
- Drag to Destination: While still holding the click, drag the image away from its source window. You should see a transparent thumbnail or outline of the image moving with your cursor.
- Release the Click: Drag the image to your desired location (e.g., your desktop, an open folder in Finder, or even directly into an application like Pages or Photoshop) and release the mouse/trackpad button. A white plus sign (+) in a green circle often appears over the thumbnail, indicating a successful copy operation.
The image file will instantly appear at the dropped location. This method is incredibly fast for populating your desktop with Photo Ideas, quick Backgrounds, or temporary assets for Graphic Design.
Saving Images from Specific Applications and Sources
Beyond general web browsing, you’ll frequently encounter images within email clients, messaging apps, and other specific platforms. Each of these often has tailored saving options that can be even more efficient.
Saving Images from Web Browsers (Safari, Chrome, Firefox, etc.)
While the Context Menu method generally applies to all browsers, Safari offers some nuanced options, and the principles extend to others.
Safari Specifics (as seen on Tophinhanhdep.com):
When browsing Tophinhanhdep.com or any other website in Safari, the contextual menu provides these specific options:
- “Save Image to the Desktop”: A direct save to your desktop, quick for temporary use or immediate access for Photo Manipulation.
- “Save Image As…”: Offers the choice of location and file name, ideal for organizing your Images (Wallpapers, Backgrounds, etc.) into specific thematic collections.
- “Add Image to Photos”: Seamlessly integrates the image into your Photos app, great for building your personal library of Beautiful Photography.
- “Use Image as Desktop Picture”: An instant wallpaper change, perfect for showcasing those stunning High-Resolution images from Tophinhanhdep.com.
- “Copy Image Address”: This copies the URL of the image itself to your clipboard, not the image file. Useful for sharing direct links without large file transfers, especially for large Stock Photos or Digital Photography examples. Remember, a link relies on the source staying live.
- “Copy Image”: This copies the actual image data to your clipboard. You’ll then need to paste it into another application (e.g., a Pages document, an email, Photoshop for Graphic Design) to permanently save it. If not pasted, it will be lost when your clipboard is cleared.
Saving Images from Mail Applications (Apple Mail, Gmail, Outlook)
Email is a common source for receiving images, whether they are personal photos, design assets, or promotional materials. Mac mail clients offer convenient ways to save these.
Apple Mail
Apple Mail is deeply integrated with macOS, offering excellent image handling.
Steps to Save Images from Apple Mail:
- Open the Email: Launch Apple Mail and select the message containing the images.
- Individual Image Save:
- Drag-and-Drop: Click and hold an individual image within the email, then drag it to your desktop or an open folder.
- Context Menu: Control-click (or two-finger tap) on an image and choose “Save Image As…” to select a location and name, or “Export to Photos” to add it directly to your Photos library. “Save to Downloads Folder” is also often available for a quick save.
- Save All Images from an Email: If an email contains multiple images (like a vacation album of Beautiful Photography or a collection of Aesthetic images), Apple Mail makes it easy to save them all at once.
- Hover for Action Bar: Hover your mouse cursor over the header area of the email (just under the subject line). An “action bar” will appear.
- Click the Paperclip Icon: Look for the paperclip icon (representing attachments). Click it.
- Select “Save All”: A drop-down menu will appear. Select “Save All…” or “Export All to Photos.”
- Choose Location: A dialog box will appear, allowing you to choose a folder to save all the attached images. This is ideal for managing large thematic collections.
Gmail via Web Browser
If you access Gmail through a web browser (like Safari, Chrome, or Firefox), the process is slightly different.
Steps to Save Images from Gmail (Web):
- Open the Email: Sign in to Gmail.com and open the email containing the image.
- Individual Image Save:
- Preview Image: If the image is displayed directly in the email body, you can often Control-click (or two-finger tap) it and select “Save image as…” (as you would for any web image).
- Attached Image: For images attached as files (often indicated by a small thumbnail below the email body or a red icon with triangles), hover over the thumbnail. You’ll typically see a “Download” icon (a downward arrow) and an “Add to Google Drive” icon. Click the “Download” icon to save the image.
- Save All Attachments: If there are multiple attachments, sometimes a “Download All attachments” button or option will appear, usually near the top of the attachment section.
Outlook on Mac
For users of the Outlook application on Mac, the steps are quite similar to Apple Mail.
Steps to Save Images from Outlook (Application):
- Open the Email: Open the email with the image attachments in Outlook.
- Look for Attachment Icons: Images will typically appear as attachments, either in the body or at the bottom of the message.
- Individual Save: Click the downward arrow or “Save As” option next to a specific attachment.
- Save All: If multiple images are present, look for a “Download All” or “Save All” button. This will usually open a save dialog where you can choose the destination folder.
Capturing and Saving Screenshots on Your Mac
Sometimes, an image cannot be directly saved due to website restrictions, or you might only need a portion of the screen. In these cases, screenshots are your best friend. Macs have robust built-in screenshot tools.
Common Screenshot Shortcuts:
- Cmd (⌘) + Shift + 3: Takes a screenshot of your entire screen. The screenshot is saved as a file on your desktop.
- Cmd (⌘) + Shift + 4: Changes your cursor into a crosshair, allowing you to click and drag to select a specific portion of the screen. Release the mouse button, and the selected area is saved as a file on your desktop.
- Cmd (⌘) + Shift + 4, then Spacebar: After pressing Cmd + Shift + 4, press the Spacebar. Your cursor will turn into a camera icon. You can then click on any window or menu to capture just that element. This is useful for capturing elements of Graphic Design or Digital Art without extraneous background.
- Cmd (⌘) + Shift + 5 (macOS Mojave and later): Opens a comprehensive screenshot toolbar at the bottom of your screen. This toolbar provides options for:
- Capturing the entire screen, a window, or a selected portion.
- Recording your entire screen or a selected portion.
- Choosing where to save the screenshot (Desktop, Documents, Clipboard, Mail, Messages, or Photos). This is particularly useful if you want to automatically add screenshots of Photo Ideas or trending styles to your Photos library.
- Setting a timer.
Saving Screenshots to Photos:
With the Cmd + Shift + 5 toolbar, you can directly choose “Photos” as your save location. Alternatively, for screenshots saved to your desktop, simply drag and drop the screenshot file from your desktop into the Photos application icon in your Dock or an open Photos window.
Beyond Saving: Leveraging Your Image Collection with Tophinhanhdep.com’s Main Topics
Once you’ve amassed a collection of stunning images from Tophinhanhdep.com and other sources, the journey doesn’t end there. The true power lies in how you utilize and manage these assets. This is where Tophinhanhdep.com’s broader focus on Photography, Image Tools, and Visual Design comes into play.
Enhancing Your Images with Image Tools
Saved images, especially those intended for professional use or demanding Visual Design projects, often require further processing. Tophinhanhdep.com highlights various Image Tools that can transform your raw captures.
- Converters: You might save an image in one format (e.g., PNG for transparency) but need it in another (e.g., JPEG for smaller file size). Converters allow you to change file types while maintaining quality.
- Compressors & Optimizers: High-resolution photography can result in very large files. Compressors reduce file size without significant visual quality loss, essential for web use or sharing. Optimizers further fine-tune images for performance. This is critical for maintaining fast loading times on websites or when creating presentations.
- AI Upscalers: Stumbled upon a beautiful but low-resolution image (perhaps an older Aesthetic or Abstract piece)? AI Upscalers can intelligently increase image resolution, adding detail and clarity, making them suitable for Wallpapers or larger prints that previously wouldn’t have been possible.
- Image-to-Text Tools: For images containing text, these tools can extract the editable text, useful for research, content creation, or documenting your Photo Ideas.
These tools are not just for professionals; they empower anyone to refine their saved images, ensuring they meet specific requirements for display, printing, or integration into various projects.
Integrating Saved Images into Visual Design & Creative Projects
Your saved images are the raw materials for endless creative endeavors.
- Graphic Design: An Abstract background or a Nature texture saved from Tophinhanhdep.com can become a focal point in a poster, a website banner, or a social media graphic. Your collection of Beautiful Photography can provide assets for branding or marketing campaigns.
- Digital Art: Saved images can be used for photo manipulation, creating composites, or as reference material for digital painting. A Sad/Emotional image might inspire a character design, while an Aesthetic pattern could inform a unique artistic style.
- Photo Manipulation: Learn to layer, blend, and transform images to create entirely new visuals. The High-Resolution Stock Photos you save can be the perfect starting point for complex photo manipulations.
- Creative Ideas: Simply browsing through your curated collection can spark new ideas. Organize your images into thematic albums: “Autumn Landscapes,” “Minimalist Aesthetic,” “Urban Night Photography” – whatever resonates with your creative vision.
Building Image Inspiration & Collections
The act of saving images is the first step in building valuable inspiration and collections.
- Photo Ideas: Create folders or albums dedicated to specific photography genres or techniques you want to explore. Collect examples of interesting lighting, unique compositions, or compelling subject matter.
- Mood Boards: Assemble visual collages using saved images to convey a particular feeling, style, or theme for a project. Whether for interior design, fashion, or a brand identity, mood boards are powerful communication tools.
- Thematic Collections: Categorize your saved images by themes like “Nature wallpapers,” “Abstract patterns,” “Sad/Emotional expressions,” or “Beautiful Photography landscapes.” This makes it easy to find specific types of images when needed.
- Trending Styles: Keep an eye on current visual trends by saving examples of popular aesthetics or artistic movements. This helps you stay current and informed in the fast-paced world of visual content.
By actively saving, organizing, and reflecting on your image collection, you transform simple downloads into a dynamic resource for learning, growing, and creating.
Troubleshooting and Best Practices for Mac Image Saving
While saving images on a Mac is generally straightforward, you might occasionally encounter issues or want to optimize your workflow.
Common Questions & Troubleshooting
- “Why won’t my Mac let me save images?”
- Permissions: Check if your user account has permission to save files in the chosen location.
- Website Restrictions: Some websites implement anti-download measures. In these cases, taking a screenshot is often your best alternative.
- Invalid Location: Ensure you’re not trying to save to a system-protected folder or an unmounted external drive.
- Image Issues: The image itself might be a background element or part of a dynamic interface, rather than a standalone file. Again, a screenshot is the workaround.
- “My saved image is low quality!”
- This almost always means you saved a thumbnail or a preview image. Always click to open the full-size image before saving. This is especially important for High Resolution Photography.
- “How do I organize my downloaded images?”
- Immediately rename files when using “Save Image As…”
- Create dedicated folders (e.g., “Wallpapers,” “Graphic Design Assets,” “Photography Inspiration,” “Mood Boards”) rather than letting everything pile up in “Downloads” or on your desktop.
- Utilize the Apple Photos app for personal and curated collections, leveraging its tagging and album features.
Best Practices for an Organized and Efficient Workflow
- Be Intentional with “Save Image As…”: While “Save to Downloads” is quick, consistently using “Save Image As…” allows you to immediately name and categorize images, saving you cleanup time later. This is vital for maintaining coherent Thematic Collections.
- Create a Folder Structure: Before you start collecting, set up a logical folder structure in Finder. Examples:
/Pictures/Wallpapers//Documents/Creative Projects/Client X/Mood Boards//Pictures/Photography/Inspiration/Color Palettes//Pictures/Digital Art Assets/Textures/
- Use Tags and Metadata: For more advanced organization, especially within Apple Photos, leverage tags, keywords, and descriptions. This makes searching for specific images (e.g., “Nature sunset,” “Abstract geometric,” “Aesthetic minimalist”) incredibly efficient.
- Copyright Awareness: Always remember that most images online are intellectual property. While saving for personal use (like a desktop Wallpaper) is generally acceptable, using copyrighted images without permission for commercial purposes or public display can lead to legal issues. For such projects, seek out Stock Photos, use images with creative commons licenses, or leverage Google’s Advanced Image Search to filter by re-use rights. Tophinhanhdep.com encourages respectful use of all visual content.
- Regular Cleanup: Periodically review your “Downloads” folder and desktop. Move important images to your organized folders and delete anything you no longer need. This keeps your Mac tidy and improves overall performance.
Saving images on your Mac is a gateway to a richer digital experience. By mastering these methods and integrating them with the principles of Photography, Visual Design, and Image Inspiration, you can transform your Mac into a powerful hub for creative expression and aesthetic appreciation. Tophinhanhdep.com is your trusted resource for discovering the beautiful visuals that will fill these collections, and now you have the skills to bring them home to your Mac.