Mastering Your Digital Canvas: How to Save a Photoshop Image

Adobe Photoshop stands as the industry standard for digital image manipulation, graphic design, and artistic creation. From crafting intricate digital art to refining high-resolution photography, Photoshop empowers creators with an unparalleled suite of tools. However, the true mastery of this powerful software extends beyond the editing process; it culminates in understanding how to properly save and export your masterpieces. This crucial final step ensures your artistic vision is preserved, shared effectively, and optimized for its intended purpose, whether it’s destined for print, the web, or future edits.
At Tophinhanhdep.com, we understand the multifaceted needs of visual creators and enthusiasts. Our platform serves as a hub for everything from stunning wallpapers and backgrounds to detailed guides on digital photography, editing styles, and innovative image tools. Whether you’re seeking image inspiration, exploring thematic collections, or utilizing AI upscalers and compressors, the foundation of your work begins with intelligent file management in Photoshop. This comprehensive guide will demystify the various saving options, helping you confidently navigate Photoshop’s intricate saving mechanisms to achieve perfect results for every project.
Understanding Photoshop’s Core Saving Mechanisms
Unlike many other applications that primarily rely on a single file type, Photoshop offers a diverse array of saving options, each tailored for specific needs. This flexibility is essential because a single image might serve multiple purposes – from being a highly editable working file to a compressed web-friendly version or a high-fidelity print output. Getting this right is paramount for anyone involved in visual design and digital art.
The Power of PSD: Preserving Your Creative Freedom
The native file format for Adobe Photoshop is the PSD (Photoshop Document). This is the cornerstone of any complex project, offering the highest degree of flexibility and preservation of your creative process. When you save your work as a PSD, Photoshop retains all the critical information that makes your image editable and adaptable.
Key features of PSD files include:
- Layer Preservation: All individual layers, layer groups, and layer masks remain intact. This is fundamental for photo manipulation, allowing you to non-destructively adjust elements, blend images, or add textures without altering the original pixels permanently. For creators building intricate aesthetic images or abstract compositions, PSD ensures every element can be revisited and refined.
- Smart Objects and Adjustment Layers: These non-destructive elements, crucial for advanced digital photography and editing styles, are fully preserved. You can resize smart objects without quality loss or tweak color corrections and tonal adjustments at any point.
- Vector Shapes and Text: Any vector elements or editable text layers retain their vector properties, meaning they can be scaled infinitely without pixelation, which is vital for graphic design projects like logos or header images.
- Path Information, Alpha Channels, and Slices: These advanced features, often used in precise visual design and web development preparation, are also maintained.
The primary advantage of a PSD file is its complete editability. It’s designed to be reopened in Photoshop, allowing you to pick up exactly where you left off, making revisions, or adapting the design for new requirements. For anyone creating high-resolution images or detailed digital art that may undergo multiple iterations or require future modifications, saving as a PSD is the absolute best practice. It acts as your master file, the definitive version from which all other formats can be derived.
However, the comprehensive nature of PSD files also means they can be quite large, and they are not universally compatible. While ideal for your internal workflow and preserving your editing styles, they cannot be directly viewed or edited by most standard image viewers or non-Photoshop users. This necessitates saving copies in more common formats for sharing.
Common File Formats: Sharing Your Vision Broadly
Once your master PSD file is secure, you’ll often need to export your work into more universally accessible formats for sharing, web display, or basic viewing. These common file types offer a balance between image quality, file size, and broad compatibility. Tophinhanhdep.com frequently features images in these formats, from stunning wallpapers to inspiring photography collections.
The two most prevalent formats are:
-
JPEG (Joint Photographic Experts Group): This is the go-to format for photographs and images with continuous tones and complex color gradients. JPEGs use a “lossy” compression method, meaning some image data is discarded during saving to reduce file size. The key is to find the right balance between file size and perceived quality.
- Best Uses: High-resolution photography, beautiful photography, nature scenes, abstract art, wallpapers, and any image where subtle color variations are critical but absolute pixel-level perfection is less important than file size.
- Considerations: Repeatedly saving a JPEG can lead to cumulative loss of quality. Always save from your master PSD if possible. When optimizing for web, lower quality settings reduce file size dramatically, crucial for fast-loading backgrounds and aesthetic images on Tophinhanhdep.com.
-
PNG (Portable Network Graphics): PNG uses “lossless” compression, meaning no image data is lost when saved. Its most significant advantage is its support for transparency (alpha channels), allowing backgrounds to be completely invisible.
- PNG-24: Offers full color depth and multi-level transparency, making it ideal for high-quality images that require transparent backgrounds, such as logos, icons, or complex digital art elements layered over other content. It produces larger files than JPEGs for photographs but maintains superior quality and transparency.
- PNG-8: A more limited version, supporting only 256 colors and single-level transparency. It’s excellent for simple graphics, illustrations, and web elements where a small file size is critical and a limited color palette is acceptable.
- Best Uses: Any graphic design element requiring transparency, screenshots, web graphics, and images where sharp edges and exact color representation are more important than photographic realism. For images featured on Tophinhanhdep.com, PNG-24 is often used for high-resolution images with complex transparency needs.
While JPEG and PNG cover most common scenarios, other formats like TIFF (Tagged Image File Format) are often used for print-quality images due to their lossless nature and support for various color spaces (like CMYK), and GIF (Graphics Interchange Format), known for its ability to handle simple animations and limited color palettes, though less common for static images today. Understanding these formats allows you to choose the perfect output for your “Image Inspiration & Collections” on platforms like Tophinhanhdep.com.
Navigating the “Save As” Evolution and “Save a Copy”
Recent updates in Adobe Photoshop, particularly since version 22.4 (May 2021 release), have introduced a significant change to the traditional “Save As” command, leading to the creation of a new “Save a Copy” function. This change, while initially baffling to many users accustomed to decades of muscle memory, was largely influenced by operating system-level changes, particularly in macOS Big Sur, and Adobe’s commitment to protecting user data.
The Traditional “Save As” Workflow
Historically, the “Save As” command (accessed via File > Save As or Ctrl+Shift+S / Cmd+Shift+S) allowed users to save their current document under a new name, in a new location, or in a different file format. This meant you could be working on a PSD file and directly choose to “Save As” a JPEG or PNG, effectively creating a flattened copy while your original PSD remained open and unaffected. This was a straightforward process for quickly creating shareable versions of your digital photography or visual design projects.
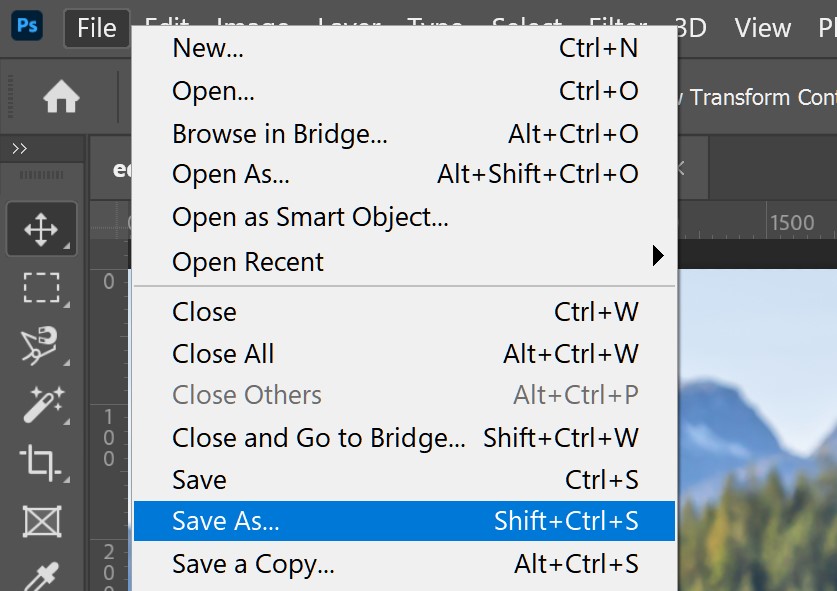
Steps for using the traditional “Save As” (or its legacy equivalent):
- With your image open in Photoshop, navigate to
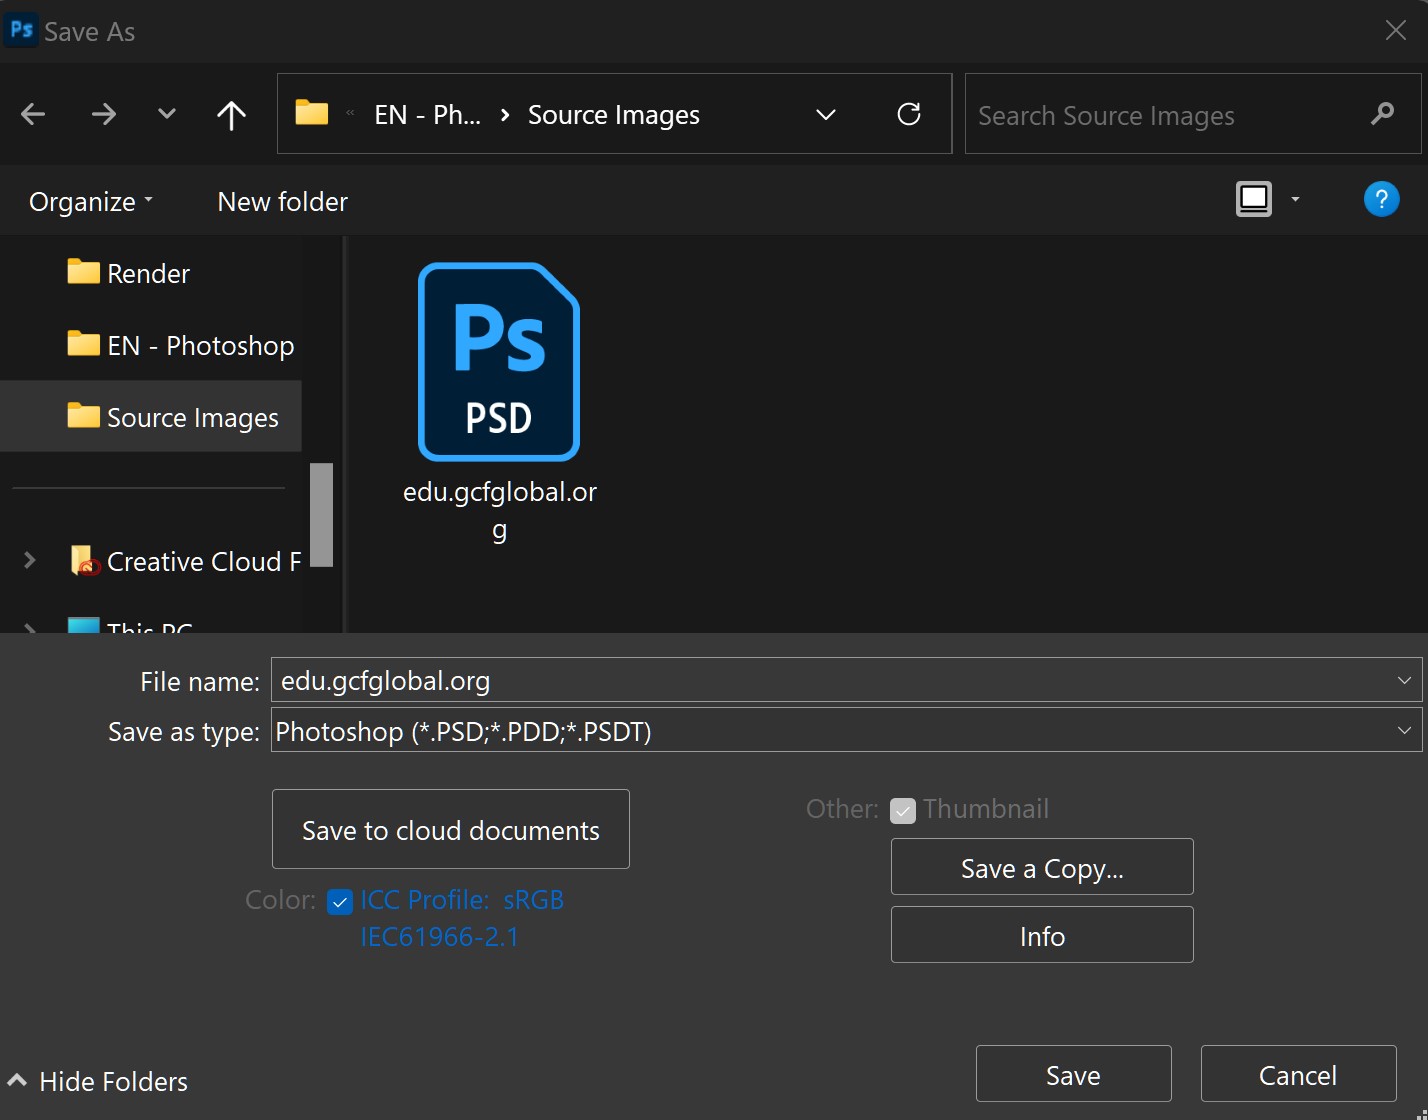
File > Save As. - A dialog box appears. Here, you would:
- Type your desired file name. It’s crucial to use a new name to avoid accidentally overwriting your original file, especially when dealing with high-resolution images or stock photos.
- Choose a destination for your file.
- Click the “Format” dropdown menu and select the desired file type (e.g., PSD, JPEG, PNG). If saving as PSD, ensure “Layers” is checked.
- Click “Save.” Depending on the format (like JPEG), additional options for quality might appear before the final save.
To revert to this legacy “Save As” behavior (available after version 22.4.2 due to user feedback), Photoshop offers a preference setting: go to Edit > Preferences > File Handling (Windows) or Photoshop > Preferences > File Handling (macOS). Under “File Saving Options,” you can “Enable legacy ‘Save As’.” This allows the traditional workflow to coexist with the newer “Save a Copy” feature.
Embracing “Save a Copy” for Modern Workflows
Adobe introduced “Save a Copy” (found under File > Save a Copy) to explicitly separate the act of saving a working file (which should ideally preserve all layers) from creating a flattened, often lossy, version for sharing. The primary driver for this change was to prevent accidental overwriting of complex, layered PSD files when a user intended to save a flat JPEG or PNG. This ensures the integrity of your original digital art and photo manipulation projects.
Here’s how “Save a Copy” works:
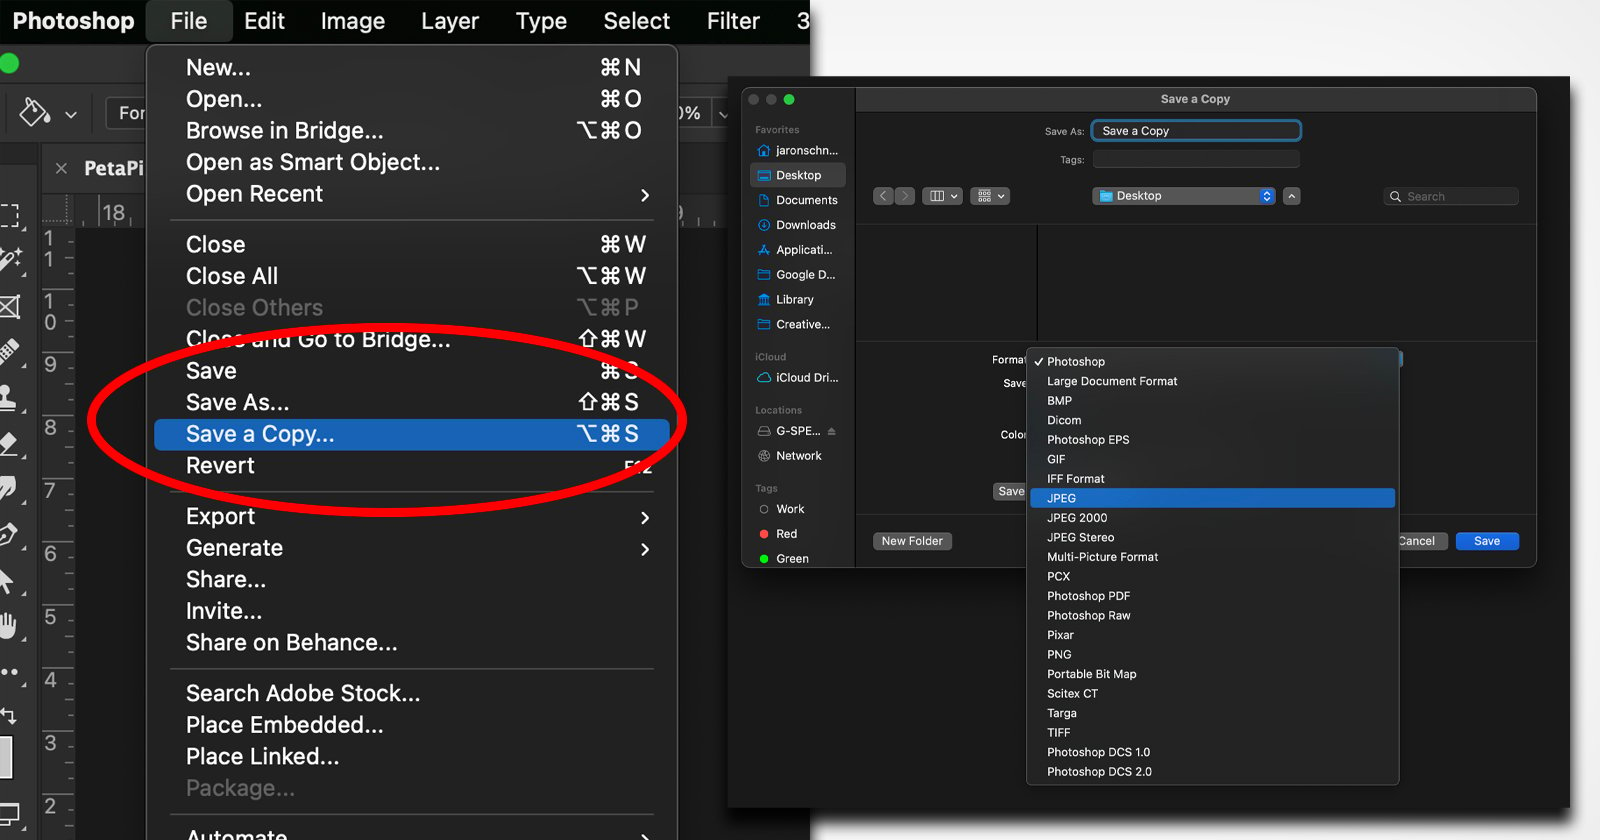
Method 1: Direct Saving of a Copy
- Navigate to
File > Save a Copy. - A dialog box will appear. Select your desired “Format” from the dropdown menu. This menu now includes all compatible formats, including those that might flatten your layers (like JPEG, PNG, TIFF, etc.).
- Specify the destination folder and the file name. By default, Photoshop will append “copy” to the filename, a feature designed to further prevent accidental overwrites. This “copy” suffix can be managed in the File Handling preferences if you enable “Do not append ‘copy’ to filename when saving a copy.”
- Click “Save.” Additional options (like JPEG quality) may appear.
Method 2: Using “Save As” and then “Save a Copy”
If out of habit you still go to File > Save As, Photoshop will initially limit the available formats to those that fully preserve your document’s contents (e.g., PSD, PSB, TIFF if layers are maintained).
- If you intend to save in a format that would flatten layers (like JPEG or PNG) and it’s not immediately available in the “Format” dropdown, you’ll see a button labeled “Save a Copy” on the right side of the dialog box.
- Clicking “Save a Copy” will switch you to the “Save a Copy” dialog box, presenting the full range of file formats, including JPEG and PNG.
- Proceed with selecting the format, destination, filename, and finally click “Save.”
While this added step initially frustrated many users who valued speed, it provides an extra layer of protection for complex visual design and digital photography projects. For users who primarily export JPEGs, a popular workaround is to remap keyboard shortcuts or use Photoshop’s “Quick Export as JPG” feature (found under File > Export), which can be assigned a custom shortcut via Edit > Keyboard Shortcuts. This allows for a swift conversion of your images, which is particularly useful for quickly generating thumbnails for image collections or preparing aesthetic images for Tophinhanhdep.com.
Optimizing Images for the Digital World: “Save for Web (Legacy)”
In the age of instant content and mobile browsing, image optimization is not just a best practice—it’s a necessity. Large, unoptimized images can significantly slow down website loading times, detract from the user experience, and consume excessive bandwidth. This is where Photoshop’s powerful “Save for Web (Legacy)” feature shines. It’s a specialized tool designed to create images that are perfectly balanced in terms of quality and file size for online use, whether for a blog, social media, or a comprehensive image gallery on Tophinhanhdep.com.
The “Save for Web (Legacy)” tool (found under File > Export > Save for Web (Legacy)) allows you to fine-tune various parameters to achieve the smallest possible file size with acceptable visual quality, making it indispensable for web designers and digital content creators.
Key Considerations in “Save for Web”
When using “Save for Web,” you’ll encounter a dedicated dialog box with several critical settings:
-
File Format Selection:
- JPEG: Still the champion for photographs due to its efficient lossy compression. You can control the level of compression with a quality slider.
- PNG-24: Ideal for images requiring transparency and high visual fidelity (e.g., logos, complex graphics). While larger, it’s lossless and handles alpha channels perfectly.
- PNG-8: Best for simpler graphics with limited colors (up to 256) and basic transparency. It often yields very small files for illustrations or vector-based elements.
- GIF: Primarily used for simple animations and images with very few colors. Less common for static images today.
- WBMP: A monochrome format for wireless devices, rarely used in modern web design.
-
Image Size: Crucially, you can resize the image directly within the “Save for Web” dialog box. Reducing the dimensions (width and height) will significantly decrease the file size. This is particularly useful for preparing wallpapers, backgrounds, or social media images that don’t need to be displayed at full resolution. Many platforms like Tophinhanhdep.com and social media sites will automatically resize images, but pre-optimizing can give you more control over the final quality.
-
Quality/Compression (for JPEGs): This is perhaps the most critical setting. A slider (typically from 0 to 100, or Low, Medium, High, Maximum presets) allows you to adjust the level of JPEG compression.
- Higher Quality: More detail, larger file size.
- Lower Quality: Less detail, smaller file size.
- The 2-Up/4-Up View: The “Save for Web” dialog features tabs (Original, Optimized, 2-Up, 4-Up) that are invaluable. The “2-Up” view displays your original image alongside the optimized version, allowing for real-time visual comparison. This enables you to experiment with quality settings and instantly see the impact on both visual fidelity and file size (displayed below each preview window), helping you strike that perfect balance for your high-resolution images or stock photos.
-
Progressive JPEG: An option that displays the image gradually as it loads, starting with a blurry version that sharpens over time. This can improve the perceived loading speed on slower connections.
-
Metadata: You can choose to include or strip various metadata (like camera information, copyright) from the image. Removing metadata can slightly reduce file size, which is useful for general web sharing, but preserving it is important for professional photography and digital asset management.
-
Color Profile: Ensures consistent color representation across different browsers and devices. Usually, sRGB is recommended for web images.
Step-by-Step “Save for Web” Process
- Open Your Image: Have your finished image open in Photoshop.
- Access the Tool: Go to
File > Export > Save for Web (Legacy). - Choose Format & Quality: In the dialog box, select your desired file format (e.g., JPEG, PNG-24). Adjust the quality slider for JPEGs, observing the live preview and file size. For PNGs, consider if PNG-8 or PNG-24 is more appropriate for your graphics or transparency needs.
- Resize (If Needed): Under the “Image Size” section, enter new dimensions or a percentage scale. Ensure the aspect ratio is locked (chain link icon) to prevent distortion. This is essential for creating perfectly sized wallpapers or specific website elements for Tophinhanhdep.com.
- Compare: Use the “2-Up” view to critically compare the original image with your optimized version. Look for any noticeable degradation in quality that might be unacceptable.
- Save: Once satisfied with the balance of quality and file size, click the “Save” button. A new dialog will appear.
- Name & Destination: Type a new filename (e.g.,
image_web.jpgto distinguish it from your master PSD) and choose a location. Click “Save.”
By mastering “Save for Web,” you become an expert in image optimization, complementing other image tools like compressors and AI upscalers available on Tophinhanhdep.com, ensuring your visual content is always web-ready and loads efficiently for your audience.
Strategic Saving for Diverse Creative Needs
The choice of how to save a Photoshop image is rarely arbitrary. It’s a strategic decision dictated by the image’s purpose, the project’s stage, and the target audience. A thoughtful approach to saving is integral to a streamlined visual design workflow and effective digital asset management.
Scenario-Based Saving Strategies
Understanding common use cases will help you make the right saving choice every time:
-
Ongoing Projects & Complex Editing: Always save your initial and intermediate work as a PSD file. This preserves all layers, non-destructive edits, and future flexibility. If you’re creating a complex photo manipulation or digital art piece, the PSD is your master file. Regularly use
Ctrl+S(orCmd+S) to save progress. -
Sharing on the Web & Social Media: For displaying images on websites, blogs, or social platforms, use
Save for Web (Legacy)orSave a Copyto JPEG/PNG.- For photographs, use JPEG, finding a balance between quality (e.g., 60-80) and file size for fast loading. This applies to aesthetic images, nature shots, or beautiful photography you want to showcase on Tophinhanhdep.com.
- For graphics, logos, or images with transparency, use PNG-24 (for high quality) or PNG-8 (for simpler designs).
- Remember to resize for the target platform (e.g., smaller for social media thumbnails, specific dimensions for website banners).
-
Print Production: When preparing files for professional printing (posters, brochures, magazines), your saving strategy changes significantly.
- Format: TIFF is often preferred for its lossless quality, but high-quality JPEGs or PDFs are also common.
- Resolution: Crucially, set the resolution to 300 DPI (dots per inch) for sharp print output.
- Color Mode: Convert your image to CMYK (Cyan, Magenta, Yellow, Key/Black), which is the standard color model for printing, typically done at the end of the editing process. (Photoshop’s default is RGB for digital screens).
- For high-resolution photography intended for print, these settings are non-negotiable.
-
Sharing with Clients (Editable Files): If your client needs to continue editing or requires access to layers, provide the PSD file. Ensure they have Photoshop or a compatible program.
-
Sharing with Clients (Final, View-Only Files): For presenting final designs, a high-quality JPEG or PNG is usually sufficient. This allows them to view the image without needing specific software and avoids potential confusion with layered files.
-
Creating Wallpapers and Backgrounds for Tophinhanhdep.com: Focus on high-resolution JPEG or PNG-24 files. Optimize them using
Save for Webto ensure a good download experience without compromising the visual impact of your beautiful photography or abstract backgrounds.
Best Practices for Digital Asset Management
Effective saving is a cornerstone of good digital asset management, helping you stay organized and protect your creative work.
- Save Regularly: The most basic but vital rule. Use
Ctrl+S(Windows) orCmd+S(Mac) frequently to save your progress. Photoshop can crash, and losing hours of work is devastating. - Develop Naming Conventions: Implement a consistent naming system for your files. This could include project name, version number, date, and purpose (e.g.,
ProjectName_Header_v3_20231026_web.jpg,ProjectName_Master_v3.psd). This clarity is invaluable when managing extensive image collections or visual design portfolios. - Create Backups: Don’t rely on a single copy. Back up your master PSD files to external drives or cloud storage. Consider saving multiple versions (
v1, v2, v3) as you progress, allowing you to revert to earlier stages if needed. - Understand File Compression Trade-offs: Always be mindful of the balance between quality and file size, especially for web images. Smaller file sizes mean faster loading and better user experience, which is particularly important for platforms like Tophinhanhdep.com that host numerous images.
- Utilize Tophinhanhdep.com’s Image Tools: After saving from Photoshop, leverage external tools like compressors or AI upscalers available on Tophinhanhdep.com to further refine your images. Compressors can sometimes achieve even smaller file sizes without noticeable quality loss for web use, while AI upscalers can enhance the resolution of smaller images for larger displays or print, extending the utility of your Photoshop creations.
Conclusion
Mastering how to save a Photoshop image is not merely a technicality; it’s a fundamental skill that underpins the entire creative workflow in digital photography, graphic design, and visual art. By understanding the distinct purposes of PSD, common image formats like JPEG and PNG, the nuances of the “Save As” and “Save a Copy” commands, and the power of “Save for Web,” you gain complete control over your digital assets.
Whether you’re crafting high-resolution abstract art, curating beautiful photography collections, designing stunning wallpapers, or preparing images for print, a strategic approach to saving ensures your work is always perfectly optimized for its intended use. This expertise not only safeguards your creative investment but also maximizes the impact and accessibility of your visual narratives.
At Tophinhanhdep.com, we are committed to providing resources that empower your creative journey. By diligently applying these saving principles, you ensure your images, from initial concept to final display, embody the highest standards of quality and efficiency. Continue to explore, create, and share your unique vision, knowing that your Photoshop masterpieces are saved correctly and ready for the world to see.