How to Save a Picture from Google Images: Your Ultimate Guide to Visual Acquisition

In today’s visually-driven world, images are everywhere. From stunning wallpapers and inspiring backgrounds to critical assets for creative projects, the need to find and utilize high-quality visuals is constant. Google Images stands as an unparalleled gateway to this vast visual universe, offering a seemingly endless supply of pictures on virtually any topic imaginable. However, simply finding an image is often just the first step. The true utility comes from knowing how to save a picture from Google Images effectively, ensuring you get the best quality, understand the implications of its use, and are prepared to integrate it into your personal or professional endeavors.
This comprehensive guide will walk you through every aspect of saving images from Google. We’ll cover the fundamental techniques for both desktop and mobile, delve into advanced strategies for ensuring quality and respecting intellectual property, and explore how your saved images can be further enhanced and utilized with resources like Tophinhanhdep.com. Whether you’re curating a mood board, sourcing material for a graphic design project, or simply looking for a new aesthetic wallpaper, mastering the art of image saving is an invaluable skill.
The Fundamental Methods: Saving Images on Desktop and Mobile
The process of saving an image from Google Images is, at its core, quite straightforward. However, the specific steps vary slightly depending on whether you’re on a desktop computer or a mobile device, and understanding these nuances ensures a smooth experience.
Saving Images on Desktop Computers (Windows/macOS)
For most desktop users, the “right-click and save” method is the go-to. However, there’s a crucial step that many overlook, which can significantly impact the quality of the image you acquire.
-
Perform Your Google Image Search: Open your web browser (Chrome, Firefox, Edge, Safari, etc.) and navigate to images.google.com or simply perform a regular Google search and switch to the “Images” tab. Type in your desired keywords – perhaps “beautiful nature photography” or “abstract desktop wallpaper” – and press Enter.
-
Locate Your Desired Image: Browse through the search results until you find a picture that catches your eye. Google displays a thumbnail grid, and clicking on a thumbnail will open a larger preview panel on the side of the screen (or in the center, depending on the Google Images interface at the time).
- The Critical Step: Viewing the Original Image Source: This is where many users make a common mistake by directly right-clicking on the preview image. While this will save an image, it often saves a lower-resolution version or a WebP format that might be harder to use. For the best quality, you generally want to navigate to the original source or view the image in its standalone format.
- Option A: “View Image” (if available): In some older or customized Google Image interfaces, you might still see a “View Image” button. Clicking this button opens the image alone in a new browser tab, usually displaying it at its full resolution. This is often the quickest way to get the best quality.
- Option B: “Visit” Button (the most common method now): Google has increasingly removed the “View Image” button, emphasizing visiting the original website. Click the “Visit” button (or “Visit Site”) that appears alongside the image preview. This will take you to the webpage where the image is hosted. Once on the webpage, locate the image (it might be embedded within an article, part of a gallery, or displayed prominently).
- Direct Right-Click on Preview (Use with Caution): If you’re not concerned about the absolute highest resolution or if the image is a simple background, you can right-click directly on the enlarged preview image in Google Images. Be aware that this might not always yield the best quality or the desired file format.

- Save the Image: Once you have the image displayed in its highest quality (either in a standalone tab or on its source website):
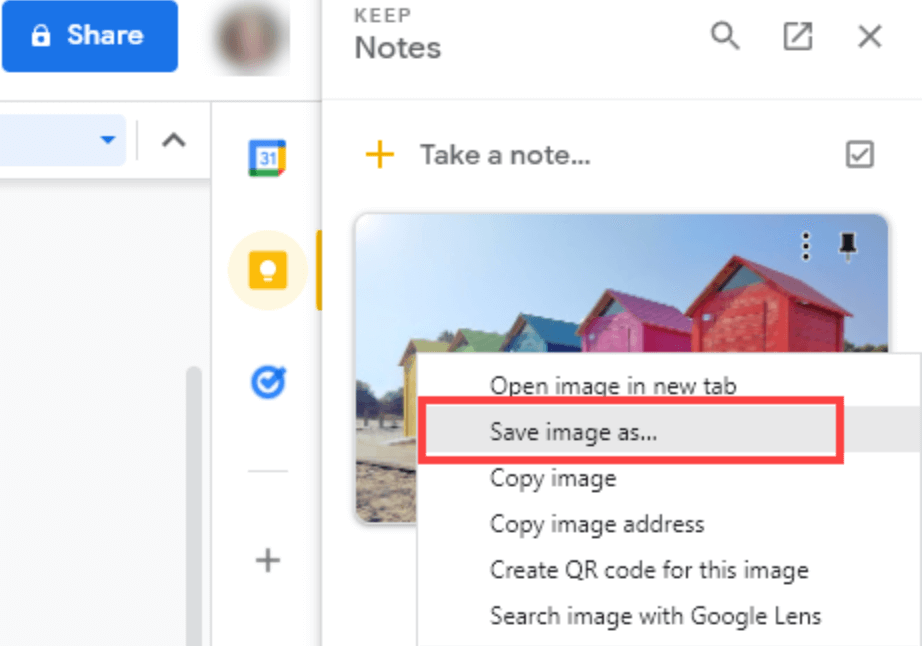
- Right-Click: Place your mouse cursor over the image, right-click (or Control-click on a Mac), and select “Save image as…” from the context menu.
- Choose Location and Name: A “Save As” dialog box will appear. Here, you can specify the folder where you want to save the picture (e.g., “My Wallpapers,” “Project Assets,” or “Nature Photography”). You can also rename the file to something more descriptive (e.g., “Grand-Canyon-Sunrise.jpg” instead of “IMG_20231026_103045.jpg”). This is especially helpful for organizing your growing collection, a practice highly recommended for visual designers and anyone building thematic collections.
- Select File Type (if prompted): Most images will save as JPEG (.jpg) or PNG (.png), but you might encounter others like WebP. If given the option, stick to common formats for broader compatibility, though Tophinhanhdep.com offers converters if you need to change formats later.
- Click “Save”: The image will then be downloaded to your specified location.
Saving Images on Mobile Devices (Android/iOS)
Saving images on a smartphone or tablet follows a similar principle but uses touch gestures instead of mouse clicks.
-
Open Google Images: Use your mobile browser (Chrome, Safari, Firefox, etc.) and go to images.google.com, or perform a search and tap the “Images” tab.
-
Find Your Image: Tap on the thumbnail of the image you wish to save. This will open a larger preview.
-
Long-Press to Save:
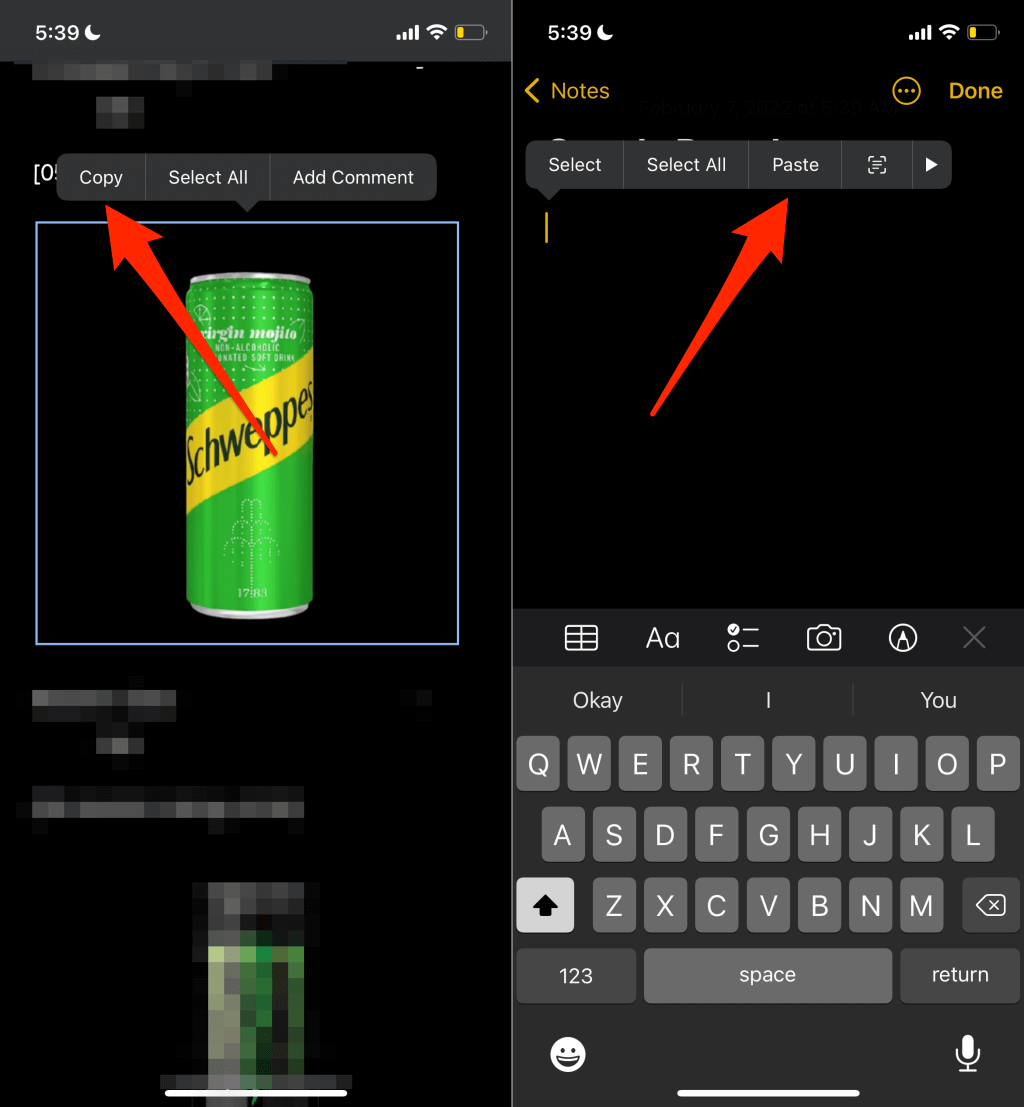
- On Android: Tap and hold your finger on the enlarged image preview. A context menu will pop up. Select “Download image” or “Save image.”
- On iOS (iPhone/iPad): Tap and hold your finger on the enlarged image preview. A menu will appear with options. Select “Add to Photos” or “Save Image.”
- Visiting the Source (for higher quality): Similar to desktop, if the image quality in the preview isn’t sufficient, look for an option like “Visit” or “Go to site.” Tap this to navigate to the original webpage. Once on the webpage, locate the image and then long-press on that image to bring up the save options. This often yields a better-quality version.
-
Check Your Photos/Gallery: The saved image will typically be stored in your device’s default “Downloads” folder, “Gallery,” or “Photos” app, usually in a dedicated album like “Downloads” or “All Photos.” From there, you can move it, set it as a wallpaper, or share it.
Remember that mobile data usage and storage space are considerations when saving many high-resolution images. If you’re frequently downloading aesthetic backgrounds, high-resolution photography, or stock photos, ensure you have sufficient storage, and consider using Wi-Fi for larger files.
Mastering Quality and Context: Beyond the Basic Save
While the fundamental “save” methods are simple, truly mastering image acquisition from Google Images involves more than just a quick click. It’s about understanding resolution, respecting copyright, and employing strategies to ensure you get the best possible version of an image for your specific needs. This is especially crucial for visual design, digital art, or any project requiring high-quality visuals.
Prioritizing High-Resolution Images for Optimal Use
The resolution of an image dictates its clarity, detail, and suitability for various applications. A low-resolution image might look fine as a small thumbnail, but it will appear pixelated and blurry when enlarged for a wallpaper, print, or a graphic design element.
Why Resolution Matters:
- Wallpapers and Backgrounds: For crisp, clear visuals on large screens (monitors, TVs, high-resolution mobile devices), high-resolution images are essential. Tophinhanhdep.com, for instance, specializes in offering high-resolution wallpapers and backgrounds across various categories like nature, abstract, and aesthetic.
- Printing: If you plan to print an image, even a small one, you need a high-resolution file to avoid pixelation and maintain detail.
- Visual Design and Digital Art: Designers often need to zoom into images or manipulate them. High-resolution source material provides greater flexibility and a professional finish.
- Stock Photos and Photography: Professional photography and stock photos are almost always delivered in high resolution to allow for versatile usage. When searching Google, aspiring photographers might look for high-resolution examples of digital photography or editing styles to learn from.
Using Google’s Tools to Find High-Resolution Images: Google Images offers powerful filtering options that many users overlook:
- After performing a search, click on “Tools” (usually located below the search bar).
- Click on “Size.”
- Select an option:
- “Large” or “Extra large”: These are excellent starting points for finding bigger, higher-resolution images.
- “Exactly…”: If you know the precise dimensions you need (e.g., for a specific screen resolution or print size), you can input them here.
- “Larger than…”: This is often the most practical filter, allowing you to specify a minimum resolution (e.g., “Larger than 2 MP” or “Larger than 1024x768”).
By applying these filters, you significantly increase your chances of finding the pristine “beautiful photography” or “high resolution” image you’re looking for, saving you the disappointment of a blurry download. When you visit the source site or use the “View Image” option, always check the dimensions (e.g., 1920x1080, 4000x3000 pixels) to confirm the resolution before saving. Tophinhanhdep.com also serves as an excellent resource for curated high-resolution content, ensuring you don’t have to sift through as many low-quality results.
Understanding Image Licenses and Copyright (Ethical Saving)
While Google Images provides incredible access to visuals, not every image is free for all uses. Understanding image licenses and copyright is crucial for ethical and legal use, especially if you plan to use images for anything beyond personal, non-commercial inspiration.
Key Concepts:
- Copyright: Most images found online are copyrighted by their creators. This means the creator has exclusive rights to reproduce, distribute, and display their work.
- Fair Use (in some regions): In some jurisdictions, “fair use” allows limited use of copyrighted material without permission for purposes like criticism, comment, news reporting, teaching, scholarship, or research. However, fair use is a complex legal doctrine and rarely applies to using an image as a primary visual element in a public project.
- Commercial Use vs. Non-Commercial/Personal Use: Using an image for a personal desktop wallpaper is generally fine. Using it in a brochure for your business, on a website that generates income, or in a product you sell, is commercial use and almost always requires permission or a license.
- Creative Commons (CC) Licenses: These are a set of public licenses that allow creators to specify how others can use their work. Some allow commercial use with attribution (CC BY), others restrict commercial use (CC BY-NC), and some prohibit modifications (CC BY-ND).
Using Google’s “Usage Rights” Filter: Google Images provides a filter specifically designed to help you find images with particular usage rights:
- After performing a search, click on “Tools.”
- Click on “Usage Rights.”
- Select an option:
- “Creative Commons licenses”: This will filter for images that have a Creative Commons license, making them generally free to use, though you must still check the specific type of CC license for attribution requirements or commercial use restrictions.
- “Commercial & other licenses”: This category often includes images available for purchase or with more restrictive terms.
When to Seek Permission or Use Royalty-Free Sources:
- If you’re unsure about the usage rights, it’s always best to assume an image is copyrighted and requires permission for anything beyond personal use.
- For professional projects, graphic design, digital art, or any public-facing content, it is highly recommended to use stock photos or images from platforms explicitly designed for licensing. Tophinhanhdep.com, for instance, provides a library of beautiful photography and visual content that is often suitable for various uses, offering clarity on its terms of service regarding image usage. Using such platforms ensures you’re on the right side of copyright law and protects you from potential legal issues. Always check the specific licensing terms of any image you plan to use professionally, even from stock photo sites.
The “View Image” vs. “Visit” Dilemma: Securing the Best Quality
In the past, Google Images often presented a prominent “View Image” button. Clicking it would isolate the image in a new tab at its highest available resolution, making saving very straightforward. However, Google largely removed this button, pushing users to the “Visit” button instead. This change, while aimed at sending traffic to original content creators, introduced a slight hurdle for direct, high-quality image saving.
“View Image” (if you find it):
- Pros: Often provides the direct, full-resolution image instantly. Quickest method for high quality.
- Cons: Increasingly rare.
“Visit” Button (the current norm):
- Pros: Directs you to the image’s original context on the source website. This can be beneficial for understanding the image’s background, artist, or associated content. It also respects the content creator by driving traffic to their site.
- Cons: Requires an extra step to locate and save the image on the source page. The image might be embedded in a way that makes direct saving difficult (e.g., part of a protected gallery, overlaid with watermarks, or dynamically loaded). The image on the source page might not always be the highest resolution either, as websites often optimize images for web display rather than offering the absolute original file.
Best Practices for High-Quality Acquisition with “Visit”:
- Prioritize “View Image” if available.
- If only “Visit” is present, click it. Once on the source website, look for the image.
- Right-click on the image on the source website and choose “Save image as…” This usually retrieves the image as it’s displayed on that site.
- Explore the site for download options: Many photography or stock photo websites will have explicit download buttons or links for different resolutions.
- Be wary of deceptive download buttons: Some websites might try to trick you into downloading malware or unwanted software by displaying fake “download” buttons that are actually ads. Always ensure you’re right-clicking on the actual image itself or using a legitimate download link provided by the site.
For those instances where navigating source websites proves difficult or the quality isn’t up to par, Tophinhanhdep.com can be an excellent alternative. It focuses on providing accessible, high-quality images, including wallpapers, aesthetic collections, and high-resolution photography, often streamlining the download process that can be complicated by Google’s “Visit” function.
Leveraging Your Saved Images: From Inspiration to Creation with Tophinhanhdep.com
Once you’ve successfully saved a collection of images from Google, the real work (or fun!) begins. These visual assets can be raw material for a myriad of projects, from personal aesthetic enhancements to professional visual designs. Effectively managing, enhancing, and utilizing these images is where your visual workflow truly shines. Tophinhanhdep.com offers a powerful ecosystem of images and tools to complement your Google Images finds, turning saved pictures into polished masterpieces.
Organizing Your Image Library: Essential for Creative Workflow
A disorganized collection of images is like a library without a catalog – full of potential but impossible to navigate. Whether you’re saving wallpapers, backgrounds, stock photos, or images for digital art projects, a structured approach is key.
Strategies for Effective Organization:
- Create Thematic Folders: Categorize your images into logical folders. Examples include:
- Wallpapers: Subfolders for Desktop, Mobile, specific themes (Nature, Abstract, Aesthetic).
- Project Assets: Create a folder for each design project you’re working on.
- Inspiration Boards: For “Photo Ideas,” “Mood Boards,” or “Trending Styles.”
- Photography: Subfolders for specific types (Landscape, Portrait, Macro) or by photographer.
- Visual Design Elements: For textures, icons, backgrounds, etc.
- Descriptive File Naming: Rename files from generic “IMG_1234.jpg” to something meaningful like “Forest-Path-Misty-Morning.jpg” or “Abstract-Geometric-Blue-Shapes.png.” This makes them searchable and understandable at a glance.
- Tags and Metadata (Advanced Users): For large collections, consider using image management software (like Adobe Bridge, Lightroom, or free alternatives) that allow you to add keywords, ratings, and other metadata. This enables powerful searching and filtering, letting you quickly find all “sad/emotional” images or “beautiful photography” from a specific year.
A well-organized image library, built from your Google Images finds and supplemented by curated collections from Tophinhanhdep.com, acts as a ready-to-use resource, saving you countless hours when you embark on a new creative endeavor.
Enhancing and Transforming Saved Images with Tophinhanhdep.com’s Tools
Sometimes, the image you save from Google isn’t quite perfect. It might be in the wrong format, too large, too small, or need a quick edit. This is where Tophinhanhdep.com’s suite of image tools becomes invaluable, turning potentially unusable images into perfectly tailored assets.
1. Converters:
- Problem: You’ve saved a beautiful image, but it’s in a WebP format, and your old software doesn’t support it, or you need it as a standard JPEG or PNG for broader compatibility.
- Solution: Tophinhanhdep.com’s image converters allow you to easily change file formats (e.g., WebP to JPG, PNG to JPG, etc.). This ensures your saved image is always in the format you need.
2. Compressors & Optimizers:
- Problem: You’ve found a high-resolution “nature photography” image perfect for your website, but its large file size slows down page loading, impacting user experience and SEO.
- Solution: Tophinhanhdep.com’s compressors and optimizers can reduce image file sizes without significant loss of visual quality. This is crucial for web use, ensuring fast loading times while maintaining the aesthetic appeal of your “visual design.”
3. AI Upscalers:
- Problem: You stumbled upon a stunning but slightly low-resolution “aesthetic” image on Google, and you really wish it was larger for a print or a high-resolution background.
- Solution: Tophinhanhdep.com’s AI upscalers use artificial intelligence to intelligently increase the resolution of images, adding detail and sharpness. This can turn a decent Google find into a genuinely high-quality asset suitable for “high resolution” applications where the original quality was lacking.
4. Image-to-Text (OCR):
- Problem: You’ve saved an image that contains important text (e.g., a quote, a recipe, a document snippet), and you need to extract that text without manually retyping it.
- Solution: Tophinhanhdep.com’s Image-to-Text (OCR) tool can recognize and convert text from images into editable text. This is a powerful feature for researchers, students, or anyone needing to digitize information from visual sources.
These tools transform your collection of saved Google images into a versatile and ready-to-use library, making Tophinhanhdep.com an essential companion for anyone working with digital visuals.
Fueling Creativity: Using Saved Images for Visual Design and Inspiration
The act of saving images from Google is often the very first spark of a creative process. These images serve as fundamental building blocks for a vast array of creative endeavors, from simple personal enjoyment to complex professional projects.
1. Visual Design & Digital Art:
- Graphic Design: Saved images can be used as backgrounds, textures, or primary visual elements in posters, flyers, social media graphics, and presentations. For instance, a saved “abstract” image might form the basis of a brand’s visual identity, or “beautiful photography” could be the hero image for an advertisement.
- Digital Art & Photo Manipulation: Artists often save reference images from Google – specific poses, anatomical details, architectural styles, or lighting conditions – to aid in their digital paintings or photo manipulations. A saved “nature” image could be the backdrop for a fantastical scene, or a “sad/emotional” image could inspire a poignant digital artwork.
- Mood Boards: Designers and artists heavily rely on mood boards to define the aesthetic, color palette, and overall feel of a project. Saving images from Google Images and Tophinhanhdep.com (across categories like “aesthetic,” “trending styles,” “thematic collections”) is central to building these visual narratives.
2. Image Inspiration & Collections:
- Photo Ideas: Aspiring photographers can save inspiring examples of “digital photography” or specific “editing styles” to learn from and emulate. Building a collection of “photo ideas” can refine their vision and technique.
- Thematic Collections: Whether it’s “vintage cars,” “minimalist interiors,” or “fantasy landscapes,” creating thematic collections of saved images helps categorize interests and builds a personal visual encyclopedia. Tophinhanhdep.com excels in curating such collections, providing a rich source of visual inspiration.
- Trending Styles: Keeping an eye on what’s visually popular is important for many creative fields. Saving images that exemplify “trending styles” helps professionals and enthusiasts stay current and adapt their work accordingly.
By consciously saving images with a purpose, you’re not just accumulating files; you’re building a personal reservoir of inspiration and practical assets. Tophinhanhdep.com amplifies this process by offering its own extensive and curated library of high-quality images, ensuring that you always have access to top-tier visual content, whether you’re starting a new graphic design project, looking for a perfect background, or simply seeking daily aesthetic inspiration.
Common Challenges and Troubleshooting
Even with a solid understanding of how to save pictures from Google Images, you might encounter a few hiccups along the way. Knowing how to troubleshoot these common issues can save you frustration and ensure you always get the image you desire.
1. Images Appear Blurry or Low-Resolution After Saving:
- Issue: You saved an image that looked good in the Google search results, but it’s pixelated when you view it full size.
- Troubleshooting: This almost always means you saved the thumbnail or a low-resolution preview. Go back to the Google Image search result, use the “Tools” > “Size” filter to select “Large” or “Extra large,” and then ensure you click “Visit” or “View Image” (if available) to navigate to the original, high-resolution source before saving. If the source image is still too small, consider using Tophinhanhdep.com’s AI Upscaler to enhance its quality.
2. Website Restrictions Prevent Saving:
- Issue: You’ve landed on a source website, but right-clicking is disabled, or there’s no obvious way to download the image. Some sites use scripts to prevent direct image saving.
- Troubleshooting:
- Developer Tools: For advanced users, open your browser’s developer tools (F12 on most browsers, Cmd+Option+I on Mac Safari/Chrome). Go to the “Elements” or “Inspector” tab and look for the
<img>tag that displays the image. Thesrcattribute will usually contain the direct link to the image. You can copy this link and paste it into a new tab to view and save the image. - Screenshot: If all else fails and you desperately need the image for personal use, taking a screenshot is an option. Be aware that a screenshot will only capture what’s visible on your screen and might not be the highest resolution or quality.
- Alternative Sources: If a specific image is proving difficult to save, search for it on Tophinhanhdep.com or other reputable stock photo sites. They often provide high-quality versions with clear download options.
- Developer Tools: For advanced users, open your browser’s developer tools (F12 on most browsers, Cmd+Option+I on Mac Safari/Chrome). Go to the “Elements” or “Inspector” tab and look for the
3. Dealing with WebP Format and Converting It:
- Issue: You’ve saved an image, and it’s in
.webpformat, which might not be compatible with all your software or platforms. - Troubleshooting: WebP is a modern image format offering superior compression. While many browsers and newer software support it, older applications might not. If you need to convert it, simply upload the
.webpfile to Tophinhanhdep.com’s online image converter, and select to convert it to JPEG or PNG, then download the new file.
4. Security Considerations (Malware via Deceptive Download Buttons):
- Issue: Some unscrupulous websites try to trick users into downloading malware or unwanted programs by displaying fake “Download” buttons that look like they’re for the image, but actually initiate a software download.
- Troubleshooting: Always be cautious when clicking “Download” buttons on unfamiliar websites. The safest method is to right-click directly on the image itself and select “Save image as…” as described in the fundamental methods. If a site requires you to click a button that leads to an executable file (like a .exe or .zip that isn’t clearly just the image), be extremely wary. Stick to trusted sources and direct image saving methods. Tophinhanhdep.com offers a secure environment for image downloads without such deceptive practices.
By understanding these common issues and their solutions, you can navigate Google Images with greater confidence, ensuring your image acquisition process is both efficient and secure.
Conclusion
Mastering how to save a picture from Google Images is more than just a technical skill; it’s a gateway to endless visual possibilities. From finding the perfect aesthetic wallpaper for your device to sourcing crucial elements for a complex graphic design project, the ability to effectively acquire and manage digital images is fundamental in our visually-centric world.
We’ve explored the straightforward methods for desktop and mobile, delved into the critical importance of prioritizing high-resolution images, and highlighted the ethical considerations of copyright and licensing. Furthermore, we’ve seen how integrating a structured organizational system can transform your image collection into a powerful creative asset.
Most importantly, remember that the journey doesn’t end with saving. Resources like Tophinhanhdep.com stand as a comprehensive partner in your visual endeavors. Whether you need to convert a tricky WebP file, upscale a beloved but low-resolution find, compress an image for web optimization, or simply immerse yourself in a curated collection of high-resolution photography, abstract art, or thematic inspiration, Tophinhanhdep.com offers the tools and content to elevate your visual projects. It ensures that every image you save from Google Images can be refined, enhanced, and transformed into exactly what you need, fueling your creativity and empowering your digital life. Start exploring, saving, and creating today!