How to Save a Word Document as an Image: Unlocking Visual Potential with Tophinhanhdep.com

In today’s visually driven world, the ability to transform static text documents into dynamic, shareable images has become an invaluable skill. Whether you’re a graphic designer compiling assets, a social media manager crafting engaging content, a student preparing a visually appealing presentation, or simply someone who needs to share information without worrying about formatting discrepancies, converting a Microsoft Word document into an image format offers unparalleled flexibility and aesthetic control. This process ensures that your content retains its exact layout and visual integrity, making it ideal for embedding in web pages, sharing across platforms that may not natively support Word files, or even as source material for more complex digital art and photo manipulation projects.
At Tophinhanhdep.com, we understand the power of images – from stunning wallpapers and backgrounds to high-resolution photography and creative visual designs. This guide delves into the practical methods for converting your Word documents into various image formats like PNG or JPEG, opening up a world of possibilities for how you present and share your information. We’ll explore several easy-to-follow techniques, ranging from built-in Word features to external tools, ensuring that whether you need to save a single page or an entire document as individual images, you have the knowledge to achieve your desired visual outcome. Get ready to transform your text into compelling visuals that resonate with your audience and enhance your digital presence.
Understanding the Why: The Power of Visualizing Your Word Documents
The traditional Word document, while excellent for text creation and editing, often falls short when it comes to universal accessibility and visual impact across diverse digital platforms. This is where converting your documents into images becomes a game-changer, aligning perfectly with the principles of visual design and digital photography championed by Tophinhanhdep.com.
Preserving Layout and Aesthetics Across Platforms
One of the primary reasons to convert a Word document to an image is to guarantee that its formatting and layout remain absolutely intact, regardless of where it’s viewed. When you share a .docx file, there’s always a risk that different versions of Word, operating systems, or even varying font installations could alter the document’s appearance. Margins might shift, fonts could be substituted, and images might relocate, compromising your carefully crafted visual design.
By converting your document into an image (like a high-resolution PNG or JPEG), you create a static visual snapshot. This is crucial for professional presentations where every pixel matters, for sharing intricate graphic design elements embedded within a report, or for creating consistent brand visuals on social media. For instance, if you’ve designed a beautiful flyer or a complex infographic in Word, saving it as an image ensures that recipients see it exactly as you intended, preserving the aesthetic quality and preventing unwelcome surprises. This principle is fundamental to creating compelling visual content, much like curating beautiful photography or developing impactful digital art. The image becomes a universal canvas, delivering your message with uncompromised visual fidelity, suitable for any background or visual collection.
Enhanced Shareability and Web Integration
Images boast a universality that Word documents often lack. Most online platforms, messaging apps, and email clients are optimized for displaying images seamlessly. Attempting to upload a Word document to certain social media platforms or embed it directly into a blog post can be cumbersome or even impossible. Converting it to an image solves this, making your content inherently more shareable and accessible.
Imagine you want to showcase a particularly insightful table, a perfectly formatted resume, or a striking quote from your document on your website or blog. Instead of linking to a downloadable file, which requires extra steps from the user, an image can be directly embedded, becoming part of the visual flow of your page. This not only improves user experience but also enhances the overall visual design of your web content, potentially boosting engagement. These images can serve as engaging backgrounds, visual cues, or aesthetic elements that enrich the digital experience. Furthermore, for those looking to create mood boards or thematic collections, directly integrating parts of documents as images into Tophinhanhdep.com’s diverse range of image categories, such as “Nature” or “Abstract,” becomes a simple matter.
Fueling Creative Ideas and Digital Photography Projects
Beyond mere preservation and sharing, converting Word documents to images opens avenues for creative exploration and advanced visual design. A document page, once an image, can become a component in a larger digital art project or a piece of photo manipulation. Graphic designers can easily extract elements, overlay text, or integrate these “document images” into more elaborate compositions.
For instance, if you have a Word document containing a visually rich report, you might save specific sections as high-resolution images. These images could then be used to create compelling social media cards, email banners, or even be optimized and upscaled using Tophinhanhdep.com’s image tools for print. They can inspire new creative ideas for visual narratives, serving as unique backgrounds for other visual elements. This transforms your Word document from a functional text file into a versatile visual asset, ready to be integrated into diverse creative projects, contributing to anything from aesthetic collections to expressive sad/emotional imagery or impactful beautiful photography. This fluidity between document and image empowers you to think of your content not just as text, but as raw material for endless visual possibilities.
Core Methods for Converting Word to Image
Converting a Word document to an image doesn’t always require specialized software. Microsoft Word itself, along with basic system tools, offers straightforward ways to achieve this. These methods are perfect for quick conversions, single-page extractions, or when you need to capture a specific visual slice of your document.
Quick Conversion via Screenshot Features in Word
For users of Word 2010 and newer versions, the “Screenshot” feature is a remarkably convenient built-in tool that allows you to capture a visual representation of your document page and convert it into an image. This method is ideal for saving one or more pages as a single image file, preserving the exact on-screen appearance.
Step-by-Step Guide:
- Open Your Word Document: Display the specific page or arrangement of pages you wish to convert. If you want to capture multiple pages as a single image, adjust the “View” settings (e.g., “View” > “Multiple Pages”) to show them together on your screen. For a single page, “View” > “One Page” is recommended.
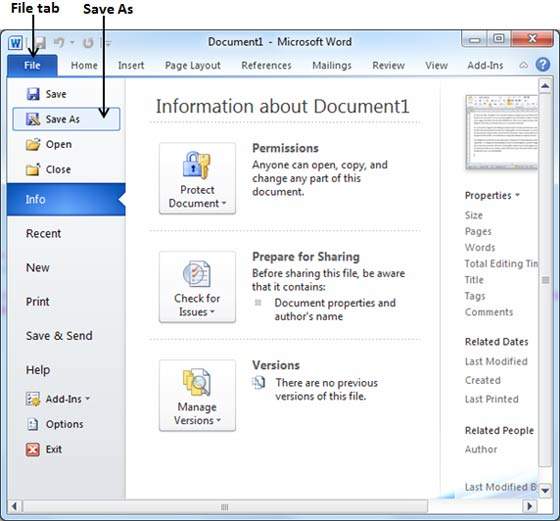
- Create a New Document: Navigate to “File” > “New” or press
Ctrl + N(or⌘ Cmd + Non Mac) to open a blank Word document. This will be your temporary canvas. - Insert Screenshot: In the new document, go to the “Insert” tab on the ribbon. Click on “Screenshot.” A dropdown menu will appear, showing thumbnails of all currently open windows.
- Select Your Document: Choose the thumbnail of your original Word document that you want to capture. Alternatively, you can select “Screen Clipping” from the same dropdown menu. This will dim your screen, allowing you to click and drag a box around the precise portion of your document you want to save as an image. This offers more control over the selection area, which can be useful for focusing on a specific table, chart, or section for your visual design needs.
- Save as Picture: Once the screenshot or screen clipping is inserted into your new Word document, right-click on the image. From the context menu, select “Save as Picture.”
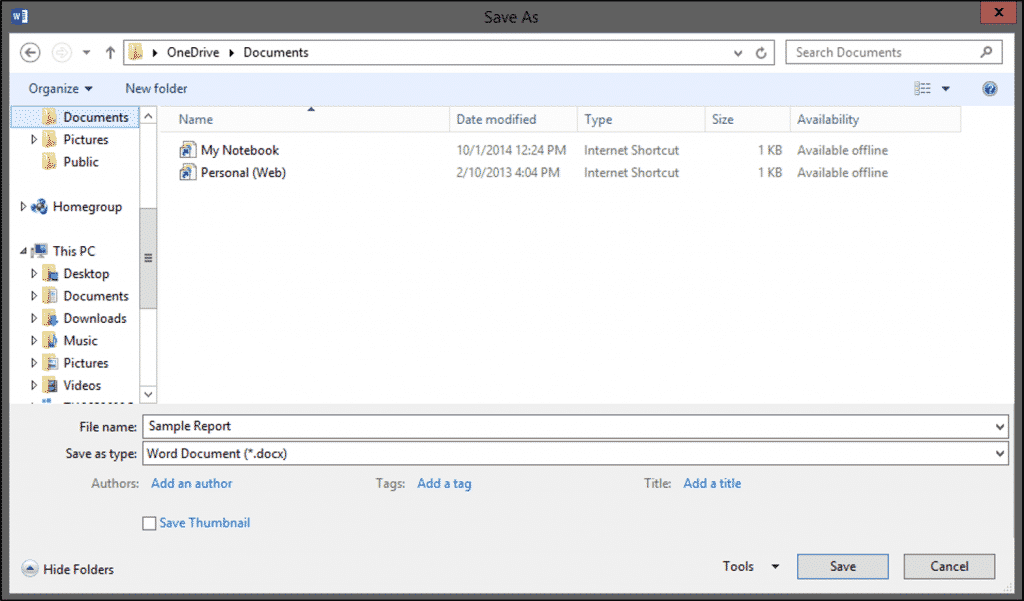
- Choose Format and Location: A “File Save” dialog box will appear.
- Navigate to the folder where you want to store your image.
- Enter a descriptive name in the “File name” box.
- Crucially, select your desired image type from the “Save as type” dropdown list. Common options include JPEG (Joint Photographic Experts Group) for photographs and complex images, and PNG (Portable Network Graphics) for images with sharp lines, text, or transparency, which is often preferred for graphic design elements and web-optimized visuals.
- Click “Save.”
This method is quick, integrated, and ensures your document’s on-screen fidelity is captured effectively for immediate use as an image, suitable for sharing as aesthetic content or integrating into a simple visual project.
Leveraging the Print Screen Key and Basic Image Editing Software
An age-old, yet still effective, method for turning any visible content on your screen into an image involves using the Print Screen (PrtScn) key in conjunction with a basic image editing program like Microsoft Paint. This technique works across all versions of Windows and is universally applicable for capturing on-screen visuals.
Step-by-Step Guide:
- Prepare Your Document: Open the Word document and display the specific page(s) you intend to capture. Just like with Word’s built-in screenshot feature, adjust the zoom level or view (e.g., “One Page” or “Multiple Pages”) to ensure the desired content is fully visible on your screen. For best results, maximize the Word window to capture as much detail as possible.
- Take the Screenshot: Press the
Print Screenkey (often labeledPrtScn,Prnt Scrn, orPrtSc) on your keyboard. On some laptops, you might need to pressFn + PrtScn. This action copies your entire screen to the clipboard. If you only want to capture the active window, pressAlt + PrtScn. - Open Paint (or another basic editor):
- Windows 8 and newer: Click the “Search” icon (magnifying glass), type “Paint,” and select the “Paint” application from the results.
- Windows 7: Click “Start” > “All Programs” > “Accessories” > “Paint.”
- You can also use other simple image editors if you prefer.
- Paste the Screenshot: In the blank Paint canvas, press
Ctrl + V(or click the “Paste” button on the ribbon) to paste the captured screenshot. - Crop the Image (Optional but Recommended):
- The
Print Screenkey captures everything on your screen, including your taskbar, desktop, and other open windows. To isolate your Word document content, click the “Select” button in Paint’s toolbar. - Draw a rectangular box around the portion of the pasted screenshot that contains your Word document page.
- Click the “Crop” button (usually next to “Select”). This will trim away all unwanted areas, leaving only your document content. This step is crucial for refining your image for visual design purposes, ensuring only relevant information is highlighted.
- The
- Save the Image:
- Click “File” > “Save” or “File” > “Save As.”
- In the “Save As” dialog box, choose your desired folder.
- Enter a “File name.”
- Select the “Save as type” (e.g., JPEG, PNG, or TIFF, which is great for high-resolution stock photos).
- Click “Save.”
This method offers direct control over the captured area through cropping and is a versatile solution when Word’s internal screenshot feature might not be available or sufficient for your editing styles. It’s a classic approach to quickly transform any visible digital content into an image ready for sharing or further manipulation.
Advanced Techniques and Tools for Image Conversion
While basic screenshot methods are effective for quick conversions, more complex needs—like batch processing an entire multi-page document or requiring higher fidelity output—call for advanced techniques and specialized tools. These methods cater to users looking for greater efficiency, quality control, and expanded functionality, especially relevant for those involved in digital photography, graphic design, and image optimization.
Utilizing Third-Party Add-ins for Batch Processing
For documents with numerous pages that all need to be converted into separate image files, manually taking screenshots page by page is incredibly inefficient. This is where third-party add-ins for Word prove invaluable, offering batch processing capabilities that save significant time and effort. While Microsoft Word itself doesn’t offer a native “export all pages as images” feature, tools like “Kutools for Word” bridge this gap, enhancing your image tools arsenal.
Example: Kutools for Word’s “Export Doc as Images” Feature:
Kutools for Word, an add-in, extends Word’s functionality with over 100 features, including a robust “Export Doc as Images” option. This is particularly useful for converting entire documents, with each page becoming an individual image file, which is perfect for creating thematic collections or assets for digital art projects.
Step-by-Step Guide:
- Open Your Document: Launch the Word document whose pages you wish to export as images.
- Access Kutools Feature: Navigate to the “Kutools Plus” tab (after installing the add-in) > “More” > “Export Doc as Images.”
- Configure Export Options: The “Export Documents to Images” dialog box will appear, presenting several customization options:
- Path: Click the “Browse” button next to the “Path” box to specify the destination folder where all your generated images will be saved. This allows for organized storage of your high-resolution outputs.
- Image Type: From the “Image Type” dropdown list, select your desired format. PNG is excellent for sharp text and graphics, while JPEG offers good compression for photographic content. Other options like TIFF might be available, offering uncompressed quality ideal for stock photos or printing.
- Image Size: Choose the preferred resolution or size for the exported images from the “Image Size” dropdown. This is critical for maintaining image quality, especially if these images are intended for wallpapers, backgrounds, or detailed visual designs. Higher resolutions will yield crisper images but larger file sizes.
- Create Index HTML (Optional): This feature can generate an HTML file that acts as an index, making it easier to navigate and view all the exported images in a web browser. This can be a significant time-saver for large documents, providing a quick overview of your image collection.
- Initiate Export: Click the “Export” button to start the conversion process.
Once the process is complete, the destination folder will automatically open, displaying each page of your Word document as a separate, high-resolution image. If you opted for the HTML index, it will also be present for easy browsing. This method significantly boosts productivity for document-to-image conversion, offering granular control over the output quality and format, which are vital for professional digital photography and visual design workflows.
Exporting via PDF for Versatile Image Output
Another highly effective and professional method for converting Word documents to images involves an intermediate step: saving the Word document as a PDF, and then converting the PDF pages into image files. This two-stage approach offers exceptional control over the fidelity of the output, as PDF is a universal format designed to preserve documents exactly as they were created, making it an excellent bridge for high-resolution image conversion.
Step-by-Step Guide:
- Save Word Document as PDF:
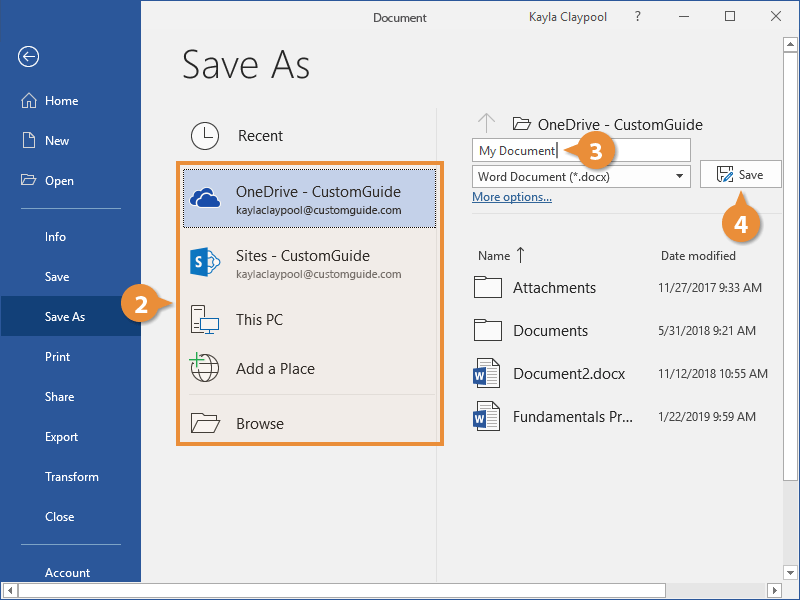
- Open your Word document.
- Go to “File” > “Save As” (or “Print” > “Print to PDF” if you have a PDF printer installed).
- Choose a location to save your file.
- In the “Save as type” dropdown menu, select “PDF (*.pdf).”
- Click “Save” or “Publish.” This creates a portable, print-ready version of your document, preserving all fonts, layouts, and graphics perfectly. This step is a cornerstone for ensuring the highest quality in your digital photography and visual design outputs.
- Convert PDF to Image: Once your document is saved as a PDF, you will need a tool to convert the PDF pages into image formats.
- Dedicated Software (e.g., Adobe Acrobat Pro): If you have professional PDF software, open the PDF, then look for an “Export” or “Save As” option. You can typically choose to export each page as a separate image file (e.g., JPEG, PNG, TIFF) and configure resolution and quality settings. This provides the most control for creating high-resolution stock photos or images for detailed graphic design.
- Online Conversion Tools: Numerous free and paid online PDF-to-image converters are available. Tophinhanhdep.com, for instance, offers advanced “Image Tools” including powerful “Converters” that can seamlessly handle PDF-to-image conversion. You simply upload your PDF, choose your desired image format (JPEG, PNG, etc.), and download the resulting image files. Other online tools also exist. Always choose a reputable service to ensure data privacy and quality output.
- Screenshot PDF Viewer: As a last resort, you can open the PDF in a viewer (like Adobe Reader or your web browser) and use the
Print Screenmethod (as described earlier) to capture pages one by one, then crop and save them in an image editor. However, this method is less precise and may not yield the highest resolution compared to direct conversion tools.
The PDF intermediary method is particularly beneficial for:
- High-Quality Output: PDFs are vector-based where possible, meaning text and crisp graphics can be scaled without pixelation, translating to superior image quality. This is vital for “high resolution” images intended for large displays or print.
- Complex Documents: For documents with intricate layouts, embedded fonts, or vector graphics, the PDF conversion ensures that all elements are rendered accurately before turning them into raster images.
- Batch Processing: Most PDF conversion tools, whether desktop or online, allow you to convert all pages of a multi-page PDF into individual images in one go, similar to the add-in approach for Word.
By employing this method, you gain a robust pipeline for transforming your Word documents into versatile image assets, ready for any purpose on Tophinhanhdep.com – from stunning wallpapers and backgrounds to elements in complex digital art and photo manipulation projects.
Optimizing and Utilizing Your Document-Generated Images
Converting your Word documents into images is just the first step. To truly leverage their potential within the visual landscape, especially with the resources available on Tophinhanhdep.com, understanding image optimization and creative integration is key. This transforms your text into powerful visual assets that can stand alongside professional digital photography and graphic design.
Image Quality and Resolution Considerations
The choice of image format and resolution directly impacts the usability and visual appeal of your converted document pages. This is a critical aspect when preparing images for diverse applications, from high-resolution desktop wallpapers to web-optimized content.
- Format Selection:
- JPEG (.jpg): Best for photographs and complex images with continuous tones. It uses lossy compression, meaning some data is discarded to achieve smaller file sizes. This makes it unsuitable for images with sharp lines, text, or transparency, as compression artifacts can become noticeable. Ideal for documents heavy on scanned images or photographic elements.
- PNG (.png): Excellent for graphics, logos, images with transparency, and documents primarily composed of text and solid colors. It uses lossless compression, preserving all original data and ensuring crisp edges and text. Preferred for web elements, graphic design assets, and when text readability is paramount.
- TIFF (.tif): Offers high-quality, lossless compression, often used in professional printing and archival contexts. TIFF files can be very large but retain maximum detail, making them suitable for “high resolution” stock photos or very detailed “beautiful photography” where no detail can be compromised.
- Resolution and File Size: The resolution (measured in pixels per inch, or PPI) determines the image’s clarity and detail.
- For web use or social media, a resolution of 72-150 PPI is often sufficient.
- For print, “high resolution” typically means 300 PPI or more.
- Always aim for the highest resolution possible during conversion if you anticipate needing the image for multiple purposes (e.g., a detail for a social post and the full image for a print brochure). You can always downscale a high-resolution image, but you cannot truly upscale a low-resolution image without losing quality (though “AI Upscalers” on Tophinhanhdep.com can help mitigate this).
- Image Tools for Optimization: Once converted, you might find your images are too large for web use or need further enhancement. Tophinhanhdep.com’s “Image Tools” provide:
- Compressors: Reduce file size without significant loss of visual quality, crucial for faster loading times on websites and efficient storage.
- Optimizers: Fine-tune images for specific platforms or uses, balancing quality and performance.
- AI Upscalers: Utilize artificial intelligence to intelligently increase the resolution of your images, adding detail and sharpness, which is invaluable for improving images that started at a lower resolution, making them suitable for “wallpapers” or large “backgrounds.”
Integrating Images into Visual Design & Creative Projects
The true value of converting your Word documents to images comes from their integration into broader visual design strategies and creative projects. Your document pages are no longer just information carriers; they are visual assets ready for “photo manipulation” and “digital art.”
- Graphic Design Elements: Individual pages or sections saved as images can be incorporated into larger graphic design layouts. Think of a beautifully designed table from your Word document becoming a key visual element in an infographic created in a graphic design suite. These elements contribute to the “aesthetic” and overall impact of your design.
- Digital Art and Photo Manipulation: For artists, a Word document saved as a PNG can provide unique textures, textual overlays, or structural elements to be manipulated in “digital art” software. It can be merged with “nature,” “abstract,” or “sad/emotional” images to create new, evocative compositions.
- Mood Boards and Thematic Collections: Use your converted document images to build “mood boards” for new projects, or to add unique pieces to your “thematic collections” of images. A document detailing a design concept can have its pages visually integrated into a mood board, combining text and imagery for clearer communication.
- Social Media and Web Content: Directly embed these images into blog posts, use them as engaging visuals for social media updates, or create eye-catching banners. The consistency of images ensures your brand’s “aesthetic” is maintained across all platforms.
Tophinhanhdep.com: Your Hub for Image Inspiration and Tools
Once you’ve skillfully converted your Word documents into stunning visuals, Tophinhanhdep.com emerges as your ultimate resource for further enhancement, inspiration, and utilization. Our platform is meticulously designed to cater to all your image-related needs, fostering “creative ideas” and elevating your “visual design” capabilities.
- Diverse Image Collections for Inspiration: Explore our vast “Image Inspiration & Collections” to find complementary visuals or new concepts. Whether you’re looking for “Wallpapers” or “Backgrounds” to accompany your document-derived images, or seeking “Photo Ideas” and “Trending Styles” to integrate them into, Tophinhanhdep.com offers:
- Aesthetic & Beautiful Photography: Discover stunning visuals to elevate your content.
- Nature & Abstract: Find diverse styles to blend with or contrast your document imagery.
- Sad/Emotional Imagery: Curate specific moods for impactful visual storytelling.
- Powerful Image Tools at Your Fingertips: Enhance your converted document images using our comprehensive suite of “Image Tools”:
- Converters: Easily switch between various image formats to suit specific project requirements, ensuring compatibility and quality.
- Compressors & Optimizers: Reduce file sizes without compromising visual integrity, vital for fast-loading web content and efficient storage of your “high resolution” images.
- AI Upscalers: Breathe new life into lower-resolution document captures by intelligently increasing their size and detail, making them suitable for larger displays or print.
- Image-to-Text: If you ever need to reverse the process or extract text from a generated image, our “Image-to-Text” tools offer a convenient solution.
- Visual Design Resources: Tophinhanhdep.com isn’t just about images; it’s about empowering your entire “Visual Design” workflow. From “Graphic Design” principles to “Digital Art” techniques and “Photo Manipulation” guides, our platform supports your creative journey. Use your newly minted document images as raw material for intricate designs or as part of larger “thematic collections.”
By seamlessly integrating the process of saving Word documents as images with the rich features of Tophinhanhdep.com, you transform a technical task into a creative opportunity. Our platform provides not only the practical utilities but also the “image inspiration” and diverse “editing styles” needed to make your document content truly shine in the digital world.
Conclusion
The transformation of a Word document into an image is far more than a simple file conversion; it’s an act of unlocking visual potential, enhancing shareability, and opening new avenues for creative expression. As we’ve explored, whether you opt for the quick convenience of Word’s built-in screenshot feature, the versatile control offered by the Print Screen key and basic image editors, or the advanced capabilities of third-party add-ins and PDF-to-image conversions, the goal remains the same: to present your information with uncompromised visual integrity and impact.
In a digital landscape where visual content reigns supreme, the ability to convert your Word documents into high-resolution, aesthetically pleasing images is an indispensable skill. It ensures your meticulously crafted layouts are preserved, your content is universally accessible, and your ideas can be seamlessly integrated into broader visual design projects, from compelling social media posts to stunning digital art.
At Tophinhanhdep.com, we champion the power of visual communication. We encourage you to take these newfound skills and explore the vast resources available on our platform. Once your Word documents are transformed into captivating images, dive into our extensive collections of wallpapers, backgrounds, and beautiful photography for inspiration. Utilize our advanced image tools—from converters and compressors to AI upscalers—to refine, optimize, and enhance your creations. Let Tophinhanhdep.com be your partner in turning every document into a visually impactful masterpiece, sparking new creative ideas and elevating your digital presence in every possible way.