How to Transform Your Word Documents into Stunning Images: A Comprehensive Guide

Microsoft Word, renowned globally as a powerhouse for document creation and editing, offers a surprisingly versatile capability beyond mere text processing: the ability to convert your carefully crafted documents into vibrant image files. In a digital landscape increasingly dominated by visual content, understanding how to transition your Word files into formats like JPEG or PNG is not just a technical trick—it’s a gateway to new avenues of sharing, presentation, and creative expression. For enthusiasts and professionals alike, whether you’re curating aesthetic mood boards, designing striking digital art, or preparing high-resolution images for social media, this conversion skill is invaluable.
At Tophinhanhdep.com, we understand the power of images. Our platform is dedicated to providing an abundance of visual resources, from breathtaking wallpapers and backgrounds to tools for image optimization and graphic design inspiration. The seamless conversion of Word documents to images directly aligns with our mission to empower users in their visual endeavors, offering a practical solution for transforming textual content into visual assets ready for any creative project.
This comprehensive guide will walk you through various methods to save your Word documents as image files, delving into the nuances of each approach. We’ll explore the built-in functionalities of Microsoft Word, the convenience of online conversion tools, and the precision offered by specialized software. Furthermore, we’ll discuss critical considerations such as image quality, resolution, and file size, ensuring your converted images meet the highest standards for any application, be it for a professional presentation or a captivating abstract background.
Why Convert Word Documents to Images? Bridging Text and Visual Storytelling
In an age where information is consumed rapidly and visually, converting textual documents into images offers a multitude of benefits, transforming static content into dynamic visual assets. This capability is particularly relevant for the diverse range of visual interests supported by Tophinhanhdep.com, from digital photography to visual design.
Enhanced Sharing and Cross-Platform Compatibility
Word documents, typically saved in .docx or .doc formats, can sometimes pose compatibility challenges. Recipients might not have Word installed, or the document’s formatting might shift unexpectedly across different operating systems or versions. By converting your Word document into a universal image format like JPEG or PNG, you sidestep these issues entirely. Images are universally viewable across virtually all devices and platforms, from smartphones to smart TVs, web browsers, and social media feeds. This makes sharing content via email, instant messaging, or embedding it on personal blogs or websites incredibly straightforward. Imagine sharing a beautifully designed resume or an important announcement as an image—it ensures everyone sees it exactly as intended, without any software-related hurdles. This immediate visual accessibility aligns perfectly with the ease of sharing and utilizing images found on Tophinhanhdep.com.
Preserving Layout for Visual Design and Digital Art
One of the most compelling reasons to convert Word documents to images is to perfectly preserve their visual layout and formatting. Word offers extensive design capabilities, allowing users to incorporate complex layouts, specific fonts, colors, and embedded graphics. When a Word document is opened on a different system, there’s always a risk that these intricate design elements might not render correctly. Saving it as an image “flattens” the document, locking its appearance.
This preservation is crucial for various visual design applications. For instance:
- Graphic Design and Photo Manipulation: A Word document containing a specific infographic, a meticulously arranged flyer, or a textual element with unique styling can be converted into an image and then seamlessly integrated into larger graphic design projects. It becomes a static layer in tools like Photoshop or GIMP, ready for further manipulation or compositing with other visual assets.
- Web Content and Presentations: When you want to ensure consistent branding and visual appeal, using image versions of document pages in a website or a presentation guarantees that the fonts, colors, and overall aesthetic remain unchanged, regardless of the viewer’s setup. This is vital for maintaining a professional appearance, much like the curated collections and beautiful photography featured on Tophinhanhdep.com.
- Mood Boards and Thematic Collections: For creative professionals and hobbyists developing mood boards or thematic image collections, a Word document outlining concepts, containing quotes, or displaying specific textual inspiration can be transformed into a visual component. This allows it to be placed alongside other images, contributing to a cohesive visual narrative without disrupting the overall aesthetic.
By transforming your Word content into an image, you unlock its potential as a visual asset, allowing it to seamlessly blend into the rich tapestry of digital images and visual designs that define our online experience.
Core Methods to Save Word Documents as Image Files
Microsoft Word and standard operating system features offer several straightforward ways to convert your documents into images. These methods are generally accessible and require minimal, if any, additional software, making them an excellent starting point for most users.
The “Save As” Option: Microsoft Word’s Built-in Image Export
Surprisingly, some versions of Microsoft Word (particularly older ones or specific configurations) offer a direct “Save As” option to convert a document to certain image formats like JPEG or PNG. While not always universally present in the latest versions for entire documents, this method is highly convenient when available, especially for converting individual elements or simpler documents.
How to Use the “Save As” Option:
- Open Your Document: Start by opening the Microsoft Word document you wish to convert.
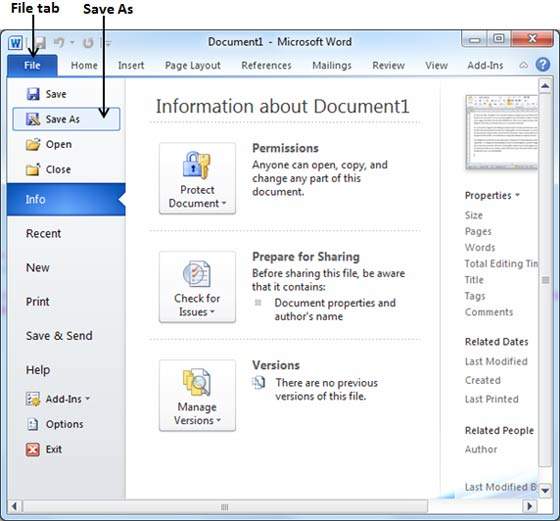
- Navigate to “File”: Click on the “File” tab in the top-left corner of the Word interface.
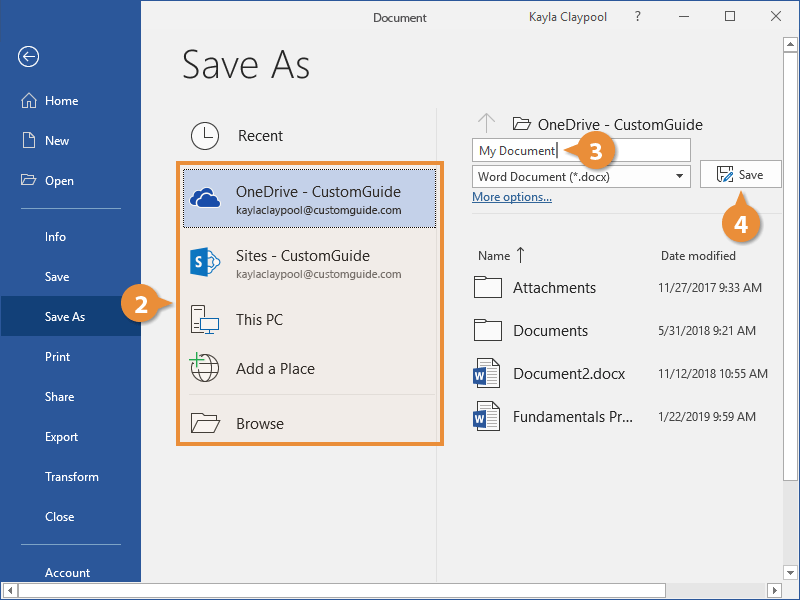
- Select “Save As”: From the dropdown menu, choose “Save As.” This will open the “Save As” dialog box.
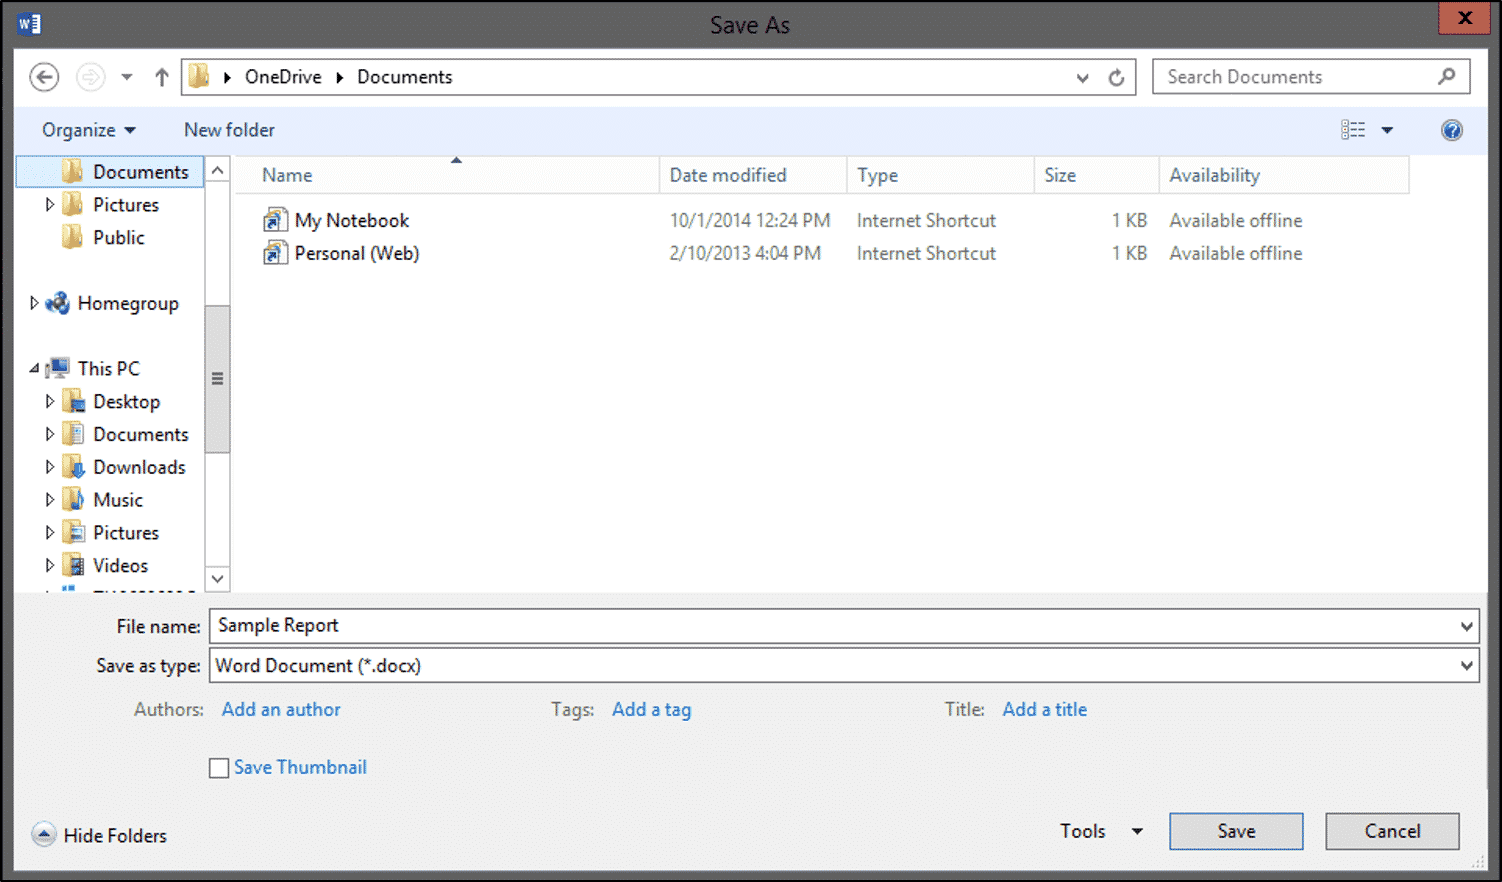
- Choose Location: Select the destination folder on your computer where you want to save the new image file.
- Specify File Name: Enter a descriptive name for your image file in the “File name” field.
- Select Image Format: This is the crucial step. Click on the “Save as type” dropdown menu. Look for options like “JPEG File Interchange Format (*.jpg, *.jpeg)” or “PNG Portable Network Graphics Format (*.png)”. If these are present, select your desired image format.
- Click “Save”: Once you’ve made your selections, click the “Save” button. Word will then convert and save the document (or sometimes just the active page or selected elements) as an image.
Considerations for the “Save As” Method:
- Version Dependency: The availability and specific image formats offered via “Save As” can vary between different versions of Microsoft Word. Newer versions sometimes prioritize PDF export over direct image export for entire documents.
- Content Conversion: When this option is available for an entire document, Word typically converts each page into a separate image file. This can be beneficial for creating individual slides or image assets for a gallery on Tophinhanhdep.com.
- Quality Settings: In some instances, after selecting the image format, a “Save As JPEG Options” or similar dialog box might appear, allowing you to adjust image quality. Higher quality means a larger file size but better visual fidelity, important for high-resolution photography.
Leveraging the Screenshot Feature in Word
For Word versions 2010 and later, a lesser-known but powerful feature allows you to take screenshots directly within the application, which can then be saved as pictures. This is particularly effective for capturing specific parts of a document or individual pages.
Steps to Use Word’s Screenshot Feature:
- Prepare Your Document: Open the Word document and navigate to the page or section you want to capture. Adjust the zoom level (“View” > “One Page” or “Multiple Pages”) to ensure everything you want is visible on the screen.
- Create a New Document (Optional but Recommended): For best results, open a new blank Word document (
Ctrl + Nor “File” > “New”). This ensures your screenshot is inserted cleanly without affecting your original document. - Insert Screenshot: In the new document, go to the “Insert” tab and click on “Screenshot.” A dropdown menu will appear showing thumbnails of all open windows.
- Select Your Document: Choose the thumbnail that represents your open Word document. Alternatively, select “Screen Clipping” to manually drag and select a specific area of your screen.
- Save as Picture: Once the screenshot is inserted into the new Word document, right-click on the image. From the context menu, select “Save as Picture.”
- Finalize Save: In the “Save As Picture” dialog box, navigate to your desired folder, give the file a name, and select your preferred image format (e.g., JPEG, PNG, GIF) from the “Save as type” dropdown. Click “Save.”
This method is quick and ideal for capturing visual snippets or single pages with precision, turning your Word content into adaptable visuals for digital art or image collections.
The Classic Print Screen and Image Editing Software Approach
Perhaps the most universally applicable method, though slightly more manual, involves using your operating system’s screenshot functionality combined with basic image editing software. This approach works for any version of Word and any content displayed on your screen.
Step-by-Step Guide:
- Display Desired Content: Open your Word document and position the content you wish to capture on your screen. Adjust zoom and scroll as needed to show exactly what you want in the screenshot. For multiple pages, you might need to take several screenshots.
- Capture Screenshot:
- Windows: Press the
Print Screen(PrtScn) key on your keyboard. This copies the entire screen to your clipboard. For a specific window, useAlt + PrtScn. For selective capture, use the Snipping Tool (search for it in Windows Start Menu) orWindows key + Shift + S. - macOS: Use
Command + Shift + 3for the entire screen orCommand + Shift + 4to select a specific area. These screenshots are usually saved directly to your desktop.
- Windows: Press the
- Open Image Editing Software: Launch a basic image editor. Windows users can use “Paint” (found in “Accessories”), while Mac users can use “Preview.” More advanced options include GIMP (free) or Adobe Photoshop.
- Paste the Screenshot: In your image editor, press
Ctrl + V(Windows) orCommand + V(macOS) to paste the captured screenshot. - Crop and Adjust: If you captured the entire screen, use the cropping tool in your image editor to isolate just the Word document content you need. You can also make basic adjustments like rotation or resizing.
- Save as Image: Go to “File” > “Save As” (or “Export” in some programs). Choose your desired location, file name, and image format (JPEG, PNG, GIF, etc.). Pay attention to quality settings if offered, especially for aesthetic or high-resolution photography needs. Click “Save.”
This method offers maximum control over what you capture and allows for immediate post-capture editing, making it highly flexible for various visual design and image inspiration tasks.
Advanced Techniques and Tools for Image Conversion
While Word’s built-in features and system-level screenshots are effective for quick conversions, more demanding tasks—such as batch processing, maintaining specific quality settings, or ensuring high fidelity for professional visual design—often benefit from dedicated tools. These advanced methods align with Tophinhanhdep.com’s commitment to providing robust image tools and resources for digital photography and graphic design.
Online Conversion Tools: Convenience and Batch Processing
The internet hosts a plethora of free online conversion tools that specialize in transforming Word documents into various image formats. These tools are incredibly convenient as they typically don’t require any software installation and can be accessed from any device with an internet connection. Many also offer batch conversion, a significant time-saver for large projects.
How to Use Online Conversion Tools:
- Search for a Converter: Open your web browser and search for “Word to JPEG converter” or “Word to image online.” You’ll find many reputable options. When looking for comprehensive image tools, remember to check Tophinhanhdep.com for recommendations and integrated solutions.
- Upload Your Document: On the chosen website, you’ll usually see a prominent “Upload,” “Choose File,” or “Drag & Drop” area. Select your Word document(s) from your computer.
- Select Output Format: Choose the desired output image format, such as JPEG, PNG, or TIFF. Some tools also let you adjust quality, resolution, or specify if each page should be a separate image.
- Initiate Conversion: Click the “Convert” or “Start Conversion” button. The tool will process your document(s) on its servers.
- Download Images: Once the conversion is complete, the website will provide a download link. You can usually download individual images or a ZIP archive containing all converted pages.
Benefits and Considerations:
- Convenience: No software installation, accessible anywhere.
- Batch Conversion: Many tools support converting multiple documents or multiple pages within a document into separate images simultaneously, highly useful for creating image inspiration collections.
- Data Privacy: Always use reputable online tools and be cautious with sensitive documents. Review their data privacy policies. Tophinhanhdep.com emphasizes secure handling for all image tools.
- File Size Limits: Free versions of online tools often have limits on document size or the number of files you can convert at once.
Third-Party Software: Precision and Professional Control
For users who frequently convert documents, require greater control over the output, or need advanced features like preserving hyperlinks or specific metadata, dedicated third-party software offers a robust solution. These applications often provide a more professional workflow, akin to the detailed editing styles found in high-resolution photography or digital art.
Types of Third-Party Software:
- PDF Converters with Image Export: Programs like Adobe Acrobat Pro or other professional PDF suites can first convert your Word document to PDF, and then export each PDF page as an image (JPEG, PNG, TIFF). This two-step process often yields very high-quality results, preserving fonts and layouts meticulously.
- Specialized Document Conversion Tools: There are applications designed specifically for converting various document types to images, offering fine-tuned control over resolution, compression, color profiles, and even watermarking. While we don’t endorse specific external products, Tophinhanhdep.com often reviews and recommends categories of tools that enhance visual content creation.
- Advanced Add-ins for Word: Some developers offer add-ins for Microsoft Word that integrate advanced image export functionalities directly into the Word interface, providing more options than the default “Save As.”
Advantages of Third-Party Software:
- High Quality & Control: Superior control over output parameters, vital for stock photos or digital photography where image integrity is paramount.
- Batch Processing: Efficiently convert entire folders of documents.
- Advanced Features: May include OCR (Optical Character Recognition) for text extraction from image-based Word documents, or the ability to embed interactive elements.
- Offline Functionality: No internet connection required once installed.
Considerations: Most professional-grade third-party software comes with a cost, either as a one-time purchase or a subscription. It’s essential to evaluate your needs against the investment.
Considering PDF as an Intermediate or Alternative
While the goal is to convert to an image, it’s worth noting that saving a Word document as a PDF can often be an excellent intermediate step or even a preferred alternative in some scenarios. Microsoft Word itself can save documents directly to PDF.
Why PDF?
- Universal Compatibility: PDFs are almost as universally viewable as images and maintain document formatting, fonts, and layout perfectly across devices, making them ideal for professional sharing.
- Print Quality: PDFs are designed for print fidelity, ensuring your document looks exactly the same when printed as it does on screen.
- Image Extraction: Once a Word document is saved as a PDF, it’s relatively easy to use PDF readers (like Adobe Acrobat Reader, or even web browsers) to take screenshots of pages or use dedicated PDF-to-image conversion tools (many found on Tophinhanhdep.com) to extract individual pages as images.
- Text Searchability: Unlike a flat image, text within a PDF remains searchable, which can be a significant advantage.
For situations where the document’s original integrity and searchability are as important as its visual presentation, PDF often serves as a robust solution. If an image is still needed, converting from the high-quality PDF to an image often yields better results than direct Word-to-image conversions in some contexts.
Optimizing Your Image Output: Quality, Resolution, and File Size
Converting a Word document to an image isn’t just about the conversion method; it’s also about understanding and controlling the characteristics of the resulting image. For a website like Tophinhanhdep.com, which focuses on high-quality visuals, wallpapers, and stock photos, optimizing your image output is crucial for both aesthetic appeal and practical functionality.
Understanding Image Compression and Quality Settings
When you save an image, especially in formats like JPEG, compression is a key factor. Compression reduces the file size by selectively discarding some image data. This is a balancing act between file size and visual quality.
- Higher Compression (Lower Quality): Results in smaller file sizes, which is ideal for web pages to ensure fast loading times (relevant for web backgrounds and aesthetic visuals on Tophinhanhdep.com). However, excessive compression can lead to “artifacts” – blocky textures, blurriness, or a loss of fine detail, especially noticeable in detailed graphics, charts, or text.
- Lower Compression (Higher Quality): Yields larger file sizes but preserves more image detail and color fidelity. This is critical for high-resolution photography, digital art, or any image intended for professional printing or close inspection.
Many conversion tools, including the “Save As” option in Word or online converters recommended by Tophinhanhdep.com, offer a quality slider or numerical setting (e.g., 0-100 or 1-12). Always aim for a quality level that provides a good balance for your intended use. For website images, moderate compression is usually sufficient. For print or very detailed work, opt for minimal compression.
Resolution and DPI for High-Quality Visuals
Resolution refers to the number of pixels in an image, typically expressed as width x height (e.g., 1920x1080 pixels). DPI (Dots Per Inch) or PPI (Pixels Per Inch) is a measure of spatial density, indicating how many pixels or dots are packed into one inch of an image. These factors directly impact the clarity, sharpness, and scalability of your converted image.
- Higher Resolution: More pixels mean more detail and allow for larger prints or displays without pixelation. For wallpapers, backgrounds, or stock photos, a high resolution is essential for a crisp, professional look. Tools like Tophinhanhdep.com’s AI Upscalers can even enhance resolution post-conversion if the initial output isn’t sufficient.
- DPI/PPI:
- 72-96 DPI: This range is standard for web display. Images intended for online use (e.g., social media, website embeds) typically don’t need higher DPI, as screens display pixels, not physical dots.
- 300 DPI or Higher: This is the industry standard for high-quality printing. If your converted Word document is meant to be printed—perhaps as a component of a graphic design poster or a detailed report—you’ll need to ensure the image is saved at 300 DPI or higher to avoid a blurry or pixelated output.
When converting, if the tool allows, always set the resolution and DPI appropriate for your final application. If your Word document contains intricate graphics or small text, a higher resolution will ensure legibility and visual appeal in the image format. Neglecting these settings can result in low-quality visuals that detract from your message, a common pitfall Tophinhanhdep.com helps users avoid through its suite of image optimization tools. By carefully managing compression, resolution, and DPI, you can transform your Word documents into visually stunning images perfectly suited for any purpose, from a simple email attachment to a professional-grade digital artwork.
Conclusion
The ability to save a Microsoft Word document as an image is a remarkably versatile skill, bridging the gap between textual content and the vibrant world of visual media. As explored in this guide, whether you’re utilizing Word’s native “Save As” function, employing the efficient screenshot feature, or turning to robust online and third-party tools, the process is accessible and offers a pathway to transform your documents into shareable, visually consistent assets.
This conversion is particularly beneficial for the diverse applications championed by Tophinhanhdep.com—from creating compelling visuals for graphic design and digital art to ensuring the pristine layout of content destined for social media, presentations, or website backgrounds. By converting your Word files into images, you unlock a wealth of possibilities for visual storytelling, safeguarding formatting, and enhancing cross-platform compatibility.
Remember to consider critical factors such as image quality, resolution, and file size, aligning them with your intended use. Leveraging resources like Tophinhanhdep.com’s image optimization tools, compressors, and AI upscalers can further refine your converted images, ensuring they meet the highest standards for clarity and impact. Embrace this practical skill to seamlessly integrate your textual creations into the rich visual tapestry of the digital age, elevating your content and expanding your creative horizons.
Frequently Asked Questions
This section addresses common queries related to saving a Word document as an image, offering quick solutions and insights.
1. Can I save a Microsoft Word document as a JPEG?
Yes, you can absolutely save a Microsoft Word document as a JPEG. While Word primarily saves files as .docx or .doc, you can easily convert a document into a JPEG format to use it as an image file. This is highly useful for sharing documents on social media platforms, embedding them in presentations, or integrating them into visual designs. The most common methods include using the “Save As” option (if available in your Word version), capturing a screenshot, or utilizing online conversion tools like those you might find on Tophinhanhdep.com.
2. Is it possible to customize the quality of the saved JPEG image?
Yes, in many conversion methods, you can customize the quality of the saved JPEG image. When using Word’s “Save As” function for image formats, a “Save As JPEG Options” dialog box might appear, allowing you to adjust a “Picture quality” slider. Similarly, online conversion tools and third-party software often provide settings for quality, compression, and resolution. Higher quality settings result in larger file sizes but preserve more image detail, which is crucial for high-resolution photography or printing purposes. Always choose a quality level appropriate for your specific needs, balancing file size with visual fidelity.
3. Can I save a specific page of a Word document as a JPEG?
Yes, you can save a specific page of a Word document as a JPEG. This is particularly helpful if you only need a portion of a multi-page document as an image. Here are common approaches:
- Screenshot Feature (Word 2010+): Open the document, navigate to the desired page, ensure it’s fully visible, then go to “Insert” > “Screenshot” > “Screen Clipping” to select and capture just that page. Right-click the inserted image and “Save as Picture.”
- Print Screen Key and Image Editor: Display the page on your screen, press the
Print Screenkey, then paste the screenshot into an image editor (like Paint or GIMP). Crop the image to show only the desired page and save it as a JPEG. - Online Conversion Tools: Some advanced online converters allow you to specify page ranges for conversion, generating individual JPEG files for each selected page. Tophinhanhdep.com’s suite of image tools can guide you to such converters.
4. What image formats can I save a Word document as?
Beyond JPEG, you can typically save a Word document as various other image formats, depending on the method and tools you use. Common supported formats include:
- JPEG (Joint Photographic Experts Group): Widely used, good for photographs and complex images due to efficient compression.
- PNG (Portable Network Graphics): Excellent for graphics, logos, screenshots, and images requiring transparency or lossless compression.
- TIFF (Tagged Image File Format): Often used for high-quality prints and professional photography, supports multiple layers and lossless compression.
- GIF (Graphics Interchange Format): Best for simple animations and images with a limited color palette.
The choice of format depends on your specific needs, such as file size, quality requirements, and whether transparency is necessary.
5. Are there any limitations or considerations when saving Word documents as pictures?
Yes, there are a few important considerations:
- Loss of Editability: Once converted to an image, the content of your Word document becomes a static picture. The text will no longer be editable as text; it will be pixels. Always keep a copy of your original Word document for future edits.
- Resolution and Quality: As discussed, the quality and resolution of the resulting image depend heavily on the conversion method and settings. A low-resolution conversion might result in pixelated or blurry images, especially if zoomed in or printed large.
- File Size: High-quality images, especially in formats like PNG or TIFF, can result in significantly larger file sizes compared to the original Word document. This is where Tophinhanhdep.com’s image compressors can be beneficial.
- Complex Formatting: While image conversion generally preserves layout, extremely complex Word documents with highly intricate interactive elements, embedded macros, or specific font renderings might experience minor visual discrepancies or loss of functionality (like hyperlinks) in the image format.
- Multi-Page Documents: Most direct Word-to-image conversions (outside of specialized tools) convert each page into a separate image file, rather than a single, continuous image.