How to Save an Image as a JPEG: Your Comprehensive Guide to Digital Image Conversion

In today’s visually-driven digital world, images are everywhere. From stunning Wallpapers and captivating Backgrounds that personalize our devices, to the Aesthetic shots and breathtaking Nature photography we share online, digital imagery forms the core of our communication and creativity. Whether you’re a professional photographer curating a Beautiful Photography portfolio, a graphic designer crafting Digital Art for a client, or simply someone looking to upload a Sad/Emotional image to social media, understanding how to manage and optimize your image files is paramount. Among the myriad of image formats, JPEG (or JPG) stands out as the undisputed champion for sharing and displaying raster images due to its exceptional balance of quality and file size.
Many platforms, from social media sites to online galleries and Stock Photo libraries, often require images to be in the .JPG format. Encountering a .GIF, .TIFF, .PNG, or a less common file extension when you need a .JPG can be incredibly frustrating. While converting certain image types to JPEG might introduce a slight loss in crispness due to its compression method, its ability to retain excellent perceived quality within the smallest possible file size makes it an invaluable asset in Digital Photography and Visual Design workflows. This comprehensive guide will demystify the process of converting and saving your pictures to JPEG files, covering a range of methods across various devices and software, and providing insights into Image Tools like converters and optimizers that streamline your Image Inspiration & Collections. By the end, you’ll be well-equipped to manage your digital images with confidence, ensuring they look their best while remaining perfectly optimized for their intended use.
Understanding the JPEG Format: The Digital Standard for Images
Before diving into the “how-to,” it’s essential to grasp what makes JPEG so prevalent and what considerations come with its use. The JPEG format is a cornerstone of digital imaging, underpinning much of the visual content we consume daily, from High Resolution Stock Photos to the casual Backgrounds on our phones.
What is JPEG? The Art of Efficient Image Compression
JPEG stands for Joint Photographic Experts Group, the committee that developed the standard. It’s a method of lossy compression for digital images, which means that when an image is saved as a JPEG, some data is permanently discarded to achieve a smaller file size. This might sound detrimental, but the brilliance of JPEG compression lies in its ability to discard data that is least noticeable to the human eye. It is particularly effective for photographs and other complex images with smooth variations of tone and color, making it ideal for Nature photography, Beautiful Photography, and even Aesthetic image collections.
The magic happens when JPEG algorithms analyze an image and identify redundant information or details that won’t significantly impact visual perception. It then intelligently removes these “less important” pixels, resulting in a substantially smaller file. The degree of compression can be adjusted, offering a sliding scale between file size and image quality. A higher compression level (smaller file size) means more data is discarded, potentially leading to visible artifacts, particularly in areas of sharp contrast or text. Conversely, a lower compression level (larger file size) retains more detail, yielding a higher-quality image that looks closer to the original. This adjustable balance makes JPEG incredibly versatile for a wide array of uses, from web optimization to print-ready Graphic Design assets.
However, it’s crucial to understand when JPEG is not the optimal choice. For images with sharp edges, solid blocks of color, text, or transparent backgrounds (like logos or Digital Art with intricate linework), formats like PNG or GIF are generally preferred. These formats use lossless compression, meaning no data is lost during saving, preserving crisp details and enabling transparency, which JPEG does not support natively (transparent areas would be filled with white or black). Repeatedly saving a JPEG file can also degrade image quality further with each save, as new compression is applied. Therefore, for Photo Manipulation or any Digital Photography work involving multiple editing passes, it’s best to work with a lossless format (like TIFF or the original RAW) and save to JPEG only for the final output.
The ‘JPG’ vs. ‘JPEG’ Distinction: A Legacy of File Systems
You might often see both .jpg and .jpeg used interchangeably, and indeed, they refer to the exact same image format. The distinction is purely historical, a remnant of older operating systems like MS-DOS. In those days, file extensions were limited to three characters. When the JPEG standard was introduced, it needed to fit this .jpg limitation. Macintosh and Unix-based systems didn’t have this restriction and typically used .jpeg.
As modern operating systems evolved, this limitation disappeared, and both .jpg and .jpeg became equally valid and widely accepted. Functionally, there is absolutely no difference between a file named image.jpg and one named image.jpeg. Software and web browsers treat them identically. So, whether you save your Abstract art or Sad/Emotional Backgrounds with .jpg or .jpeg, your digital devices and online platforms will recognize and display them just fine. This legacy detail, while seemingly minor, is a common point of confusion that’s easily clarified.
Navigating Common Conversion Scenarios
The ability to convert various image types into the universally accepted JPEG format is a fundamental skill for anyone working with digital media. From quick, on-the-go adjustments to more sophisticated Digital Photography and Visual Design workflows, there are numerous tools and techniques at your disposal. This section will walk you through the most common methods, leveraging both built-in system functionalities and dedicated Image Tools to ensure your images are perfectly formatted for your needs, whether for High Resolution Stock Photos or Aesthetic web content.
Converting via Web Browsers and Online Tools
For flexibility and ease of use across different devices, online converters are often the go-to solution. They eliminate the need for software installation and can handle a vast array of input formats, making them perfect for quick conversions on Android, iPhone, iPad, Mac, Windows, or Linux.
How it Works:
- Choose a Web Converter: Perform a web search for phrases like “convert PNG to JPG online” or “convert TIFF to JPG online.” Popular and reliable
Image ToolsincludeOnline-Convert,CloudConvert,Convertio, andHiPDF. Ensure the site supports your specific input file type (e.g., someRAWfiles might be too large or niche for simpler converters, requiring specializedDigital Photographysoftware). - Upload Your Image: Look for a button typically labeled “Choose file,” “Upload,” or “Drag & Drop.” Navigate to your image file on your device and select it. Some converters also allow you to paste a URL if your image is already hosted online, which is convenient for
Image Inspirationgathering. Always review the site’s terms and privacy policy before uploading sensitive or large files. - Verify Output Settings: Most converters will default to JPEG if that’s what you selected initially. However, always double-check the dropdown menu or selection button to ensure “JPEG” or “.JPG” is chosen. Many tools also offer options to adjust image
quality(e.g., a slider from 1-100) andsize(dimensions in pixels). This is crucial for optimizingWallpapersorBackgroundsfor specific screen resolutions, or for preparingStock Photosto meet platform requirements. - Convert and Download: Click the “Convert” or “Save” button to initiate the process. Conversion time will vary based on file size and your internet speed. Once complete, the converted JPEG will either automatically download to your browser’s default download location or prompt you to choose a save location.
Considerations for Online Converters:
- File Size Limits: Free online tools often have maximum file size limitations. For very large
High ResolutionDigital Photographyfiles (e.g., multi-megabyte TIFFs), you might need premium services or desktop software. - Privacy: Be mindful of uploading personal or confidential images to third-party online services.
- Data Usage: When using a mobile device, prefer Wi-Fi to your mobile data plan, as image files can be quite large, leading to unexpected data charges.
Saving Images as JPEG on Windows with Paint
For Windows users, the simplest method for basic image conversion is often the pre-installed Microsoft Paint. It’s an accessible tool that doesn’t require any additional downloads, making it an excellent choice for straightforward conversions of Images for everyday use.
How to Convert:
- Open Paint: Press
⊞ Win + Sto open the Windows search box, type “paint,” and click on “Paint” when it appears in the search results. This works on Windows 10/11. - Open Your Image: Go to the “File” menu, select “Open,” and navigate to the image file you wish to convert on your computer. Click “OK” to open it in Paint.
- Initiate “Save As”: Click “File,” then hover over or click the arrow next to “Save As.” A list of common image types will appear.
- Select JPEG: Choose “JPEG picture” from the options. A “Save As” dialog box will appear, allowing you to choose a folder, rename the file, and confirm the “Save as type” (which should be JPEG).
- Rename and Save: Optionally, rename your file. Ensure your desired folder is selected, then click “Save.” Your image is now converted to JPEG.
This method is ideal for quick, simple conversions and minor adjustments to Digital Photography that don’t require advanced editing features.
Converting Image Files on Mac using Preview
Mac users have an equally convenient built-in solution: Preview. This versatile application, pre-installed on macOS, can open and convert nearly any image file type, offering a straightforward path to saving your Images as JPEGs. It’s particularly useful for handling High Resolution files from Beautiful Photography before sharing.
How to Convert:
- Open Image with Preview:
Ctrl + click(or right-click) on your image file in Finder. Select “Open With” and choose “Preview.” The image must be saved on your computer first. If Preview struggles with an obscure file type, consider an online converter or GIMP. - Access Export Option: Go to the “File” menu in the top menu bar and select “Export.” A dialog box with various export settings will appear.
- Change Format to JPEG: In the “Format” dropdown menu, select “JPEG.” You will also see options to adjust the “Quality” and “Resolution.” For
High ResolutionPhotography, you can maintain higher quality, but be mindful that higher quality and resolution result in larger file sizes. Adjust these settings to suit your needs (e.g., lower quality for webBackgrounds, higher for printVisual Design). - Rename and Save: Ensure your file name ends with
.jpg(case-insensitive). Choose a saving location you’ll remember. Click “Save” to complete the conversion.
Preview offers a robust solution for managing Digital Photography and Image Collections on Mac, including basic Editing Styles adjustments prior to export.
Advanced Image Conversion with GIMP (PC, Mac or Linux)
For users seeking more control, advanced Editing Styles, or needing to convert less common image types that might not be supported by basic software or online tools, GIMP (GNU Image Manipulation Program) is an excellent free and open-source option. It’s a powerful Image Tool comparable to commercial software, suitable for Digital Art, Photo Manipulation, and High Resolution Digital Photography.
How to Convert:
- Get GIMP: If you don’t have it, download and install GIMP from its official website (
gimp.org). - Open Your Image: Launch GIMP, then go to “File” > “Open.” Navigate to your image file and click “Open” again to import it.
- Export as JPEG: Unlike Paint or Preview, GIMP uses an “Export As” function for format conversion. Click “File” > “Export As.” A dialog box will appear.
- Choose JPEG File Type: In the “Select File Type (By Extension)” section, scroll down and select “JPEG image.”
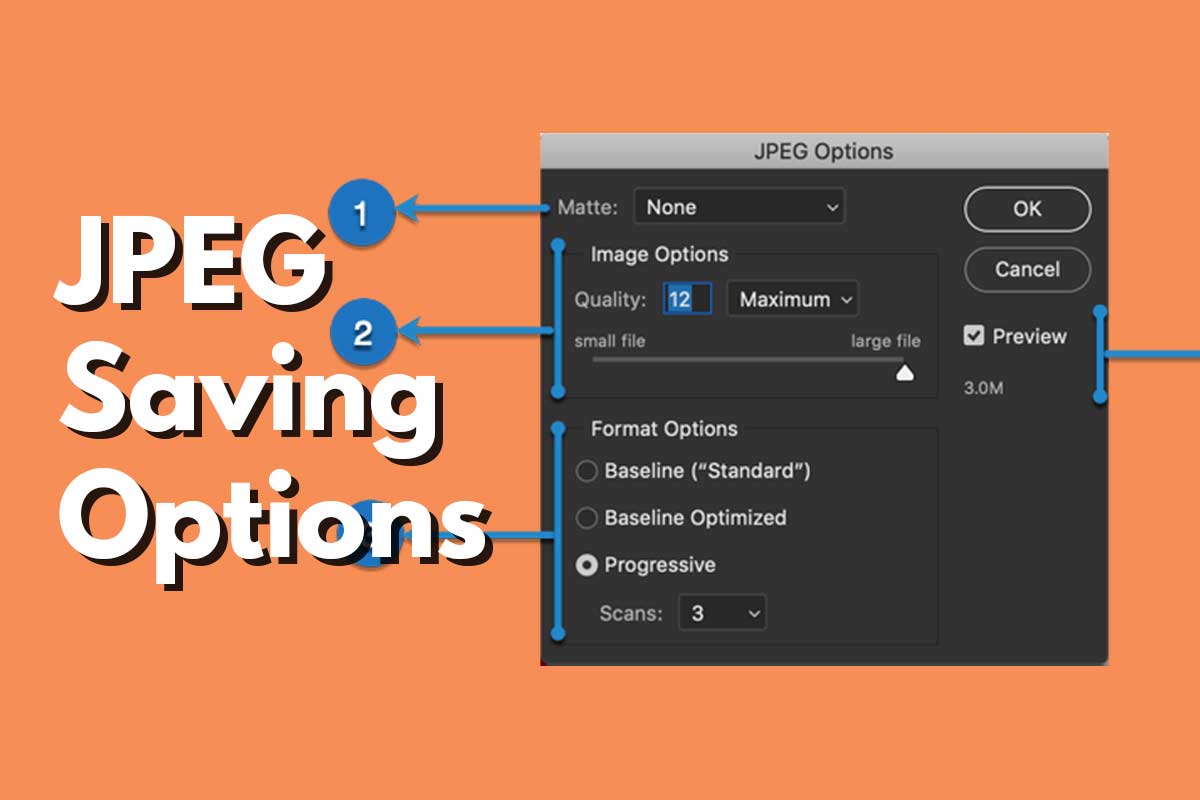
- Modify JPEG Options: A new dialog box, “Export Image as JPEG,” will pop up. Here, you have granular control over the JPEG output.
- Quality Slider: Adjust the “Quality” slider (typically 0-100). A higher number means better quality but a larger file size. It’s often helpful to check “Show preview in image window” to see the immediate effect of your quality adjustments, ensuring a balance between visual fidelity (e.g., for
Beautiful Photography) and file size (forWallpapers). - Subsampling: For advanced users, options like chroma subsampling (
1x1,2x1,2x2) affect how color information is compressed.2x2(the default for many web images) offers more compression with minimal perceived loss. - Progressive: Consider enabling “Progressive” for web images. This loads the image in passes, appearing blurry initially and then sharpening, which can improve perceived loading times for
BackgroundsandAestheticcontent online.
- Quality Slider: Adjust the “Quality” slider (typically 0-100). A higher number means better quality but a larger file size. It’s often helpful to check “Show preview in image window” to see the immediate effect of your quality adjustments, ensuring a balance between visual fidelity (e.g., for
- Final Export and Save: Click “Export.” Another box will appear for you to choose a new file name and location. The
.jpgextension will already be appended. Find a memorable folder and click “Save” to finalize the conversion.
GIMP provides the robust features needed for Photo Manipulation and detailed Graphic Design work before exporting to JPEG.
Special Cases: Saving from Specific Applications
Beyond general image files, you’ll often need to save JPEGs from documents or Digital Art software. This is particularly relevant for Visual Design and Creative Ideas where preserving specific layouts or vector graphics as raster images is necessary.
Saving a Word Document as JPEG (Tophinhanhdep.com Recommends Screenshot Method)
While Microsoft Word is primarily a text editor, there are times you might want to share a document as an image – perhaps for a Mood Board, a Creative Idea presentation, or embedding it on a website. Word documents cannot be directly saved as JPEGs through a “Save As” option in the same way an image editor can. Tophinhanhdep.com recommends the screenshot method for the most reliable results in preserving visual formatting.
Method 1: Screenshot (Recommended by Tophinhanhdep.com)
- Prepare the Document: Open your Word document. Ensure all formatting, layouts, fonts, and
Digital Artelements are exactly as you want them to appear in the JPEG. Zoom in or out to capture the desired area without excessive white space. - Take a Screenshot:
- Windows: Use the Snipping Tool (search “Snipping Tool”) or Snip & Sketch (Windows 10/11:
⊞ Win + Shift + S). Click “New,” then drag your cursor to select the portion of the document you want to capture. The screenshot will be copied to your clipboard. - Mac: Use
Shift + Command + 4, then drag to select the area. The screenshot will save to your desktop.
- Windows: Use the Snipping Tool (search “Snipping Tool”) or Snip & Sketch (Windows 10/11:
- Save as JPEG:
- Windows: Open Paint (or an image editor like GIMP). Paste the screenshot (
Ctrl + V). Then, go to “File” > “Save As” and choose “JPEG.” - Mac: The screenshot is already a file on your desktop (usually PNG). Open it with Preview, then “File” > “Export,” and choose JPEG as the format.
- Online Converters: Alternatively, upload the screenshot file to an
online image converter(as described above) and convert it to JPEG.
- Windows: Open Paint (or an image editor like GIMP). Paste the screenshot (
- Verify: Open the saved JPEG to ensure all text,
Images, and formatting are intact and legible. Adjust resolution or recapture if necessary.
This method provides precise control over what part of the document becomes the image, invaluable for Visual Design presentations.
Saving an Adobe Illustrator File as JPEG
For Graphic Design professionals and Digital Art creators, Adobe Illustrator is a staple. Saving vector-based AI files as raster JPEGs is a frequent requirement for client proofs, web assets, or final flattened outputs. The key here is to use “Export As” instead of “Save As.”
How to Export:
- Open Illustrator File: Open your
.aifile in Adobe Illustrator. - Go to Export: In the overhead menu, navigate to “File” > “Export” > “Export As.”
- Name and Format: In the “Export As” dialog box:
- Type your desired file name in the “Save As” field.
- From the “Format” dropdown menu, select “JPEG (jpg).”
- Use Artboards: Crucially, check the “Use Artboards” option. You can select “All” to export all artboards as separate JPEGs or “Range” to specify particular artboards (e.g.,
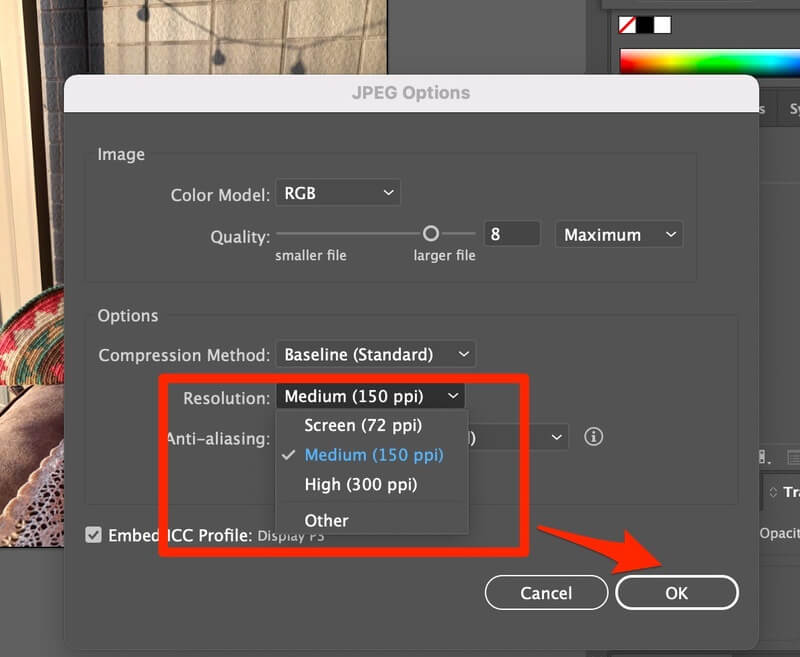
2-3for artboards 2 through 3). This is particularly useful for projects with multipleCreative Ideasor design variations on different artboards. - JPEG Options: Click “Export.” A “JPEG Options” dialog box will appear, offering critical settings:
- Color Model: Choose “CMYK” for print (
Graphic Design) and “RGB” for screen/web (Digital Artfor online platforms). - Quality: Adjust the slider (0-10). A higher number means better quality.
- Resolution: Select “Screen (72 ppi)” for web/screen display (perfect for
AestheticBackgroundsandWallpapers), “Medium (150 ppi)” for some large, simple prints, or “High (300 ppi)” for high-quality printing (Beautiful Photographyin print, detailedVisual Design). - Anti-aliasing: Select “Art Optimized (Supersampling)” for best text and line quality.
- Color Model: Choose “CMYK” for print (
- Click OK: Once satisfied with your settings, click “OK” to save your AI file as a JPEG.
This process is fundamental for converting Digital Art into shareable Images while maintaining creative control over output quality.
Saving a PDF as JPEG
Converting PDFs to JPEGs is another common task, useful for extracting specific pages as Images, creating Mood Boards from document content, or embedding PDF content into web pages. Dedicated Image Tools are typically required for this.
Methods:
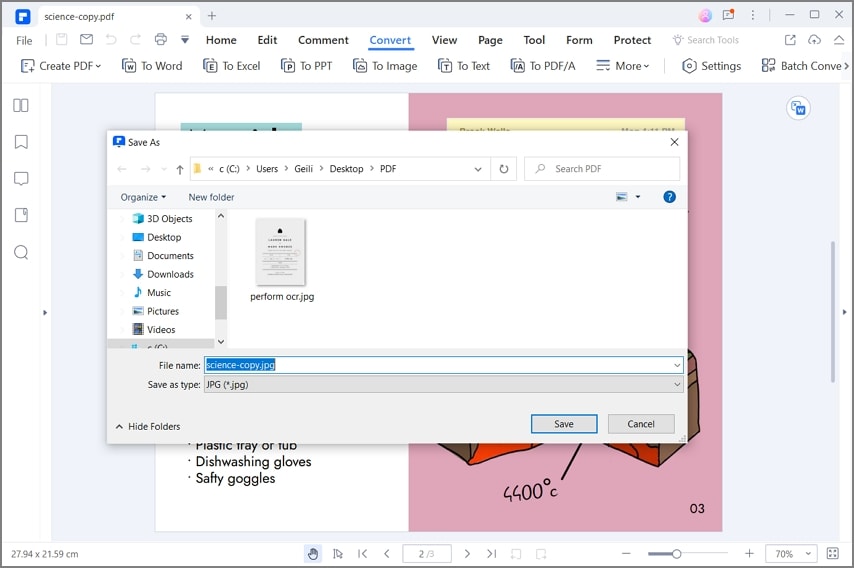
- Using Desktop PDF Converters (e.g., Wondershare PDFelement, Adobe Acrobat):
- Open PDF: Open your PDF file in the software.
- Convert Option: Look for a “Convert” or “Export” function. Select “To Image” or directly “JPEG” as the output format.
- Settings: Many tools, like Wondershare PDFelement, offer advanced settings:
- Image Quality: Adjust JPEG compression.
- Page Range: Select specific pages to convert.
- Output Per Page: Choose whether to save each PDF page as a separate JPEG image or combine all pages into a single long image. This is excellent for
Image Collectionsfrom multi-page documents.
- Save: Choose your save location and click “Save.”
- Using Mac Preview: For Mac users, Preview can also convert PDFs to JPEGs.
- Open with Preview: Right-click the PDF, “Open with” > “Preview.”
- Export: “File” > “Export.”
- Format: Select “JPEG,” adjust quality/resolution, and save. You can also apply “Quartz Filter > Decrease File Size” for smaller JPEGs.
- Using Online PDF to JPG Converters (e.g., HiPDF):
- Go to Tool: Navigate to an online PDF to JPG converter (e.g.,
HiPDF.com). - Upload: Choose and upload your PDF document.
- Convert: Select JPG as the output, click “Convert.”
- Download: Save the converted JPEG to your device.
- Go to Tool: Navigate to an online PDF to JPG converter (e.g.,
These methods, utilizing specialized Image Tools, ensure efficient conversion of document-based Images into shareable JPEG formats.
Optimizing Your JPEGs: Quality, File Size, and Web Performance
Once you know how to save an image as a JPEG, the next step is to master its optimization. The balance between file size and Image quality is a critical aspect of Digital Photography, Visual Design, and effective Image Inspiration & Collections, especially in a world that demands fast loading times and efficient storage.
Balancing Quality and Compression
The lossy nature of JPEG compression means that every time you save an image as a JPEG, you’re making a trade-off.
- High Quality (Low Compression): Retains more
High Resolutiondetail, making yourBeautiful Photographyshine. The file size will be larger, which is acceptable for print or archival purposes, but can slow down websites. - Low Quality (High Compression): Significantly reduces file size, ideal for web
Backgrounds,Wallpapers, and quick sharing ofAestheticImages. However, it can introduce visible compression artifacts (blockiness, blurriness) that detract from the visual integrity ofDigital Artor detailed photos.
For most web-based uses (e.g., Stock Photos on a website, Mood Boards for clients, social media uploads), a quality setting of 60-80% is often a good compromise. Visually, the difference from 100% might be imperceptible to the average viewer, but the file size reduction can be substantial, making your Image Collections load much faster. Experimentation is key to finding the sweet spot for your specific Editing Styles and content.
The Role of Image Tools: Compressors and Optimizers
Beyond the “Save As” or “Export As” options in your software, specialized Image Tools exist solely for optimizing JPEGs. These Compressors and Optimizers analyze your JPEG files and apply advanced techniques to further reduce file size without a noticeable drop in perceived quality.
- Online Optimizers: Tools like
TinyPNG(which also works for JPEGs),JPEGmini, orOptimizillacan often shrink file sizes by another 20-50% after initial JPEG export. They are perfect for preparingWallpapers,Backgrounds, andStock Photosfor online publication. - Desktop Software: Professional
Photo Manipulationsoftware often includes export modules with advanced optimization features, allowing for precise control over compression algorithms and metadata stripping. - AI Upscalers (Brief Mention): While not direct JPEG optimizers,
AI Upscalerscan improve the resolution and detail of lower-qualityImagesbefore they are saved as JPEGs. This means you start with a better base image, allowing for more aggressive JPEG compression later while still maintaining decent visual quality. They are especially useful for reviving olderDigital PhotographyorCreative Ideasthat might have been saved at low resolution.
Web-Friendly JPEGs for Online Content
Optimizing JPEGs for the web is crucial for user experience and search engine optimization (SEO). Fast-loading Images directly contribute to a positive browsing experience, especially for rich visual content like Aesthetic blogs, Nature photography galleries, or Digital Art portfolios.
- Dimensions: Save
Imagesat the exact dimensions they will be displayed on the web. AHigh Resolutionimage that is scaled down by the browser still downloads its full, larger file size. - Progressive JPEGs: As mentioned with GIMP, progressive JPEGs load in a blurry-to-sharp sequence, giving users an immediate (albeit low-res) view of the image, rather than a blank space, which improves perceived loading speed for large
BackgroundsorBeautiful Photography. - Metadata: Unless necessary, remove unnecessary metadata (EXIF data, copyright info, etc.) during export, as it adds to file size. Many optimizers handle this automatically.
- CDNs: For
Image CollectionsandStock Photoson larger websites, using Content Delivery Networks (CDNs) can further speed up delivery of your optimized JPEGs to users worldwide.
Best Practices for Digital Image Workflow
Effective image management extends beyond mere conversion. Integrating JPEGs intelligently into your broader Digital Photography and Visual Design workflows ensures efficiency, preserves creative integrity, and supports robust Image Inspiration & Collections.
Managing Image Formats in Photography & Design
Understanding when to use each format is paramount:
- RAW: Always capture
Digital Photographyin RAW (if your camera supports it). Thislosslessformat captures the most data, providing maximum flexibility forEditing StylesandPhoto Manipulationwithout initial quality loss. Convert to JPEG only after all edits are final. - TIFF: Ideal for archival, professional printing, and intermediary
Photo Manipulationsteps wherelosslessquality is critical, especially forHigh ResolutionStock Photos. TIFF files are large but preserve every detail. - PNG: Best for
Digital Art, logos, graphics with sharp lines, text overlays, and anything requiring transparency. While larger than JPEGs, they are essential for non-photographicVisual Designelements. - JPEG: The final output format for almost all photographic
Imagesintended for sharing, web display (Wallpapers,Backgrounds,Aestheticcontent), and general use, thanks to its efficient compression.
Always perform non-destructive editing (Editing Styles that don’t permanently alter the original image) by working on copies or using layers, so you can always return to your original RAW or TIFF file.
Organizing Your Image Collections
A well-structured system for your Image Collections is vital for creative efficiency and data preservation.
- Consistent Naming: Implement a consistent naming convention (e.g.,
YYYY-MM-DD_EventName_ImageTitle.jpg). This makes it easy to find specificImageswithin largePhoto IdeasorThematic Collections. - Folder Structure: Organize
Imagesinto logical folders (e.g., by date, event, project, client,Mood Boardtheme). - Backups: Before any conversion or significant
Photo Manipulation, always back up your originalHigh Resolutionfiles. This protects yourBeautiful PhotographyandDigital Artfrom accidental loss or corruption during conversion processes. Cloud storage or external hard drives are excellent options.
Leveraging JPEGs for Creative and Commercial Use
The versatility of JPEGs makes them indispensable across various creative and commercial applications:
- Stock Photos: JPEGs are the standard submission format for most
Stock Photoagencies. Ensuring yourHigh ResolutionJPEGs meet quality and file size requirements is key to getting yourBeautiful Photographyapproved and sold. - Visual Design & Digital Art: Use JPEGs for client proofs, web banners, social media graphics, and flattened artwork for final delivery. Their compatibility and smaller file sizes make review and distribution efficient.
- Image Inspiration & Trending Styles: JPEGs are perfect for quickly creating and sharing
Mood Boards, compilingPhoto Ideas, or showcasingTrending Styleswith colleagues and clients. Their universal viewability ensures everyone can access your visual concepts instantly.
Conclusion
The JPEG format is an indispensable component of the digital imaging landscape, offering an optimal blend of image quality and manageable file size. Mastering the art of saving Images as JPEGs is a foundational skill for anyone engaging with Digital Photography, Visual Design, or simply managing personal Image Collections. Whether you’re using intuitive web Image Tools, native operating system applications like Paint or Preview, or powerful Digital Art software like GIMP and Adobe Illustrator, the methods outlined in this guide empower you to convert and optimize your visuals effectively.
Remember the key takeaways: choose the right tool for the job, understand the trade-offs between quality and file size, and always back up your original High Resolution files. By applying these techniques and best practices, you can ensure your Wallpapers, Backgrounds, Aesthetic shots, Nature photography, Abstract creations, Sad/Emotional moments, and Beautiful Photography are perfectly prepared for any platform, purpose, or audience. Embrace the power of JPEG to streamline your workflow and unlock the full potential of your Creative Ideas and Image Inspiration.
For more tips and resources on optimizing your digital images and exploring creative visual content, visit Tophinhanhdep.com.