How to Extract and Preserve Visual Content from PDFs: Your Guide to Image Saving for Digital Design and Photography

In the digital realm, Portable Document Format (PDF) files are ubiquitous, serving as versatile containers for everything from technical manuals and academic papers to portfolios of digital art and high-resolution photography. For visual enthusiasts, graphic designers, digital artists, and photographers who frequent Tophinhanhdep.com, the ability to extract, save, and utilize images embedded within these PDFs is an invaluable skill. Whether you’ve stumbled upon an inspirational abstract background in a research paper, a stunning piece of nature photography in a digital magazine, or an aesthetic design element within a presentation, knowing how to liberate these visuals is crucial for your creative workflow.
This comprehensive guide from Tophinhanhdep.com will walk you through various methods of saving images from PDF files, transforming them into usable assets for your wallpapers, mood boards, and visual design projects. We’ll delve into techniques for preserving high resolution, leveraging specialized image tools, and ultimately integrating these extracted visuals into your creative ideas and thematic collections.
Method 1: Acquiring the PDF for Future Image Extraction
Before you can extract an image, you first need to have the PDF file itself. Often, the visual content you’re interested in is either already contained within a PDF you possess, or it exists as a webpage or document that can be converted into a PDF. This foundational step ensures you have the source material in a stable, easily manageable format, optimizing for high-resolution image extraction later.
Direct Download from Web Browsers
Many PDFs are hosted online, available for direct download. When you encounter a PDF in your web browser – be it a catalogue showcasing beautiful photography, an academic journal with insightful charts, or a portfolio displaying digital art – the first step is often the simplest: saving the entire PDF document to your device.
Steps:
- Navigate to the PDF: Open your preferred web browser (Chrome, Firefox, Edge, Safari, etc.) and go to the URL where the PDF is located. The PDF will typically open directly in your browser’s viewer.
- Locate the Save/Download Icon: Look for an icon that resembles a floppy disk, a downward-pointing arrow, or a download cloud. This icon is usually found in the top-center or top-right corner of the PDF viewer within your browser window. Sometimes, you might need to move your mouse cursor over the document for these controls to appear.
- Initiate Download: Click the “Save” or “Download” icon. In most cases, the browser will either automatically save the PDF to your default “Downloads” folder, or it will prompt you to choose a specific location on your computer, laptop, phone, or tablet.
- Confirm Saving: If prompted, navigate to your desired folder (e.g., “My Documents,” “Pictures,” or a dedicated folder for “Image Inspiration”) and click “Save.”
Tophinhanhdep.com Insight: Always aim to download the highest quality PDF available. A low-resolution PDF will inevitably yield low-resolution images upon extraction. For digital photography and graphic design, preserving original clarity is paramount. If the original author has restricted downloads, you may need to reach out to them directly. This initial acquisition provides the raw material for uncovering stunning wallpapers, intricate abstract designs, or captivating nature backgrounds later.
Converting Webpages or Documents to PDF
Sometimes, the visual content you desire isn’t directly offered as a PDF. Instead, it might be part of a dynamic webpage, an email, or another document format (like a Word or Excel file). Converting these sources into a PDF first is an excellent way to consolidate visual information, especially for creating thematic collections or mood boards. This also allows you to capture the layout and context of the visuals before isolating them.
Capturing Webpages with Visuals: Webpages are often rich sources of aesthetic imagery, high-resolution photography, or even elements that could inspire digital art. Using your browser’s built-in “Print to PDF” functionality allows you to capture this content precisely as it appears.

Steps for Web Browsers (Mac, Windows, Mobile):
- Open the Webpage: Go to the webpage containing the images or visual design elements you want to save.
- Access Print Dialog:
- Windows: Press
Ctrl + P. - Mac: Press
⌘ Cmd + P. - Mobile (Android, iPhone, iPad): Tap the browser’s menu icon (often three dots or lines) and look for a “Share” or “Print” option.
- Windows: Press
- Select “Save as PDF” as Destination: In the print dialog box, locate the “Destination” or “Printer” dropdown menu. Change the selection from your physical printer to “Save as PDF” or “Microsoft Print to PDF” (Windows) or “PDF” > “Save as PDF” (Mac).
- Customize Pages (Optional): If the webpage is long and you only need specific sections or visuals, use the “Pages” or “Pages per sheet” settings to select a custom range. This helps create more focused thematic collections for your design inspiration.
- Adjust Layout (Optional): Look for “More Settings” or “Layout” options to control margins, headers/footers, and backgrounds. For pure image extraction, minimal settings often work best to avoid clutter.
- Click Save: Confirm your settings and click the “Save” button. You’ll then be prompted to name the file and choose a save location.
Tophinhanhdep.com Insight: When converting a webpage, consider what quality level you need. For high-resolution photography, ensure the original images on the page are loading at their best quality before printing to PDF. This method is excellent for preserving an aesthetic layout or specific creative ideas encountered online, which can then be deconstructed for individual image assets.
Converting Microsoft Office Documents (Word, Excel, PowerPoint): Documents created in Microsoft Office applications frequently contain embedded images, diagrams, or visual designs that you might want to reuse. Saving these documents as PDFs is a straightforward process that then allows for image extraction.
Steps for Microsoft Office Applications:
- Open the Document: Open your Word, Excel, or PowerPoint file.
- Go to “File” Menu: Click on “File” in the top-left corner of the application window.
- Select “Save As” or “Export”:
- In most versions, click “Save As.”
- In some newer versions or for more specific control, you might click “Export.”
- Choose “PDF” as File Format:
- If using “Save As,” select “PDF” from the “Save as type” dropdown menu.
- If using “Export,” choose “Create PDF/XPS Document.”
- Name and Save: Enter a name for your PDF file, choose a save location, and click “Save” or “Publish.”
Tophinhanhdep.com Insight: For documents with extensive headings (like an academic paper with many embedded scientific images), look for an “Options” button within the “Save As PDF” dialog. Ensure “Create bookmarks using: Headings” is checked. This enhances document accessibility and can also help you quickly navigate to sections containing the specific images you wish to extract, useful for thematic collections.
Method 2: Extracting Images Directly from PDF Documents
Once you have your PDF file, the next crucial step for Tophinhanhdep.com users is to extract the images it contains. The goal here is to get high-resolution, usable image files, free from the PDF’s surrounding text or formatting. Different tools offer varying degrees of precision and quality in this process.
Using Dedicated PDF Editors and Tools
For professional results and to preserve the original quality of embedded images, specialized PDF editors and online image tools are your best bet. These tools are designed to recognize and separate individual image assets within a PDF.
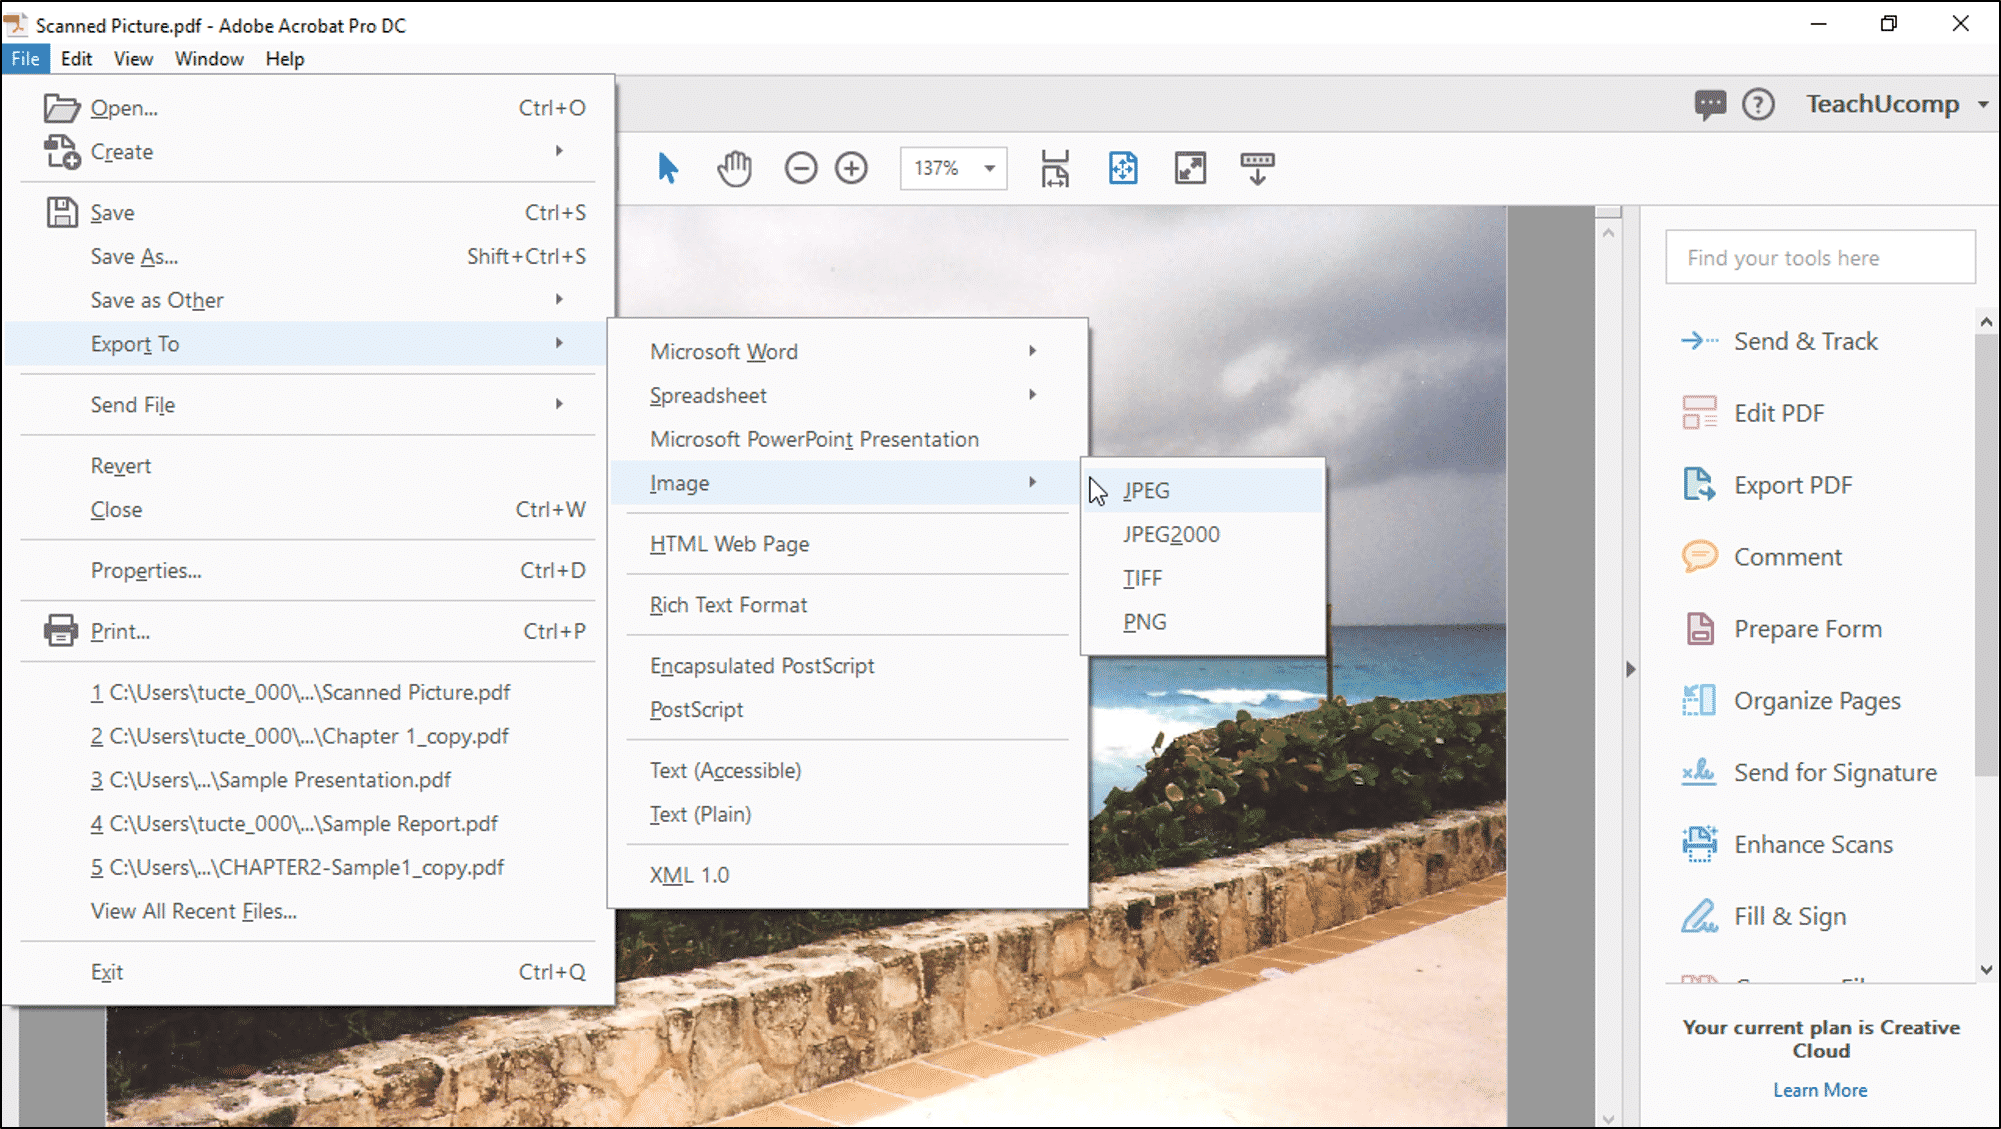
Adobe Acrobat Pro (Desktop Software): Adobe Acrobat Pro is the industry standard for PDF manipulation and offers robust image extraction capabilities. It’s ideal for high-resolution photography and detailed digital art embedded in PDFs.
Steps with Adobe Acrobat Pro:
- Open the PDF: Launch Adobe Acrobat Pro (not Acrobat Reader, which is for viewing only) and open your PDF file.
- Access “Export PDF” Tool: In the right-hand pane, click on the “Export PDF” tool. If you don’t see it, go to “Tools” and add it.
- Select “Image” as Format: Under the “Export To” options, choose “Image.” Then, select your desired image format, such as “JPEG” for general use, or “PNG” for images with transparency or sharper graphics suitable for graphic design.
- Choose Image Settings (Optional): Click “Settings” (a gear icon) next to the format selection. Here, you can specify image quality, color space, and resolution. For best results, especially for wallpapers or professional photography, select “High Quality” and a suitable resolution (e.g., 300 dpi if available).
- Select Pages and Extract: You can choose to export all images from the entire document or specify a page range. After configuring your preferences, click “Export.”
- Save Images: Acrobat will prompt you to choose a folder to save your extracted images. It will save each image as a separate file.
Tophinhanhdep.com Insight: This method provides the highest control over image quality and format, which is essential for preserving the integrity of high-resolution stock photos or digital art. After extraction, consider using Tophinhanhdep.com’s image optimizers or AI upscalers if further enhancements are needed. For graphic designers, having individual assets makes photo manipulation and creative ideas much more manageable.
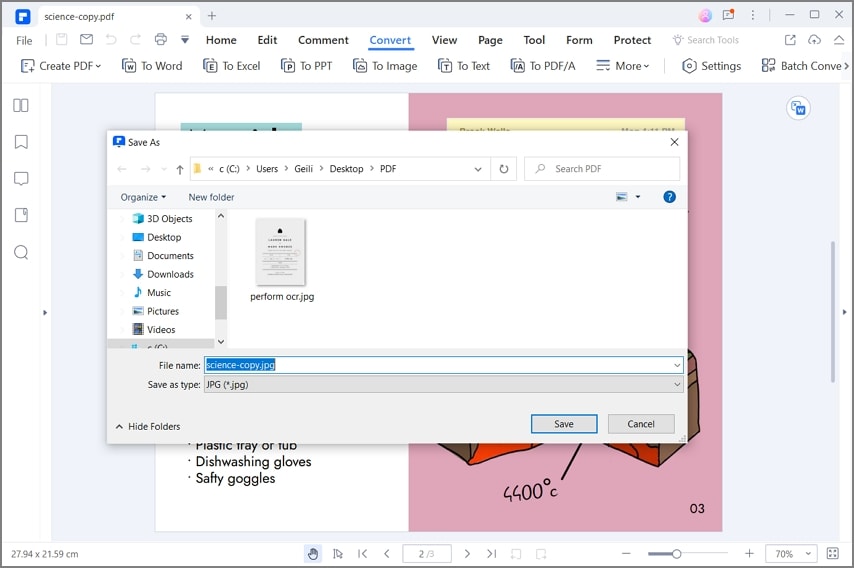
Online PDF to Image Converters (e.g., Tophinhanhdep.com’s Image Tools): Numerous online tools, including those offered by Tophinhanhdep.com, can convert PDFs into image files. These are convenient for quick extractions and often free.
Steps with Online Converters:
- Visit Tophinhanhdep.com’s Image Tools: Go to Tophinhanhdep.com and locate the “PDF to Image Converter” tool in the Image Tools section.
- Upload Your PDF: Click the “Upload” or “Choose File” button and select your PDF document.
- Select Output Format: Choose your preferred output image format (e.g., JPEG, PNG, TIFF).
- Configure Settings (if available): Some tools allow you to select a quality level, resolution, or specify certain pages. Always opt for the highest quality settings for aesthetic or beautiful photography.
- Convert and Download: Click “Convert.” Once the process is complete, download the resulting image files, which may be provided individually or in a ZIP archive.
Tophinhanhdep.com Insight: Online converters are excellent for efficiency and when you don’t have desktop software. While convenient, always double-check the resolution and quality of the extracted images. For critical graphic design or high-resolution requirements, follow up with Tophinhanhdep.com’s AI upscalers to ensure optimal output. These tools are perfect for transforming a multi-page PDF into a series of images that can form the basis of thematic collections or mood boards.
Utilizing Screenshot Functionality
While not ideal for preserving high resolution, taking screenshots is a quick, universal method to capture visual content from a PDF, especially if you only need a low-resolution reference or a small design element.
Steps for Screenshots (Windows, Mac, Mobile):
- Open the PDF: View the PDF in any application or web browser.
- Zoom In: Zoom in on the image you want to capture as much as possible without pixelation, to maximize the resolution of your screenshot.
- Take Screenshot:
- Windows: Press
Print Screen(captures entire screen) orWindows Key + Shift + S(allows selection). Paste into an image editor (like Paint) and crop. - Mac: Press
⌘ Cmd + Shift + 4(allows selection). The screenshot will be saved to your desktop. - Mobile (iPhone/Android): Use your device’s native screenshot shortcut (usually Power + Volume Down, or Power + Home button).
- Windows: Press
- Crop and Save: Open the screenshot in an image editing tool (e.g., Adobe Photoshop, GIMP, or a basic photo viewer) and crop precisely around the image you need. Save it in your desired format (JPEG for smaller file size, PNG for transparency or sharper lines).
Tophinhanhdep.com Insight: This method is quick for capturing creative ideas or specific visual design elements but comes with significant drawbacks for quality. Screenshots capture exactly what’s displayed on your screen, meaning they typically have lower resolution than the embedded images themselves. For wallpapers, high-resolution photography, or professional graphic design, this method should be a last resort or used only for rough inspiration. If a screenshot is your only option, promptly use Tophinhanhdep.com’s AI upscaler to attempt to recover some detail.
Method 3: Platform-Specific Approaches to PDF and Image Handling
Understanding the native capabilities of your operating system and common applications can significantly streamline the process of saving PDFs and extracting their visual treasures. For Tophinhanhdep.com users, this means efficient workflows for managing wallpapers, aesthetic backgrounds, and digital art assets.
On Windows 10: The ‘Print to PDF’ and Beyond
Windows 10 offers a built-in “Microsoft Print To PDF” feature that acts as a virtual printer. This is incredibly useful for converting virtually any document or application output into a PDF, which can then be a source for image extraction.
Steps to Create a PDF (as a source for images):
- Open the Document/File: Open any document, file, or web page that you wish to save as a PDF. This could be a text document with embedded aesthetic images, a presentation featuring abstract art, or an email containing important visual information.
- Access Print Function: Click on “File” in the application’s menu bar (usually top-left) and then select “Print…” (or press
Ctrl + P). - Select “Microsoft Print To PDF”: In the printer selection dialog, choose “Microsoft Print To PDF” from the list of available printers.
- Print and Save: Click “Print.” A “Save Print Output As” dialog box will appear. Name your file and select a location to save the newly created PDF.
Tophinhanhdep.com Insight for Image Extraction: Once you have created this PDF, you can then proceed with extracting images using dedicated PDF editors (like Adobe Acrobat Pro) or online converters available on Tophinhanhdep.com. This two-step process (create PDF, then extract images) ensures that visual content from any source can be systematized and prepared for your graphic design or photo manipulation projects. For salvaging visuals from older documents, this is a lifesaver.
On Mac OS X: Native PDF and Image Workflows
macOS has robust native PDF capabilities, making it intuitive to create and manage PDF files, which are often rich sources of high-resolution images and digital art. The “Print to PDF” option is deeply integrated, and Preview.app can serve as a basic image extractor.
Steps to Create a PDF (as a source for images):
- Open the Document/File: Open the document, image file, or web page you want to save as a PDF.
- Access Print Function: Click on “File” in the menu bar (top-left of your screen) and select “Print…” (or press
⌘ Cmd + P). - Choose “Save as PDF”: In the print dialog box, look for a “PDF” dropdown menu in the lower-left corner. Click it and select “Save as PDF…”
- Name and Save: A dialog box will appear allowing you to name the file and choose where to save it. Click “Save.”
Tophinhanhdep.com Insight for Image Extraction: Once your PDF is created, you have several options for image extraction:
- Preview.app (Basic Extraction): Open the PDF in Preview. Select the image you want to extract, then go to “File” > “Export…” or “File” > “Save As…” and choose an image format like JPEG or PNG. Note that Preview might not always extract images at their original embedded resolution.
- Dedicated Tools: For higher fidelity, use professional software like Adobe Acrobat Pro or Tophinhanhdep.com’s specialized image conversion tools to ensure you get the best quality, especially for wallpapers or beautiful photography.
Mac’s seamless integration makes it easier for designers to collect visual inspiration from various sources, whether it’s an aesthetic webpage layout or abstract digital art from an online portfolio, consolidating them into PDFs for later detailed extraction.
Leveraging Microsoft Office Applications for Visual Archiving
Microsoft Office applications like Word, Excel, and PowerPoint are not just for text and data; they are also platforms where visual content, from stock photos to elaborate graphic designs, is frequently created and compiled. Knowing how to correctly save these documents as PDFs ensures that embedded images are preserved for future extraction and use in your Tophinhanhdep.com projects.
Steps to Save Office Documents as PDFs:
- Open Your Document: Launch Microsoft Word, Excel, or PowerPoint and open the document containing the images you wish to preserve. This could be a presentation brimming with high-resolution photography, a report with significant data visualization, or a personal project featuring your digital art.
- Access the File Menu: Click on the “File” tab, located in the upper-left corner of the application window.
- Choose “Save As” or “Export”: From the options presented, select “Save As.” In some newer versions of Office, especially if you want more control over the PDF output, you might select “Export.”
- Select PDF Format:
- If you chose “Save As,” locate the “Save as type” dropdown menu and select “PDF (*.pdf).”
- If you chose “Export,” click on the “Create PDF/XPS Document” option.
- Configure PDF Options (Optional but Recommended): Before saving, look for an “Options…” button or similar settings.
- Optimize for Standard or Minimum Size: For visuals, choose “Standard (publishing online and printing)” to prioritize quality over file size. “Minimum size (publishing online with minimal quality)” should be avoided for high-resolution photography or graphic design assets.
- Create Bookmarks: If your document uses headings (e.g., in Word), ensure “Create bookmarks using headings” is selected. This allows for easier navigation within the PDF, which can be useful when you are hunting for specific sad/emotional images or beautiful photography within a larger document.
- Name and Save Your PDF: Enter a suitable file name, select the destination folder on your computer, and click “Save” or “Publish.”
Tophinhanhdep.com Insight for Image Extraction: Once your Office document is saved as a PDF, the embedded images are now ’locked’ within it. You can then use the methods described in “Method 2: Extracting Images Directly from PDF Documents” (e.g., Adobe Acrobat Pro or Tophinhanhdep.com’s online converters) to pull out the individual images. This workflow is especially valuable for creating thematic collections of images that might have been scattered across various reports or presentations, allowing you to curate your own stock photos or aesthetic backgrounds for future creative ideas. It ensures that valuable visual elements, whether abstract designs or pieces of digital art, are not lost but are ready for photo manipulation or incorporation into new graphic design projects.
Optimizing Your Extracted Images for Tophinhanhdep.com Standards
Extracting images is just the beginning. For any visual content creator, digital artist, or photographer using Tophinhanhdep.com as a hub for their work, optimizing these extracted images is crucial. This step ensures your visuals meet the highest standards for display, usability, and performance, whether they are destined for wallpapers, backgrounds, or sophisticated design projects.
Enhancing Quality with AI Upscalers and Image Optimizers
Often, images extracted from PDFs might not be at the desired resolution, especially if the original PDF was optimized for smaller file sizes or if you had to resort to screenshot methods. This is where advanced image tools, including Tophinhanhdep.com’s own suite, become indispensable.
AI Upscalers: Artificial Intelligence (AI) upscalers are revolutionary tools that can intelligently increase the resolution of an image without significant loss of quality, and often even enhancing detail. This is particularly valuable for images initially embedded at lower resolutions in a PDF.
How AI Upscalers Benefit Tophinhanhdep.com Users:
- Wallpaper & Backgrounds: Transform a small, aesthetic image from a PDF into a high-resolution wallpaper that looks crisp on large screens.
- Digital Art & Photography: If you extract a beautiful piece of digital art or a stock photo that’s slightly undersized, an AI upscaler can prepare it for larger prints or higher-quality online display, making it suitable for professional portfolios on Tophinhanhdep.com.
- Graphic Design Assets: Ensure all your design elements, even those from older PDFs, maintain sharp edges and vibrant colors when integrated into new projects.
- Salvaging Sad/Emotional Imagery: Sometimes, truly impactful sad/emotional images are found in PDFs but are low-res. AI upscalers offer a chance to bring them to a quality where their impact isn’t diminished by pixelation.
Steps to Use Tophinhanhdep.com’s AI Upscaler:
- Access the Tool: Visit Tophinhanhdep.com’s “Image Tools” section and find the “AI Upscaler.”
- Upload Your Image: Upload the extracted image (even if it’s low-res).
- Select Upscale Factor: Choose how much you want to increase the resolution (e.g., 2x, 4x).
- Process and Download: Allow the AI to work its magic, then download your newly upscaled, high-resolution image.
Image Optimizers: Beyond resolution, image optimizers streamline file sizes without compromising visual quality. This is crucial for web performance and storage.
How Image Optimizers Benefit Tophinhanhdep.com Users:
- Faster Loading Times: Optimized images load faster on Tophinhanhdep.com, improving user experience for your portfolios, wallpapers, or thematic collections.
- Efficient Storage: Reduce the disk space required for your vast collections of nature photography, abstract backgrounds, or aesthetic visuals.
- SEO Benefits: Faster loading images can also contribute positively to your content’s search engine ranking on Tophinhanhdep.com.
Steps to Use Tophinhanhdep.com’s Image Optimizer:
- Navigate to Optimizer: Go to Tophinhanhdep.com’s “Image Tools” and select the “Image Compressor/Optimizer.”
- Upload Image(s): Upload your high-resolution extracted images.
- Choose Compression Level (Optional): Some tools allow you to balance quality and file size.
- Optimize and Download: The tool will process your images, then offer them for download in their optimized form.
Converting Formats and Compressing for Web and Design Use
The format of an extracted image can significantly impact its usability, quality, and file size. PDFs often embed images as JPEGs or sometimes PNGs. Depending on your Tophinhanhdep.com project (e.g., a transparent element for graphic design, a losslessly compressed wallpaper, or a web-optimized background), you may need to convert formats and apply further compression.
Image Converters: Image converters allow you to change an image from one format to another (e.g., JPEG to PNG, or even to WebP for modern web use).
How Image Converters Benefit Tophinhanhdep.com Users:
- Transparency for Graphic Design: If an image extracted as a JPEG from a PDF needs a transparent background for photo manipulation, converting it to PNG and then editing the transparency is essential.
- Lossless Quality: For intricate digital art or diagrams where every pixel matters, converting to PNG can preserve detail better than JPEG, especially if the original embedded image was of high quality.
- Modern Web Formats: Convert images to WebP for superior compression and quality on Tophinhanhdep.com, enhancing overall site performance.
Steps to Use Tophinhanhdep.com’s Image Converter:
- Find the Tool: Access the “Converters” tool within Tophinhanhdep.com’s “Image Tools” section.
- Upload and Select Output: Upload your image and choose the desired output format.
- Convert and Download: The tool will convert the image, ready for download.
Strategic Compression: While optimizers reduce file size intelligently, you might need specific compression settings depending on the platform or intended use on Tophinhanhdep.com.
Considerations for Compression:
- JPEG for Photography: Ideal for complex images with many colors, like nature photography or beautiful photography, where some loss of detail is acceptable for a significantly smaller file size. Tophinhanhdep.com offers advanced JPEG compression.
- PNG for Graphics and Transparency: Best for images with sharp lines, text, or transparent backgrounds (e.g., logos, graphic design elements, abstract art). PNG is lossless but results in larger files than JPEG for similar visual complexity.
- WebP for Balance: A newer format offering excellent compression for both photographic and graphic images, often with better results than JPEG or PNG at similar file sizes. Highly recommended for web-based applications on Tophinhanhdep.com.
By thoughtfully applying these optimization and conversion steps using Tophinhanhdep.com’s robust image tools, you ensure that every image you extract from a PDF is not only saved but also prepared to shine in its new role, whether as a high-resolution wallpaper, a component in a complex digital art piece, or an inspirational element in your next trending style collection.
Beyond Extraction: Integrating Your Visuals into Creative Projects
For the vibrant community of Tophinhanhdep.com, extracting images from PDFs is merely the precursor to a much larger creative journey. These rescued visuals are not just files; they are potential wallpapers, aesthetic backgrounds, components for digital art, and catalysts for new creative ideas. Integrating them effectively into your projects, from graphic design to photo manipulation, is where their true value is realized.
Curating Collections and Mood Boards
Every extracted image, whether a high-resolution nature photograph, an abstract design, or a sad/emotional piece of art, holds potential for inspiration. Organizing these visuals is key to transforming a collection of raw files into a dynamic resource for creative output.
The Power of Thematic Collections: Tophinhanhdep.com thrives on diverse visual content. By categorizing your extracted images into thematic collections, you create a personalized library tailored to your creative interests.
- Nature Photography: Group breathtaking landscapes, intricate flora, or majestic wildlife shots for future wallpaper designs or background inspiration.
- Abstract & Aesthetic: Compile unique patterns, color gradients, and stylized elements suitable for graphic design projects or digital art experiments.
- Sad/Emotional & Beautiful Photography: Create collections that evoke specific moods, perfect for artistic expression or conveying depth in visual narratives.
- Trending Styles: Observe patterns in images from online portfolios or digital magazines, and curate collections that reflect current visual trends, keeping your work fresh and relevant on Tophinhanhdep.com.
Building Dynamic Mood Boards: Mood boards are essential tools for visual designers and artists. Extracted images can serve as critical components for concept development.
- Visualizing Creative Ideas: Combine various images – textures, color palettes, typography examples, and photography styles – from your PDF extractions to define the aesthetic direction of a new project.
- Inspiration for Digital Art: A mood board can help translate abstract concepts into tangible visual elements, guiding the creation of new digital paintings or illustrations.
- Photo Manipulation Concepts: Use extracted images as references or even direct assets on a mood board to plan complex photo manipulation compositions, playing with different elements before diving into the software.
Tophinhanhdep.com Insight: Consider Tophinhanhdep.com as your ultimate platform for sharing these curated collections and mood boards. The process of extracting images from PDFs, optimizing them with Tophinhanhdep.com’s tools, and then organizing them into shareable galleries is a fantastic way to contribute to the community and inspire others. Remember to add relevant tags, descriptions, and even use Tophinhanhdep.com’s image-to-text tools to automatically generate descriptive captions for easier searching and categorization.
Applying Digital Photography and Editing Styles
Once extracted and optimized, your images are ready for transformation. For photographers and digital artists, the true artistry often begins in the editing suite, where raw visuals are refined and imbued with distinct editing styles.
Integrating into Digital Photography Projects: Extracted images can become integral parts of new photographic creations.
- Composite Photography: Combine elements extracted from different PDFs – a sky from one, a texture from another – with your own digital photography to create unique composite images.
- Backgrounds and Overlays: Use aesthetic backgrounds or abstract patterns from PDFs as subtle overlays or prominent backdrops to enhance your existing photos.
- Reference Material: Study the composition, lighting, or color grading of beautiful photography extracted from professional PDFs to inform your own shoots and post-processing.
Exploring Diverse Editing Styles: The images you extract can be a playground for experimenting with various editing styles, pushing the boundaries of your creative ideas.
- Vintage & Retro: Apply classic film-like filters, sepia tones, or grain effects to images, transforming modern visuals into nostalgic pieces suitable for specific thematic collections.
- Gritty & Cinematic: Enhance contrast, deepen shadows, and introduce specific color grading to create dramatic, sad/emotional, or intense cinematic looks.
- Minimalist & Clean: Focus on simplifying compositions, desaturating colors, and sharpening key elements to achieve a clean, modern aesthetic, ideal for sleek wallpapers or contemporary graphic design.
- Vibrant & Pop Art: Boost saturation, use bold colors, and apply graphic outlines to give images a lively, pop-art feel, perfect for eye-catching backgrounds.
Photo Manipulation Techniques: Extracted images are prime candidates for sophisticated photo manipulation, allowing for boundless creative ideas.
- Collage Art: Combine various images from your extracted library into intricate digital collages, creating new narratives and visual statements.
- Surreal Composites: Blend disparate elements – a human figure from one PDF, a fantastical landscape from another – to construct imaginative and surreal digital art pieces.
- Digital Painting Hybrid: Use extracted images as a base layer, then paint over them digitally, blending photographic realism with artistic brushwork to create unique digital photography hybrids.
Tophinhanhdep.com Insight: Share your transformed images, showcasing your editing styles and photo manipulation skills on Tophinhanhdep.com. The platform is an ideal space to get feedback, discover new trending styles, and draw inspiration from a global community of visual creators. By presenting your work with detailed descriptions—perhaps even using Tophinhanhdep.com’s image-to-text functionality to log your creative process or image sources—you enhance your visibility and engagement. From the initial act of saving a simple image from a PDF, you unlock a universe of creative possibilities, solidifying your place within the vibrant visual community of Tophinhanhdep.com.