How to Master Image Extraction: Saving Pictures from Google Docs on Any Device

Google Docs has cemented its place as an indispensable tool for collaborative document creation, enabling teams and individuals to work seamlessly across various devices and locations. Its ease of use, auto-save functionality, and robust sharing options make it a go-to platform for everything from simple text documents to complex reports and presentations. However, despite its many strengths, Google Docs presents a peculiar challenge that often leaves users scratching their heads: the seemingly straightforward task of saving an embedded image.
Unlike most web pages or traditional word processors where a simple right-click and “Save Image As” does the trick, Google Docs often denies this direct approach. This can be particularly frustrating for creators, designers, and photographers who rely on extracting visual content for further use, whether it’s for curating a mood board, incorporating into a graphic design project, or simply archiving high-resolution photography. In an era where visual content is king—from aesthetic wallpapers and compelling backgrounds to digital art and thematic collections—the ability to efficiently manage and extract images is paramount. This comprehensive guide will navigate you through the various workarounds and effective strategies to save images from Google Docs, ensuring you can harness your visual assets with ease, regardless of whether you’re on a desktop computer or a mobile device. We’ll explore methods that cater to individual image saves, bulk extraction, and even address considerations for preserving image quality, linking these techniques to the broader world of digital photography, visual design, and image inspiration.

Why Image Management Matters in the Digital Age
In our increasingly visual world, documents are no longer just blocks of text. They are rich tapestries woven with images, graphics, and visual elements that convey meaning, evoke emotion, and capture attention. From professional reports needing compelling charts to blog posts adorned with beautiful photography, the visuals within a document are often as crucial as the text itself.
Beyond Simple Documents: The Visual Power of Google Docs
Google Docs, while primarily a text editor, is also a canvas for visual storytelling. Users embed images for a myriad of reasons: showcasing product photos, illustrating concepts, adding aesthetic backgrounds to enhance readability, or including emotional imagery to resonate with readers. For individuals interested in images for Wallpapers, Backgrounds, or creating an Aesthetic visual experience, the content within a Google Doc might be a valuable source. Similarly, Nature photography, Abstract art, or Sad/Emotional imagery, all falling under the umbrella of diverse image categories, often find their way into documents to support narratives or presentations.
The challenge arises when these embedded images, especially those that represent High Resolution photography or Stock Photos, need to be extracted for purposes beyond the document itself. A graphic designer might need a specific image for a Digital Art piece, or a photographer might want to retrieve a previously uploaded photo for Editing Styles or Photo Manipulation. Without efficient ways to save these images, a crucial part of the creative and organizational workflow is disrupted. Understanding how to liberate these visual assets from their document confines is therefore not just a technicality, but a fundamental skill in today’s visually-driven digital landscape.
The Unexpected Hurdles of Google Docs Image Saving
The intuitive action of right-clicking an image to save it directly to your device is a standard feature across most web browsers and applications. You see an image, you want to save it, you right-click. Simple. However, Google Docs operates within its own ecosystem, and this seemingly universal functionality is often disabled or behaves differently.
When you right-click an image in a Google Docs document, you’re usually presented with a limited set of options like “Cut,” “Copy,” “Paste,” or specific Google Docs image manipulation tools. The familiar “Save Image As…” option is conspicuously absent. This isn’t an oversight, but rather a design choice rooted in how Google’s web-based applications handle embedded content. Images in Google Docs are not always treated as standalone files accessible via a direct URL in the same way an image on a typical webpage might be. Instead, they are part of the document’s broader data structure, making direct extraction less straightforward.
This peculiarity necessitates alternative methods, requiring users to leverage other Google services or document export features. While initially a “head-scratching task,” as some might describe it, these workarounds are typically quick and, once learned, empower you to reclaim your visual assets for any creative endeavor, from building Mood Boards to compiling Thematic Collections and exploring Trending Styles in Image Inspiration & Collections.
Desktop Strategies: Extracting Images from Google Docs on Your PC or Mac
For users primarily working on desktop computers, Google Docs offers several ingenious, albeit indirect, methods to save embedded images. These approaches range from simple right-click tricks to more comprehensive document export options, catering to both individual image extraction and bulk downloads.
Method 1: The Google Keep Shortcut (For Individual Images)
This is one of the most convenient methods for saving individual images from a Google Docs document and seamlessly integrates with Google’s broader ecosystem. It’s particularly useful when you only need one or a few specific images rather than the entire collection.
- Open your Google Docs document: Ensure the document containing the image you wish to save is open in your web browser.
- Right-click on the image: Instead of looking for “Save Image As,” you’ll find an option that says “Save to Keep.” Select this.
- Google Keep opens in the sidebar: A Google Keep sidebar will appear on the right side of your Google Docs interface. The image will automatically be saved as a new note within Google Keep.
- Right-click the image in Keep: Now, within the Keep sidebar, right-click on the image thumbnail. This time, you will see the much-anticipated “Save image as…” option.
- Save the image: Choose your desired file name and location on your computer, then click “Save.”
This method is quick, efficient, and ensures that the image retains its original quality as it was uploaded to the document. It’s an excellent way to grab specific Photography elements or Aesthetic visuals that you might want to organize later for Image Inspiration & Collections within Google Keep or directly on your desktop. Once saved to your computer, you can optionally delete the note from Keep if it’s no longer needed there.
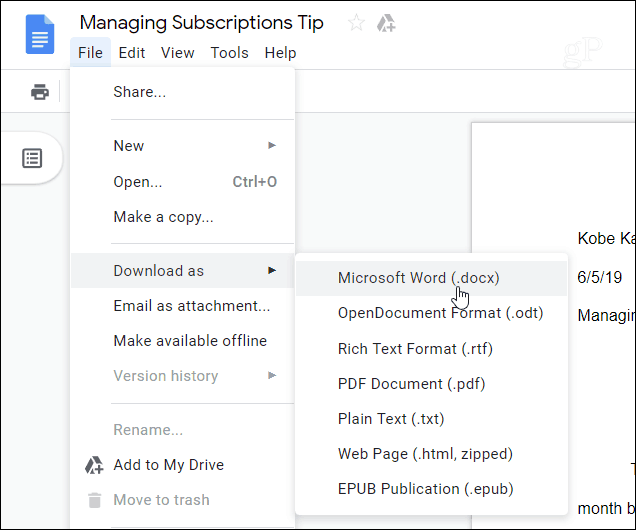
Method 2: Exporting as a Microsoft Word Document (For Individual or Batch Saving)
Leveraging Microsoft Word’s robust image handling capabilities is another highly effective method for extracting images, especially if you’re comfortable working with .docx files. This approach allows for both individual image saves and offers format flexibility.
- Download the Google Doc as a Word file: In your Google Docs document, go to
File > Download > Microsoft Word (.docx). The document will download to your computer. - Open the downloaded
.docxfile: Locate the downloaded Word document in your file explorer and open it using Microsoft Word (or a compatible word processor). - Save individual images: Once the document is open in Word, you can simply right-click on any image you want to save and select “Save as Picture…”.
- Choose format and location: Word provides options to save the image in various formats such as JPEG, PNG, or GIF. This flexibility is a valuable feature, allowing you to choose the best format for your needs, whether it’s for High Resolution output or a web-optimized Visual Design element. Select your preferred format, name the file, and save it to your desired location.
This method also works well for batch extraction:
- Save the Word document as a Web Page (HTML): If you need to extract all images, once the
.docxfile is open in Word, go toFile > Save As. In the “Save as type” dropdown, select “Web Page (.htm)”. - Locate the images folder: When you save a Word document as a web page, Word creates a main HTML file and a companion folder (usually named
[Document Name]_files) that contains all the embedded images. Navigate to this folder, and you will find all your images neatly extracted.
This technique is excellent for those who appreciate the granular control offered by desktop applications and is a robust way to collect images for more involved Photo Manipulation or Graphic Design projects.
Method 3: Downloading as a Web Page (For Bulk Extraction)
When your Google Docs document is brimming with images—perhaps it’s a portfolio, a photo essay, or a comprehensive Image Inspiration & Collections piece—downloading it as a web page is arguably the most efficient way to extract all embedded visuals simultaneously.
- Open the Google Docs document: Access the document in your web browser.
- Navigate to the download option: Go to
File > Download > Web page (.html, zipped). - Save and extract the ZIP file: Your browser will download a single
.ziparchive. Locate this file on your computer and extract its contents. - Find the images folder: Inside the extracted folder (which will typically have the same name as your document), you’ll find another subfolder usually named “images” or “files.” Open this folder, and voilà! All your images from the Google Docs document will be saved there.
Key considerations: While incredibly convenient for bulk downloads, this method has a couple of quirks. The images will likely be assigned generic, randomly generated filenames (e.g., image1.jpeg, image2.png), and their original order might not be preserved in the filenames. This means you might need to manually rename and reorder them if specific sequencing is important for your Photo Ideas or Thematic Collections. However, for quick acquisition of all visual assets, it’s an unrivaled choice.
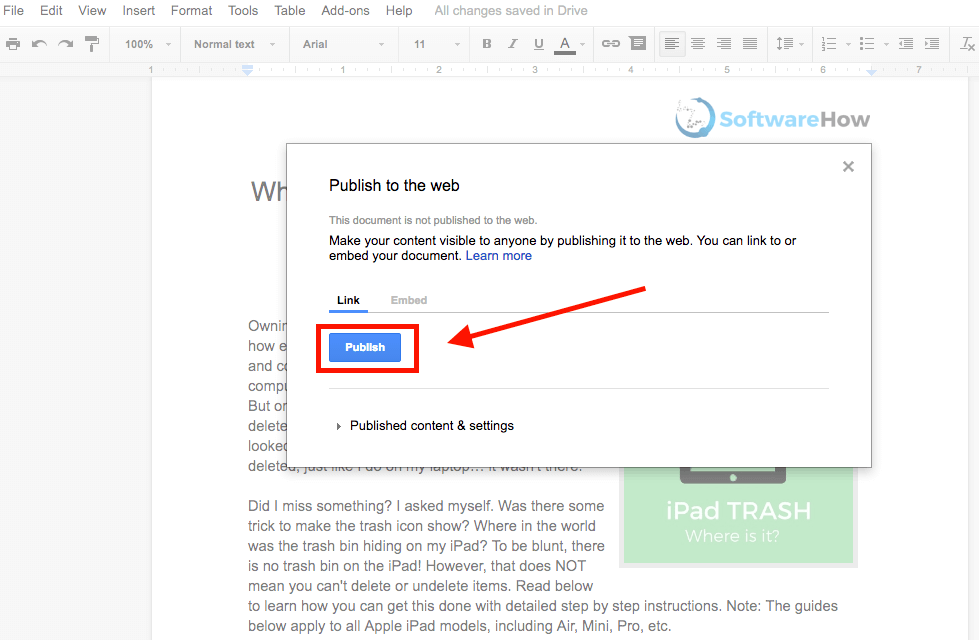
Method 4: Publishing to the Web (For Select High-Quality Downloads)
This method provides a unique workaround by turning your Google Docs document into a viewable web page, from which images can be downloaded using standard browser functions. It’s particularly useful if you need to extract selected images while preserving their original names and maintaining High Resolution quality.
- Open the Google Docs document: Ensure your document is open in your web browser.
- Initiate “Publish to the web”: Go to
File > Share > Publish to the web. - Confirm publishing: A dialog box will appear. Click the “Publish” button, then confirm your action if prompted.
- Copy the generated URL: Google Docs will provide a URL for the newly published web page. Copy this URL.
- Open the URL in a new browser tab: Paste the copied URL into a new tab in your web browser and press Enter. Your Google Docs content will now appear as a simple webpage.
- Save images directly: On this newly opened web page, you can now right-click on any image you want to save. The “Save image as…” option will be available.
- Name and save: Choose your desired file name (which will often default to the image’s original name from its upload) and save it to your computer.
The “Publish to the web” trick is excellent for selectively downloading images with their original file names intact, making it easier to manage collected assets for specific Creative Ideas or Digital Photography projects without the hassle of renaming.
Method 5: The Universal Screenshot (Quick & Dirty)
Sometimes, the simplest solution is the most accessible, even if it comes with compromises. Taking a screenshot is the age-old technique that works for literally anything displayed on your screen, including images in Google Docs.
- On Windows: Use the Snipping Tool (search for it in the Start menu), the Snip & Sketch app (Windows Key + Shift + S), or simply press
Print Screenand paste into an image editor like Paint. - On Mac: Use
Cmd + Shift + 4to select a specific area, orCmd + Shift + 3for a full-screen capture.
Pros:
- Instant: Quickest way to grab an image.
- Versatile: Works with any visual content, regardless of embedding restrictions.
Cons:
- Quality Loss: Screenshots capture what’s on your screen at its current resolution, meaning you won’t get the original High Resolution quality of the embedded image. This is a significant drawback if you’re aiming for crisp Digital Photography or Visual Design elements.
- Manual Cropping: You’ll likely need to crop the image to remove unwanted parts of the screen.
While not ideal for High Resolution images or those requiring pristine quality, screenshots are perfect for quick references, sharing an Aesthetic snippet, or capturing a temporary Mood Board element. For improving the quality of a low-resolution screenshot, you might later employ Image Tools like AI Upscalers to enhance its clarity and detail.
Mobile Solutions: Saving Pictures from Google Docs on Android and iOS
Saving images from Google Docs on a mobile device presents a slightly different set of challenges and solutions compared to desktop computers. The direct “Save image as” option is often unavailable, but resourceful workarounds ensure that your visual content remains accessible on the go.
For iOS: The Copy-Paste to Notes Trick
For iPhone and iPad users, a clever trick involving the native Notes app allows for the extraction of individual images from Google Docs. This method is surprisingly effective and doesn’t require downloading the entire document.
- Open the Google Docs app: Launch the official Google Docs app on your iPhone or iPad and open the document containing the image.
- Long-press and Copy the image: Tap and hold your finger on the image you want to save. A context menu will appear. Select “Copy.”
- Open the Notes app and Paste: Navigate to your device’s Notes app (or any other app that accepts image pastes). Create a new note, then tap and hold on a blank space in the note and select “Paste.” The image will appear.
- Save the image from Notes: Tap on the image within the Notes app. A share icon (a square with an upward arrow) will typically appear in the bottom-left corner. Tap this icon.
- Select “Save Image”: From the sharing options, select “Save Image.” This will save the picture directly to your device’s Photos app (camera roll).
This method is ideal for quickly saving specific Aesthetic images or Beautiful Photography pieces found within a document on your iOS device, perfect for immediate sharing or adding to your personal photo collections.
For Android: Download as Web Page (Bulk via Google Drive)
Android users have a robust option for bulk image extraction that mirrors one of the desktop methods, leveraging the “Save as Web Page” functionality and Google Drive. This method is particularly useful when you need to download all the images from a document at once.
- Open the Google Docs app: Launch the Google Docs app on your Android phone and open the document.
- Access “Share & export”: Tap the three-dot icon (menu icon) in the top-right corner, then select “Share & export.”
- Choose “Save as Web Page”: From the options, select “Save as” and then “Web page (.html, zipped)”. Tap “OK.”
- Save to Google Drive: The app will prompt you to save the generated ZIP archive. Select “Drive” (Google Drive) as your destination. Give the document a suitable name and select the desired Drive folder, then tap “Save.”
- Download from Google Drive: Open the Google Drive app. Locate the newly created ZIP archive (it will have the same name as your Google Docs document). Tap the three-dot icon next to the ZIP file and select “Download.”
- Extract the ZIP archive: Once downloaded to your phone, use your device’s file manager (e.g., Google Files, or a third-party app) to locate and extract the contents of the ZIP archive. Inside the extracted folder, you’ll find an “images” folder containing all your document’s pictures.
This process is highly effective for collecting large numbers of images, such as those intended for Visual Design projects, Mood Boards, or compiling extensive Thematic Collections for Image Inspiration.
The Mobile Screenshot (Instant Access)
Just like on desktop, the screenshot method is the most immediate way to capture any visual content on your mobile screen. While it comes with the same quality limitations, its speed and universality make it a go-to for quick captures.
- On Android: Typically, press and hold the
Powerbutton andVolume Downbutton simultaneously. Some devices might have gesture-based screenshots or options in the notification shade. - On iOS: On iPhones with Face ID, press the
Sidebutton andVolume Upbutton simultaneously. On iPhones with a Home button, press theSideorTopbutton and theHomebutton simultaneously.
Use cases: This method is ideal for capturing an Aesthetic snapshot, quickly sharing a Sad/Emotional image from a document, or getting an immediate visual reference. For any captured screenshot, especially if quality is a concern, consider utilizing Image Tools like AI Upscalers to potentially enhance their resolution and detail after extraction.
Advanced Considerations & Optimizing Your Image Workflow
Beyond merely extracting images, understanding the nuances of image quality, formats, and post-extraction workflows can significantly enhance your digital asset management and creative output.
Understanding Image Quality and Formats
When saving images from Google Docs, a common concern is whether the images will retain their original quality. Generally, when you save an image using methods like Google Keep or “Publish to the web,” the image retains the quality it had when it was uploaded to the document. However, there’s a crucial caveat: if the image was already compressed or significantly downsized before being added to Google Docs, or if it was manipulated within Docs (e.g., extensively cropped), you won’t be able to magically retrieve a higher resolution than what was embedded.
- JPEG (Joint Photographic Experts Group): Ideal for Photography with many colors and gradients, like Nature or Beautiful Photography. It uses lossy compression, meaning some data is discarded to achieve smaller file sizes, but the loss is often imperceptible.
- PNG (Portable Network Graphics): Best for images with transparency, sharp lines, or text, common in Graphic Design and Digital Art. It uses lossless compression, preserving all original image data, making it suitable for logos, icons, and detailed illustrations.
- GIF (Graphics Interchange Format): Primarily used for simple animations and images with a limited color palette. Not typically favored for High Resolution or complex static images.
For professionals working with High Resolution images or those requiring specific Editing Styles, it’s vital to choose an extraction method that preserves the maximum possible quality. Post-extraction, if you need to convert formats for specific uses (e.g., from PNG to JPEG for a website background to reduce file size), Image Tools like Converters are invaluable.
Post-Extraction: Enhancing and Utilizing Your Images
Once you’ve successfully extracted images from your Google Docs, the real potential for creativity and utility unfolds. This is where the themes of Visual Design, Photography, and Image Tools truly come into play.
- Optimization and Compression: Large image files can slow down websites and presentations. Use Image Tools like Compressors and Optimizers to reduce file sizes without noticeable quality degradation. This is crucial for web use, ensuring your Wallpapers or Backgrounds load quickly.
- Upscaling Low-Quality Images: If you had to rely on a screenshot (which inherently sacrifices resolution), consider using AI Upscalers. These advanced Image Tools can intelligently increase the resolution of an image, adding detail and sharpness, making it suitable for more prominent displays or print, even if it started as a low-quality capture.
- Creative Transformation: The extracted images can serve as raw material for further Digital Art or Photo Manipulation. Apply different Editing Styles to achieve a specific mood—whether it’s to enhance the Aesthetic appeal, deepen the impact of Sad/Emotional imagery, or highlight the vibrancy of Nature photography.
- Visual Inspiration and Collections: Organize your saved images into Mood Boards or Thematic Collections. This helps in developing Photo Ideas, exploring Trending Styles, or simply building a personal library of visual inspiration. High-resolution Stock Photos extracted from documents can be repurposed for new Creative Ideas or Graphic Design projects.
- Image-to-Text Conversion: In some cases, an image might contain text you wish to extract. Specialized Image-to-Text tools (OCR) can convert text embedded in an image into editable text, adding another layer of utility to your extracted visuals.
By thinking beyond simple saving and incorporating these post-extraction steps, you transform a retrieved image into a versatile asset ready for diverse applications, elevating your visual projects from good to truly exceptional.
Avoiding Third-Party Add-ons (A Word of Caution)
While Google Workspace Marketplace offers various third-party add-ons promising to simplify image extraction from Google Docs, it’s prudent to exercise caution. Some add-ons, like “Image Extractor & Remover” mentioned in external discussions on Tophinhanhdep.com, might offer convenience but often come with extensive permission requests.
These requests can include access to your Google Drive files, personal information, and the ability to view, edit, and even delete your documents. Granting such broad permissions to an external application can pose significant privacy and security risks.
Given the array of built-in methods available—from Google Keep to exporting as a web page or Word document—relying on these native solutions is generally safer and just as effective. Prioritizing your data security and privacy over marginal convenience is always a wise decision in the digital realm. The built-in features provide reliable ways to save images without compromising your Google account’s integrity.
Conclusion
Saving images from Google Docs, initially a puzzling task due to the platform’s unique handling of embedded media, is entirely manageable once you’re equipped with the right techniques. Whether you’re working from a desktop computer or a mobile device, a variety of effective strategies exist to extract individual images or entire collections, ranging from the immediate “Save to Keep” shortcut and the versatile “Download as Microsoft Word” option to the comprehensive “Download as Web Page” for bulk extraction and the quality-preserving “Publish to the web” method. Even the quick screenshot, despite its quality limitations, remains a universally accessible option for instant visual capture.
For mobile users, platform-specific methods like copying to the Notes app on iOS or saving as a web page via Google Drive on Android ensure that your visual assets are always within reach. Beyond mere extraction, understanding image formats and leveraging post-processing Image Tools like compressors, optimizers, and AI Upscalers can further enhance the utility and quality of your saved visuals, transforming them into valuable resources for any Visual Design project, Digital Photography endeavor, or source of Image Inspiration.
By mastering these techniques, you unlock the full potential of your Google Docs content, allowing you to seamlessly integrate your extracted Beautiful Photography, Aesthetic graphics, Nature scenes, or Abstract art into new creative projects. Empower yourself with efficient image management, and let your digital documents serve as a rich wellspring for all your visual needs.
For more insights into image manipulation, stunning wallpapers, and advanced photo editing techniques, explore the vast resources available on Tophinhanhdep.com.