How to Save an Image from Google Slides: Your Comprehensive Guide to Digital Asset Management

In today’s visually-driven world, presentations are more than just text on a screen; they are dynamic canvases brought to life with impactful images, captivating graphics, and thoughtful design. Platforms like Google Slides have become indispensable tools for crafting these compelling narratives, allowing users to embed a wealth of visual assets to enhance their message. However, the process of creating a stunning presentation often overlooks a crucial step: the efficient management and reuse of these visual assets.
Many users find themselves in a common predicament: they’ve meticulously placed an image in a Google Slides presentation, only to realize later they need that specific picture for another project, a website banner, a social media post, or simply to keep a record on their device. The intuitive “right-click and save” option, so prevalent across the web, often eludes individual images within a Google Slide. This can lead to frustration and a sense of lost opportunity for leveraging valuable visual content.
At Tophinhanhdep.com, we understand the profound importance of images – from vibrant wallpapers and aesthetic backgrounds to high-resolution photography and abstract art. Our mission is to provide you with the knowledge and tools to manage your visual assets effectively. This comprehensive guide will walk you through multiple methods of saving images from Google Slides, ensuring you can extract, optimize, and repurpose your visuals with ease. We’ll delve into not just how to save them, but why preserving image quality and understanding different saving techniques is vital for your broader visual design and digital photography endeavors, perfectly aligning with Tophinhanhdep.com’s extensive resources.
The Indispensable Role of Visuals and Why You Need to Extract Them
Images are the universal language of communication in the digital age. They convey emotion, simplify complex data, capture attention, and enhance memory recall in ways text alone cannot. Whether you’re designing a corporate presentation, a student project, or a creative portfolio, the right image can elevate your content from mundane to magnificent.
Google Slides facilitates this by allowing seamless integration of images. But the journey of an image doesn’t—and shouldn’t—end within the confines of a single slide deck. The ability to extract and reuse these images is a fundamental skill for anyone involved in digital content creation, visual design, or even just personal digital organization.
Beyond Presentations: The Versatility of Saved Images
Why go through the effort of saving an image from a Google Slide? The reasons are manifold and directly connect to the diverse applications of visual content we celebrate at Tophinhanhdep.com:
- Improved Sharing and Accessibility: Once saved as an independent file, an image can be shared effortlessly via email, messaging apps, or social media. This bypasses the need to share the entire presentation when only a specific visual is required, making your content more accessible and portable. Imagine a compelling chart or a stunning piece of beautiful photography from your slide needing to be an integral part of a marketing campaign – saving it as an image makes this possible.
- Increased Flexibility for Editing and Manipulation: An extracted image becomes a raw asset that can be imported into various image editing software. This opens up a world of possibilities for photo manipulation, resizing, cropping, applying filters, or even incorporating it into more elaborate graphic design projects. At Tophinhanhdep.com, we offer extensive guides on editing styles and tools that can transform a simple slide image into a sophisticated digital art piece.
- Enhanced Portability Across Devices and Platforms: A standalone image file can be viewed on any device – smartphones, tablets, laptops – without requiring a specific presentation software. This ensures your key visuals are always at your fingertips, whether you’re compiling a mood board, updating your desktop wallpaper with aesthetic backgrounds, or adding to a thematic collection.
- Archiving and Record Keeping: Saving important graphics or photographic elements from your presentations acts as a digital backup, preserving them independently of the presentation file. This is crucial for maintaining a personal library of stock photos, high-resolution imagery, or curated visual inspiration for future projects.
- Content Repurposing: In content marketing, repurposing is king. An image from a slide can become part of a blog post, a website hero image, an infographic, or an advertisement. This maximizes the return on investment for the effort put into sourcing or creating the original visual. For example, a striking nature shot used in a slide could become a stunning wallpaper on Tophinhanhdep.com.
Preserving Quality and Maintaining Creative Control
The quality of an image is paramount. A pixelated or low-resolution image can detract from an otherwise professional presentation or design project. When extracting images from Google Slides, it’s essential to understand methods that help preserve the original fidelity, or even enhance it post-extraction.
This is where Tophinhanhdep.com’s focus on “High Resolution” photography and “AI Upscalers” becomes particularly relevant. While Google Slides might not always offer a direct “save as high quality” option for individual images, knowing the right extraction technique, followed by leveraging external tools, can make all the difference. Maintaining creative control also means having the flexibility to choose the right file format – JPEG for smaller file sizes, PNG for transparency and lossless quality, or even SVG for scalable vector graphics – depending on your specific needs, all of which are discussed and supported by resources on our website.

Core Methods for Extracting Images from Google Slides
Despite the absence of a direct “right-click, save image as” option for individual embedded images within Google Slides, there are several effective workarounds. Each method offers a unique balance of convenience, quality, and versatility, catering to different user needs and technical proficiencies. We’ll explore the most reliable techniques, highlighting their advantages and when to apply them.
Method 1: Leveraging Google Keep Notes for Quick Saves
One of the most straightforward and integrated ways to save an image from Google Slides involves using Google Keep Notes. This method is excellent for quickly extracting one or two images without leaving the Google ecosystem.
Step-by-Step Guide:
- Access Your Presentation: Open your Google Slides presentation within your web browser. Ensure you are signed in to your Google account.
- Locate and Select the Image: Navigate to the specific slide containing the image you wish to save. Click on the image to select it.
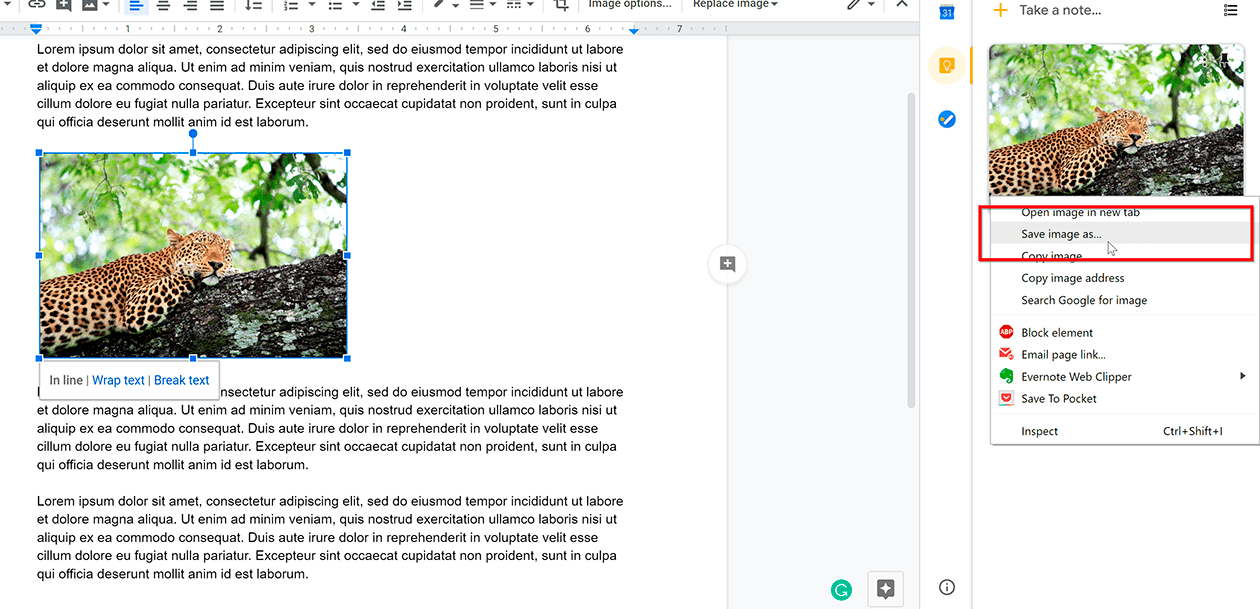
- Save to Keep: Right-click on the selected image. From the context menu that appears, choose the “Save to Keep” option.
- Open in Google Keep: A “Keep Notes” panel will open on the right side of your screen, displaying the image embedded in a new note. This provides a temporary holding place for your visual asset.
- Save Image to Computer: Within the Keep Notes panel, right-click on the image again. This time, you will see the familiar “Save image as…” option. Select it.
- Choose Location and Save: A file dialog box will appear. Select your desired save location on your computer, provide a suitable filename, and click “Save.” The image will be downloaded, typically in its original format (e.g., PNG or JPEG).
Why This Method Excels: This technique is praised for its speed and integration. It’s a natural extension of your Google Drive workflow, making it incredibly convenient for quick extractions. It’s particularly useful when you need to grab an image for immediate use, perhaps for a social media update or a quick visual reference for a mood board.
Considerations for Image Quality: While efficient, the “Save to Keep” method might sometimes result in a slightly compressed image, depending on the original file and how Google Keep processes it. For visuals where “High Resolution” and pristine quality are non-negotiable – such as images intended for large-format printing or professional “Stock Photos” – you might consider other methods or utilize Tophinhanhdep.com’s “AI Upscalers” post-download to restore or enhance quality. However, for most general uses like “Backgrounds” or “Aesthetic” digital displays, the quality is often perfectly acceptable.
Method 2: Isolating and Downloading Images from a New Slide
This method offers a good balance between control and ease, especially when you need a specific image to fill a frame or wish to ensure the downloaded image is perfectly cropped from the slide. It essentially treats the image as a standalone slide for direct download.
Step-by-Step Guide:
- Open Your Presentation and Source Slide: Begin by opening your Google Slides presentation and navigating to the slide that contains the image you intend to download.
- Select and Copy the Image: Click on the image to select it. Right-click on the selected image and choose “Copy” from the menu, or use the keyboard shortcut (Ctrl+C on Windows, Cmd+C on Mac).
- Create a New, Blank Slide: In your presentation, go to “Insert” in the menu bar, then select “New Slide.” Alternatively, you can right-click on an existing slide in the thumbnail pane and choose “New slide.” To ensure the image is the sole focus, you might want to change the layout of this new slide to “Blank” (Format > Layout > Blank).
- Paste and Adjust the Image: Click anywhere on the new blank slide and right-click to choose “Paste,” or use (Ctrl+V on Windows, Cmd+V on Mac). The copied image will appear. You can now resize and center the image using the drag handles. If the original image quality is high, you can stretch it to fill the entire slide area to capture it at its largest possible dimensions.
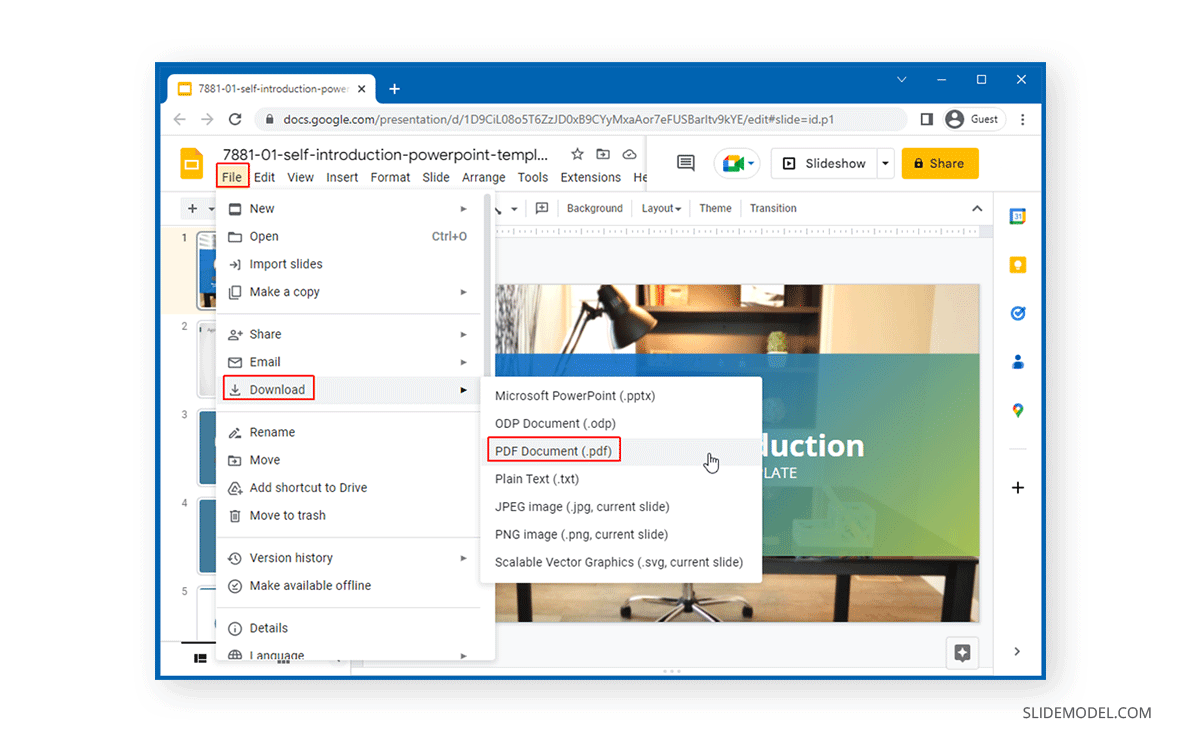
- Download as Image: With the new slide containing only your desired image active, go to “File” in the menu bar. Hover over “Download,” and then select your preferred image format:
- “PNG Image (.png, current slide)”: Ideal for preserving crispness and transparency, perfect for graphics, logos, or high-quality visuals. This is a lossless format, meaning no quality is lost during compression.
- “JPEG Image (.jpg, current slide)”: Suitable for photographs or complex images with many colors. It’s a lossy format, which means some data is discarded during compression to achieve a smaller file size.
- “SVG Image (.svg, current slide)”: This option (if available for your image type) is best for vector graphics, ensuring scalability without pixelation, crucial for “Graphic Design” elements.
- Save to Your Computer: After selecting the format, your browser will download the current slide (which is now just your image) to your default downloads folder or prompt you to choose a location.
Benefits for Visual Design: This method is particularly valuable for “Visual Design” projects as it allows you to frame the image precisely how you want it to appear as an output. By isolating it on a new slide, you essentially create a dedicated canvas for your image, minimizing unwanted elements. The choice between PNG and JPEG also aligns with “Photography” considerations, allowing you to prioritize either transparency and sharpness (PNG) or smaller file size (JPEG), topics extensively covered on Tophinhanhdep.com’s “Image Tools” section.
Method 3: Utilizing Google Docs for Enhanced Resolution Extraction
For users prioritizing the highest possible resolution for their extracted images, especially when other methods seem to yield slightly compressed results, Google Docs offers a clever workaround. This technique involves embedding the image into a Docs file and then extracting it from a web page archive.
Step-by-Step Guide:
- Open Your Google Slides Presentation: Access the presentation containing the image you wish to save.
- Select and Copy the Image: Navigate to the slide with the desired image, click on it to select, then right-click and choose “Copy” (or Ctrl+C/Cmd+C).
- Create/Open a New Google Doc: Open a new Google Docs document (or an existing one). This will serve as an intermediary.
- Paste the Image into Google Docs: Right-click anywhere in the Google Doc and select “Paste” (or Ctrl+V/Cmd+V). The image will now be embedded within the document.
- Download as Webpage (HTML, Zipped): Go to “File” in the Google Docs menu bar. Hover over “Download,” and then select “Web page (.html, zipped).” This action will download a ZIP file to your computer.
- Extract the Image Files: Locate the downloaded ZIP file. It will typically be named after your Google Doc. Extract the contents of this ZIP file. Inside the extracted folder, you will find an “images” subfolder.
- Access Your High-Resolution Image: Open the “images” folder. Your desired image will be present among the extracted files, often saved at a higher resolution than what might be obtained through other direct download methods.
Advantages for High-Quality Photography and Digital Art: This method is often preferred for preserving the original “High Resolution” of an image, making it ideal for elements intended for “Digital Photography,” “Stock Photos,” or intricate “Digital Art” where fidelity is paramount. It bypasses potential compression algorithms that might affect direct image saving within other Google services. The slight extra effort of unzipping the folder is a small price to pay for superior quality, which is often a cornerstone for “Beautiful Photography” and professional “Visual Design.” Tophinhanhdep.com emphasizes that image quality is a non-negotiable aspect for truly impactful visuals, and this method supports that principle.
Alternative Techniques and Practical Considerations
Beyond the core methods, several other techniques can prove useful, especially when you need quick results or when dealing with complex graphic elements that aren’t simple images. Understanding these alternatives, along with key considerations like file formats and post-extraction enhancement, will provide a holistic approach to managing your visual assets.
Method 4: The Simplicity of Screenshots for Immediate Capture
When time is of the essence, or when you need to capture a complex arrangement of objects (like a chart or diagram composed of multiple Google Slides elements that don’t easily export as a single image), a screenshot is your fastest friend. While generally not the method for “High Resolution” needs, it’s incredibly practical for quick captures.
How to Take a Screenshot (Windows):
- Open the Slide: Navigate to the Google Slide containing the image or object you want to capture. For best results, consider entering “Present” mode (click the “Slideshow” icon in the top right) to remove distractions like toolbars.
- Activate Snipping Tool: Press the
Windows key + Shift + Son your keyboard. Your screen will dim, and a snipping toolbar will appear at the top. - Select the Area: Use your mouse to click and drag a rectangle around the specific image or area you wish to capture.
- Save the Screenshot: The captured image will be copied to your clipboard. You’ll typically see a notification. Click on this notification to open the snipping tool editor. From there, you can further crop, annotate, and then click the “Save” icon (a floppy disk) to save it as a PNG, JPEG, or GIF file to your chosen location.
How to Take a Screenshot (Mac):
- Open the Slide: Open your Google Slides presentation and go to the slide with the image. Again, “Present” mode can offer a cleaner capture.
- Activate Screenshot Tools: Press
Shift + Command + 4on your keyboard. Your cursor will turn into a crosshair. - Select the Area: Click and drag your mouse to define the rectangular area of the screen you want to capture.
- Locate the Screenshot: Once you release the mouse button, the screenshot will be automatically saved to your Desktop as a PNG file, with a filename like “Screen Shot [date and time].png.”
When to Use Screenshots: Screenshots are excellent for capturing entire slides as images, complex diagrams, or textual elements that are visually significant. They are quick and require no special add-ons. However, the quality is limited by your screen’s resolution and the zoom level, which can lead to pixelation if resized significantly. For enhancing these captures, Tophinhanhdep.com offers “Image Tools” like “AI Upscalers” to improve resolution and “Optimizers” to refine file size without sacrificing too much quality.
Method 5: Copy-Pasting Images into Google Chat for Seamless Sharing
Similar to Google Keep, this method leverages another Google service for a quick extraction, particularly useful if your workflow involves frequent communication and sharing within Google Chat.
Step-by-Step Guide:
- Open Your Presentation: Access your Google Slides presentation.
- Select and Copy the Image: Go to the slide with the image, select it, and copy it (right-click > Copy, or Ctrl+C/Cmd+C).
- Launch Google Chat: Open your Google Chat application (either in your browser or the desktop app).
- Paste the Image: Click inside a chat window (either an existing chat or a new one you create for this purpose) and paste the image (Ctrl+V/Cmd+V).
- Save Image As: Once the image appears in the chat, right-click on it. You will now see the “Save Image As…” option. Select this.
- Choose Location and Save: Select the desired location on your computer, provide a name, and click “Save.”
Convenience for Collaborative Work: This method offers a simple way to grab an image when you’re already operating within the Google ecosystem and might even be collaborating on projects. It’s akin to the Google Keep method in terms of ease and quickness. However, like Keep, it may sometimes involve a slight degree of compression, so “High Resolution” needs might be better served by Method 3.
Understanding File Formats: JPEG vs. PNG and Beyond
The choice of file format dramatically impacts image quality, file size, and intended use. At Tophinhanhdep.com, we emphasize understanding these distinctions for effective “Digital Photography” and “Visual Design”:
- JPEG (Joint Photographic Experts Group): Best for photographs and complex images with smooth color gradients. It uses “lossy” compression, meaning some data is permanently discarded to achieve a smaller file size. This makes it ideal for web images or situations where file size is a primary concern (e.g., “Backgrounds” or “Wallpapers” for mobile devices).
- PNG (Portable Network Graphics): Ideal for images requiring transparency (like logos or graphics) and for images with sharp lines or blocks of color. It uses “lossless” compression, preserving all original data and thus maintaining higher quality, especially for “Digital Art” and “Graphic Design” elements.
- SVG (Scalable Vector Graphics): A vector image format that defines graphics in XML format. SVGs can be scaled up or down to any size without losing quality, making them perfect for logos, icons, and illustrations in “Visual Design” contexts. While Google Slides allows downloading slides as SVG, individual images might not always be directly exportable in this format unless they were originally vector graphics.
Tophinhanhdep.com provides “Image Tools” like “Converters” to switch between these formats and “Compressors” to optimize them, ensuring your images are always perfectly suited for their purpose, whether it’s a vibrant “Nature” shot or an intricate “Abstract” design.
Elevating Your Extracted Images with Tophinhanhdep.com’s Tools
Once you’ve successfully extracted an image from Google Slides, the journey towards perfecting your visual asset has just begun. Tophinhanhdep.com is your go-to platform for taking these images to the next level, ensuring they meet the highest standards of quality and utility for any project, from personal “Aesthetic” collections to professional “Stock Photos.”
Here’s how our “Image Tools” can empower you:
- AI Upscalers: Did a screenshot or a quick save from Google Keep result in a slightly lower resolution than desired? Our “AI Upscalers” can intelligently enhance the resolution of your images, adding detail and sharpness, making them suitable for larger displays, printing, or integration into “High Resolution” projects. This is particularly transformative for turning a good visual into truly “Beautiful Photography.”
- Compressors: While “High Resolution” is often sought after, large file sizes can slow down websites and presentations. Our “Compressors” allow you to reduce the file size of your extracted images without a significant loss in perceived quality, balancing performance with visual fidelity. This is crucial for optimizing images for web use or for creating lighter presentation files.
- Converters: Easily switch between different image formats (JPEG, PNG, WEBP, etc.) to suit your specific needs. Need a transparent background for a “Graphic Design” element? Convert to PNG. Need a smaller file size for an online “Background”? Convert to JPEG or WEBP. Our “Converters” streamline this process, making your images versatile.
- Optimizers: Beyond simple compression, our “Optimizers” perform a suite of enhancements to ensure your images load quickly and look great on any platform. This includes meta-data stripping and other fine-tuning to deliver images that are web-ready and efficient.
- Image-to-Text: For those times when your Google Slides image contains crucial text that you need to extract and edit, our “Image-to-Text” (OCR) tool can accurately convert printed or handwritten text within an image into editable digital text. This is an invaluable asset for repurposing content or archiving information.
By integrating these powerful tools from Tophinhanhdep.com into your workflow, you transform raw extracted images into polished, optimized, and perfectly formatted assets ready for any application.
Maximizing Your Image Assets: From Extraction to Inspiration with Tophinhanhdep.com
The act of saving an image from Google Slides is more than just a technical step; it’s the gateway to unlocking the full potential of your visual assets. At Tophinhanhdep.com, we believe every image, once liberated from its original context, holds the promise of becoming something new and impactful.
Post-Extraction: Refining Your Images for Diverse Applications
Once you have your images saved, the creative possibilities expand exponentially, especially when paired with the resources available on Tophinhanhdep.com:
- Visual Design Projects: An image extracted from Google Slides could be the perfect component for a new “Graphic Design” project, a striking element in “Digital Art,” or the basis for intricate “Photo Manipulation.” Our platform offers tutorials and inspiration for integrating these images into broader creative endeavors.
- Creating Engaging Content: Imagine using a powerful “Sad/Emotional” image or a serene “Nature” landscape extracted from a presentation as the emotional core of a blog post, a social media campaign, or an advertising visual. Tophinhanhdep.com helps you understand the impact of various “Editing Styles” and how to apply them to convey your message effectively.
- Personalization and Aesthetics: Your favorite images, once saved, can become custom “Wallpapers” for your devices, unique “Backgrounds” for your desktop, or additions to your personal “Aesthetic” collections. Our vast libraries of images and design tips guide you in creating personalized digital environments.
- Building Image Collections: Over time, extracting images from presentations can help you build your own curated library of “Stock Photos” or “Thematic Collections.” This repository becomes a valuable resource for future projects, mood boards, and sources of “Photo Ideas” and “Trending Styles.”
Discovering New Visual Horizons with Tophinhanhdep.com
Tophinhanhdep.com is not just about tools; it’s a hub for “Image Inspiration & Collections.” After mastering the art of extracting images from Google Slides, you might find yourself with a newfound appreciation for the visual elements around you. Our website encourages this exploration:
- Explore Diverse Categories: Dive into our extensive categories, from breathtaking “Beautiful Photography” to thought-provoking “Abstract” art. Find the perfect complement to your extracted images or discover entirely new visuals for your projects.
- Learn and Grow: Our blog features articles on “Digital Photography” techniques, advanced “Editing Styles,” and insights into “Visual Design” principles. Enhance your skills and expand your creative horizons.
- Stay Inspired: Discover “Mood Boards,” explore “Trending Styles,” and gather “Photo Ideas” to fuel your next creative endeavor. Whether you’re a seasoned designer or a casual creator, Tophinhanhdep.com is your partner in visual excellence.
In conclusion, saving an image from Google Slides, while seemingly a minor task, is a powerful act of digital asset management. By employing the various methods discussed – from the quick convenience of Google Keep and Google Chat to the high-resolution prowess of Google Docs and the practicality of screenshots – you gain control over your visual content. And with the robust suite of “Image Tools” and rich “Image Inspiration & Collections” offered by Tophinhanhdep.com, you are not just saving images; you are unlocking a world of creative possibilities, ensuring your visuals are always at their best, ready to inform, engage, and inspire.