How to Seamlessly Save Images on Your MacBook: A Comprehensive Guide for Visual Enthusiasts

In today’s visually-driven world, images are more than just pixels on a screen; they are sources of inspiration, tools for communication, and building blocks for creative projects. For MacBook users, the ability to efficiently save and manage these visual assets is fundamental. Whether you’re curating stunning wallpapers, collecting high-resolution stock photos for a digital art project, or simply archiving beautiful photography you encounter online, mastering the art of image saving on your Mac is invaluable. Tophinhanhdep.com understands this need, offering a vast array of visual content and powerful image tools designed to enhance your creative workflow.
This comprehensive guide will walk you through the various methods of saving images to your MacBook, from basic right-click techniques to advanced file management strategies. More importantly, we’ll explore how these saved images can be seamlessly integrated with Tophinhanhdep.com’s innovative tools – including converters, compressors, AI upscalers, and more – to unlock their full potential for visual design, photography, and endless creative ideas. Get ready to transform your MacBook into a powerful hub for visual inspiration and effective image management.
Effortless Image Capture: Essential Methods for Your MacBook
Saving an image on a MacBook is a straightforward process, though it differs slightly from Windows PCs which typically feature a dedicated “right-click” mouse button. Macs offer intuitive alternatives that are quick and efficient, allowing you to quickly grab visuals from Tophinhanhdep.com, messages, documents, or any other web source. These foundational techniques are the first step in building your personal collection of images for wallpapers, aesthetic inspiration, or professional use.
The Right-Click Equivalent: Utilizing the Context Menu
The “context menu” (often referred to as the right-click menu) is your primary tool for saving images on a Mac. This method offers a classic, structured approach to file management, allowing you to choose how and where your image is saved.
Steps to Save Using the Context Menu:
- Locate Your Image: Begin by navigating to the image you wish to save. This could be a breathtaking nature shot on Tophinhanhdep.com, an abstract design in an article, or a high-resolution stock photo from a professional photography site.
- Ensure Full View (If Necessary): If the image is presented as a thumbnail or preview, click it to open it in its full-size glory. This ensures you’re saving the highest quality version available. Be mindful of images that act as links; if clicking takes you to a new page, use your browser’s “Back” button to return.
- Position Your Cursor: Place your mouse pointer directly over the image you intend to save.
- Open the Context Menu: This is where Mac’s unique input methods come into play:
- Control-Click: The most common method. Press and hold the Control (Ctrl) key on your keyboard, then click the image once with your mouse or trackpad. Release the Control key, and a pop-up menu will appear.
- Two-Finger Tap (Trackpad): If you’re using a MacBook trackpad, you can simply tap or click with two fingers simultaneously on the image.
- Right Side Click (Some Trackpads/Mice): Some older MacBooks or external mice may allow a physical click on the right side of the trackpad/mouse button to simulate a right-click.
- Choose Your Save Option: From the context menu, you’ll typically see options such as:
- “Save Image to “Downloads””: This quickly saves the image directly into your Mac’s default “Downloads” folder. It’s excellent for rapid saving of aesthetic images or backgrounds when you don’t need to specify a location immediately.
- “Save Image As…”: This more versatile option opens a dialogue box, allowing you to rename the image file, choose a specific folder for saving (e.g., a dedicated folder for “Nature Photography” or “Abstract Wallpapers”), and select the file format if multiple options are available. This is crucial for organizing your digital photography collection and maintaining a clean desktop.
- “Add Image to Photos”: This integrates the image directly into your Photos app library, ideal for personal collections and easy syncing across Apple devices. This is perfect for collecting beautiful photography and organizing it for future editing.
This context menu method provides precise control over how and where your images are stored, making it a powerful tool for visual enthusiasts who value organization and specific file management.
Instant Gratification: Drag-and-Drop Simplicity
For those who prioritize speed and simplicity, especially when quickly grabbing visual ideas or creating mood boards, the drag-and-drop method is a Mac superpower. It bypasses menus and allows for direct placement of images.
Steps to Save Using Drag-and-Drop:
- Locate Your Image: Find the image you want to save. This could be a trending style visual from Tophinhanhdep.com, a creative idea from a blog, or any image that catches your eye.
- Ensure Full View (If Necessary): Similar to the context menu method, open the image to its full size if it’s currently a preview or thumbnail.
- Prepare Your Workspace: To make drag-and-drop effective, you’ll need a visible destination. Click the yellow minimize button in the upper-left corner of your browser window to resize it, revealing a portion of your Mac’s desktop or a target folder.
- Click and Drag: Click and hold the image with your mouse or trackpad. You’ll see a transparent thumbnail of the image appear under your cursor.
- Move to Destination: Drag this thumbnail off the browser window and hover it over your desktop or an open folder (like a “Wallpapers” folder you’ve created).
- Release the Click: Once the transparent image is positioned over your desired save location, release the click. The image file will instantly appear there. You might see a green circle with a white plus sign, indicating it’s ready to be dropped.
This method is incredibly efficient for quickly populating a folder with aesthetic images, abstract backgrounds, or photo ideas for a new project. It’s perfect for users who want immediate access to newly acquired visuals without navigating through save dialogues.
Expanding Your Digital Library: Saving from Various Sources
Beyond the fundamental methods, specific scenarios and advanced options allow for more tailored image saving experiences. Whether you’re gathering high-resolution photography from Tophinhanhdep.com, extracting visuals from an email, or needing more granular control over your file operations, your MacBook offers robust solutions.
Curating Visuals from Tophinhanhdep.com and Other Websites
Tophinhanhdep.com is a treasure trove of images, from stunning landscapes and nature photography to abstract art and thematic collections for every mood. Saving images from this platform, or any other website, is typically done using the context menu or drag-and-drop methods described above, but Safari and other browsers offer additional nuances.
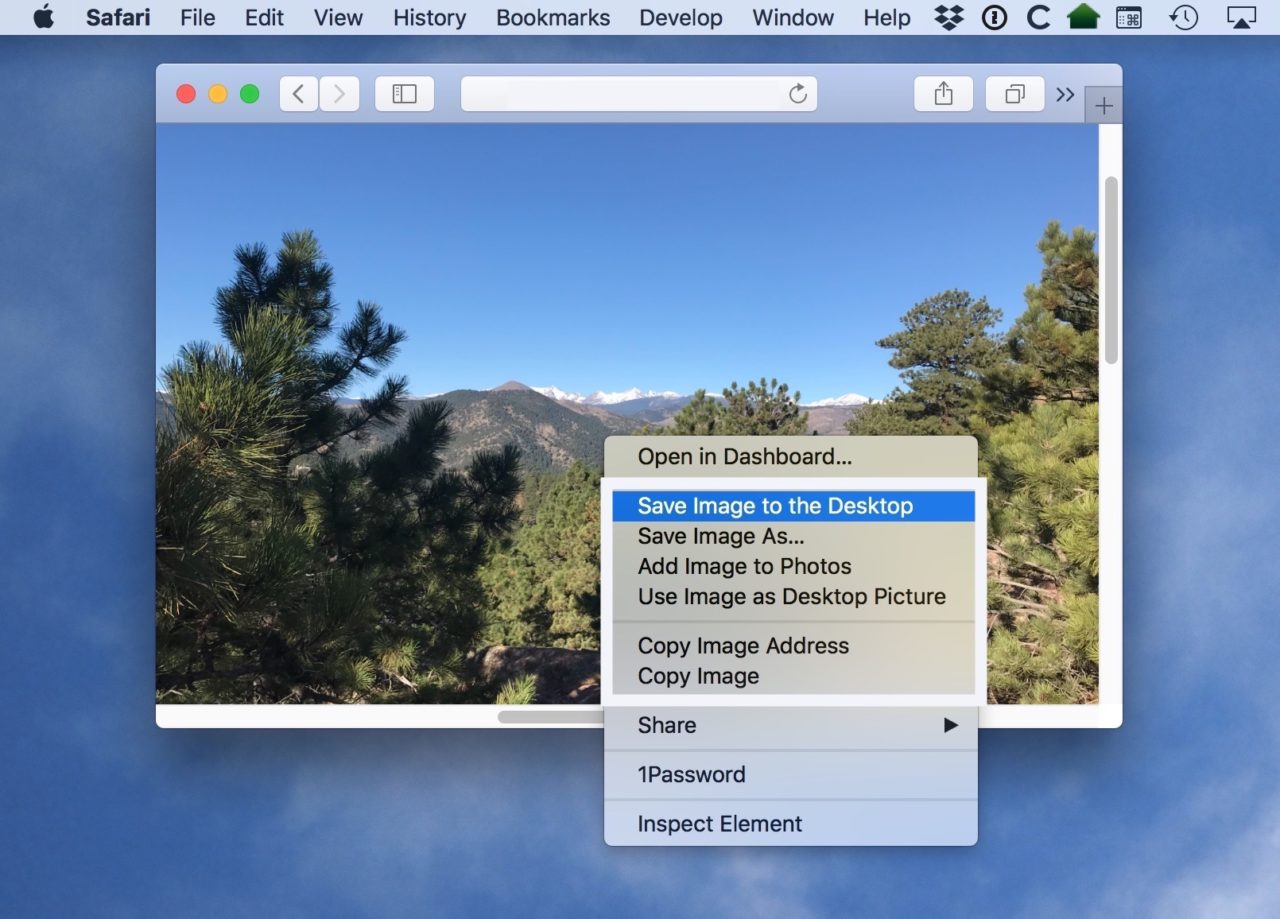
When you right-click (Control-click) an image on Tophinhanhdep.com within Safari, you’ll often see several options tailored for web content:
- “Save Image to the Desktop”: A quick one-click option to save the image directly to your desktop. This is handy for temporary access, perhaps for an image you plan to use immediately in graphic design software or as a beautiful background.
- “Save Image As…”: This provides the traditional save dialogue, allowing you to specify the filename, format (e.g., JPEG, PNG), and location. This is invaluable for organizing high-resolution stock photos or digital photography into project-specific folders. You could create a folder for “Aesthetic Backgrounds” or “Sad/Emotional Photography” and save directly there.
- “Add Image to Photos”: Automatically imports the image into your Mac’s Photos application, perfect for building a personal collection of image inspiration.
- “Use Image as Desktop Picture”: Instantly sets the image as your desktop wallpaper. This is a favorite for users who frequently update their Mac’s background with new finds from Tophinhanhdep.com’s extensive collection of wallpapers. Be aware of the image’s resolution; a low-resolution image stretched across a large display might appear pixelated. Tophinhanhdep.com often provides images optimized for various screen sizes, ensuring a crisp visual experience.
- “Copy Image Address”: This copies the URL (web address) of the image itself to your clipboard. This is useful for sharing a direct link to a very large image without downloading it first or for embedding images in web projects without hosting them yourself. Remember, if the source website removes the image, your link will no longer work.
- “Copy Image”: This copies the image data itself (not just the link) to your clipboard. You can then paste it directly into an image editing application like Photoshop for photo manipulation, a document, an email, or even another folder. This is a vital step for many visual design and digital art workflows, allowing you to quickly move an image from the web into a creative canvas.
For images from Tophinhanhdep.com, choosing the right save option ensures your curated content is organized and ready for its next purpose, whether it’s a creative ideas mood board or a detailed digital photography project.
Managing Attachments: Saving Images from Email Clients
Email often serves as a conduit for sharing important images, from personal photos to client design concepts. Saving these attachments to your MacBook requires a slightly different approach depending on whether you’re using a web-based client like Gmail or a desktop application like Apple Mail.
Saving from Gmail (Web Browser):
- Access the Email: Open the email containing the image attachment in your web browser.
- Identify Attachment: Images are usually displayed either inline within the email body or as an attachment icon (often a paperclip or a thumbnail preview). For attachments, look for a red icon with triangles indicating an attached image.
- View Image (If Necessary): Click on the image thumbnail or the attachment icon to open it in a new preview screen.
- Download Icon: In the upper-right corner of the image preview, you’ll typically find a “Download” icon (often represented by a down arrow). Click this to save the image to your Mac’s default “Downloads” folder.
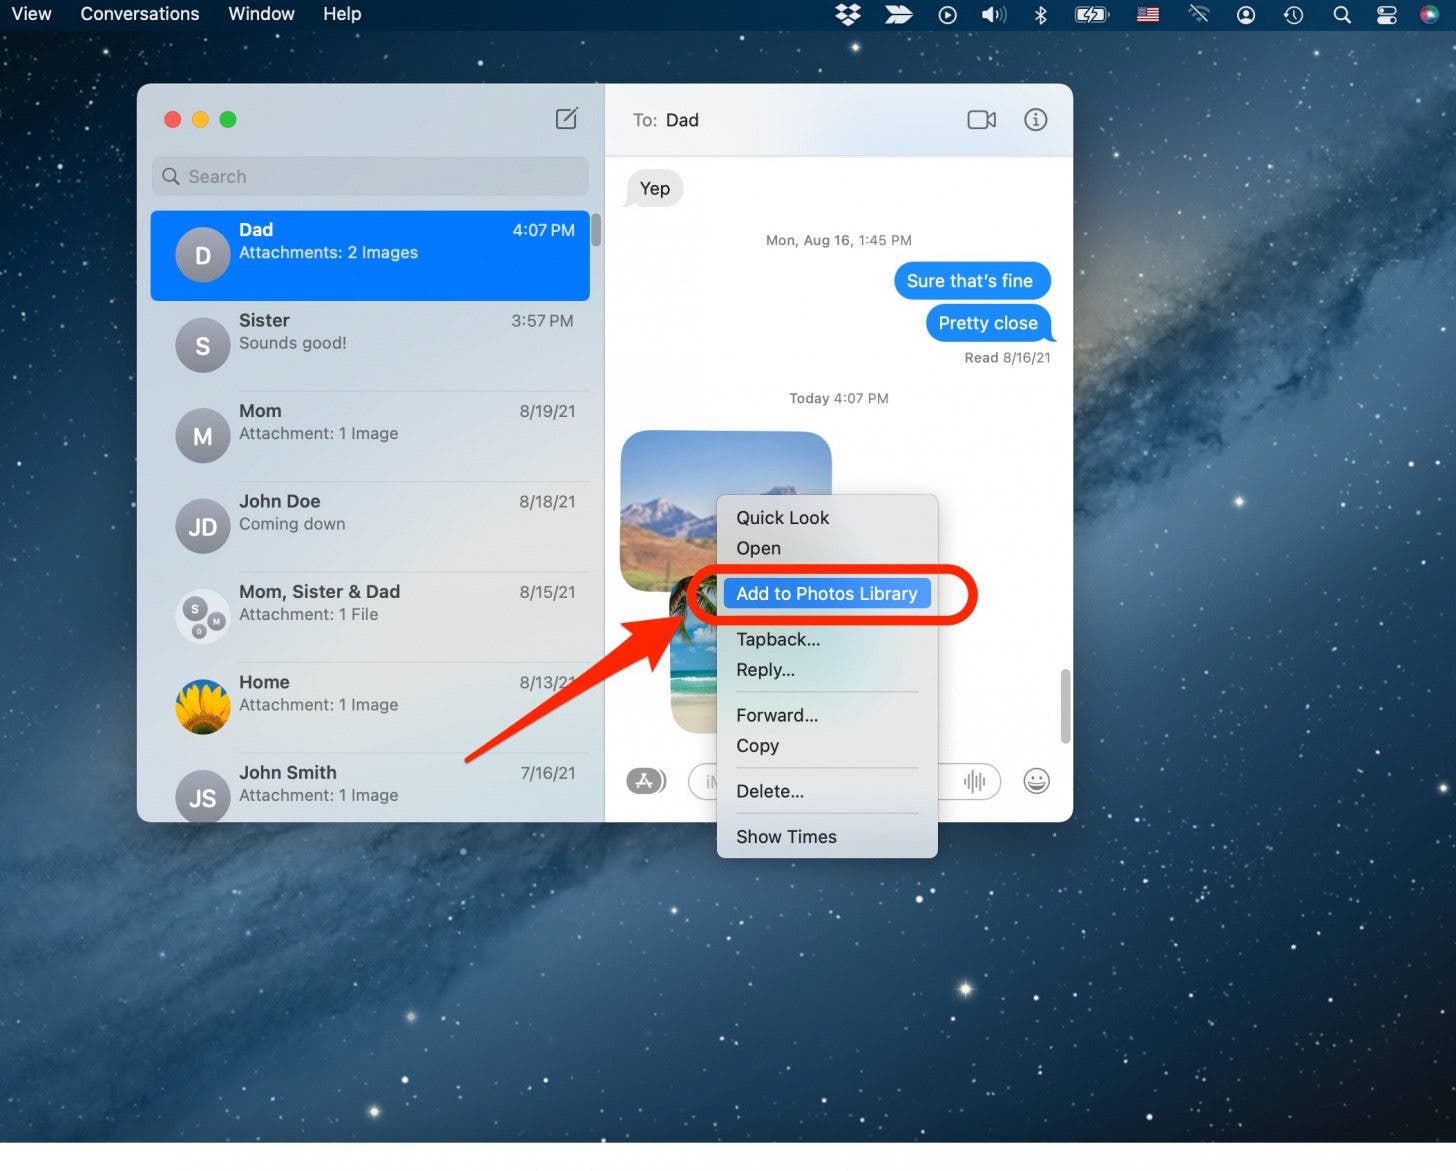
Saving from Apple Mail (Desktop Application):
- Open the Message: Launch the Apple Mail application and select the email containing the photos.
- Locate Attachments: Images might appear directly within the email body or as attachment icons at the bottom or top of the message.
- Hover for Action Bar: Hover your mouse cursor over the horizontal line just below the email header information. An “action bar” should appear.
- Use Paperclip Icon: Click the paperclip icon on the action bar. A drop-down menu will appear, offering options such as “Save All…” for multiple images or allowing you to select individual photos to save. You might also see an option to “Export to Photos” for direct integration with your photo library.
- Choose Location and Save: Select your desired save location and click “Save” to confirm the download.
Similar steps apply to other desktop email clients like Outlook on Mac, where you’ll typically find a download option near the attachment icon. Saving images from emails ensures that crucial visual assets, whether they’re high-resolution files or personal memories, are securely stored and accessible on your MacBook.
Advanced File Management: Unleashing the ‘Save As’ Function
For seasoned Mac users and those who value meticulous file organization, the “Save As” command is a powerful tool. While Apple introduced automatic saving and versioning, which subtly altered the visibility of “Save As” in favor of “Duplicate,” its utility for creating new versions of a document or saving an image to a specific location with a new name remains paramount. Tophinhanhdep.com recognizes the importance of this control in digital photography and visual design workflows.
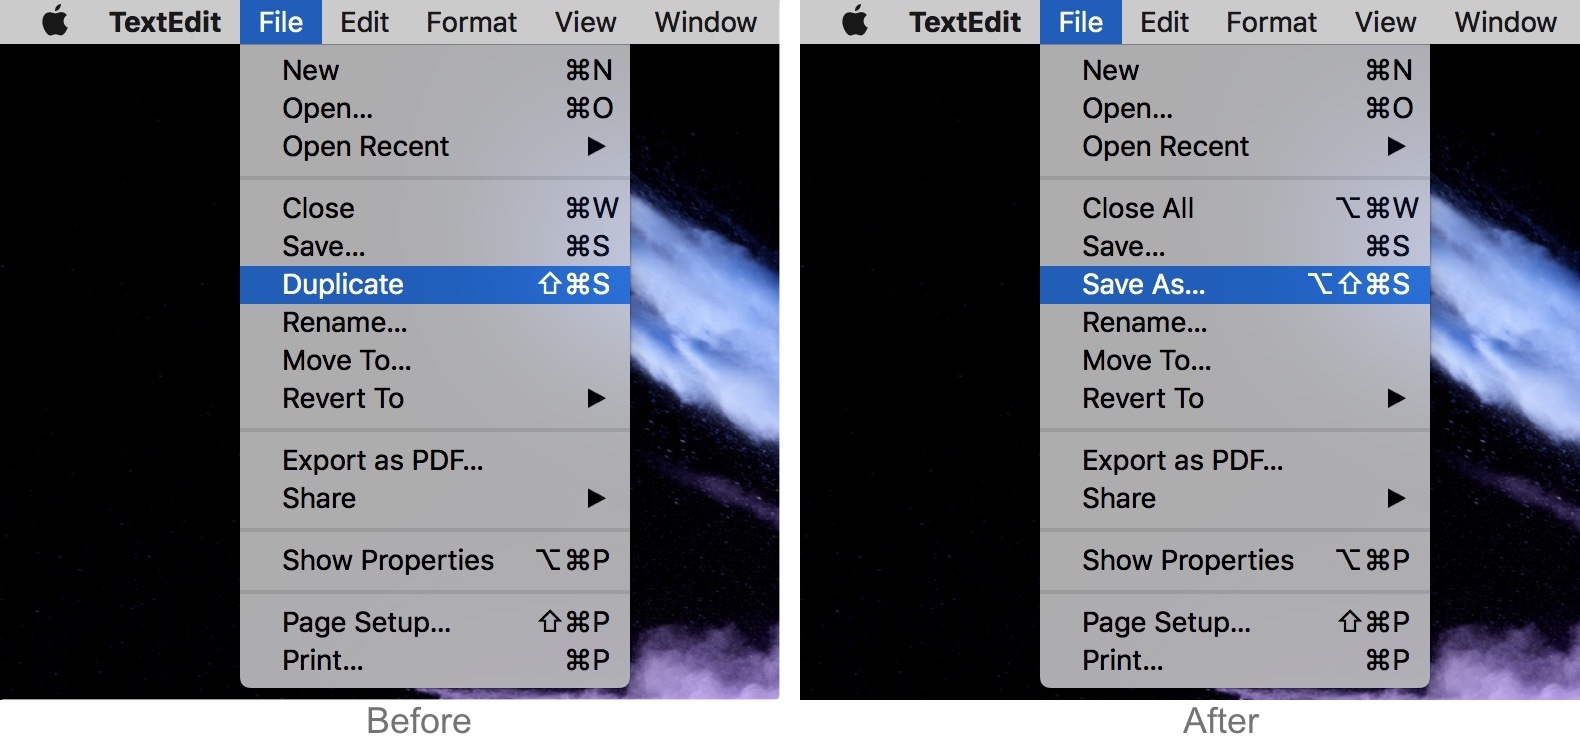
By default, in many Mac applications, “Save As” is hidden. Instead, you might see “Save” (which overwrites the current file) and “Duplicate” (which creates a copy of the current file in the same location). However, you can easily access or even permanently restore the “Save As” command.
Methods to Access ‘Save As’:
-
The On-the-Fly Option Key Trick: This is the quickest way to access “Save As” if you only need it occasionally.
- In any application, click the File menu in the menu bar.
- Press and hold the Option (Alt) key on your keyboard.
- Notice how the “Duplicate” option in the File menu instantly transforms into “Save As…”. Click this option.
- A standard save dialogue box will appear, allowing you to specify a new name, format, and save location for your image or document, effectively creating a new file without overwriting the original. This is particularly useful when you’ve made edits to a high-resolution photo and want to save it as a new version while preserving the original.
-
Keyboard Shortcut for Power Users: The Option key trick reveals the associated keyboard shortcut: Option + Shift + Command + S. Pressing these four keys simultaneously will directly invoke the “Save As” dialogue, making it a faster workflow for advanced users who frequently need this command.
-
Permanently Adding ‘Save As’ to the File Menu: For those who prefer “Save As” to be a constant fixture, you can create a custom keyboard shortcut via System Settings.
- Go to System Settings (or System Preferences on older macOS versions).
- Navigate to Keyboard > Keyboard Shortcuts… (or Shortcuts tab).
- Select App Shortcuts in the sidebar and click the plus button (+).
- In the pop-up window:
- Application: Choose “All Applications” to make it globally available, or select a specific app (e.g., Preview, Photoshop) if you only want it there.
- Menu Title: Type “Save As…” (the three periods are crucial for an exact match).
- Keyboard Shortcut: Click this field and press Option + Shift + Command + S (or another memorable, unused combination).
- Click Done twice to save.
- After this, the “Save As…” option will appear permanently in the File menu of supported applications.
By mastering the “Save As” function, you gain granular control over your saved images, ensuring that your digital photography, visual design assets, and creative ideas are meticulously organized and version-controlled. This is a cornerstone for any serious visual enthusiast managing a growing library of high-resolution images.
Elevating Your Saved Images with Tophinhanhdep.com’s Powerful Tools
Saving an image is just the beginning. The real power comes from what you do with that image next. Tophinhanhdep.com isn’t just a source for beautiful photography and aesthetic backgrounds; it’s also a robust suite of image tools designed to transform, optimize, and enhance your visual assets. Once an image is safely stored on your MacBook, Tophinhanhdep.com can help you prepare it for graphic design, digital art, social media, or simply archival purposes.
Unlocking Detail: AI Upscaling for High-Resolution Photography
You’ve found a stunning piece of abstract art or a captivating nature photograph on Tophinhanhdep.com, but perhaps it’s not quite high enough resolution for that large print or detailed design project. This is where Tophinhanhdep.com’s AI Upscalers become indispensable.
Traditional image resizing often leads to pixelation and loss of detail, especially when significantly enlarging a photo. Tophinhanhdep.com’s AI Upscalers leverage advanced artificial intelligence algorithms to intelligently add pixels, reconstruct textures, and sharpen edges, effectively transforming a standard-resolution image into a high-resolution masterpiece.
How it enhances your workflow:
- For Wallpapers and Backgrounds: Upscale your favorite aesthetic images to perfectly fit high-resolution Retina displays without any loss of quality, ensuring your MacBook’s background always looks pristine.
- For Digital Photography Projects: If you’re working with older photos or images from less powerful cameras, upscaling can breathe new life into them, making them suitable for larger prints or more demanding digital art manipulations.
- For Graphic Design: Crisp, high-resolution source images are crucial. Upscaling allows designers to use images that might otherwise be too small, expanding their creative options for banners, posters, and web elements.
After saving an image to your MacBook, simply upload it to Tophinhanhdep.com’s AI Upscaler, choose your desired resolution, and let the AI do its magic. Download the enhanced version back to your Mac, ready for its next big role.
Optimizing for Performance: Compression and Conversion
Digital photography and visual design often demand specific file characteristics. High-resolution images, while beautiful, can be large, consuming storage space and slowing down website loading times. Different platforms or software might also require particular file formats. Tophinhanhdep.com’s Compressors and Converters address these challenges head-on.
- Image Compressors:
- These tools reduce file size without significant, noticeable loss of visual quality. This is vital for web designers and content creators who need fast-loading websites and efficient data transfer.
- Compressing images saved from Tophinhanhdep.com (or anywhere else) allows you to use more visuals in your digital art portfolios, share high-quality images faster, and ensure your aesthetic or beautiful photography collections don’t hog all your hard drive space.
- Tophinhanhdep.com’s compressors offer various compression levels, giving you control over the balance between file size and image fidelity.
- Image Converters:
- Digital photography comes in many formats (JPEG, PNG, GIF, TIFF, HEIC, WebP, etc.), each with its own advantages. A converter allows you to switch between these formats effortlessly.
- Need a transparent background? Convert to PNG. Looking for smaller web files? Convert to WebP. Want a widely compatible format for sharing? JPEG is your go-to.
- Converting images saved on your MacBook ensures compatibility with different software, platforms, and specific project requirements, from graphic design mockups to photo manipulation.
By integrating these tools from Tophinhanhdep.com into your workflow, you can ensure that every image you save is not only visually appealing but also perfectly optimized for its intended purpose.
Bridging Visuals and Text: Image-to-Text Capabilities
Sometimes, the information contained within an image is not just visual. Photos of documents, screenshots of instructions, or images with embedded captions carry valuable textual data. Tophinhanhdep.com’s Image-to-Text (OCR) tool allows you to extract this text directly from any image saved on your MacBook.
- For Digital Photography and Archiving: Imagine you have a beautiful photograph with a significant historical caption embedded in the image. With Tophinhanhdep.com’s Image-to-Text tool, you can extract that text, making it searchable, editable, and easily transferable to your notes or documents.
- For Creative Ideas and Mood Boards: If you’ve saved an aesthetic image that includes inspirational quotes or design specifications, this tool can help you quickly pull out those textual elements for direct use in your visual design projects or for sharing with collaborators.
- Enhanced Productivity: Instead of manually typing out text from a screenshot or a scanned document image, the OCR tool saves time and reduces errors, enhancing your overall workflow, especially for professionals in graphic design or content creation.
This unique feature extends the utility of your saved images, turning them into versatile assets for both visual and informational needs, further cementing Tophinhanhdep.com’s role as a holistic visual resource.
Beyond Saving: Transforming Images into Inspiration and Design
Saving images to your MacBook is not just about hoarding files; it’s about curating a personal visual universe. Every image you collect, especially from a rich source like Tophinhanhdep.com, contributes to your creative potential. These saved visuals become the raw material for personal expression, professional projects, and endless inspiration in the realms of photography and design.
Personalizing Your Mac: Wallpapers and Backgrounds from Tophinhanhdep.com
One of the most immediate and satisfying uses for saved images is personalizing your MacBook’s desktop. Tophinhanhdep.com offers an unparalleled collection of Wallpapers and Backgrounds across every conceivable theme – from serene nature scenes and dynamic abstract art to moody emotional visuals and vibrant aesthetic photography.
- Finding Your Perfect Match: Browse Tophinhanhdep.com’s curated collections to find images that resonate with your current mood or design aesthetic. Whether you prefer a minimalist abstract background or a dramatic landscape, the variety is immense.
- Seamless Application: As discussed, you can directly “Use Image as Desktop Picture” from the context menu in Safari, or simply save the image to your desktop and then drag it into System Settings > Wallpaper.
- High-Resolution Experience: Tophinhanhdep.com ensures that most of its offerings are high-resolution, perfectly suited for MacBook Retina displays, guaranteeing crisp and vibrant visuals without any pixelation. This commitment to quality means your chosen wallpaper will always look its best, reflecting the beautiful photography it originates from.
Regularly updating your desktop with new finds from Tophinhanhdep.com is a simple yet powerful way to keep your workspace fresh and inspiring, constantly fueling your creative ideas.
Fueling Creativity: Images for Graphic Design and Digital Art
For graphic designers, digital artists, and anyone engaged in photo manipulation, a well-stocked image library is a goldmine. The images saved on your MacBook, especially those sourced from Tophinhanhdep.com, serve as essential building blocks for countless creative endeavors.
- Stock Photos and High-Resolution Assets: Tophinhanhdep.com’s Stock Photos and High-Resolution Photography sections are invaluable. Saving these images provides you with professional-grade assets for commercial projects, presentations, or personal digital art pieces. The detailed quality ensures they can be manipulated, layered, and resized within graphic design software without losing integrity.
- Inspiration for Digital Art: An abstract image from Tophinhanhdep.com might spark an entire digital art series, or a piece of beautiful photography could serve as a foundational element for a photo manipulation masterpiece. Saving these creative ideas directly to your MacBook makes them readily available for integration into applications like Photoshop, Illustrator, or Affinity Photo.
- Photo Manipulation Techniques: Practice and refine your editing styles by saving various image types from Tophinhanhdep.com. Experiment with blending modes, color grading, and compositing using a diverse range of visual content, from nature scenes to sad/emotional images, to achieve unique effects.
- Leveraging Tophinhanhdep.com’s Tools: Remember to use the image tools to prepare these assets. Upscale smaller images for larger canvases, compress final outputs for web delivery, and convert formats as needed for different software requirements.
Your MacBook, populated with a rich collection of saved images from Tophinhanhdep.com, becomes an indispensable tool for turning creative ideas into tangible visual designs and compelling digital art.
Cultivating Collections: Mood Boards and Thematic Visuals
Beyond individual projects, saved images are perfect for building personal Image Inspiration & Collections. These can take the form of digital mood boards, thematic collections, or simply curated folders of visual styles that resonate with you. Tophinhanhdep.com excels in offering diverse content perfect for this purpose.
- Developing Mood Boards: A mood board is a powerful tool for conceptualizing projects, from interior design to branding. Start by saving a collection of aesthetic images, trending styles, and photo ideas from Tophinhanhdep.com that encapsulate a particular feeling, color palette, or theme. Organize these images into a dedicated folder on your MacBook, or use apps like Pinterest or Milanote to compile them.
- Thematic Collections: Whether you’re passionate about a specific type of Nature Photography, captivated by Abstract patterns, or exploring Sad/Emotional imagery for storytelling, Tophinhanhdep.com provides rich sources. Create themed folders on your Mac (e.g., “Forest Scenes,” “Geometric Abstractions,” “Expressive Portraits”) to house these collections. This systematic approach makes it easier to revisit and draw inspiration from your carefully curated library.
- Tracking Trending Styles: The visual world is constantly evolving. By regularly saving images that represent Trending Styles from Tophinhanhdep.com, you can keep your finger on the pulse of current design aesthetics and photographic techniques. This proactive approach helps you stay relevant and informed in your creative pursuits.
- Photo Ideas for Future Shoots: Aspiring photographers can save compelling “Photo Ideas” from Tophinhanhdep.com’s beautiful photography sections, analyzing composition, lighting, and subject matter to inspire their own work.
The process of saving and organizing these collections on your MacBook transforms scattered images into a powerful, accessible source of creativity and knowledge. With Tophinhanhdep.com as your partner, your visual library will continually grow, offering endless possibilities for personal projects and professional endeavors.
In conclusion, saving images on your MacBook is a fundamental skill that opens up a world of creative possibilities. From the simple context menu click to advanced ‘Save As’ techniques, your Mac provides efficient ways to capture visual inspiration. When combined with Tophinhanhdep.com’s expansive image library – featuring everything from stunning wallpapers and high-resolution stock photos to aesthetic and thematic collections – and its powerful suite of image tools like AI upscalers, compressors, and converters, your digital workflow becomes truly seamless and highly productive. Embrace these methods, explore the vast visual universe of Tophinhanhdep.com, and unlock your full creative potential.