How to Save an Image from Google: Your Ultimate Guide by Tophinhanhdep.com

In today’s visually-driven world, images are more than just pictures; they are powerful tools for communication, inspiration, and creativity. Whether you’re curating a stunning wallpaper collection, gathering backgrounds for a new design project, seeking aesthetic inspiration, or simply saving important visuals from a document, knowing how to efficiently save images from Google’s diverse ecosystem is a fundamental skill. From the vast expanse of Google Image Search to the collaborative environment of Google Docs, Sheets, and Slides, the methods to acquire and manage these visuals can vary.
At Tophinhanhdep.com, we understand the critical role images play in your digital life, whether for professional photography, visual design, or personal collections. This comprehensive guide will navigate you through the various ways to save images from Google’s platforms, ensuring you can acquire the high-resolution, beautiful photography or abstract visuals you need. Beyond just saving, we’ll also explore how to optimize, convert, and even upscale these images using the powerful tools available right here on Tophinhanhdep.com, transforming them into perfect assets for your projects and aesthetic pursuits.
Google, while a powerhouse of information, doesn’t always make image saving as intuitive as a simple right-click, especially within its productivity suite. However, with the right knowledge, these processes become straightforward. Let’s delve into the various techniques, from quick saves to bulk extractions, ensuring you master the art of image acquisition from any Google source.
Capturing Visuals from Google Image Search and Beyond
The journey of saving an image often begins with discovery. Google Image Search is an unparalleled resource for finding everything from nature photography to abstract backgrounds, mood board inspiration, and specific stock photos. But how do you get those images from the search results onto your device or into an organized digital collection?
Saving Directly to Your Device for Immediate Use
The most common and immediate way to save an image from Google Search results is to download it directly to your computer or mobile device. This method is ideal when you need an image for a quick background, a reference for digital photography, or a component for a graphic design project that you want to start working on right away.

On Desktop (Windows or Mac):
- Perform your search: Navigate to Google and type in your desired image keywords (e.g., “aesthetic nature photography,” “high resolution abstract wallpaper,” “beautiful landscape backgrounds”).
- Access the image: Click on the image you wish to save in the search results. This will usually expand the image and display it alongside its source website.
- Right-click to save: Right-click on the expanded image. A context menu will appear.
- Select “Save Image As…”: Choose this option from the menu.
- Choose location and name: A dialog box will open, prompting you to select a location on your computer where you want to save the image (e.g., your “Downloads” folder, a specific project folder). You can also rename the file to something more descriptive, which is excellent for organization and even SEO if you plan to use it on a website.
- Confirm save: Click “Save.” Your image is now on your device, ready for use.
This method is straightforward for acquiring individual images. Whether it’s a stunning piece of digital art for inspiration or a specific photo for manipulation, having it locally allows for immediate integration into your workflow. Remember that Tophinhanhdep.com offers a suite of image tools, including converters and compressors, which you might find useful immediately after downloading, especially if you need to adjust the file type or size for specific applications like web use or personal wallpaper.
On Mobile (Android or iOS): Saving images directly to your phone or tablet from Google Image Search is equally simple:
- Search and select: Open your browser (e.g., Chrome, Safari) or the Google app, perform an image search, and tap on the image you want.
- Long-press to save: Press and hold down on the image. A pop-up menu will appear.
- Choose “Save Image” or “Download Image”: Select the appropriate option. The image will be saved to your device’s photo gallery or camera roll.
This allows for easy access to images for mobile-first visual design, quick sharing on social media, or setting new backgrounds and wallpapers directly from your phone.
Utilizing Google Collections for Inspiration and Organization
For those who frequently gather visual inspiration, build mood boards, or create thematic collections, Google Collections offers an integrated solution. This feature allows you to save images within your Google account, accessible across all your devices, making it perfect for compiling trending styles, photo ideas, or beautiful photography for future projects.
Saving to Google Collections:
- Be signed in: Ensure you are signed into your Google account.
- Search and select: Conduct an image search and click on an image to expand it.
- Add to collection:
- On desktop: Look for an “Add to” button (often a bookmark icon) below the expanded image. Click it. If it’s your first time, you might be prompted to create a new collection or add it to “Favorites.”
- On mobile: Tap the “Add to” icon (an outline bookmark icon) below the selected image. By default, it might go to “Favorites” or your last-viewed collection. You’ll often see a “CHANGE” option to select a different collection or create a new one.
- Manage your collections: Once saved, the image is added to your chosen collection. If you try to add an already saved image, clicking “Added” (desktop) or the solid bookmark icon (mobile) will remove it.
Viewing Your Google Collections: Accessing your saved collections is simple:
- On desktop: From any Google search results page, look for “Collections” below the search bar. Alternatively, on Google.com, click the 3x3 grid icon (Google Apps) and select “Collections.”
- On mobile: After running an image search, tap the Menu icon (three horizontal lines), then tap “Collections.”
Google Collections is an excellent resource for visual artists, graphic designers, and anyone building a digital portfolio or mood board. It keeps your image inspiration organized and readily available, feeding your creative ideas and helping you refine your editing styles.
Extracting Images from Google Docs, Sheets, and Slides
Unlike standard web pages, Google Docs and other Workspace applications don’t typically offer a direct “Save Image As” option when you right-click an embedded image. This can be a head-scratcher, especially when you need to extract images that are crucial for a blog post, a presentation, or a digital art project. Fortunately, there are several clever workarounds to get those images out, both individually and in bulk.
The HTML Download Method: Bulk Image Extraction
This is arguably the easiest and most efficient way to download all images from a Google Document (or Sheet/Slide) simultaneously. It’s particularly useful if your document contains many images, and you want to avoid saving them one by one.
- Open your document: Access the Google Doc, Sheet, or Slide that contains the images you wish to download.
- Go to File > Download > Web Page (.html, zipped): In the top menu, click “File,” hover over “Download,” and select “Web Page (.html, zipped).”
- Download the ZIP file: Your browser will download a
.zipfile to your computer (typically to your “Downloads” folder). - Unzip the folder: Double-click the
.zipfile to extract its contents. You’ll find a folder containing an HTML file and, crucially, an “images” subfolder. - Access your images: Open the “images” folder. All the images from your document will be there, usually named
image1,image2, etc.
This method is fantastic for quickly acquiring all visuals for purposes like compiling high-resolution stock photos used in a project, or archiving visual assets from a digital photography assignment. While the image names might be generic, Tophinhanhdep.com’s tools can help you rename and organize them, or even batch process them for specific editing styles.
Publishing to the Web for Individual Saves
Another effective method involves temporarily publishing your document to the web. This makes the document accessible as a simple web page, from which you can easily right-click and save individual images just like you would from any other website.
- Open the document: Go to the Google Doc, Sheet, or Slide.
- Go to File > Share > Publish to web: Click “File,” hover over “Share,” and then select “Publish to web.”
- Publish the content: A dialog box will appear. Click the “Publish” button. You’ll get a confirmation prompt; click “OK.”
- Copy the link: Google Docs will provide you with a URL for your published content. Copy this link.
- Open in a new tab: Paste the copied URL into a new browser tab and press Enter. Your document will now appear as a simple web page.
- Right-click and save: Right-click on any image on this web page and select “Save image as…” (or “Save Picture As…”).
- Choose location and name: Select your desired save location and filename, then click “Save.”
- Stop publishing (optional but recommended): If you don’t want your document to remain public, go back to your original Google Doc tab, return to “File > Share > Publish to web,” and click “Stop publishing.”
This method is particularly useful for extracting specific images, maintaining their original names (if they had any on the web page), and assessing their visual design components in a web context. It offers more control over individual images compared to the bulk HTML download, making it suitable for selecting specific aesthetic elements or high-resolution photography.
Leveraging Google Keep for Quick Captures
Google Keep, Google’s note-taking service, is integrated with Google Docs and provides a convenient way to save individual images. This is perfect when you only need one or two images from a long document, avoiding the need to download the entire file.
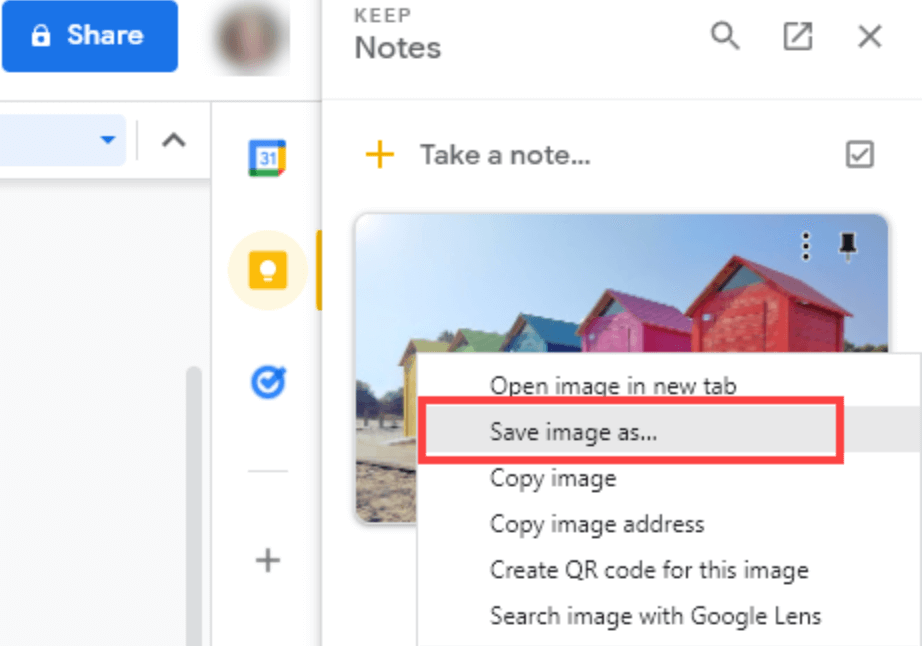
- Right-click the image: In your Google Doc, right-click on the image you want to save.
- Select “Save to Keep notepad”: From the context menu, choose this option.
- Keep sidebar appears: The Google Keep sidebar will open on the right side of your screen, with your selected image appearing as a new note.
- Right-click and save from Keep: Right-click on the image within the Google Keep sidebar and select “Save image as…”
- Save to your computer: Choose a destination on your computer and click “Save.”
- Delete from Keep (optional): To keep your Keep notes tidy, you can then delete the image note from the sidebar if it was only for temporary extraction.
Google Keep acts as a handy intermediate tool, streamlining the process for single image saves. This is great for grabbing a quick reference photo, an interesting graphic design element, or a piece of digital art that catches your eye within a document.
Mobile Strategies for Google Docs Images (iOS and Android)
Saving images from Google Docs on mobile devices has its own nuances, differing slightly between iOS and Android.
On iOS (iPhone/iPad): For individual images, you can use the built-in Notes app:
- Open in Google Docs app: Open the document in the Google Docs app.
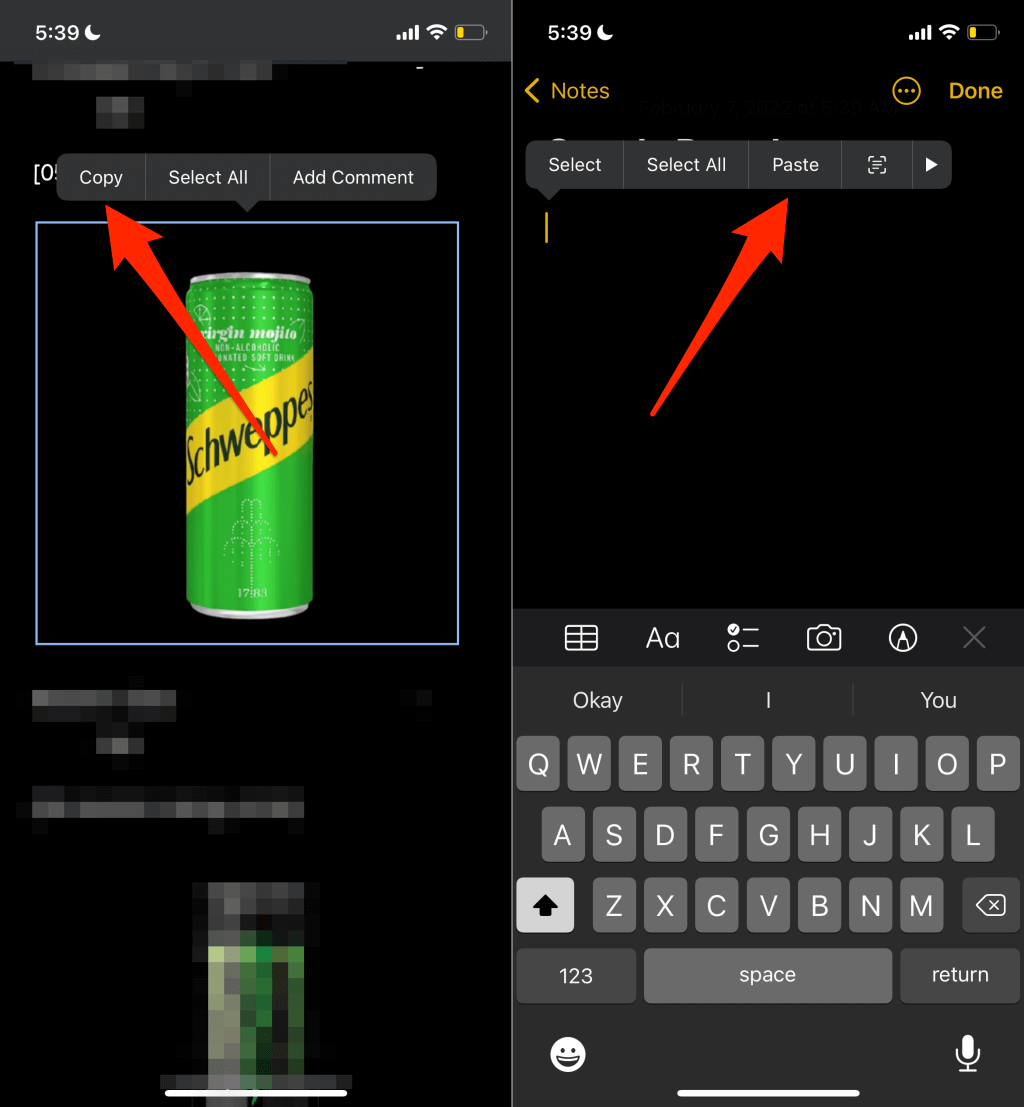
- Copy the image: Long-press the image you want to save, then release your finger and select “Copy” from the pop-up menu.
- Paste into Notes: Open the Notes app, create a new note, long-press a blank space, and select “Paste.”
- Save to Photos: Tap the pasted image, then tap the share icon (usually a square with an arrow pointing up) in the bottom-left corner. Select “Save Image.”
- Check your Photos app: The image will now be saved to your iPhone or iPad’s Photos app.
On Android: Currently, Android’s Google Docs app doesn’t allow saving individual images directly. You’ll need to use the bulk download HTML method via Google Drive:
- Open in Google Docs app: Access your document in the Google Docs app.
- Send a copy: Tap the menu icon (three dots) on the document, then select “Send a copy.”
- Choose “Web page (.html, zipped)”: Select this format and tap “OK.”
- Upload to Drive: In the share menu, select “Drive” to upload the zipped file to your Google Drive account. Give it a name and select a folder, then tap “Save.”
- Download from Drive: Once uploaded, open the Google Drive app, locate the zipped file, tap its menu icon, and select “Download.”
- Extract images: Use a file manager app on your Android device to open the downloaded
.zipfile and extract the “images” folder. The images will be saved to your device’s storage.
These mobile-specific methods ensure you can save important visuals regardless of your device, enabling you to carry your aesthetic collections, inspiring photography, and design elements with you everywhere.
Exporting to Microsoft Word for Enhanced Control
Another desktop workaround involves exporting your Google Doc as a Microsoft Word document. Word provides more traditional image saving options, making it a reliable method for those familiar with the software.
- Download as Word document: In your Google Doc, go to “File > Download > Microsoft Word (.docx).”
- Open in Word: Once downloaded, open the
.docxfile using Microsoft Word on your computer. - Save individual images: In Word, right-click on any image and select “Save as Picture…” You can then rename the image, choose a different file format (PNG, JPEG, BMP, GIF), and select its save location.
- Save all images (via HTML export from Word): If you need all images, in Word, go to “File > Save As.” Choose “Web Page (.htm)” from the “Save as Type” dropdown. This will create a folder containing all the images from the Word document, similar to the Google Docs HTML download.
This method provides excellent control over image formats and quality, making it suitable for professionals who might need specific file types for digital photography, graphic design, or photo manipulation projects.
Enhancing and Managing Your Saved Images with Tophinhanhdep.com
Once you’ve successfully saved images from Google, the next step often involves optimizing, refining, and organizing them for their intended purpose. This is where Tophinhanhdep.com truly shines, offering a suite of powerful Image Tools to elevate your visuals.
Optimizing Images for Performance and Quality
Many images saved from Google, especially those intended for web use, might not be perfectly optimized. Large file sizes can slow down websites, impacting user experience and SEO. For aesthetic wallpapers or backgrounds, maintaining quality without excessive file size is key.
Tophinhanhdep.com provides:
- Image Compressors: Reduce file sizes without significant loss in quality, perfect for web use on blogs, e-commerce sites, or social media. This ensures your high-resolution images load quickly, enhancing your site’s performance.
- Image Optimizers: Fine-tune various image parameters to strike the ideal balance between file size and visual fidelity, crucial for projects requiring both beauty and efficiency.
By utilizing these tools, you can ensure that the beautiful photography or digital art you’ve saved is perfectly prepared for online display, contributing positively to your visual design efforts and blog content.
Elevating Visuals with AI Upscaling and Editing Tools
Sometimes, the images you find, while perfect in concept, might lack the desired resolution or require a specific artistic touch.
Tophinhanhdep.com offers:
- AI Upscalers: If you’ve found an image that would make a perfect high-resolution wallpaper but its original size is too small, our AI upscalers can intelligently enhance its resolution, preserving details and clarity. This is invaluable for preparing images for large prints, detailed graphic design, or even improving stock photos.
- Converters: Easily switch between different image formats (e.g., JPEG, PNG, WebP) to suit specific project requirements. For example, converting an image to WebP can further optimize it for the web.
- Editing Styles (Conceptual): While direct editing tools are not explicitly listed in the main topics, the emphasis on “Editing Styles” and “Photo Manipulation” suggests a need for such capabilities. Tophinhanhdep.com provides the foundation for users to prepare their images for advanced editing, whether it’s for creating abstract art, enhancing nature photography, or achieving specific aesthetic looks.
These tools empower digital artists, photographers, and graphic designers to transform their raw saved images into professional-grade assets, pushing the boundaries of creative ideas and visual design.
Curating Your Visual Design & Creative Collections
Beyond technical optimization, Tophinhanhdep.com supports the entire creative workflow, from inspiration to final output.
- Photo Ideas & Mood Boards: The images you save from Google can form the backbone of your thematic collections and mood boards. Organize them into folders for specific creative ideas, trending styles, or personal aesthetic preferences.
- Graphic Design & Digital Art: Whether you’re assembling components for a new graphic design project or using images as references for digital art, the ability to save, refine, and categorize these visuals is paramount. Tophinhanhdep.com’s tools ensure that your source materials are of the highest quality and in the most suitable format for your creative endeavors.
- Image-to-Text (OCR): For specific needs, if you’ve saved images containing text (e.g., an infographic or a document snippet), our Image-to-Text tool can extract that information, further enhancing the utility of your saved visuals.
Important Considerations: Copyright and Image Quality
While the ease of saving images from Google is undeniable, it’s crucial to address important ethical and practical considerations.
Image Copyright: Most images found online, especially through Google Image Search, are protected by copyright. This means they cannot be used freely without permission from the creator or owner.
- Personal Use vs. Commercial Use: Always assume an image is copyrighted unless explicitly stated otherwise. If you’re saving images for personal use (e.g., a desktop wallpaper, a personal mood board), it’s generally acceptable. However, for public use (blogs, social media, commercial projects, website content), you must ensure you have the appropriate rights or permissions.
- Sourcing Images Ethically: Tophinhanhdep.com encourages users to source images responsibly. Look for images licensed under Creative Commons, use stock photo websites, or create your own original photography. Always check the terms of use for any image you intend to publish.
Maintaining and Improving Image Quality: When saving images, especially from documents or web pages, the original quality might not always be preserved perfectly, or the source image itself might be low resolution.
- Original Resolution: Whenever possible, try to save the highest resolution version of an image. This provides more flexibility for editing, resizing, and using it in various visual design contexts.
- Tophinhanhdep.com’s Role: If an image is a bit blurry or too small, don’t despair! Our AI Upscalers can significantly improve image quality and resolution. Our compressors and optimizers, on the other hand, ensure that your high-quality images are also web-friendly, striking the perfect balance between visual appeal and performance.
Conclusion
Saving images from Google’s various services, from general search results to collaborative documents, is a fundamental skill for anyone working with digital content. While the methods can vary, the processes are straightforward once understood. Whether you’re downloading bulk images for a large project using the HTML export method, grabbing a single aesthetic visual via Google Keep, or curating a collection of inspiring photography from Google Images, you now have the knowledge to do so efficiently.
Beyond mere acquisition, the true power lies in what you do with these images. Tophinhanhdep.com is your comprehensive partner in this journey, offering a robust suite of Image Tools—including converters, compressors, optimizers, and AI upscalers—to transform your raw visuals into perfectly crafted assets. We empower you to create stunning wallpapers, design compelling graphics, refine your digital art, and build rich thematic collections that truly reflect your creative vision and trending styles. Explore the possibilities, save your images with confidence, and let Tophinhanhdep.com help you unleash their full potential.