Mastering Image Capture on Your MacBook: A Comprehensive Guide

In today’s visually-driven world, images are more than just pixels on a screen; they are sources of inspiration, tools for creative expression, and vital components of our digital lives. Whether you’re curating a mood board for a new design project, collecting stunning high-resolution photography for your digital art, or simply saving an aesthetic background for your desktop, knowing how to efficiently save images on your MacBook is a fundamental skill. MacBooks, renowned for their vibrant displays and intuitive interfaces, are powerful companions for anyone passionate about visual content – from breathtaking nature shots and intricate abstract designs to poignant emotional photography and beautiful landscapes.
This guide, brought to you by Tophinhanhdep.com, delves into the essential methods for saving images on your MacBook, ensuring you can effortlessly build your personal collection of captivating visuals. We’ll explore various techniques, from the classic “right-click” (or Control-click) and the fluid drag-and-drop, to specialized approaches for capturing content from emails and websites. Beyond the simple act of saving, we’ll also touch upon how these methods serve as the first step in a larger creative workflow, paving the way for image editing, optimization, and the generation of innovative visual design concepts.
As a hub for all things visual, Tophinhanhdep.com understands the diverse needs of image enthusiasts and professionals alike. Our resources cover everything from high-resolution stock photos and digital photography techniques to advanced image tools like converters, compressors, AI upscalers, and image-to-text functionalities. We aim to inspire your visual journey, helping you discover trending styles, compile thematic collections, and transform mere images into powerful creative ideas. Let’s begin by mastering the art of saving images, unlocking a world of visual potential right on your MacBook.
The Essential Techniques: Saving Images with Precision
MacBooks offer several intuitive ways to save images, each suited for different scenarios. Understanding these core methods is the first step to building a comprehensive visual library, whether it’s for personal enjoyment, graphic design projects, or collecting stunning photographic references.
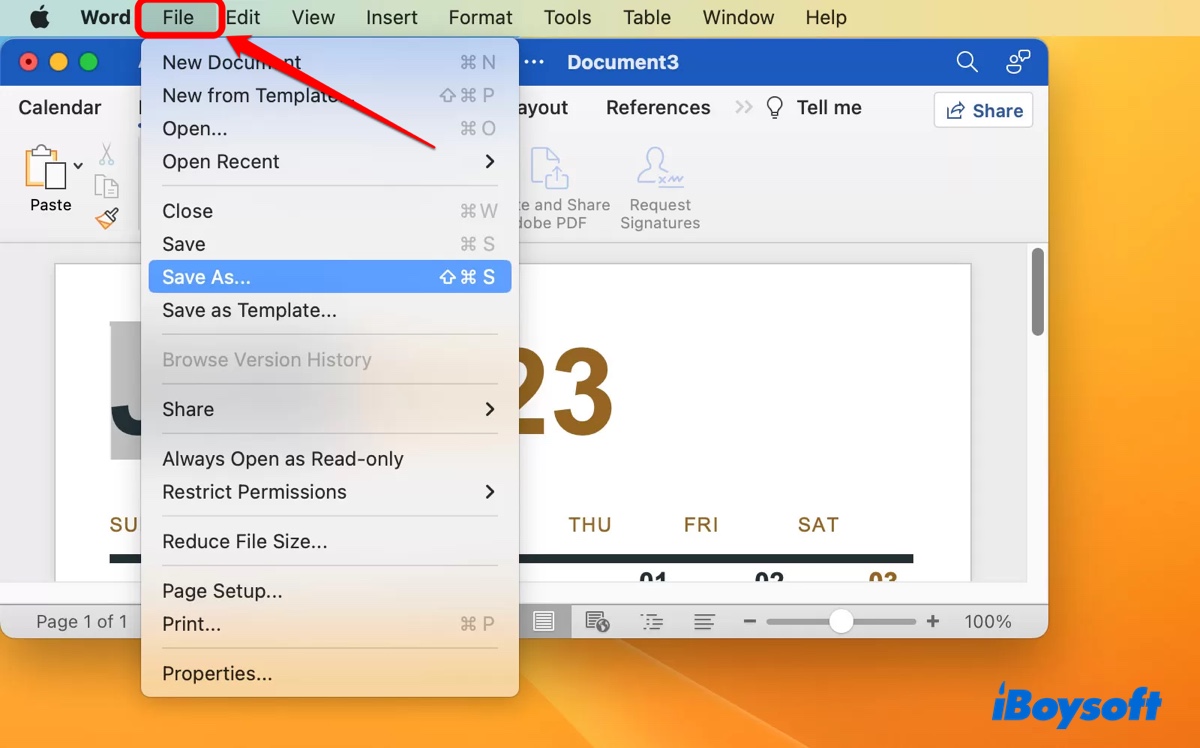
Harnessing the Context Menu (The “Right-Click” on Mac)
The context menu, often associated with a “right-click” on Windows PCs, is an indispensable tool for interacting with digital content on your Mac. While MacBooks might not have a dedicated right-click button on their trackpads, accessing this menu is just as straightforward, opening up a world of options, including saving images. This method is particularly useful when you need to quickly save an image to your Downloads folder or specify a different location and filename.

To utilize this method effectively, follow these steps:
-
Locate Your Desired Image: Begin by navigating to the image you wish to save. This could be a breathtaking nature photograph on Tophinhanhdep.com, an aesthetic wallpaper you found online, an abstract art piece within a document, or a beautiful photo shared in a message. Ensure the image is fully loaded and displayed. If it’s a thumbnail or a preview, click on it to open its full-size version, which often yields a higher resolution and better quality for your collection. Be mindful that certain platforms may restrict direct downloads. For such instances, Tophinhanhdep.com offers insights into creative capture methods (like screenshots, which we’ll discuss later).
-
Execute the “Right-Click” (Control-Click) on Mac:
- Using the Trackpad: Position your mouse pointer directly over the image. Now, press and hold the
Controlkey on your keyboard, then tap the trackpad with a single finger. A contextual menu will instantly appear on or near the image. Alternatively, many MacBook trackpads support a two-finger tap (without holdingControl) to simulate a right-click, or you can configure your trackpad settings to allow clicking the bottom-right corner for a secondary click. - Using an External Mouse: If you’re using an external mouse with a right-click button, simply hover over the image and click the right button.
It’s crucial to hold down the
Controlkey throughout the entire duration of the click for the menu to appear if you’re using the Control-click method.
- Using the Trackpad: Position your mouse pointer directly over the image. Now, press and hold the
- Saving to Downloads or a Specific Location: Once the context menu appears, you’ll see several options.
- “Save Image to ‘Downloads’”: This is often the quickest way. Clicking this option will immediately download the image directly into your Mac’s default “Downloads” folder. This is perfect for collecting a batch of stock photos or various inspirational images for a mood board without interruption. You can easily access this folder later by opening Finder (the blue, face-shaped icon in your Dock) and selecting “Downloads” from the sidebar.
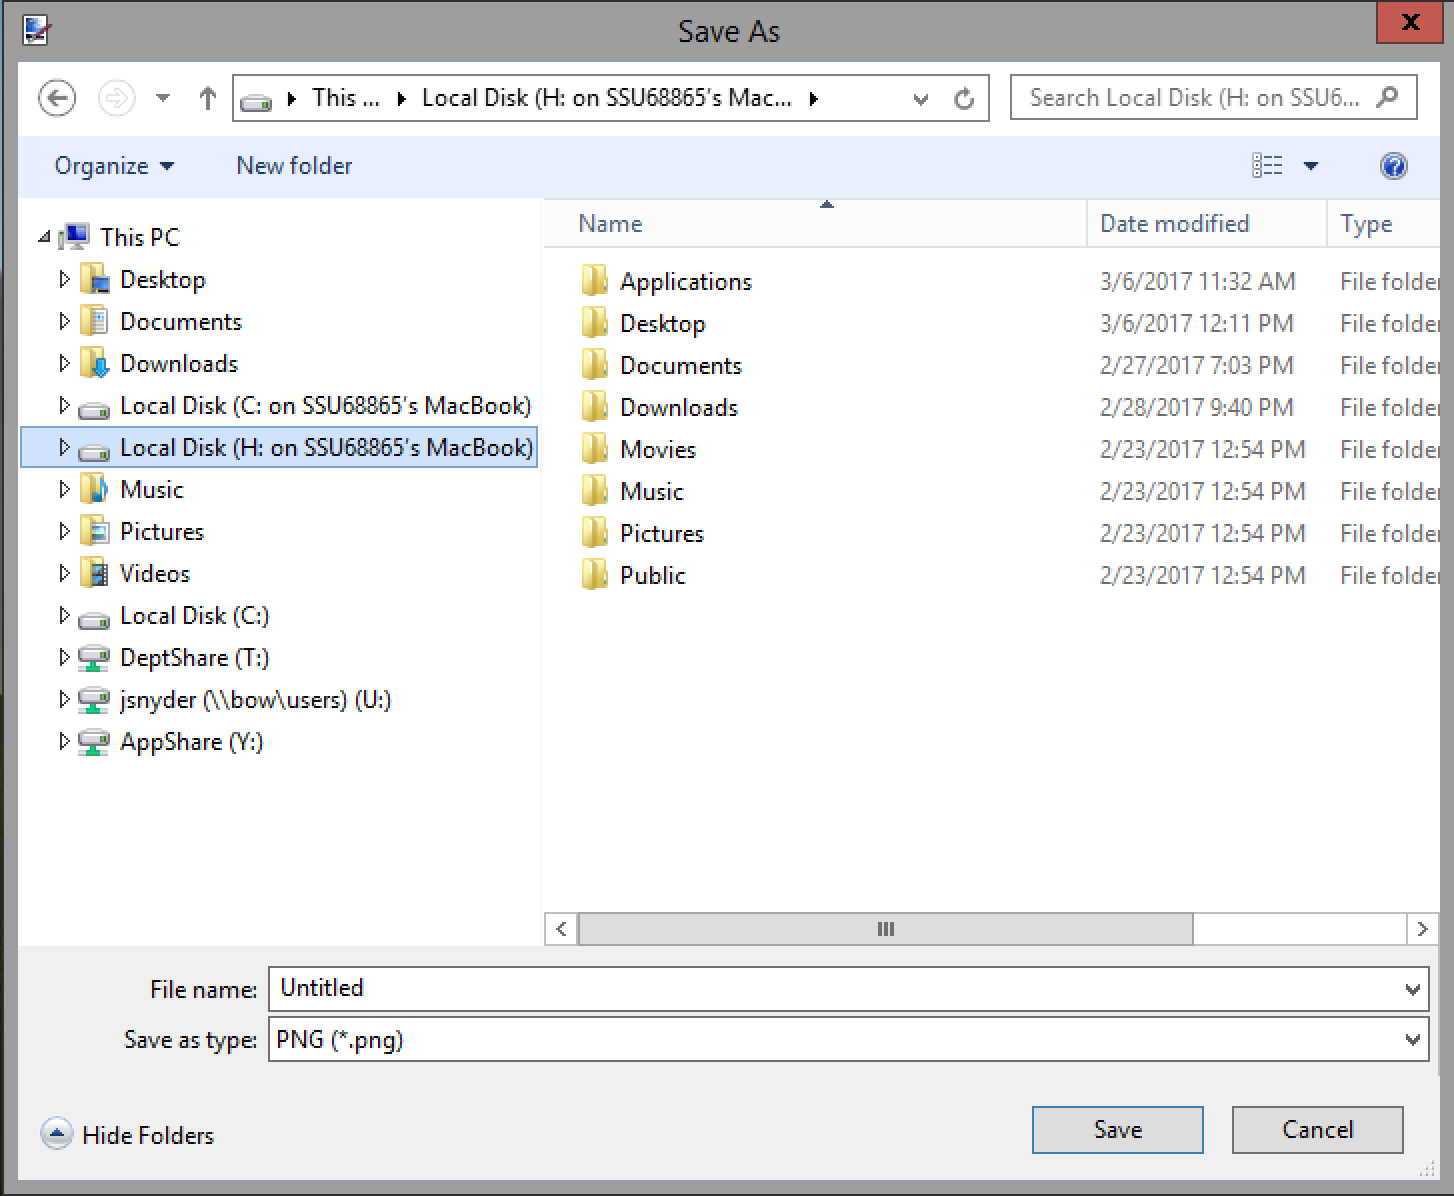
- “Save Image As…”: For more control, select “Save Image As…”. This option opens a dialogue box, allowing you to:
- Rename the File: Give your image a descriptive name (e.g., “Sunrise_Nature_Aesthetic.jpg” instead of “IMG_20250502.jpg”). Renaming immediately helps with organization, especially if you’re building thematic collections or curating images for graphic design projects.
- Choose a Specific Location: Decide where on your Mac you want to save the image. You can navigate to an existing folder, such as your “Wallpapers” folder, a dedicated “Digital Art References” folder, or even an external hard drive. This ensures your collection of high-resolution photography, abstract backgrounds, or digital art resources is organized from the moment it’s saved.
- Select File Format (if applicable): Sometimes, this dialogue also allows you to choose a different file format (e.g., JPEG, PNG), which can be useful for optimizing images for web use or specific visual design software.
This methodical approach ensures that every image you collect contributes to a well-structured and easily accessible visual library, ready for your next creative endeavor.
The Art of Drag-and-Drop: Intuitive Image Saving
The drag-and-drop method is a hallmark of macOS’s user-friendly interface, offering a fluid and direct way to transfer images from a source to a destination. It’s incredibly efficient for quickly grabbing multiple aesthetic images, a series of beautiful photographs, or various elements for visual design without navigating through menus.
Here’s how to master this intuitive technique:
-
Preparing Your Workspace for Seamless Transfer: Before you start dragging, it’s helpful to arrange your windows.
- Resize Your Browser or Application Window: Click the yellow minimize button in the upper-left corner of your browser or application window (where the image is located) to make it smaller. This will expose a portion of your desktop or the target folder you wish to drop the image into.
- Open Your Target Folder (Optional but Recommended): If you want to save the image directly into a specific folder (e.g., “Nature Wallpapers,” “Abstract Backgrounds for Design,” “Mood Board Inspiration”), open that folder in a Finder window and position it conveniently on your screen. This helps maintain organization, especially when dealing with high-resolution images or stock photos for ongoing projects.
-
Dragging and Releasing for Instant Access:
- Click and Hold the Image: Place your mouse pointer over the desired image. Click and hold down the left button (or single-finger tap on the trackpad) to “grab” the image. You should see a transparent thumbnail or outline of the image appear, indicating it’s ready to be moved.
- Drag to Your Destination: While still holding the click, drag the image thumbnail away from the original window. You can drag it:
- To Your Desktop: This is the most common use. Drag the image onto any empty space on your desktop. A green circle with a white plus sign
+will usually appear, signifying that the image will be copied to that location. - Into an Open Folder: If you have a folder open, drag the image directly into that folder’s window.
- Into an Application: You can also often drag images directly into applications like Pages, Keynote, Photoshop, or even a new email draft, bypassing the need to save it to a folder first. This is incredibly handy for graphic design workflows or creating quick digital art compositions.
- To Your Desktop: This is the most common use. Drag the image onto any empty space on your desktop. A green circle with a white plus sign
- Release the Click: Once the image is suspended over your desired location (desktop, folder, or application), release the click. The image file will instantly appear in its new home.
The drag-and-drop method simplifies the process of collecting visual content, making it easy to populate your themed collections, gather photo ideas, or swiftly integrate images into your creative projects. While it saves the image with its original filename (which you can rename later by clicking on the file name and typing), its speed and intuitiveness are unmatched for quick acquisitions.
Expanding Your Visual Library: Capturing Beyond the Browser
While browsing websites for beautiful photography or aesthetic wallpapers is a common use case for saving images, your MacBook offers robust capabilities for capturing visuals from a variety of sources, including personal communications and even static content on your screen.
Saving Images from Email and Messaging Apps
Images often arrive in our inboxes or chat applications, whether they’re personal photos, creative ideas from collaborators, or high-resolution stock photos for a project. Mac’s Mail app and web-based email services like Gmail, along with various messaging apps, provide straightforward ways to save these visual assets.
-
From Apple Mail:
- Open the Email: Launch the Apple Mail application and select the email containing the photo(s) you wish to save. Images might appear embedded within the message body or as attachments at the bottom.
- Access the Action Bar: Hover your mouse pointer over the horizontal line just below the email’s header information (sender, subject, date). An action bar will appear, often displaying icons for replying, forwarding, and an attachment icon (often a paperclip).
- Save Attachments: Click the paperclip icon. A drop-down menu will appear, giving you options like “Save All…” for multiple attachments, or the ability to select individual photos to save. You might also see an option to directly “Export to Photos,” which integrates the image into your macOS Photos library for easy management and editing.
- Choose Location and Save: Select your desired saving option, then specify a location on your Mac (e.g., your “Downloads” folder, a project-specific folder for digital photography) and click “Save.”
-
From Gmail (Web Browser):
- Open the Email: Log in to Gmail via your web browser and open the email containing the image.
- View Embedded Images: If the image is embedded, you can often right-click (Control-click) on it and select “Save Image As…” just like from any webpage.
- Download Attachments: For attached images, you’ll typically see a thumbnail of the image with a small download icon (a down arrow) when you hover over it. Click this icon to download the image directly to your “Downloads” folder. If there are multiple attachments, an option to “Download All” might appear at the top or bottom of the email. After downloading, you can move these images to your organized thematic collections.
-
From Other Messaging Apps (e.g., Messages, WhatsApp Desktop, Slack):
- Most desktop messaging applications offer similar functionality. You can usually right-click (Control-click) on an image within a chat window and find an option like “Save Image,” “Save Attachment,” or “Download.”
- Often, simply dragging and dropping the image directly from the chat window to your desktop or a folder will also work efficiently, mimicking the web-based drag-and-drop method. This is a quick way to collect visual design references or photo ideas shared by colleagues.
Saving images from these communication channels ensures that all your valuable visual content – from candid personal shots to professional stock photos – is consolidated and accessible within your Mac’s organized file system, ready for any purpose Tophinhanhdep.com inspires.
The Power of Screenshots: When Direct Saving Isn’t an Option
Sometimes, a direct download or right-click save isn’t possible, perhaps due to website restrictions (e.g., certain social media platforms) or because you want to capture a specific portion of your screen that isn’t a standalone image. In these situations, your MacBook’s built-in screenshot functionality becomes an incredibly powerful image tool, allowing you to capture anything displayed on your screen.
-
Capturing a Specific Portion of the Screen (Selection):
- Command (⌘) + Shift + 4: Press these three keys simultaneously. Your cursor will change into a crosshair icon.
- Drag to Select: Click and drag your mouse (or a single finger on the trackpad) to draw a box around the exact area you want to capture. This is ideal for isolating a particular element from a larger webpage, grabbing a specific part of a graphic, or capturing a creative idea from a visual layout.
- Release to Capture: Release the mouse button or trackpad. The screenshot will be taken.
-
Capturing an Entire Window:
- Command (⌘) + Shift + 4, then Spacebar: Press
Command + Shift + 4, then release those keys and press theSpacebar. Your cursor will turn into a camera icon. - Click the Window: Hover the camera icon over the window you want to capture. The window will highlight in blue. Click your mouse or trackpad to take a screenshot of that specific window. This is perfect for capturing a full design mockup or a complete webpage section.
- Command (⌘) + Shift + 4, then Spacebar: Press
-
Capturing the Entire Screen:
- Command (⌘) + Shift + 3: Press these three keys simultaneously. Your Mac will instantly take a screenshot of your entire display(s). This is useful for capturing a full aesthetic background or documenting your entire desktop setup.
Where Screenshots Go: By default, all screenshots on macOS are saved as PNG files to your Desktop. For users with macOS Mojave or later, a thumbnail of the screenshot briefly appears in the bottom-right corner of your screen, allowing for quick annotation, sharing, or deletion before it settles on your Desktop.
Managing Screenshots: Screenshots, particularly high-resolution ones, can quickly accumulate. To keep your desktop tidy and integrate these captures into your thematic collections or digital photography archives, consider:
- Renaming and Moving: Rename the screenshot files with descriptive titles and move them to relevant folders (e.g., “Graphic Design References,” “Abstract Inspiration”).
- Changing Default Save Location: You can change the default save location for screenshots via the Screenshot app (Command (⌘) + Shift + 5) to directly send them to your “Photos” app or another specific folder, streamlining your workflow.
- Editing: Use Mac’s built-in Preview app or the Photos app to quickly crop or make minor edits to your screenshots before filing them away, enhancing their utility for photo manipulation or visual design projects.
This versatile screenshot capability ensures that no visual content on your screen is out of reach, allowing you to capture intricate details, trending styles, and spontaneous creative ideas for your Tophinhanhdep.com-inspired library.
Optimizing and Organizing Your Tophinhanhdep.com Image Collection
Saving images is just the beginning of building a truly valuable visual library. The subsequent steps of enhancing, organizing, and utilizing these assets are where your MacBook, combined with insights from Tophinhanhdep.com, truly shines.
Post-Capture: Enhancing and Managing Your Visual Assets
Once you’ve saved a collection of wallpapers, stock photos, or beautiful photography, the next phase involves refining them and integrating them into your creative workflow.
-
Basic Editing with Built-in Tools:
- Photos App: Every Mac comes with the Photos app, a powerful management and basic editing tool. You can import saved images here, organize them into albums (e.g., “Nature Aesthetics,” “Sad/Emotional Collection,” “Abstract Art Ideas”), and apply quick edits like cropping, color correction, and filters. For high-resolution images, these basic adjustments can significantly enhance their impact as backgrounds or for mood boards.
- Preview: For quick adjustments to individual image files (especially screenshots), the Preview app is invaluable. It allows you to crop, rotate, annotate, and even adjust color levels without needing a full-fledged image editor. This is particularly useful for preparing images for graphic design layouts or digital art composites.
-
Advanced Image Tools for Tophinhanhdep.com Enthusiasts:
- Image Converters and Compressors: Tophinhanhdep.com emphasizes optimizing images. After saving, you might find that some images are in unsuitable formats or are too large. Utilizing image converters (e.g., from PNG to JPG for smaller file sizes) and compressors can drastically reduce file size without significant loss of quality, crucial for web design, presentations, or sharing large thematic collections.
- Optimizers and AI Upscalers: For those aiming for professional-grade visual design or preparing images for print, optimizers ensure images load quickly online, while AI upscalers (as highlighted on Tophinhanhdep.com) can intelligently increase the resolution of a lower-quality image. This means even a smaller aesthetic image you saved can be transformed into a high-resolution wallpaper or a usable element for photo manipulation.
- Image-to-Text Tools: If your saved images contain text – perhaps a creative quote on an abstract background or important details from a digital photography project – Tophinhanhdep.com’s focus on image-to-text tools can help you extract that information, making your visual assets even more functional.
-
Strategic Organization:
- Folder Hierarchy: Create a logical folder structure on your MacBook. Beyond basic “Pictures” and “Downloads,” establish folders for “Wallpapers,” “Graphic Design Resources,” “Digital Art Inspiration,” “Mood Boards,” and “Thematic Collections” (e.g., “Nature Photography,” “Abstract Styles”). This meticulous approach is key to managing a vast collection of high-resolution images and visual design elements.
- Metadata and Tagging: For even deeper organization, especially within the Photos app or dedicated asset management software, utilize tags and keywords. Tagging images with “aesthetic,” “trending,” “nature,” “emotional,” or specific themes makes them easily searchable and retrievable for future photo ideas or design projects.
Troubleshooting Common Image Saving Challenges
Despite the straightforward nature of saving images on a Mac, you might occasionally encounter issues. Tophinhanhdep.com aims to equip you with solutions to common problems.
-
“Save Image” Option Not Working:
- Restart Your Mac: A simple restart can often resolve minor software glitches that might be preventing the save function from appearing or working correctly.
- Check Browser/App: Try saving the image using a different web browser (e.g., Safari, Chrome, Firefox) or application. Sometimes, specific browser extensions or settings can interfere. Ensure your browser is updated to its latest version.
- Insufficient Storage: Verify that your MacBook has enough free storage space. Navigate to
System Settings > General > Storageto check. If your disk is full, you won’t be able to save new files, including images. - Website Restrictions: As mentioned, some websites (like certain Instagram pages or protected content platforms) actively prevent direct image downloads. In these cases, the “Save Image As” option might be greyed out or simply unavailable. This is where the screenshot method becomes your best alternative.
-
Images Saving to an Unexpected Location:
- Check Defaults: Most browsers default to saving images in the “Downloads” folder. Always check there first if you can’t find a saved image.
- Review Browser Settings: Each browser has its own settings for download locations. For Safari, you can find this under
Safari > Settings > General > File download location. For Chrome, go toSettings > Downloads. Ensure your preferred location is selected.
-
Image Quality Issues After Saving:
- Source Resolution: The saved image quality is directly dependent on the source. If you save a low-resolution thumbnail, it will remain low-resolution. Always try to open the full-size, high-resolution version of an image before saving.
- File Format: Some formats (like heavily compressed JPEGs) can introduce artifacts. If available, saving in a less lossy format like PNG or TIFF might yield better quality, though at a larger file size. Tophinhanhdep.com’s resources on digital photography and image formats can offer deeper insights here.
By understanding these saving techniques and employing strategic organization and troubleshooting tips, you transform your MacBook into a powerful hub for visual inspiration and creation. Tophinhanhdep.com is your ultimate partner in this journey, providing the knowledge and tools to curate, enhance, and creatively utilize every image you save. Embrace the possibilities, build your perfect collection, and let your visual ideas flourish.