How to Save an Image as JPEG: Your Ultimate Guide for Flawless Visuals

In today’s digital-first world, visual content reigns supreme. From captivating wallpapers and immersive backgrounds to stunning photography and intricate digital art, images are the currency of communication. Whether you’re a professional graphic designer, an aspiring digital artist, a photographer sharing your latest work, or simply someone looking to curate the perfect aesthetic for your desktop, understanding image formats is fundamental. Among the myriad of available formats, JPEG stands out as a universally recognized and incredibly versatile choice.
The ability to save or convert your images into JPEG format is an invaluable skill, crucial for seamless sharing, web optimization, and maintaining a balance between visual quality and file size. At Tophinhanhdep.com, we understand the critical role high-resolution images and efficient image tools play in bringing your creative ideas to life. This comprehensive guide will delve into the essence of the JPEG format, walk you through various methods of saving images as JPEG across different platforms and applications, and provide essential tips to optimize your visuals for any purpose. We’ll explore how to convert documents, web images, and files from popular editing software like Adobe Illustrator and Photoshop, ensuring your visual content always looks its best.
Understanding the JPEG Format: Why It’s Indispensable for Your Visuals
Before diving into the “how-to,” it’s essential to grasp the “why.” What makes JPEG such a pervasive and indispensable format for visual content creators and consumers alike?
JPEG, an acronym for Joint Photographic Experts Group, refers to a commonly used method of lossy compression for digital images, particularly those produced by digital photography. It’s the most common image format for storing and transmitting photographic images on the World Wide Web.
Advantages of the JPEG Format:
- Efficient File Size Management: JPEG’s primary strength lies in its effective compression algorithm. It can significantly reduce file sizes without a drastic compromise in visual quality. This is vital for web performance, faster uploads, and more efficient storage. For users exploring Tophinhanhdep.com’s vast collections of wallpapers, backgrounds, and thematic images, efficient file sizes mean quicker downloads and smoother browsing. Our Image Tools section, featuring compressors and optimizers, leverages these principles to help you manage your visual assets effectively.
- Universal Compatibility: JPEG files are virtually universally supported. They can be opened and viewed on almost any device, operating system, and software application, from basic image viewers to professional photo editing suites. This wide compatibility makes JPEG the go-to format for sharing images online, in presentations, or through messaging apps, ensuring your audience can always access your content.
- Ideal for Photographic Images: JPEG excels at compressing photographs and images with continuous tones and smooth color gradients, such as nature photography, beautiful photography, and aesthetic visuals. It handles the subtle variations in color and light found in real-world scenes remarkably well, making it perfect for capturing and sharing high-resolution images.
- Flexible Quality Settings: When saving as JPEG, you typically have control over the compression level, allowing you to balance image quality with file size. This flexibility means you can choose maximum quality for print (e.g., for showcasing high-resolution stock photos or digital photography) or a lower quality for faster web loading times.
Limitations of the JPEG Format:
Despite its many advantages, JPEG does have some limitations to be aware of:
- Lossy Compression: The “lossy” nature means that some image data is permanently discarded during compression. This is generally imperceptible in a single save, but repeatedly editing and re-saving a JPEG file can lead to a cumulative degradation of image quality, resulting in artifacts and a “blocky” appearance. For critical editing, it’s always best to work with lossless formats (like PNG or TIFF) or the application’s native format (like PSD for Photoshop or AI for Illustrator) and save a JPEG copy only for the final output.
- No Transparency Support: Unlike formats like PNG, JPEG does not support transparency. If your image contains transparent areas, saving it as a JPEG will replace those areas with a solid background color, typically white or black. This is an important consideration for visual design elements that require a transparent background.
Understanding these characteristics helps you make informed decisions when managing your visual assets. Tophinhanhdep.com is dedicated to providing you with the knowledge and tools to navigate these technicalities, enhancing your digital photography and creative output.
Mastering JPEG Conversion Across Platforms and Applications
The process of saving an image as JPEG varies depending on the source material and the software you’re using. Below, we’ll explore various scenarios, from converting documents to images to handling specific file types from popular design software.
Saving a Microsoft Word Document as JPEG
Microsoft Word is primarily a word processing tool, but there are many instances where you might need to convert its content into an image format like JPEG. This is particularly useful for sharing specific sections as images, embedding snippets into presentations, or preserving complex layouts for web use without worrying about font or formatting compatibility.
Method 1: Using the “Save As” Feature (Limited Direct Support)
While some versions of Word might offer a “Save as Picture” option or an indirect route to JPEG, the most straightforward approach often involves an intermediate step or capturing the visual output. In certain contexts, such as when embedding objects that are then saved as pictures, Word can generate JPEGs. However, for an entire document, direct “Save As JPEG” is not universally available.
Typical Steps for Limited Direct Conversion (if available):
- Open the document in Microsoft Word.
- Select the content you want to save as an image. If it’s the entire page, you’ll select everything.
- Copy the selection.
- Paste it into another application that supports saving as JPEG (e.g., Microsoft Paint, GIMP, Adobe Photoshop, or even a blank Word document where you can then right-click and “Save as Picture” if the option appears for the pasted content).
- In the target application, navigate to “File” > “Save As” or “Export”.
- From the “Save as type” or “Format” dropdown menu, select “JPEG (*.jpg, *.jpeg)”.
- Choose a location and name your file, then click “Save.”
Method 2: The Screenshot Method (Most Reliable)
This method is highly effective for converting any visible portion of your Word document into a JPEG image, offering a faithful reproduction of what’s on your screen.
- Open the Word Document: Ensure your document is formatted exactly as you want it to appear in the JPEG. Adjust fonts, colors, layouts, and zoom level for optimal visual fidelity.
- Take a Screenshot:
- On Windows: Use the built-in “Snipping Tool” or “Snip & Sketch” app (Windows 10/11). Search for it in the Start Menu. Click “New,” then drag your cursor to select the area of the document you wish to capture. Once released, the screenshot appears in the tool’s window.
- On Mac: Press
Command + Shift + 4, then drag to select the desired area. The screenshot will typically save to your desktop. - Third-Party Tools: For enhanced functionality, consider tools like Snagit, Greenshot, or Lightshot, which offer more advanced annotation and editing capabilities before saving.
- Save the Screenshot as a JPEG Image:
- Using Image Editing Software (e.g., Paint, Photoshop, GIMP): Open the captured screenshot in your preferred image editor. Go to “File” or “Export,” select “JPEG” as the format. Adjust image quality or resolution settings as needed (e.g., lower quality for smaller file size for web, higher for detailed visuals), then click “Save.”
- Using Online Image Converters: Upload your screenshot to an online converter (e.g., those found on Tophinhanhdep.com’s Image Tools section). Select JPEG as the output format and download the converted file.
- Verify the JPEG Image: Open the saved JPEG to ensure it accurately represents your Word document’s content, including text, images, and formatting.
Converting Various Image Files to JPEG on Desktop and Mobile
Beyond documents, you’ll frequently encounter scenarios where existing image files need to be converted to JPEG. This is common when dealing with less compatible formats like TIFF, GIF, PNG (when transparency isn’t needed), or the increasingly common WebP format. Tophinhanhdep.com’s Image Tools are perfect for these conversions.
1. Using a Web Browser (Online Converters):
Online converters are ideal for quick, hassle-free conversions across any device with internet access – including smartphones and tablets.
- Choose a Reliable Online Converter: Search for “convert [original_format] to jpg online” (e.g., “convert PNG to JPG online”). Many reputable sites offer this service, including those linked from Tophinhanhdep.com’s Image Tools section. Ensure the chosen site supports your specific input file type.
- Upload Your Image: Click the “Choose file” or “Upload” button and select the image from your device. Some converters also allow you to paste an image URL. Be mindful of any maximum file size limits.
- Verify JPEG Output: Most converters will default to JPEG or allow you to select it from a dropdown menu. You might also find options to adjust image quality, resolution, or size – critical for optimizing your visuals for various uses, from high-resolution images to web-optimized aesthetic content.
- Convert and Download: Click “Convert” or “Save.” The process may take a few moments. The JPEG file will either download automatically to your device’s default download location or prompt you to choose one.
2. Using Paint in Windows:
Windows’ built-in Paint application offers a simple way to convert images to JPEG.
- Open Paint: Search for “Paint” in your Windows Start Menu and launch the application.
- Open Your Image: Click the “File” menu, then “Open.” Navigate to your image file, select it, and click “Open.”
- Save as JPEG: Click “File” again, then click the arrow next to “Save As.” From the list of image types, select “JPEG picture.”
- Rename and Save: A dialog box will appear. Choose your desired folder, optionally rename the file, and ensure “JPEG” is selected as the “Save as type.” Click “Save.”
3. Using Preview on a Mac:
macOS users can leverage the versatile Preview application for image conversions.
- Open Your Image with Preview: Locate your image file, right-click (or Ctrl-click) it, select “Open With,” and choose “Preview.”
- Export as JPEG: Go to the “File” menu and select “Export.” A dialog box with various options will appear.
- Change Format to JPEG: In the “Format” dropdown menu, select “JPEG.” You can also adjust the “Quality” and “Resolution” sliders to control file size and image clarity. Higher settings result in larger files, important for maintaining the fidelity of high-resolution images.
- Rename and Save: Optionally rename your file (ensure it ends with “.jpg” or “.jpeg”) and select a saving location. Click “Save.”
4. Using GIMP on PC, Mac, or Linux:
GIMP (GNU Image Manipulation Program) is a free, open-source image editor that provides robust conversion capabilities, ideal for digital photography and complex image manipulation.
- Get GIMP: If you don’t have it, download and install GIMP from its official website.
- Open the Image: Launch GIMP, click “File,” then “Open.” Select your image and click “Open” again.
- Export as JPEG: Go to “File,” then “Export As.” A dialog box will appear. In the “Select File Type (By Extension)” section, choose “JPEG image.”
- Modify JPEG Options: A new “Export Image as JPEG” dialog will pop up. You can check “Show preview in image window” to see the impact of your settings. Adjust the “Quality” slider (0-100) to find the perfect balance between file size and visual integrity for your aesthetic or nature photography.
- Export and Save: Click “Export.” Another dialog will prompt you to choose a file name and location. The “.jpg” extension will already be appended. Click “Save” to complete the conversion.
5. Addressing WebP to JPEG Conversion (Windows 11 PC & Browsers):
The WebP format, designed by Google for web optimization, offers superior compression but isn’t as universally compatible as JPEG. Many modern browsers, especially in Windows 11, may default to saving web images as WebP. This can be problematic for users needing JPEGs for productivity or business. Tophinhanhdep.com’s Image Tools are designed to assist with such conversions.
- Temporary Workaround (Save then Convert):
- Right-click the image and “Save image as…” (it will likely save as WebP).
- Open the saved WebP file in Microsoft Paint (or Preview on Mac, or GIMP).
- Use “File” > “Save As” (or “Export” on Mac/GIMP) and select “JPEG.”
- Browser Extensions: Install a browser extension like “Save Image As Type” (available for Chrome-based browsers like Brave or Edge). These extensions typically add options to the right-click context menu, allowing you to directly save web images in different formats, including JPEG.
- Online Converters: Use online WebP to JPEG converters. Upload the WebP file and download it as a JPEG. Tophinhanhdep.com can direct you to reliable converters for this purpose.
Exporting Adobe Illustrator and Photoshop Files as JPEG
For graphic designers and digital artists using professional software, exporting to JPEG is a common requirement for client previews, web use, or integrating elements into other applications. The process here is often more nuanced, offering greater control over output quality, which is crucial for high-resolution stock photos or digital art.
1. Adobe Illustrator (AI to JPEG):
Illustrator is vector-based, meaning its native files (AI) are resolution-independent. When exporting to a raster format like JPEG, you define the resolution.
- The “Export As” Distinction: Crucially, in Adobe Illustrator, you export to JPEG, you don’t “Save As” JPEG directly from the main “File” menu.
- Initiate Export: Go to the overhead menu: File > Export > Export As…
- Choose Format and Name: In the “Export As” dialog box, type your desired file name. From the “Format” dropdown menu, select “JPEG (jpg)”.
- Use Artboards: If your Illustrator file has multiple artboards (which represent distinct pages or elements, often used in visual design and graphic design), check the “Use Artboards” box. You can choose “All” to export all artboards as separate JPEGs or specify a “Range” (e.g., “2-3” for artboards 2 and 3). This is essential for managing thematic collections or digital art portfolios.
- Click Export: This will open the “JPEG Options” dialog box.
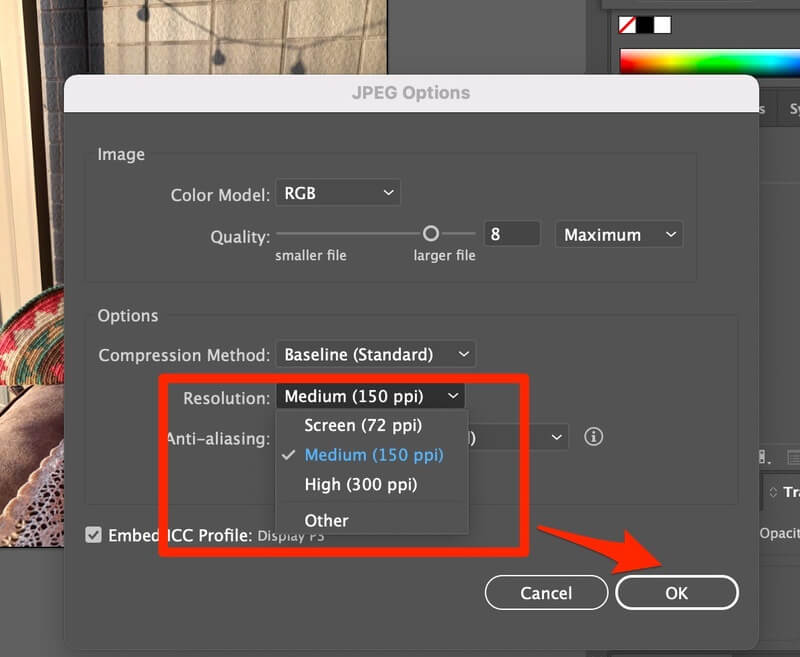
- Color Model Selection:
- CMYK: Choose CMYK (Cyan, Magenta, Yellow, Black) if the JPEG is intended for print. This color model is standard for commercial printing and ensures color accuracy in physical output.
- RGB: Choose RGB (Red, Green, Blue) if the JPEG is intended for screens or web use. This is the standard color model for digital displays and will ensure your images look vibrant and accurate online, aligning with aesthetic and beautiful photography.
- Image Quality (Resolution): This is a critical setting for defining the output clarity and file size, impacting everything from high-resolution images to web backgrounds.
- Screen/Web (72 ppi): For images viewed on monitors, websites, or social media, 72 ppi (pixels per inch) is generally sufficient. It provides good visual quality while keeping file sizes small for fast loading.
- Print (300 ppi): For professional printing, high-resolution (300 ppi) is almost always preferred. This ensures crisp, detailed output when your graphic design or digital art is rendered physically.
- Mid-Range (150 ppi): For large but less detailed print items, 150 ppi can be an acceptable compromise, but 300 ppi remains the standard for quality.
- Click OK: Once all settings are configured, click “OK” to export your Illustrator file as a JPEG.
Additional Illustrator Tips:
- Saving with Bleed: JPEG export doesn’t have explicit bleed settings during export. To include bleed, you must set up the bleed area when creating your Illustrator document (File > Document Setup > Bleed). The exported JPEG will then include this area if your artwork extends to it. This is crucial for professional graphic design print projects.
- Transparent Backgrounds: JPEG cannot have a transparent background. If you need transparency, export as a PNG file (which supports transparency), and then convert the PNG to a JPEG if you absolutely need JPEG, understanding that transparency will be lost (filled with white or black).
2. Adobe Photoshop (PSD to JPEG):
Photoshop, being a raster-based editor, is inherently designed for working with pixels. Saving to JPEG is a core function, offering extensive controls for optimization. Tophinhanhdep.com’s focus on digital photography and editing styles means these tools are central to many users’ workflows.
Method 1: The ‘Save As’ Technique
This is the most direct and frequently used method.
- Open Your File: Have your image open in Photoshop.
- Access ‘Save As’: Navigate to File > Save As…
- Choose Location: Photoshop may first ask if you want to save to Cloud Documents or “On Your Computer.” Select “On Your Computer.”
- Select JPEG Format: In the “Save As” dialog box, find the “Format” dropdown menu and choose “JPEG (.JPG;.JPEG;*.JPE)”.
- Name and Save: Give your file a name, choose a saving location, and click “Save.”
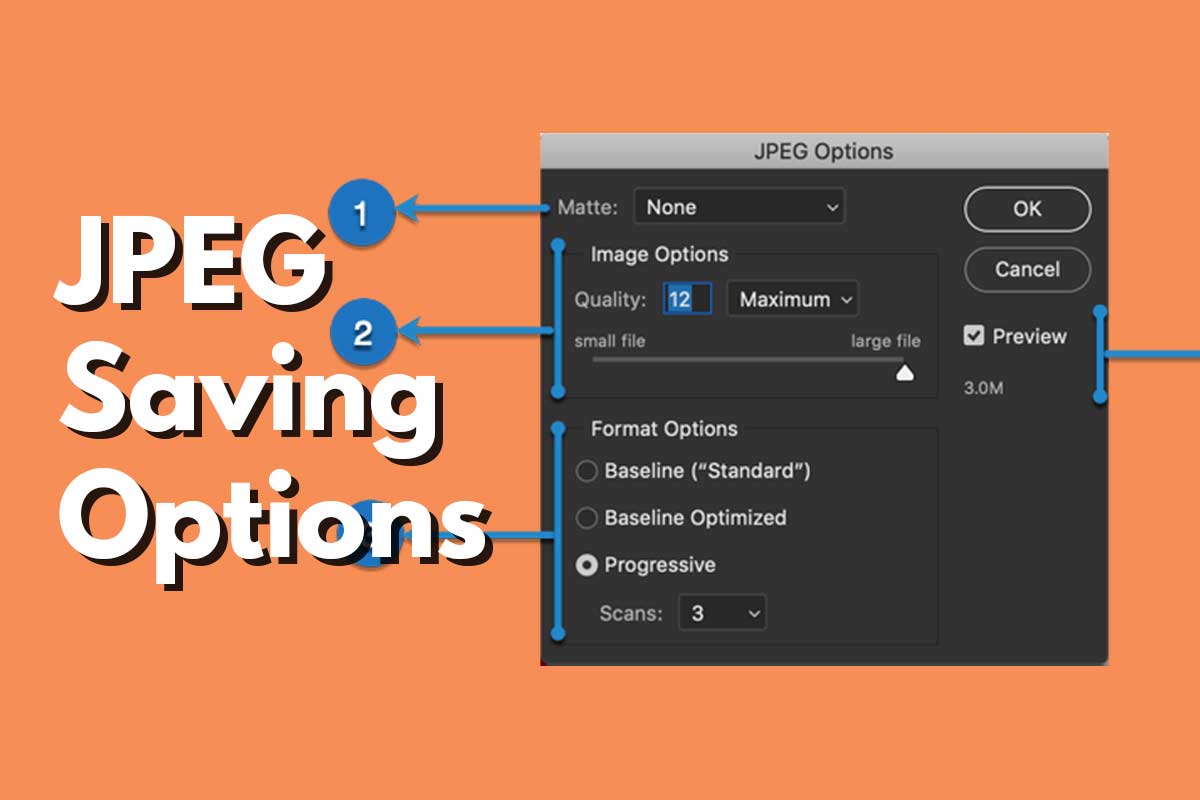
- JPEG Options Dialog: A “JPEG Options” dialog box will appear, offering critical settings:
- Quality: This is a slider or numerical input (0-12, or Low/Medium/High/Maximum). Higher values mean better image quality but larger file sizes. An estimated file size is usually shown. For high-resolution images or beautiful photography, aim for higher quality. For web images, a slightly lower setting (e.g., 8-10) often provides a good balance.
- Matte: If your image has transparent areas (which JPEGs don’t support), the “Matte” option allows you to fill those transparent pixels with a specific color (e.g., white, black, or a custom color).
- Format Options:
- Baseline (“Standard”): The most compatible option, suitable for all devices and web browsers.
- Baseline Optimized: Offers slightly better compression (smaller file size) than Standard without reducing image quality. Widely supported.
- Progressive: JPEGs load in successive “scans” in web browsers, showing a low-resolution version first, then progressively rendering more detail. Useful for larger web images to give the user a sense of what’s loading quickly.
- Preview: Check this box to see a real-time preview of how your image will look with the selected settings, helping you make informed decisions for your aesthetic visuals.
- Click OK: Once satisfied, click “OK” to save.
Method 2: The ‘Export As’ Option
This method, accessible via File > Export > Export As…, provides a more modern interface with specific features tailored for web and digital output.
- Access Export As: Go to File > Export > Export As…
- Select JPEG Format: In the “Export As” dialog, choose “JPEG” from the “Format” dropdown.
- Adjust Settings: You’ll find options similar to “Save As,” including:
- Quality: Adjust the slider for desired quality.
- Width & Height: Resize your image directly here.
- Canvas Size: Useful for adding padding around your image.
- Convert to sRGB: Generally keep this checked for images destined for the web or mobile devices to ensure consistent color representation.
- Click Export: Save your optimized JPEG.
Method 3: The ‘Save for Web (Legacy)’ Method
Though labeled “Legacy,” this powerful feature (found at File > Export > Save for Web (Legacy)…) remains a favorite for its granular control over image optimization, especially for web graphics and balancing speed with visual quality.
- Access Save for Web (Legacy): Go to File > Export > Save for Web (Legacy)…
- Choose JPEG: In the large dialog box, select “JPEG” from the format dropdown on the right side.
- Extensive Optimization Controls:
- Preset: Choose from predefined settings (e.g., JPEG High, JPEG Medium) or save your own custom settings.
- Quality: A slider from 0-100 for fine-tuning.
- Optimized: Check for better compression.
- Progressive: Enable progressive loading for web.
- Embed Color Profile: Include color profile (e.g., sRGB) for consistent color display.
- Blur: Apply a subtle blur to further reduce file size (use sparingly as it affects sharpness).
- Convert to sRGB: Essential for web display.
- Preview: Choose how you want to preview the output.
- Metadata: Decide how much (if any) metadata to include, impacting file size and digital photography information.
- Image Size: Adjust dimensions for web display.
- 2-Up / 4-Up Tabs: Compare different compression settings side-by-side to find the optimal balance.
- Click Save: Once settings are finalized, click “Save.”
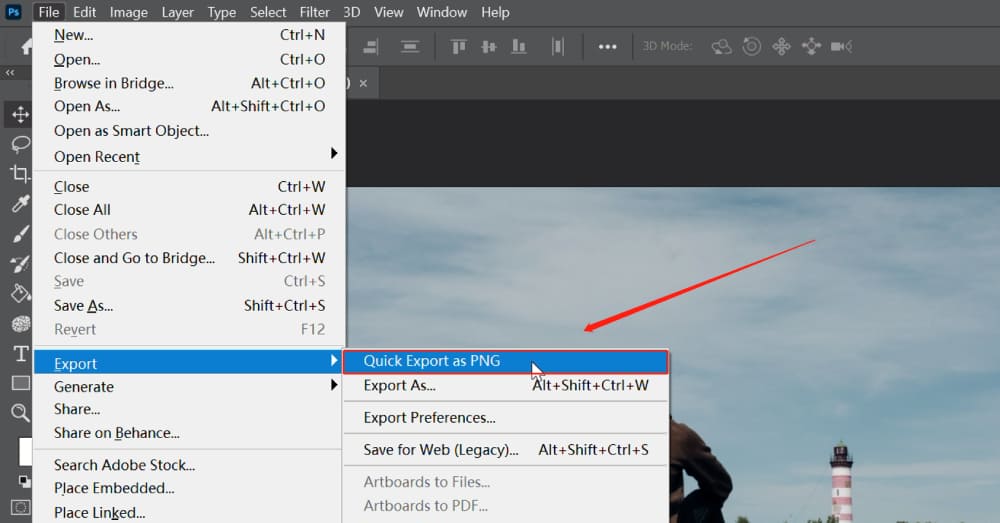
Method 4: Quick Export as JPEG
For speed and convenience when you have a standard JPEG export setting, use Quick Export.
- Set Default Quick Export Format:
- Go to Edit > Preferences > Export… (on Mac, Photoshop > Settings > Export…).
- In the “Export Preferences” dialog, set the “Quick Export Format” to “JPEG.” You can also set a default quality here.
- Quick Export: Now, you can simply go to File > Export > Quick Export as JPEG. This single click will export your image using the predefined settings, greatly streamlining your workflow, especially when combined with powerful tools like TourBox.
Streamlining Your Workflow with TourBox
For professionals consistently managing visual design, digital art, and photography, the repetitive steps of exporting can become time-consuming. External creative consoles like TourBox integrate seamlessly with Photoshop (and other creative software) to automate these processes. With TourBox, you can create custom macro commands, allowing you to execute complex export sequences (like setting specific JPEG quality, resizing, and saving to a designated folder) with a single button press. This shifts the focus from tedious operations back to the creative process, enhancing efficiency in managing high-resolution images and visual collections.
Optimizing Your JPEG Images for Diverse Visual Needs
Beyond merely saving an image as a JPEG, true mastery lies in optimizing it for its intended use. Tophinhanhdep.com provides a platform for various visual needs, from wallpapers and backgrounds to aesthetic and nature photography, each requiring a different optimization strategy.
- Balancing Quality and File Size: This is the eternal struggle with JPEG.
- High-Resolution for Print/Large Displays: For professional printing, stock photos, or wallpapers meant for large, high-definition screens, always aim for the highest possible quality (e.g., 300 ppi, JPEG quality 10-12 in Photoshop). This preserves fine details and vibrant colors.
- Web and Social Media: For fast-loading websites, social media sharing, or email attachments, prioritize smaller file sizes. You can often reduce quality slightly (e.g., 72 ppi, JPEG quality 7-9) without a noticeable drop in visual quality on standard screens. Our Image Tools include compressors and optimizers specifically for this purpose.
- Color Profiles (sRGB vs. CMYK):
- sRGB for Digital: Always convert your JPEGs to sRGB color profile for web, mobile, and general digital display. This is the most widely supported color space and ensures your colors look consistent across different screens.
- CMYK for Print: If your JPEG is for professional print, use the CMYK color model. This ensures color accuracy when translated to physical ink. Incorrect color profiles can lead to unexpected color shifts in print.
- Image Dimensions: Resize your images appropriately. Large, high-resolution images should be downscaled for web use. For example, a beautiful photography piece might be 6000 pixels wide at 300 ppi for print, but only 1920 pixels wide at 72 ppi for a website banner. Using Tophinhanhdep.com’s image tools like AI upscalers can also help improve dimensions if starting with smaller files.
- Metadata: Consider whether to include or strip metadata (e.g., camera information, copyright) during export. Including it adds a tiny bit to file size but preserves valuable information for digital photography. For maximum privacy or smallest file size, you can remove it.
Enhancing Your Visual Workflow with Tophinhanhdep.com
Mastering how to save an image as JPEG is more than just a technical skill; it’s a gateway to effective visual communication and artistic expression. Whether you’re curating aesthetic images for a mood board, preparing high-resolution stock photos, or manipulating digital art for a client, the correct use and optimization of the JPEG format are paramount.
At Tophinhanhdep.com, we are dedicated to empowering your creative journey. Our extensive resources cover everything from stunning Images (Wallpapers, Backgrounds, Aesthetic, Nature, Abstract, Sad/Emotional, Beautiful Photography) to in-depth guidance on Photography (High Resolution, Stock Photos, Digital Photography, Editing Styles). Furthermore, our robust Image Tools (Converters, Compressors, Optimizers, AI Upscalers, Image-to-Text) provide practical solutions for every stage of your workflow. For those seeking to refine their craft, our Visual Design section (Graphic Design, Digital Art, Photo Manipulation, Creative Ideas) offers inspiration and techniques, complemented by Image Inspiration & Collections featuring Photo Ideas, Mood Boards, and Trending Styles.
By understanding and applying the methods outlined in this guide, you can confidently transform your visual content into perfectly optimized JPEG files, ready for any platform or purpose. Explore Tophinhanhdep.com to discover more tools, inspiration, and knowledge to elevate your visual storytelling and design endeavors.
Conclusion
The JPEG format remains an indispensable standard in the digital world, celebrated for its efficiency and widespread compatibility, especially for rich photographic and graphic content. As we’ve explored, saving or converting an image to JPEG can involve various methods, from simple right-clicks on web images to intricate export settings in professional design software like Adobe Illustrator and Photoshop, or even creative workarounds for Microsoft Word documents.
The key to successful JPEG conversion lies in understanding your specific needs: whether it’s optimizing for fast web loading with a smaller file size, preserving the highest possible quality for print and high-resolution images, or navigating the unique challenges of different source applications. Always remember the trade-offs of lossy compression and the importance of maintaining original, editable files for future modifications.
By adopting these practices and leveraging the powerful resources available at Tophinhanhdep.com, you are well-equipped to manage your digital visuals effectively. From converters and compressors to AI upscalers and endless creative inspiration, Tophinhanhdep.com is your go-to hub for transforming your visual ideas into stunning, perfectly formatted realities. Embrace the power of JPEG and let your images shine!