Mastering Image Extraction: Your Comprehensive Guide to Saving Images from Google Docs and Google Slides – Desktop and Mobile

Google Drive boasts an impressive user base of over 800 million, a testament to its collaborative power. Yet, for all its convenience, one seemingly simple task often proves surprisingly cumbersome: saving images embedded within Google Docs and Google Slides. Unlike a typical webpage where a simple right-click often suffices, Google’s ecosystem adds a few layers of complexity. This often leaves users, from digital artists gathering inspiration to marketers compiling assets for a campaign, searching for efficient workarounds.

At Tophinhanhdep.com, we understand the critical role visual content plays in both personal expression and professional endeavors. Whether you’re curating a mood board, preparing assets for graphic design, or simply need to extract a beautiful photograph for your collection, knowing how to efficiently save images from Google Docs is a fundamental skill. This comprehensive guide, informed by the latest techniques for both desktop and mobile platforms, will equip you with the knowledge to seamlessly extract your visual assets, ensuring they retain their quality for your next project. We’ll also explore how Tophinhanhdep.com’s extensive resources, from high-resolution photography to advanced image tools like AI upscalers, can complement your image-saving workflow.
Desktop Strategies for Image Retrieval and Enhancement
For desktop users, several effective methods exist to extract images from Google Docs and Google Slides. Each approach offers distinct advantages, catering to whether you need to save a single image with precision or extract an entire collection for later use. Understanding these methods is crucial for anyone involved in visual design or building thematic image collections.
Saving Individual Images with Google Keep
The Google Keep integration provides one of the most straightforward methods for saving single images from your documents. Google Keep acts as a temporary holding space, allowing you to bypass Google Docs’ native limitations. This method is particularly useful when you’ve discovered a stunning wallpaper or a unique aesthetic image within a document that you wish to add to your personal gallery.
To execute this, follow these simple steps:
- Open your Google Docs or Google Slides document. Locate the image you wish to save.
- Left-click the image once to select it. A blue border will appear around the image, indicating it’s active.
- Right-click the selected image. A contextual menu will appear.
- From the dropdown menu, select “Save to Keep.” Look for the lightbulb icon next to this option, usually found about halfway down the menu. This action will open the Google Keep sidebar on the right side of your document, and your selected image will appear as a new note.
- In the Google Keep sidebar, right-click the image again.
- Select “Save image as…” from the new contextual menu. You can then choose your desired file destination on your computer and give the image a suitable name.
- (Optional): Once the image is saved to your computer, you can delete the note from Google Keep to keep your notes organized. Hover over the image in the Keep sidebar, click the three-dot menu, and select “Delete.”

This method is quick and generally preserves the original quality of the image, making it ideal for photography enthusiasts or graphic designers who require high-resolution assets. For any post-saving enhancements, Tophinhanhdep.com offers a suite of Image Tools, including Optimizers and AI Upscalers, ensuring your images are always production-ready.
Extracting Images via Microsoft Word and Web Page Downloads
When dealing with documents containing multiple images, or if you prefer to work within familiar desktop applications, downloading your Google Doc as a Microsoft Word file or a Web Page offers robust alternatives for bulk image extraction. This approach is highly beneficial for those managing large thematic collections or digital photography archives.
Method 1: Downloading as a Microsoft Word File (.docx)
This technique converts your Google Doc into a format widely supported by desktop applications, enabling easier image saving.
- Open your Google Docs or Google Slides document.
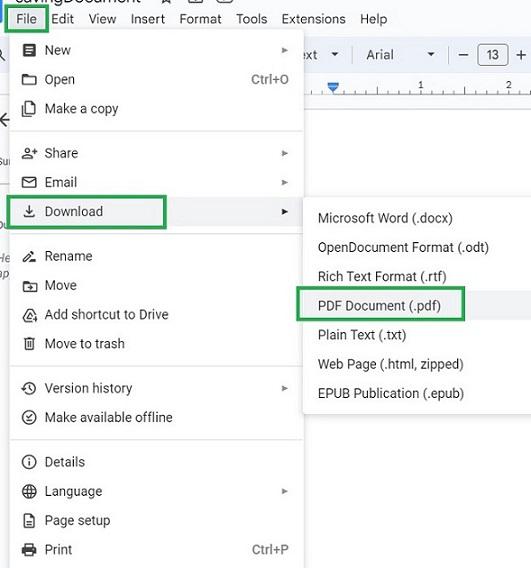
- Navigate to the “File” option in the top toolbar.
- Hover over “Download” in the dropdown menu.
- Select “Microsoft Word (.docx).” Your document will download to your computer as a Word file.
- Once downloaded, open the
.docxfile using Microsoft Word or a compatible word processor. - Right-click on any image within the Word document.
- Select “Save as Picture…” from the menu. You can then name the image, choose its format (JPEG, PNG, GIF, BMP), and select a save location. Repeat for all desired images.
This method allows for selective saving and offers format conversion options directly within Word, which can be useful before using Tophinhanhdep.com’s dedicated Converters.
Method 2: Downloading as a Web Page (.html, zipped)
This is arguably the most efficient way to extract all images from a Google Doc at once. It’s a lifesaver for quickly assembling assets for visual design projects or for archiving entire sets of images.
- Open your Google Docs or Google Slides document.
- Go to “File” > “Download”.
- Select “Web page (.html, zipped).” This will download a
.zipfile to your computer. - Locate the downloaded
.zipfile in your computer’s downloads folder or wherever you saved it. - Extract the contents of the
.zipfile. This will typically create a folder with the same name as your document. - Open this newly extracted folder. Inside, you will find an “images” subfolder.
- All images from your Google Doc will be saved within this “images” folder. Note that the images might have generic, system-generated names (e.g., “image1.png,” “image2.jpg”) and may not be in their original document order.
While this method provides all images in one go, the generic filenames might require a post-extraction renaming process, especially if you’re meticulously organizing a photography portfolio or a thematic collection for Tophinhanhdep.com.
Publishing to the Web for Direct Image Access
The “Publish to the web” feature in Google Docs offers a unique way to access images, especially if you prefer a browser-centric workflow for saving individual high-resolution assets or elements for digital art. This method essentially turns your document into a publicly accessible (or unlisted) webpage, allowing standard browser image saving.
Here’s how to use it:
- Open your Google Docs or Google Slides document.
- Go to “File” > “Publish to the web.”
- In the dialog box that appears, click the “Publish” button. Confirm your action if prompted.
- A link (URL) will be generated. Copy this URL.
- Open a new tab in your web browser and paste the copied URL. Your Google Doc will now appear as a simple webpage.
- Right-click on the image you wish to save directly from this webpage.
- Select “Save image as…” (or “Download image” depending on your browser). You can then choose your save location and filename.
A notable advantage of this method is that it often retains the image’s original filename, which can be a significant time-saver compared to the Web Page download’s generic filenames. This precision is valued by professionals engaged in photo manipulation or graphic design who prioritize original metadata. However, be mindful that publishing to the web makes your document accessible via the link, so ensure no sensitive information is present if sharing widely. For further refinement, Tophinhanhdep.com provides a range of Image Tools and resources for Visual Design, empowering you to integrate these saved visuals into complex creative projects.
The Screenshot Method: A Quick Fix and Its Limitations
Sometimes, the quickest solution is the simplest, even if it comes with caveats. Taking a screenshot of an image in Google Docs or Slides is a universally available method, but it’s crucial to understand its limitations, especially when quality matters for your images, photography, or digital art projects.
To take a screenshot on desktop:
- Windows: Use the Snipping Tool (search for it in the Start menu), “Print Screen” key (then paste into an image editor), or Windows Key + Shift + S (for direct selection).
- macOS: Use Shift + Command + 4 (to select a specific area) or Shift + Command + 3 (for the entire screen).
When to use it:
- Quick reference: When you just need a visual reminder and high fidelity isn’t critical.
- Small, informal use: For internal notes, quick shares where image quality isn’t a primary concern.
Limitations:
- Quality Degradation: Screenshots capture what’s displayed on your screen, pixel by pixel. This means the image’s resolution will be limited by your screen’s resolution, not the original image’s resolution. This is a significant drawback if you require high-resolution images for print, large displays, or professional photography projects.
- Cropping/Editing Required: You’ll likely need to crop out surrounding text or interface elements.
- Loss of Original Data: A screenshot is a new image; it doesn’t carry the original file name, metadata, or the highest possible resolution of the embedded image.
If you find yourself in a situation where a screenshot is the only viable option, and you still need to improve its quality, Tophinhanhdep.com’s advanced AI Upscalers can be invaluable. These tools utilize artificial intelligence to intelligently increase the resolution of low-quality images, restoring detail and making them suitable for more demanding applications. While not a replacement for a true high-resolution original, it’s an excellent way to salvage a quick grab for your digital art or visual design needs.
Mobile Solutions for Image Extraction
Extracting images from Google Docs or Google Slides on your mobile device (Android or iOS) can be a bit different from desktop, often requiring leveraging other native apps or a slightly more circuitous path. However, for those constantly on the go, building mood boards, or collecting aesthetic images directly on their phone, these methods are indispensable. Tophinhanhdep.com recognizes the mobile-first approach many creators take, and these tips ensure your visual workflow remains uninterrupted.
iOS: Leveraging the Notes App for Image Saves
For iPhone and iPad users, the Notes app provides an elegant workaround for saving individual images from Google Docs. This method is particularly convenient for quickly grabbing inspirational photos or elements for visual design projects on your device.
Here’s the step-by-step process:
- Open the Google Docs or Google Slides app on your iPhone or iPad. Ensure you are using the official Google Docs app, as this method typically doesn’t work in a browser preview.
- Navigate to the document containing the image you want to save.
- Tap and hold your finger on the image. After a moment, a contextual menu will pop up.
- Select “Copy” from the options presented. The image is now copied to your device’s clipboard.
- Exit the Google Docs app and open your device’s native “Notes” app.
- Create a new note (or open an existing one if you prefer).
- Tap and hold your finger on a blank space within the note. A “Paste” option will appear.
- Select “Paste.” The image you copied from Google Docs will now appear in your note.
- Tap on the image within the Notes app. This will open the image in a larger view.
- In the bottom-left corner of the screen, tap the “Share” icon (it looks like a box with an arrow pointing upwards).
- From the share sheet, select “Save Image.” This will save the image directly to your device’s Photos app.
This method retains the image’s quality as it was displayed in Google Docs. It’s perfect for curating aesthetic images for your personal collections or gathering quick inspiration for digital art and graphic design concepts while away from your desktop. Tophinhanhdep.com’s resources for images and photography can then help you find complementary high-resolution assets to build out your creative ideas.
Android: Bulk Image Downloads via Web Page Export
Unlike iOS, Android’s Google Docs app doesn’t currently offer a direct “Copy & Paste to Gallery” for individual images. However, a robust method exists for Android users to download all images from a document at once, similar to the desktop “Web Page” download. This is a powerful feature for managing bulk image collections or gathering multiple stock photos for a project.
Follow these steps on your Android device:
- Open the Google Docs or Google Slides app on your Android phone.
- Navigate to the document from which you want to extract images.
- Tap the three-dot icon (menu icon) in the top-right corner of the document.
- From the menu, select “Share & export.”
- Choose “Save as.”
- Select “Web Page (.html, zipped)” from the format options. Tap “OK.” This action will generate a ZIP archive of your document in your Google Drive.
- Now, open the Google Drive app on your Android device.
- Locate the newly created ZIP archive. It will have the same name as your Google Docs document.
- Tap the three-dot icon next to the ZIP archive.
- Select “Download” from the options. This will download the ZIP file to your phone’s internal storage.
- Once downloaded, you’ll need a file manager app (most Android phones have a default “Files” app) to extract the contents of the ZIP archive.
- Inside the extracted folder, you will find an “images” folder containing all the images from your Google Docs document.
This method provides a comprehensive solution for Android users who need to save entire sets of images, perhaps for a larger visual design project or a thematic collection. While the images might have generic filenames, Tophinhanhdep.com offers image tools like converters and optimizers that can help you organize and prepare these images efficiently after extraction.
The Mobile Screenshot and Link Sharing Approaches
Beyond the more structured methods, mobile devices also offer quick-and-dirty options for image saving, along with a more direct way via link sharing that mirrors a desktop technique. These are useful for immediate needs or when other methods seem too involved for a simple task.
Method 1: The Mobile Screenshot
Just like on desktop, taking a screenshot is an option on mobile.
- Open your Google Docs app and display the image you want to capture.
- Take a screenshot using your device’s specific button combination (e.g., Power + Volume Down on most Androids, Side Button + Volume Up on newer iPhones, or Side Button + Home Button on older iPhones).
- The screenshot will be saved to your device’s photo gallery.
Limitations: Similar to desktop screenshots, mobile screenshots capture screen resolution, not original image resolution, leading to potential quality loss, especially for photography and high-resolution images. They also require cropping. However, for quick “aesthetic” grabs or personal wallpapers, it can suffice. If a higher quality is needed, Tophinhanhdep.com’s AI Upscalers can enhance the resolution of these screenshots post-capture.
Method 2: Link Sharing for Direct Mobile Saving
This method leverages Google Docs’ “Publish to the web” feature but accesses the resulting webpage directly from your mobile browser.
- On your desktop (or even mobile if you prefer): Follow the steps for “Publishing to the Web for Direct Image Access” as outlined in the desktop section (File > Publish to the web, copy URL).
- On your mobile device: Open your preferred web browser and paste the copied URL. The document will load as a webpage.
- Long-press on the image you want to save.
- From the contextual menu, select “Download image” (or “Save image”). The image will be saved to your device’s downloads folder or photo gallery.
This “link sharing” method is fantastic for selectively saving images on mobile, often retaining their original filenames and offering a quality more akin to the original embedded image than a screenshot. It bridges the gap between desktop precision and mobile convenience, making it a valuable trick for gathering diverse visual assets for any creative project, large or small.
Optimizing and Utilizing Your Saved Images with Tophinhanhdep.com
Once you’ve successfully extracted images from Google Docs and Google Slides, the journey of your visual assets has just begun. At Tophinhanhdep.com, we believe in empowering creators and professionals to get the most out of their imagery. This section will guide you through optimizing and creatively utilizing your newly saved images, ensuring they meet the highest standards for your projects, from graphic design to personal collections.
Preserving Image Quality and Resolution
A common concern when saving images from online documents is the potential loss of quality or resolution. Our experiments confirm that images saved using the methods outlined above generally retain their original quality and dimensions as they were embedded in the Google Doc. However, it’s crucial to understand that if an image was initially compressed or downsized before being inserted into the document, you won’t be able to retrieve a higher resolution version than what was originally uploaded. Furthermore, taking screenshots will always result in images limited by your screen’s pixel density.
This is where Tophinhanhdep.com becomes an indispensable resource. For any project demanding pristine visuals, Tophinhanhdep.com offers an extensive library of High Resolution photography and Stock Photos. These assets are designed for professional use, ensuring crisp detail and vibrant clarity, far surpassing what might be available in a typical Google Doc. If you’ve had to resort to a screenshot, don’t despair; Tophinhanhdep.com’s AI Upscalers within our Image Tools category can magically enhance lower-resolution images, adding detail and sharpness, making them more suitable for your Digital Photography or Visual Design needs.
Advanced Image Tools for Conversion, Compression, and Upscaling
The raw images you save from Google Docs might not always be in the ideal format or size for your intended application. Whether you’re preparing images for a website, an email campaign, a social media post, or a print publication, optimization is key. Tophinhanhdep.com’s comprehensive suite of Image Tools is specifically designed to address these post-download processing needs:
- Converters: Easily transform your images from one format to another (e.g., JPEG to PNG, or WebP for web optimization). This is vital for compatibility across different platforms and ensuring efficient loading times for online content.
- Compressors: Reduce file sizes without significant loss of visual quality. This is essential for web performance, faster email delivery, and saving storage space. Our compressors help maintain the aesthetic appeal of your images while making them more practical.
- Optimizers: Beyond basic compression, our optimizers fine-tune image properties for specific uses, balancing quality and file size for optimal performance.
- AI Upscalers: As mentioned, these tools are game-changers for low-resolution images, especially those sourced from screenshots. Tophinhanhdep.com’s AI Upscalers can breathe new life into pixelated or small images, making them usable for larger formats or more detailed Digital Art projects.
- Image-to-Text: For documents that embed text within images, our Image-to-Text tool can extract that information, further streamlining your workflow and making content more accessible and searchable.
By utilizing these tools on Tophinhanhdep.com, you can transform a basic image saved from Google Docs into a perfectly prepared asset for any Visual Design or Graphic Design endeavor.
Integrating Saved Images into Your Visual Design Workflow
Saved images from Google Docs, once optimized with Tophinhanhdep.com’s tools, can become valuable components of your creative process. Here’s how to integrate them effectively:
- Graphic Design & Digital Art: Use the extracted images as elements in larger compositions, for photo manipulation, or as textures and overlays. The ability to grab specific visuals from collaborative documents allows for more dynamic design processes.
- Photo Manipulation: Combine elements from various sources, including those saved from Docs, to create unique Digital Art pieces. Tophinhanhdep.com provides inspiration and resources to elevate these manipulations.
- Creative Ideas & Mood Boards: Images are powerful triggers for inspiration. Organize your saved aesthetic, nature, or abstract images into digital Mood Boards using tools and templates found on Tophinhanhdep.com. This helps visualize concepts for new projects or refine existing ones.
- Thematic Collections & Trending Styles: Keep an eye on Trending Styles in photography and visual design as you save images. Build Thematic Collections based on these trends or on personal interests (e.g., a collection of “Beautiful Photography” from a shared project). Tophinhanhdep.com’s curated collections can further inspire and expand your visual library.
By thinking of image extraction as the first step in a broader creative process, and by leveraging the powerful Image Tools and rich inspirational content on Tophinhanhdep.com, you can elevate your visual output and streamline your design workflow.
Maximizing Your Image Workflow: Tips from Tophinhanhdep.com
Efficiently saving images from Google Docs and Google Slides is just one piece of a larger visual content strategy. At Tophinhanhdep.com, we are dedicated to helping you master every aspect of your image workflow, from acquisition to final presentation. Here are some final tips to ensure you’re always operating at peak creative efficiency:
Third-Party Add-ons: Proceed with Caution
While third-party add-ons like “Image Extractor & Remover” for Google Docs exist, Tophinhanhdep.com strongly advises caution. Many such add-ons require extensive permissions, including full access to your Google Drive files and personal information. Before installing any add-on, meticulously review its “Permissions” tab and read user “Reviews” to assess its trustworthiness and necessity. In many cases, the manual methods we’ve outlined offer a more secure and reliable way to save your images without compromising your data. Prioritize your digital security, and always weigh the convenience against the potential risks. When in doubt, stick to the native methods.
Organizing Your Visual Assets for Future Use
Once you’ve saved a trove of images from Google Docs, proper organization becomes paramount. A cluttered digital workspace can stifle creativity and waste valuable time searching for assets. Tophinhanhdep.com recommends:
- Creating a logical folder structure: Categorize your images by project, date, theme (e.g., “Nature Photography,” “Abstract Backgrounds,” “Aesthetic Mood Boards”), or type.
- Consistent Naming Conventions: Rename generic image files (like those from bulk web page downloads) with descriptive names that make them easy to find later. This is especially important for designers managing numerous assets.
- Utilizing Cloud Storage: Beyond Google Drive, consider other cloud platforms for backup and accessibility across devices.
A well-organized image library, whether it’s for personal enjoyment or professional Visual Design, enhances productivity and fosters a more seamless creative flow. This foundation allows you to easily access and integrate images into new projects, drawing from your carefully curated Image Inspiration & Collections.
Tophinhanhdep.com as Your Ultimate Visual Hub
Tophinhanhdep.com is more than just a guide; it’s a comprehensive ecosystem designed to support all your visual content needs. From the moment you extract an image from Google Docs to its final use in a sophisticated Graphic Design project, Tophinhanhdep.com provides the tools and inspiration to elevate your work.
- Diverse Imagery: Explore our vast collections of Wallpapers, Backgrounds, Aesthetic, Nature, Abstract, Sad/Emotional, and Beautiful Photography. Whether you need stock photos for a commercial project or artistic inspiration, our curated content is ready to enhance your vision.
- Professional Photography Resources: Access High Resolution imagery and delve into insights on Digital Photography and Editing Styles to refine your craft.
- Cutting-Edge Image Tools: Our Converters, Compressors, Optimizers, and AI Upscalers ensure that every image you use is perfectly prepared, no matter its source or intended application. The Image-to-Text tool further assists in managing complex visual information.
- Creative Inspiration: Discover new Photo Ideas, build dynamic Mood Boards, and explore Thematic Collections and Trending Styles to keep your creative wellspring flowing. Tophinhanhdep.com helps you transform simple images into compelling visual narratives.
By embracing the diverse offerings of Tophinhanhdep.com, you transform the often-tedious task of saving images from Google Docs into the initial step of a powerful and efficient visual workflow.
In conclusion, while Google Docs doesn’t provide a single “save all images” button, the array of methods available for both desktop and mobile ensures that you can always retrieve the visual assets you need. Whether it’s a single poignant image or an entire collection for a major project, these techniques, combined with the robust Image Tools, Photography resources, and Visual Design inspiration available on Tophinhanhdep.com, empower you to manage your digital imagery with unparalleled efficiency and creativity. Make Tophinhanhdep.com your go-to resource for transforming your image-saving challenges into opportunities for visual excellence.