How to Save Images from Google Slides

In today’s visually-driven world, presentations are more than just text and bullet points; they are dynamic canvases brought to life by compelling images. Google Slides, as a ubiquitous tool for creating and collaborating on presentations, often becomes a repository for high-quality visuals, inspiring photography, and carefully curated design elements. However, you might find yourself in a common predicament: you need to reuse an image from an older Google Slides presentation, but the original file is nowhere to be found on your computer. The challenge arises because Google Slides, unfortunately, doesn’t offer a direct “Save Image As” option when you right-click on an individual picture within a slide.
This isn’t just about recovering a lost file; it’s about maintaining your creative workflow, ensuring consistency across your visual projects, and leveraging every valuable asset you’ve already crafted or sourced. Whether you’re a graphic designer needing an element for a new digital art piece, a photographer looking to repurpose a high-resolution shot, or simply building your thematic collections, knowing how to extract images efficiently from your Google Slides is an indispensable skill.

This comprehensive guide, brought to you by Tophinhanhdep.com, will walk you through a variety of simple yet effective methods for saving images directly from your Google Slides presentations. We’ll explore techniques ranging from quick screenshots to more intricate extraction processes that help preserve image quality, ensuring your visual assets remain pristine for any future use, be it for a new aesthetic background, a digital photography project, or an inspiration mood board. By the end, you’ll be equipped to effortlessly grab the images you need, ready to integrate them into your next creative endeavor or to enhance your existing image collections at Tophinhanhdep.com.
The Essential Guide to Extracting Visuals for Your Creative Projects
In the realm of visual content, every image holds potential. From the stunning nature photography used as a slide background to the abstract art representing a complex idea, these visuals are critical components of effective communication and design. Understanding how to systematically extract these elements from your Google Slides presentations is more than a technical trick; it’s a strategic move for any creator or enthusiast.
Why Saving Images is Crucial for Designers and Photographers
For professionals and enthusiasts deeply invested in images and visual design, the ability to save assets from Google Slides is paramount.
- Enhanced Visual Design and Creative Flow: Images extracted can serve as foundational elements for new graphic design projects, digital art, or photo manipulation. Perhaps an aesthetic background image from a past presentation could inspire a new wallpaper design, or a specific visual might fit perfectly into a mood board for a trending style. Without a reliable way to save these, you risk breaking your creative flow and having to recreate or find replacements, which can be time-consuming and costly.
Tophinhanhdep.comadvocates for a seamless flow between content creation and asset management, emphasizing how readily available images can spark new creative ideas. - Maintaining High-Resolution Photography Standards: Many Google Slides presentations contain high-resolution stock photos or digital photography. When these images are integrated into slides, it’s vital to be able to extract them while preserving their original quality. This is particularly important for images intended for print, large displays, or detailed editing. Low-quality extractions can lead to pixelated backgrounds, blurry art, or unprofessional graphic design. Our focus at
Tophinhanhdep.comis on providing tools and knowledge to help you maintain the integrity of your visual assets, whether they’re beautiful photography or intricate abstract designs. - Building Your Image Collections and Inspiration Boards: Every saved image contributes to your personal or professional library of visual resources. Whether you’re curating thematic collections, gathering photo ideas for future shoots, or compiling mood boards for upcoming projects, these extracted images are invaluable. They can populate your folders of wallpapers, backgrounds, or even sad/emotional imagery for specific narrative contexts.
Tophinhanhdep.comserves as an ultimate hub for organizing and finding inspiration through such diverse image collections, making the act of saving from Google Slides a direct pipeline to enhancing your visual assets.
My Go-To Methods for Downloading Individual Images
When you need a specific image, not an entire slide, these methods offer precise control over your extraction. While a direct right-click “Save Image As” isn’t typically available for images within Google Slides, these workarounds are highly effective.
Method 1: The New Slide and Download Technique
This technique is excellent for isolating a single image and downloading it as a standalone file, offering a good balance of quality and control.
- Open the Source Slide: Navigate to the Google Slides presentation and locate the slide that features the image you wish to save.
- Select and Copy the Image: Click directly on the image to select it. Once highlighted, right-click on the image and choose “Copy” from the context menu that appears.
- Create a New Slide: In your presentation, click “Insert” in the top menu bar, then select “New Slide.” This provides a clean canvas.
- Paste and Adjust: Click anywhere on the newly created slide and right-click, then choose “Paste.” The copied image will appear. You can now resize and center the image using its drag handles. To optimize for download quality, if the image resolution allows, stretch it to fill the slide without excessive pixelation. Otherwise, keep it at its original size to prevent distortion. This step is crucial for ensuring that when you download the slide as an image, your target visual is as prominent and clear as possible.
- Download as Image: Go to “File” in the menu bar. Hover over “Download” and then select your preferred image format. For high-quality photography and intricate graphic design elements, PNG is often recommended as it offers lossless compression, preserving detail and transparency. If file size is a primary concern for web use or quick sharing, JPEG is a suitable alternative. This step effectively transforms your single-image slide into a downloadable picture file.
- Optional Cropping: After downloading, you might find that the image still has some white space or borders from the slide. For precision in visual design or to focus on a specific aesthetic detail, you can use image editing software available at
Tophinhanhdep.comto crop the image further.
Method 2: Seamless Saving with Google Keep Integration
Google Keep is a versatile note-taking service seamlessly integrated within the Google ecosystem, making it a surprisingly efficient tool for image extraction. This method is particularly handy for quick saves and when you’re already operating within Google’s suite of applications.
- Locate the Image: Open your Google Slides presentation and navigate to the specific slide containing the image you intend to save.
- Select and Save to Keep: Click on the image to select it. Now, right-click on the selected image. From the menu that appears, choose “Save to Keep.” A new note will automatically open in the Google Keep sidebar on the right of your screen, with the image already embedded. This instant transfer helps in organizing aesthetic elements or digital art pieces into quick notes for later review.
- Save Image to Computer: Within the Google Keep note sidebar, right-click on the saved image itself. You’ll now see the “Save image as…” option. Select this, choose your desired location on your computer, and click “Save.” This method is excellent for quickly capturing individual elements, whether it’s a detail from a beautiful photography piece or a key graphic design element.
It’s worth noting that while convenient, Google Keep might apply some minor compression to images, potentially affecting their absolute highest fidelity. For critical high-resolution photography, consider other methods. However, for most general uses, building inspiration mood boards, or quickly extracting aesthetic visuals, this method is fast and effective.
Method 3: Leveraging Google Docs for High-Resolution Extraction
For users who prioritize retaining the highest possible image quality, especially for professional digital photography or intricate graphic design, using Google Docs as an intermediary offers a superior solution compared to some other quick methods. This technique effectively extracts the original image file that was uploaded to Google Slides.
- Open the Source Presentation and Copy: In your Google Slides presentation, navigate to the slide containing the desired image. Click to select it, then right-click and choose “Copy.”
- Paste Into a New Document: Open a new Google Docs document (or an existing one if preferred). Right-click anywhere in the document’s canvas and select “Paste.” The image will appear in the document. This temporary placement in Google Docs is the key to unlocking its higher-resolution potential.
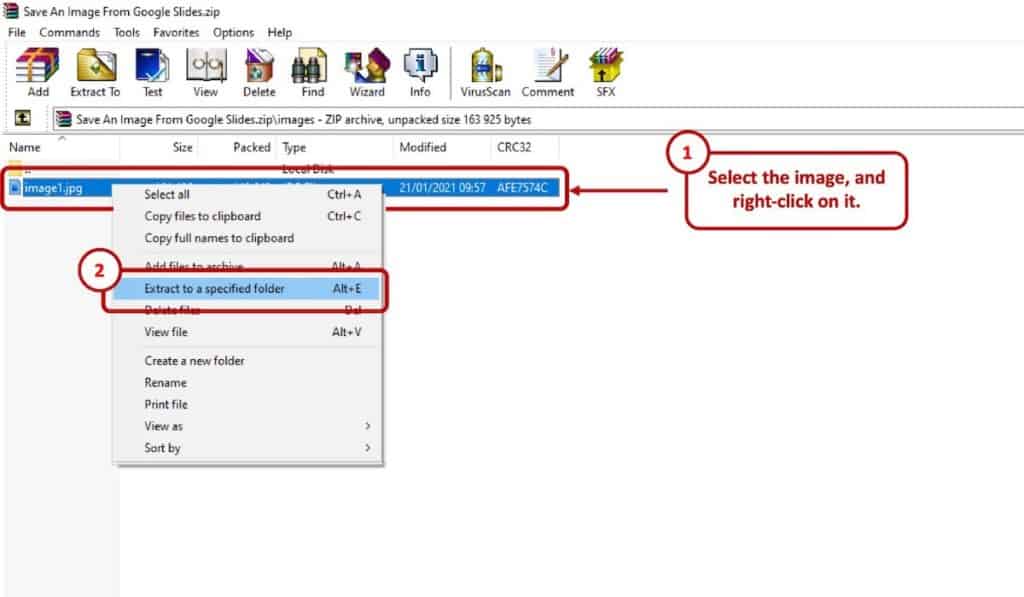
- Download as Webpage (HTML, Zipped): With the image now in Google Docs, go to “File” in the top menu. Hover over “Download,” and then select “Web page (.html, zipped).” This action prompts Google Docs to download a ZIP archive containing the HTML file of your document along with a separate folder specifically for all embedded images. This is where your high-resolution image resides.
- Extract the Image Files: Locate the downloaded ZIP file on your computer. Extract its contents using your operating system’s built-in tools (e.g., right-click and “Extract All” on Windows, or double-click on Mac). Inside the extracted folder, you’ll find an “images” subdirectory. Your desired image, saved with its original or very close-to-original quality, will be among these files. This method is highly recommended for preserving the detail of stock photos, abstract art, or beautiful photography for subsequent photo manipulation or graphic design projects.
Method 4: Quick Capture with Google Chat
While less conventional, Google Chat can serve as a surprisingly quick conduit for extracting images from your Google Slides, particularly useful when you need to grab an image for immediate sharing or temporary use.
- Open Your Presentation and Copy Image: Navigate to the desired image in your Google Slides presentation. Select it, right-click, and choose “Copy.”
- Open Google Chat: Launch the Google Chat application on your desktop or via a web browser. You can open an existing conversation or start a new chat, even with yourself, for this purpose.
- Paste and Save the Image: Click inside the chat’s message input area and paste the image (using Ctrl+V on Windows or Cmd+V on Mac). Once the image renders in the chat window, right-click on it. A context menu will appear, giving you the direct option to “Save Image As…” Choose a suitable location on your computer and save the image. This method is effective for quick extractions of images intended for social media, internal team communication, or any scenario where a fast turnaround is more critical than absolute maximum resolution.
Advanced Techniques for Visual Asset Management
Sometimes, an individual image isn’t enough, or the asset you need isn’t a simple picture but a complex graphic or even an entire slide design. These advanced techniques provide flexibility for various visual design needs.
Method 5: Instant Image Grab via Screenshot (for Objects and Full Slides)
The screenshot method is a universally applicable and rapid way to capture any visual element on your screen, including specific objects within Google Slides that can’t be copied directly, or even full slides. While the quality is dependent on your screen resolution, it’s invaluable for quick captures of charts, diagrams, or intricate text layouts that aren’t native image files.
On Windows:
- Open the Slide: Open your Google Slides presentation and navigate to the slide containing the image or object you want to capture. For best clarity, consider entering “Present” mode (F5 or “Slide Show” icon) to maximize the image’s size and minimize interface clutter.
- Capture the Screen (Snipping Tool): Press
Windows + Shift + S. This hotkey combination will launch the Snipping Tool, dimming your screen and providing crosshairs. - Select the Image Area: Use the crosshairs to click and drag a box precisely around the image, object, or section of the slide you wish to save. Release the mouse button.
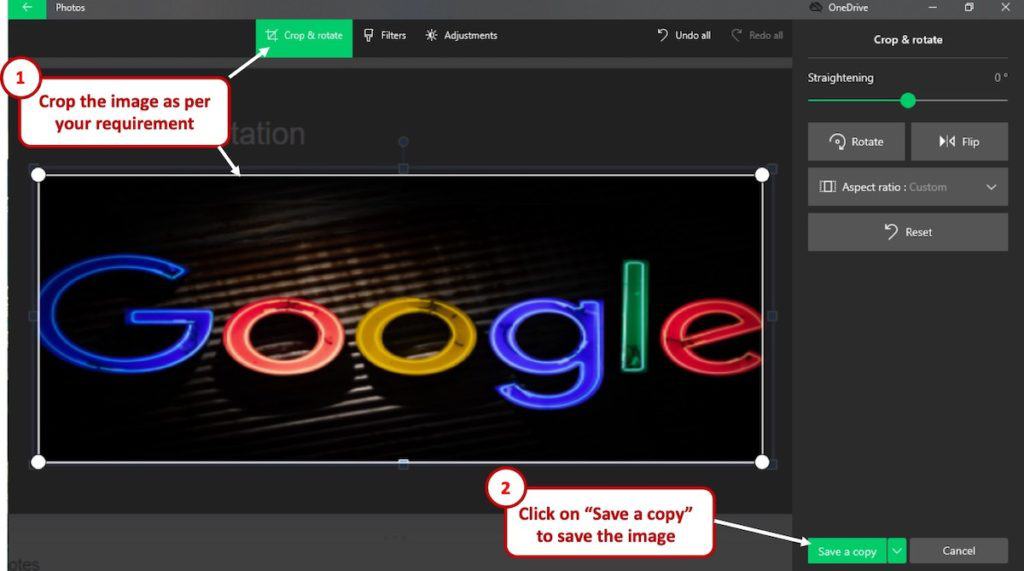
- Save the Screenshot: The captured area will be copied to your clipboard. A notification might appear, allowing you to click and open the captured image in the Snipping Tool’s editor. From there, you can perform basic crops if needed, then click the “Save” icon (a floppy disk) and choose “Save Image As…”. Select your desired location and format (PNG or JPEG are common) on your computer.
On Mac:
- Open the Slide: Navigate to the slide with the image or object in Google Slides. Again, “Present” mode can enhance clarity.
- Capture the Screen: Press
Shift + Command + 4. Your cursor will transform into a crosshair icon. - Capture the Image: Click and drag the crosshair to select the specific area of the image or object you want to save. Release the mouse button.
- Locate the Screenshot: Unlike Windows, Mac typically saves screenshots directly to your Desktop by default, with a filename format like “Screen Shot [date and time].png”. You can then rename, crop, or edit this file using image editing software available at
Tophinhanhdep.com.
This method is perfect for capturing visual design elements that are composites, such as infographics or flowcharts, or for grabbing a quick reference photo idea for a mood board.
Method 6: Exporting Entire Slides as Standalone Image Files
Sometimes, the entire slide itself is the image you need. This could be a beautifully designed title slide, a complex infographic that functions as a single visual unit, or a slide featuring a full-bleed wallpaper background. Google Slides offers a direct way to export an entire slide as a high-quality image.
- Open the Presentation and Select Slide: Open your Google Slides presentation and go to the specific slide you wish to save as an image.
- Access Download Options: Click on “File” in the top menu bar.
- Choose Image Format for Download: Hover your mouse over “Download” in the dropdown menu. You will see options like “PNG image (.png, current slide)” and “JPEG image (.jpg, current slide).”
- PNG: Opt for PNG if you require high-fidelity, lossless quality, especially if the slide contains sharp lines, text, or transparent elements. This is ideal for graphic design, digital art, or when you need to maintain the crispness of a high-resolution photograph.
- JPEG: Choose JPEG if file size is a concern, such as for quick web uploads or email attachments. JPEGs use lossy compression, which can slightly reduce quality but results in smaller file sizes.
- Download: Click on your preferred image format. The current slide will be downloaded as an image file directly to your computer’s default downloads folder.
This method is particularly useful for creating background images, converting specific presentation pages into digital art for portfolios, or distributing individual slides as visual updates for thematic collections. Tophinhanhdep.com provides extensive resources on choosing the right image formats for various visual design applications.
Utilizing Specialized Tools for Bulk Image Extraction
For users dealing with numerous presentations or needing to extract many images simultaneously, manual methods can be time-consuming. This is where specialized tools, often in the form of browser extensions or dedicated online platforms, come into play.
- Identify Reputable Tools: Search for “Google Slides image extractor” in your browser’s extension store (e.g., Chrome Web Store) or on general web search. Examples might include “Image Extractor” extensions or online services like
Tophinhanhdep.com’s comprehensive tools section. - Exercise Caution and Review: Before installing any third-party add-on or uploading your presentation to an online tool, always:
- Check Reviews: Read user reviews and ratings to gauge reliability and effectiveness.
- Understand Permissions: Be aware of the permissions the tool requests (e.g., access to your Google Drive, ability to read all websites).
- Review Privacy Policy: Ensure the tool has a clear privacy policy, especially if your presentations contain sensitive information. Prioritize tools that emphasize user data security.
Tophinhanhdep.comemphasizes the importance of data privacy and recommends using trusted sources for any third-party tools.
- How to Use (General Steps):
- Install/Access: Install the chosen extension or navigate to the online tool’s website.
- Open Presentation: Open your Google Slides presentation.
- Run Tool: Activate the extension (usually by clicking its icon in your browser toolbar) or follow the online tool’s instructions (which might involve uploading your presentation file).
- Download Images: The tool will typically scan the presentation and provide options to download all detected images, often in a ZIP file.
These tools are invaluable for building large thematic collections, assembling mood boards from multiple sources, or preparing a vast library of aesthetic and abstract images for future visual design projects.
Optimizing and Elevating Your Saved Images with Tophinhanhdep.com
Extracting images from Google Slides is just the first step in a broader visual design and photography workflow. Once you have your images, the next phase involves optimizing their quality, managing their formats, and potentially transforming them to fit new creative ideas. This is where Tophinhanhdep.com truly shines as your ultimate resource.
Mastering Image Quality: Formats, Compression, and AI Upscaling
The utility of a saved image is often defined by its quality and how well it’s optimized for its intended use.
- Understanding Formats (PNG vs. JPEG): As previously discussed, PNG is ideal for crisp lines, text, and transparent backgrounds, making it a favorite for graphic design elements and digital art where fidelity is paramount. JPEG, with its smaller file sizes, is perfect for photographs and backgrounds where some loss of detail is acceptable for faster loading times on websites or efficient storage.
Tophinhanhdep.comoffers comprehensive guides on when to use each format and provides image converters to switch between them effortlessly. - Compression and Optimization: For web use, social media, or reducing storage footprint, image compressors and optimizers are essential. These tools reduce file size without significantly compromising visual quality, ensuring your beautiful photography loads quickly without looking pixelated.
Tophinhanhdep.comprovides powerful, easy-to-use compressors that help you maintain professional standards for all your images, from nature wallpapers to abstract designs. - AI Upscalers: If an image was originally embedded at a lower resolution or was captured via a screenshot, it might not meet the standards for a high-resolution background or detailed photo manipulation.
Tophinhanhdep.com’s AI upscalers can intelligently enhance image resolution, adding detail and sharpness, effectively transforming a good image into a stunning, high-quality asset suitable for any demanding visual design project or wallpaper collection.
Fueling Your Visual Design Workflow: From Extraction to Inspiration
The images you save from Google Slides aren’t just standalone files; they are potential sparks for new creative ventures.
- Digital Art and Photo Manipulation: Extracted images, especially high-resolution ones, become raw material for digital artists and photographers. They can be integrated into collages, subjected to editing styles, or serve as layers in complex photo manipulation projects.
Tophinhanhdep.comprovides tutorials and tools that empower you to transform these images into unique pieces of digital art. - Graphic Design and Creative Ideas: A well-saved image can be a key component in a new poster, brochure, or social media graphic. It might be the perfect aesthetic background, a compelling nature shot, or an abstract pattern that defines a new brand identity. The versatility of these images fuels graphic design, and
Tophinhanhdep.comoffers a wealth of inspiration and resources for turning simple images into powerful visual statements. - Image Inspiration & Collections: Use your saved images to enrich your personal collections. Categorize them into thematic collections—be it serene wallpapers, vibrant backgrounds, thought-provoking sad/emotional images, or trending styles. These collections become invaluable for building mood boards, generating new photo ideas, and ensuring a constant flow of creative inspiration.
Tophinhanhdep.comis your go-to platform for exploring, curating, and being inspired by an endless array of visual content.
By integrating the practical steps of image extraction with the advanced tools and creative insights available at Tophinhanhdep.com, you transform a simple task into a powerful strategy for managing and elevating your visual assets.
Frequently Asked Questions About Image Saving
Can I download a single image directly from Google Slides with a right-click “Save Image As”?
Unfortunately, Google Slides does not currently offer a direct right-click “Save Image As” option for individual images within a slide. You’ll need to use one of the workaround methods described above, such as Google Keep, Google Docs, or a screenshot.
What’s the best way to save high-quality images for professional use?
For the highest quality, we recommend using the “Method 3: Leveraging Google Docs for High-Resolution Extraction” or “Method 6: Exporting Entire Slides as Standalone Image Files” (saving as PNG). These methods typically retain more of the original image’s resolution and detail, crucial for digital photography, graphic design, and any project requiring crisp, clear visuals.
Does saving an image through Google Keep affect its quality?
It’s a possibility. Google Keep may apply slight compression to images to save storage space. While often imperceptible for general use or aesthetic mood boards, for very high-resolution photography or graphic design where absolute fidelity is critical, consider the Google Docs method.
Is there a way to save each slide as a separate image file automatically?
Yes, you can use “Method 6: Exporting Entire Slides as Standalone Image Files.” Go to “File” > “Download” and choose either “PNG Image (.png, current slide)” or “JPEG Image (.jpg, current slide)” for each slide individually. For an automated solution across many slides, a third-party add-on might be necessary (see below), but always review such tools carefully.
Can I save an image from Google Slides using the mobile app?
While there isn’t a direct “save image” function in the mobile app, you can use a workaround similar to Google Keep. Copy the image from your Google Slides presentation in the app, then open the Google Keep app, paste the image into a new note, and then tap and hold the image in Keep to find a “Save image” or “Download image” option to save it to your device.
Are third-party add-ons for Google Slides safe to help save images?
While some add-ons can be very useful for bulk image extraction, exercise caution. Always research any add-on thoroughly before installing it. Check reviews, understand the permissions it requests, and review its privacy policy. Ensure it’s from a reputable source to protect your Google Slides security and data. Tophinhanhdep.com advises users to prioritize secure and well-vetted tools.
What if I need to extract text from an image in Google Slides?
Once you’ve saved the image using any of the methods, you can utilize Tophinhanhdep.com’s Image-to-Text (OCR) tool. This tool can analyze the image and convert any readable text within it into editable digital text, which is incredibly useful for repurposing content from presentations.
Closing Thoughts
Mastering the art of extracting images from Google Slides is an invaluable skill for anyone engaged in visual design, photography, or content creation. From quick captures with Google Keep or screenshots to more refined, high-resolution extractions via Google Docs or full slide exports, the methods detailed in this guide provide a robust toolkit for managing your visual assets.
These techniques empower you to reclaim your creative work, populate your image collections, craft compelling mood boards, and integrate beautiful photography or abstract art into new projects with ease. Whether you’re enhancing your desktop wallpapers, developing a new graphic design concept, or simply saving inspiring images for future reference, the ability to effortlessly pull visuals from your presentations is a significant advantage.
Remember, the journey of an image often extends beyond its initial placement in a slide. With the array of image tools available at Tophinhanhdep.com—including converters, compressors, optimizers, and AI upscalers—you can further refine, enhance, and transform your saved images to perfectly fit any visual design or digital photography need. Explore Tophinhanhdep.com today to discover how these tools, combined with your newly acquired extraction skills, can elevate your entire visual workflow and provide endless inspiration for your creative ideas and thematic collections.