Mastering Image Saving in Photoshop: A Comprehensive Guide for Creatives

In the dynamic world of digital imagery, where every pixel tells a story, mastering the art of saving your creations in Adobe Photoshop is as crucial as the creative process itself. For anyone involved in photography, visual design, or simply curating stunning image collections—be it for high-resolution stock photos, aesthetic backgrounds, or intricate digital art—understanding Photoshop’s saving mechanisms ensures your work is preserved with integrity, optimized for its intended use, and ready for sharing across various platforms. This guide, brought to you by Tophinhanhdep.com, delves deep into the nuances of saving images in Photoshop, equipping you with the knowledge to make informed decisions for every project.
Photoshop, the industry-standard image editing software, offers a multitude of saving and exporting options, each tailored for specific purposes. Unlike simpler applications that might rely on a single default file type, Photoshop’s flexibility allows you to prepare images for everything from a web gallery to a professional print, from a layered masterpiece ready for future edits to a compressed file for quick sharing. The choices you make during the saving process directly impact an image’s quality, file size, and compatibility, making this a fundamental skill for any digital artist or photographer.
Understanding Photoshop’s Core Saving Mechanisms
At the heart of Photoshop’s file management are its diverse saving options, designed to accommodate the varied needs of image creators. From preserving complex layered designs for future editing to preparing a simple JPEG for online display, Photoshop offers precise control over how your visual assets are stored and distributed. This section explores the fundamental methods and formats available, providing a foundational understanding for effective image handling.
The Power of the PSD: Your Editable Masterpiece
The .psd (Photoshop Document) file format is Photoshop’s native and default saving option. It is the cornerstone for any serious digital photography or visual design project because it is specifically engineered to retain all of Photoshop’s intricate data. When you save a file as a PSD, you’re not just saving an image; you’re preserving your entire creative journey.
Why PSD is Indispensable:
- Layer Preservation: PSD files keep all your layers intact—adjustment layers, text layers, shape layers, smart objects, masks, and more. This is critical for photo manipulation and digital art, allowing you to return to any stage of your project and make non-destructive edits without flattening your work. For photographers dealing with high-resolution images or graphic designers building complex visual designs, PSD ensures maximum flexibility.
- Retaining Editability: Every filter, brush stroke, and effect you apply is stored within the PSD. This means complete re-editability; you can change text, modify colors, or adjust compositions long after the initial save. This is particularly valuable for projects that undergo multiple revisions or evolve over time, such as client work or ongoing thematic collections.
- Comprehensive Project Information: Beyond layers, PSDs store color profiles, guides, slices, notes, and other metadata essential for detailed visual design and digital photography workflows. This comprehensive data retention is vital for maintaining the integrity of creative ideas and ensuring consistency across related images.
While PSDs are invaluable for ongoing projects, they are typically large files and are not universally compatible. They are primarily designed to be opened within Photoshop itself. Therefore, while working on an abstract art piece or a beautiful photography composition, you’ll consistently save your progress as a PSD. However, for sharing your finished work, you’ll need to export a copy in a more common format.
Common File Formats: The Universal Language of Images
Once your design or photo is perfected within Photoshop, you’ll often need to save it in a format that can be easily viewed, shared, and used across different devices and platforms. These “common file formats” strip away Photoshop’s layer information, producing a flattened image that is universally accessible.
Popular Formats for Sharing and Display:
- JPEG (Joint Photographic Experts Group): This is arguably the most widely used image format, especially for photographs. JPEGs employ a “lossy” compression method, meaning some image data is discarded to achieve significantly smaller file sizes. This makes them ideal for online use, such as web wallpapers, aesthetic backgrounds, social media posts, and stock photos, where fast loading times are crucial. The trade-off is that repeated saving of a JPEG can degrade image quality. You can adjust the quality setting during saving to balance file size with visual fidelity.
- PNG (Portable Network Graphics): PNG offers “lossless” compression, meaning no image data is lost during saving. Its standout feature is support for transparency, making it the preferred choice for graphics, logos, and digital art where elements need to seamlessly overlay other backgrounds. PNG-24 retains full color depth and alpha channel transparency, while PNG-8 is a more compressed option suitable for images with limited color palettes, akin to GIFs but with better quality. It’s excellent for graphic design elements and images requiring crisp edges.
- TIFF (Tagged Image File Format): Often seen as the gold standard for high-resolution images destined for print or archival purposes, TIFF files are lossless and can retain layers (though a PSD is generally preferred for active editing). They are uncompressed or use lossless compression, resulting in large file sizes but uncompromising image quality. This makes them perfect for professional photography and print projects where detail and color accuracy are paramount.
- PDF (Portable Document Format): While commonly associated with documents, Photoshop can save images as PDFs, which are highly versatile. A Photoshop PDF can embed both vector and raster data, making it an excellent choice for sending print-ready files that maintain resolution, text, and graphics. It can also preserve Photoshop editing capabilities, making it a hybrid option between a PSD and a flattened image.
Choosing the right common format depends entirely on your end goal. For sharing your beautiful photography on a blog, a high-quality JPEG is usually sufficient. For a graphic design element with a transparent background, PNG is the way to go. For a print-ready poster, TIFF or PDF ensures professional results.
Saving for Web (Legacy) and Export As: Optimizing for Online Presentation
In today’s visually driven digital landscape, optimizing images for the web is critical for user experience, search engine optimization, and efficient sharing. Photoshop provides dedicated tools to achieve this balance between image quality and file size.
Save for Web (Legacy): This feature (found under File > Export > Save for Web (Legacy)) is a powerful tool for preparing images for online platforms, blogs, and websites. It allows precise control over compression, dimensions, and file format to ensure images load quickly without sacrificing too much visual fidelity. For web-centric content like backgrounds, aesthetic images, or abstract wallpapers, this is your go-to.
Key Features of Save for Web:
- File Format Selection: Primarily allows choosing between JPEG, PNG-8, PNG-24, and GIF, each suited for different types of web graphics.
- Quality/Compression Control: For JPEGs, you can adjust the compression level, directly impacting file size and perceived quality. The “2-Up” view is particularly useful here, letting you compare the original image with the optimized version and its associated file size.
- Image Resizing: You can resize images directly within the dialog box, reducing dimensions and thus file size, which is essential for faster loading web content.
- Metadata Control: Options to remove unnecessary metadata (like camera information) further reduce file size, optimizing for web speed.
Export As: Introduced as a more modern and streamlined export experience, “Export As” (File > Export > Export As) offers many of the same functionalities as Save for Web but with a more contemporary interface and improved performance. It allows you to select formats like PNG, JPG, GIF, and SVG, adjust dimensions, scaling, and canvas size, and fine-tune compression. For high-resolution images or stock photos being prepared for online galleries, “Export As” offers a more integrated approach.
Both “Save for Web (Legacy)” and “Export As” are vital tools for ensuring your visual content, from creative ideas to thematic collections, looks stunning online while remaining efficient. They directly contribute to the “Image Tools (Optimizers, Compressors)” aspect of digital asset management.
Navigating the Evolving Save Workflow: “Save As” vs. “Save a Copy”
Adobe Photoshop’s saving commands, particularly “Save As,” underwent a significant and controversial change in the May 2021 release (version 22.4). This alteration, primarily driven by changes in macOS APIs, introduced a new command, “Save a Copy,” fundamentally altering decades of muscle memory for many users. Understanding this evolution is key to an efficient workflow on both Mac and PC.
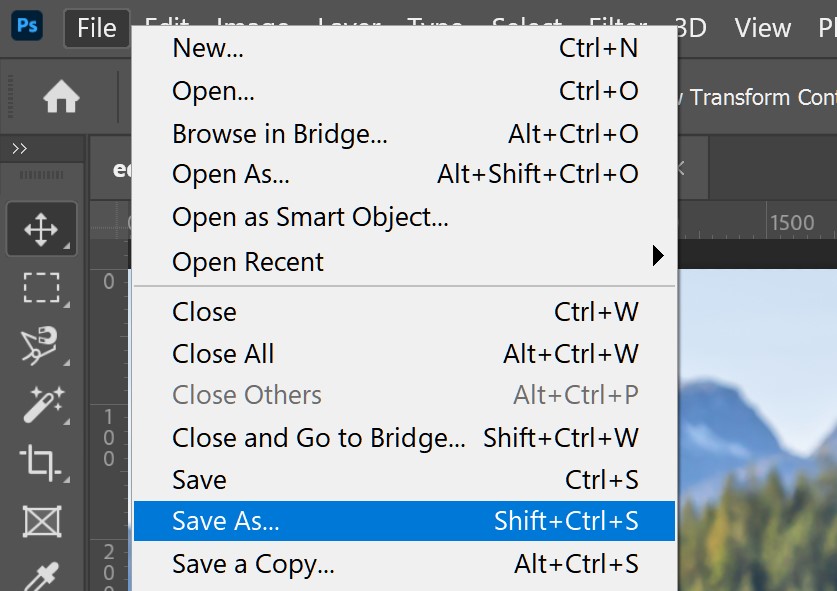
The Traditional “Save As” Command
Historically, the “Save As” command (File > Save As or Shift + Ctrl/Cmd + S) was the primary method for saving a file under a new name, in a different location, or in an alternative file format. This command allowed users to choose a format that might not preserve all of Photoshop’s editing capabilities (e.g., saving a PSD as a JPEG) while still maintaining the original file and making the newly saved file the active document for subsequent saves.
How “Save As” Traditionally Worked:
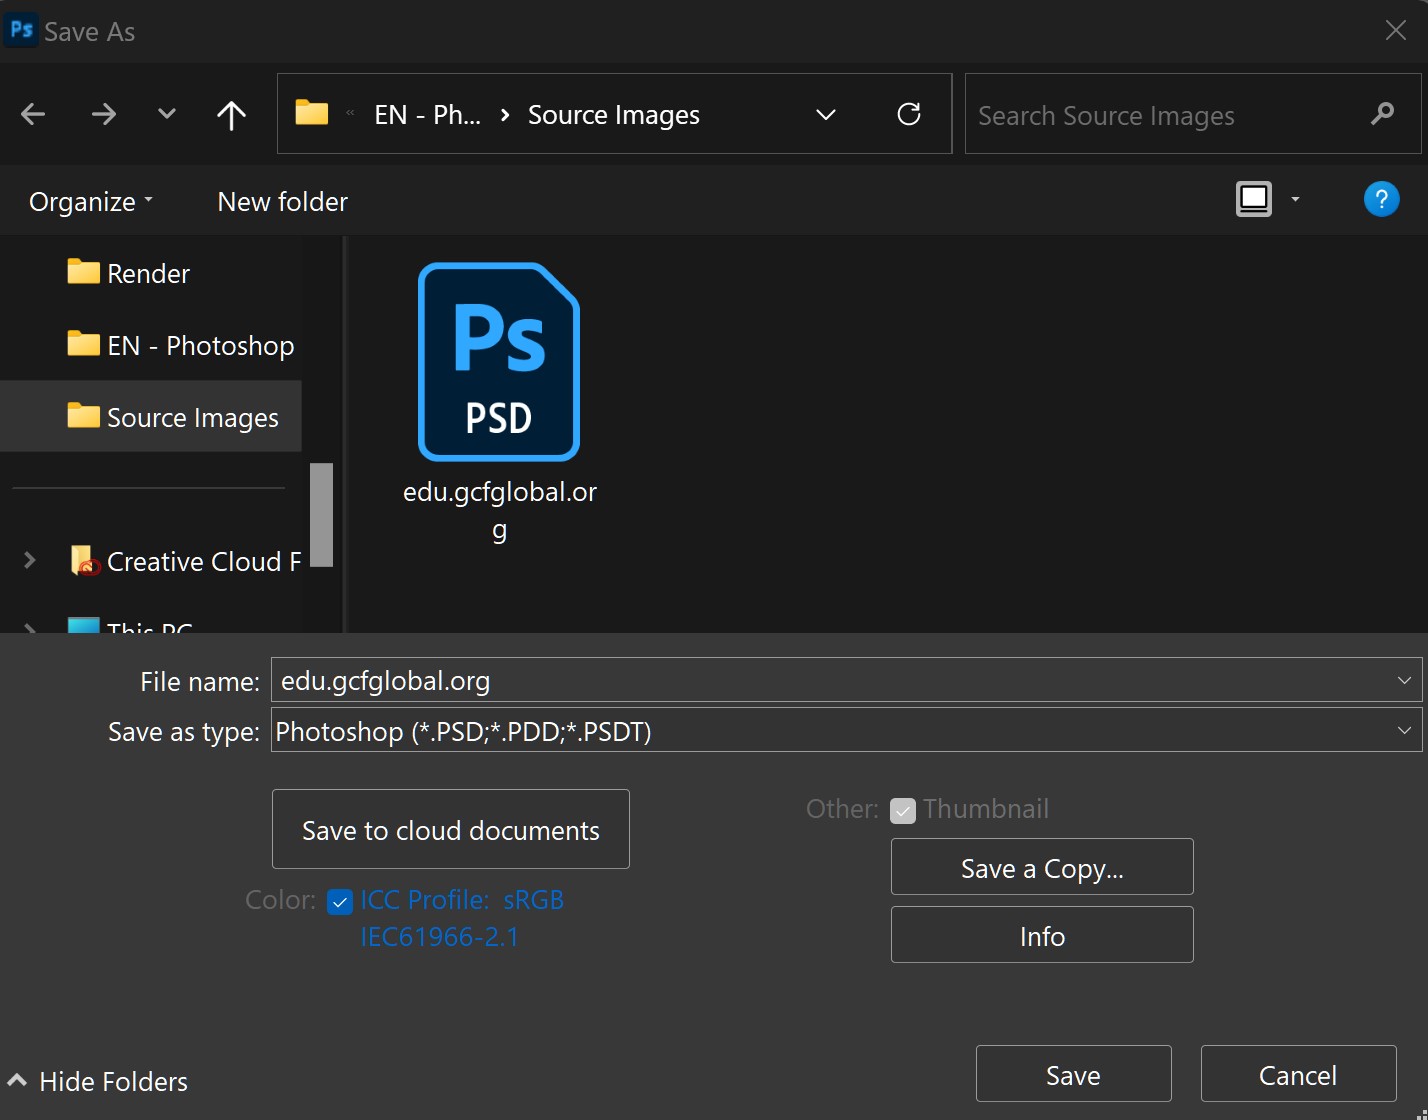
- Select File > Save As: A dialog box appears.
- Choose File Name and Location: Specify where to save and what to call the new file.
- Select Format: From a dropdown menu, choose any available format (PSD, JPEG, PNG, TIFF, etc.). If you chose a flattened format like JPEG, Photoshop would prompt you about potential loss of layers, but still allow the save.
- Click Save: The new file is created, and it becomes the active document.
This straightforward approach was intuitive and integrated, allowing users to quickly convert a layered PSD into a web-ready JPEG or a print-optimized TIFF in a single action.
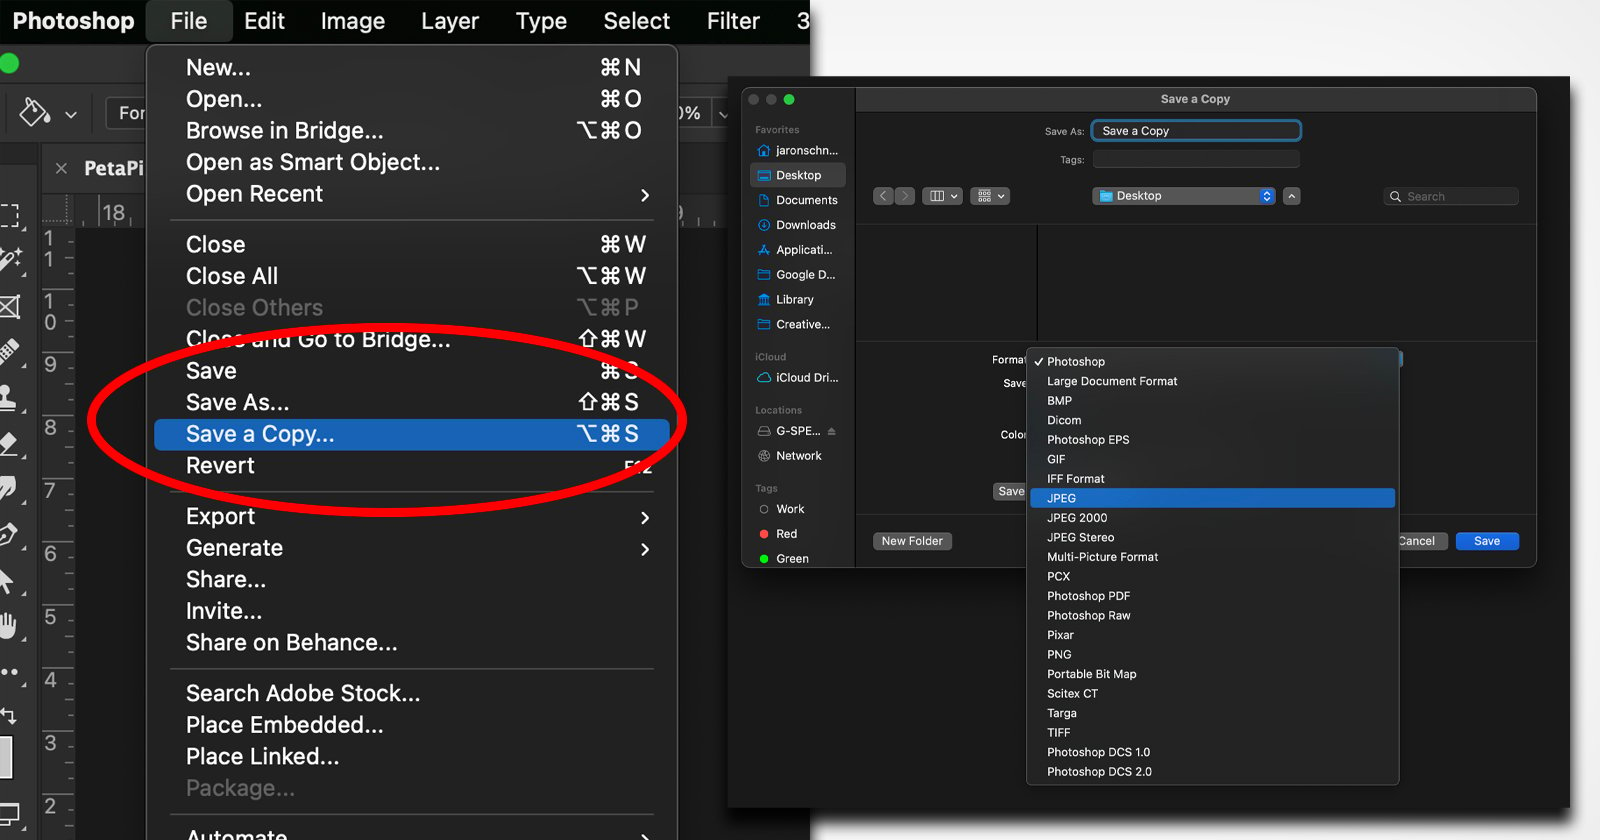
The Introduction of “Save a Copy” and User Frustration
With Photoshop version 22.4, Adobe redefined “Save As.” The command was restricted to only saving formats that fully preserve the document’s content and Photoshop editing capabilities (like PSD, Large Document Format, or TIFF with layers). If a user wished to save to a “flattened” format such as JPEG or PNG, or to a format that would not entirely preserve all document content (like a flattened TIFF or PDF without editing capabilities), they were now directed to a new command: “Save a Copy.”
Adobe’s Rationale and the Apple Connection: The change, as confirmed by Adobe, stemmed from Apple’s removal of an API in macOS 10.15 (Catalina) and later versions (including Big Sur). This API previously allowed applications like Photoshop to dynamically manipulate aspects of the Save As dialog, specifically the filename text. Adobe used this to append “copy” safely when saving to a format that would flatten the image, preventing accidental overwriting of the original PSD. Without this API, Adobe stated they could no longer safely combine “Save As” and “Save a Copy” operations into one, leading to the separation of commands. While the change was triggered by macOS, it was implemented for both Mac and Windows users to maintain feature parity.
Impact on User Workflow: The introduction of “Save a Copy” (File > Save a Copy) was met with significant user backlash. Many found it an unnecessary extra step, disrupting decades of ingrained workflow habits. Users complained about:
- Added Clicks: Having to choose a different menu item or click an extra button within the Save As dialog.
- Default “Copy” Suffix: The “Save a Copy” command automatically appended “copy” to the filename, requiring manual deletion in most cases.
- Confusion: The new separation created confusion about which command to use for specific saving needs.
This change, though technically explained, highlighted the tension between software evolution and user experience. It directly impacts the efficiency of “Image Tools” and general “Editing Styles.”
Reverting to Legacy Saving: The “Enable Legacy Save As” Option
Acknowledging user feedback, Adobe introduced an option in Photoshop 22.4.2 to revert to the legacy “Save As” behavior. This allows users to restore the pre-22.4 workflow, enabling them to save to any format directly from the “Save As” dialog without needing “Save a Copy” for flattened files.
How to Enable Legacy “Save As”:
- Go to Preferences:
- macOS: Photoshop > Preferences > File Handling
- Windows: Edit > Preferences > File Handling
- Locate “File Saving Options”: Within this section, find the checkbox for “Enable legacy Save As.”
- Check the Box and Click OK: This restores the traditional “Save As” functionality.
Even with “Legacy Save As” enabled, the “Save a Copy” option might still appear in the File menu, but the primary “Save As” command will function as it did historically. On macOS, even with legacy saving, the system may still append “copy” to the filename when saving certain formats, reflecting the underlying OS limitations that prompted the change.
For users who prefer the streamlined process of previous Photoshop versions, enabling “Legacy Save As” is a crucial adjustment to maintain efficiency in their “Digital Photography” and “Visual Design” workflows.
Choosing the Right Format for Your Visual Creation
The variety of file formats in Photoshop can seem daunting, but each serves a specific purpose, catering to different aspects of image display, print quality, and storage. Selecting the correct format is a critical decision that impacts everything from website performance to print fidelity. This section will guide you through the most common formats and their optimal uses, aligning with the diverse image categories on Tophinhanhdep.com.
JPEG: The Web Workhorse for Photographs
Best for:
- Photographs: Ideal for high-resolution photography, beautiful photography, stock photos, and general images with continuous tones and smooth color gradients (e.g., nature scenes, portraits).
- Web Use: Excellent for wallpapers, backgrounds, social media sharing, and any online content where file size needs to be minimized for fast loading.
- Scenario: Sharing vacation photos with friends, uploading an aesthetic image to a blog, or presenting a portfolio of nature photography online.
Key Characteristics:
- Lossy Compression: Permanently discards some image data to achieve smaller file sizes.
- Quality Slider: Allows you to control the compression level (and thus file size). Higher quality means larger files but less noticeable degradation.
- No Transparency: JPEGs do not support transparent backgrounds; transparent areas will appear white or fill with a solid color.
Saving in Photoshop: Use “File > Save As” (with Legacy Save As enabled) or “File > Export > Save a Copy” or “File > Export > Export As.” Adjust the quality slider (0-12 or 0-100%) to find the optimal balance for your needs. Remember that repeated editing and re-saving JPEGs can lead to cumulative quality loss.
PNG: Clarity and Transparency for Graphics and Digital Art
Best for:
- Graphics and Illustrations: Perfect for digital art, graphic design elements, logos, icons, and screenshots with sharp edges and distinct areas of color.
- Web Use: Indispensable for web elements that require transparency (e.g., an overlaying graphic on a varying background).
- Scenario: Creating a transparent logo for a website, saving a piece of abstract art with a complex transparent layer, or designing a UI element.
Key Characteristics:
- Lossless Compression: Retains all image data, preserving original quality.
- Transparency Support: PNG-24 supports full alpha channel transparency (varying degrees of opacity), while PNG-8 supports single-color transparency (on or off).
- Better for Text and Lines: Maintains crispness for text and vector-like graphics where JPEG compression can cause artifacts.
- Larger File Sizes (than JPEG): Due to lossless compression, PNG files are generally larger than comparable JPEGs, especially for photographs.
Saving in Photoshop: Use “File > Save As” (with Legacy Save As enabled) or “File > Export > Save a Copy” or “File > Export > Export As.” Choose between PNG-8 (for limited colors, smaller files) and PNG-24 (for full color and transparency).
TIFF: Uncompromised Quality for Print and Archiving
Best for:
- High-Resolution Print: The preferred format for professional printing of high-resolution stock photos, creative ideas for posters, or fine art reproductions.
- Archival: Ideal for long-term storage of original, uncompressed, or losslessly compressed images due to its robust data retention.
- Professional Photography: Often used by photographers for delivering final images to clients or for portfolio pieces where maximum quality is essential.
- Scenario: Sending a magazine ad to a printer, archiving raw digital photography edits, or creating a gallery-quality print.
Key Characteristics:
- Lossless or Uncompressed: Can be saved without any compression or with lossless compression (e.g., LZW, ZIP), ensuring no data is lost.
- Supports Layers: Can retain Photoshop layers, though a PSD is more efficient for active editing.
- CMYK and RGB Support: Suitable for both web (RGB) and print (CMYK) color modes.
- Large File Sizes: Often the largest file format, reflecting its commitment to quality.
Saving in Photoshop: Use “File > Save As” and select TIFF. In the TIFF Options dialog, choose “None” or a lossless compression method like LZW. For print, ensure the correct color profile is embedded and set byte order to “IBM PC” or “Macintosh” as required by your print service.
PDF: Versatility for Print and Multi-faceted Design
Best for:
- Print-Ready Documents: Excellent for multi-page layouts, brochures, and artwork combining images and text for professional printing.
- Vector/Raster Hybrid: Can embed both raster (pixel-based) images and vector (scalable) graphics, preserving the integrity of both.
- Design Delivery: A common format for delivering proofs and final designs to clients, as it ensures consistent viewing across different systems.
- Scenario: Creating a digital magazine cover, designing a brochure with embedded images and text, or sending a final design proof.
Key Characteristics:
- Platform Independent: Viewed consistently across different operating systems and devices.
- Editable or Flattened: Can be saved with Photoshop editing capabilities preserved (larger file) or as a flattened, uneditable version (smaller file).
- Security Options: Can include password protection, though this should be avoided when submitting to print services without prior arrangement.
Saving in Photoshop: Use “File > Save As” and select “Photoshop PDF.” Configure settings in the “Save Adobe PDF” dialog box for compatibility (e.g., Acrobat 5 (PDF 1.4)), compression (typically “None” for print), output (color conversion), and security. For print, CMYK color mode is usually required.
By carefully considering the strengths of each format and aligning them with your project’s goals—whether it’s a vibrant wallpaper, a critical design element, or a high-resolution print—you can ensure your visual creations from Tophinhanhdep.com are always presented in their best light.
Optimizing and Preserving Your Digital Masterpieces
Beyond merely selecting a file format, effective image saving in Photoshop involves a set of best practices that optimize your work for its intended use, preserve its quality, and streamline your creative workflow. These tips are invaluable for anyone creating images, managing photography assets, or developing visual designs.
Resolution and Color Mode: The Pillars of Image Fidelity
Understanding Resolution (DPI/PPI): Resolution refers to the detail an image holds, measured in Dots Per Inch (DPI) for print or Pixels Per Inch (PPI) for digital displays.
- Web and Digital Display (72 PPI): For images intended solely for screen viewing—such as web wallpapers, backgrounds, social media graphics, or online portfolios—a resolution of 72 PPI is generally sufficient. Increasing the PPI beyond this for web use only increases file size without visible improvement on typical screens. This is crucial for “Image Tools (Optimizers, Compressors)” as it directly impacts loading speed.
- Print (300 PPI and Up): For print projects (e.g., posters, brochures, high-resolution photography prints), 300 PPI is the industry standard for high-quality output. Higher resolutions (e.g., 600 PPI for very fine detail or large-format prints) may be required depending on the output size and viewing distance. Using lower resolutions for print results in pixelation and blurriness. This directly relates to preserving the quality of “High Resolution” photography and “Visual Design” for physical media.
Choosing the Right Color Mode (RGB vs. CMYK): Color mode dictates how colors are represented in your image.
- RGB (Red, Green, Blue): This additive color model is used for digital displays, including monitors, televisions, and web images. Most digital cameras capture images in RGB. For all web-based “Images,” “Wallpapers,” “Aesthetic” collections, and “Digital Photography” viewed on screens, RGB is the correct choice.
- CMYK (Cyan, Magenta, Yellow, Black): This subtractive color model is used for professional printing. Printers mix these four inks to create a range of colors. When preparing “Graphic Design” or “Visual Design” for print, convert your image to CMYK to ensure color accuracy and avoid unexpected color shifts during the printing process. This conversion should typically be one of the last steps before saving for print.
Strategic Naming Conventions and Version Control
Maintaining an organized workflow is paramount, especially when dealing with numerous image assets.
- Descriptive Filenames: Adopt a consistent naming convention that includes relevant information like project name, version number, date, and purpose. For example:
ProjectName_Element_v01_Date_Web.jpgorNatureSeries_Photo001_Final_Print.tif. This is vital for managing “Image Collections” and “Stock Photos.” - Version Control: Save incremental versions of your project. Instead of just overwriting, use “Save As” to create new versions (e.g.,
design_v1.psd,design_v2.psd,design_v3_final.psd). This allows you to revert to earlier stages if needed, protecting your “Creative Ideas” and progress. - Backup Solutions: Always maintain backups of your work, preferably in multiple locations (e.g., cloud storage, external hard drive). Accidents happen, and losing hours of “Photo Manipulation” or “Digital Art” can be devastating.
Periodic Saving and the Quick Export Feature
- Save Regularly (Ctrl/Cmd + S): Get into the habit of saving your work frequently. Use the keyboard shortcut
Ctrl+S(Windows) orCmd+S(Mac) to quickly save your current progress without opening a dialog box. This is particularly important for complex “Photo Manipulation” and “Digital Art” projects where unforeseen crashes can lead to significant data loss. - Quick Export: For fast, no-frills exports of your entire canvas as a JPEG or PNG, use “File > Export > Quick Export as PNG” or “Quick Export as JPEG.” This is a convenient option when you need to quickly generate a web-ready image without delving into detailed compression or resizing settings. It’s an efficient “Image Tool” for rapid sharing of “Trending Styles” or “Mood Boards.”
Handling Metadata and Copyright
- Embed Color Profile: Always ensure your color profile (e.g., sRGB for web, Adobe RGB or ProPhoto RGB for professional photography, or CMYK profile for print) is embedded when saving. This helps maintain color consistency across different devices and applications.
- Copyright Information: For “Stock Photos” or “Beautiful Photography” intended for commercial use, embed copyright information and other metadata into your files (File > File Info). This protects your intellectual property and helps track usage.
- Remove Unnecessary Metadata for Web: When using “Save for Web (Legacy)” or “Export As” for online images, consider removing all unnecessary metadata to reduce file size further, contributing to better web performance.
The Art of Compression: Quality vs. File Size
A fundamental aspect of “Image Tools (Compressors, Optimizers)” is understanding the trade-off between image quality and file size.
- Web Optimization: For web images, smaller file sizes translate to faster loading times, which improves user experience and SEO. Experiment with JPEG quality settings or PNG compression levels in “Save for Web (Legacy)” or “Export As” to find the smallest file size that still provides acceptable visual quality for your “Aesthetic” images or “Thematic Collections.”
- Print Quality: For print, prioritize quality over file size. Use lossless formats like TIFF or high-quality PDFs with minimal compression to ensure every detail of your “High Resolution” photography is reproduced accurately.
By meticulously applying these saving, optimization, and preservation strategies, you transform raw digital files into finely tuned assets, ready to captivate audiences, inspire new “Photo Ideas,” and stand the test of time. Tophinhanhdep.com advocates for these best practices, empowering you to confidently manage your visual creations for any purpose, from personal “Image Inspiration” to professional “Visual Design” projects.
Conclusion: Empowering Your Creative Output
Saving an image in Photoshop is far more than a simple click; it’s a critical decision point that shapes the destiny of your visual creation. From the initial conceptualization of your “Creative Ideas” and the meticulous process of “Digital Photography” or “Photo Manipulation,” to the final presentation as “Wallpapers,” “Backgrounds,” or “Stock Photos,” the choices you make during the saving process dictate how your work will be perceived, used, and preserved.
This comprehensive guide, presented by Tophinhanhdep.com, has explored the diverse landscape of Photoshop’s saving mechanisms. We’ve delved into the indispensable .psd for retaining layered projects, examined the universal utility of common formats like JPEG and PNG, and navigated the nuanced world of web optimization with “Save for Web (Legacy)” and “Export As.” Furthermore, we’ve dissected the controversial evolution of “Save As” and the strategic necessity of “Save a Copy,” along with the option to revert to the familiar “Legacy Save As” workflow.
The core takeaway is that context is king. The “how” and “what” of saving are dictated by the “why.” Are you preparing a “High Resolution” image for a gallery print, or an “Aesthetic” background for a quick social media share? Is it a complex piece of “Digital Art” destined for future edits, or a “Sad/Emotional” photograph that needs to be widely accessible? Each scenario demands a specific approach to file format, resolution, color mode, and compression.
By understanding the strengths and limitations of each file type, mastering the various saving commands, and diligently applying best practices for organization and quality control, you empower yourself to take full command of your creative output. Tophinhanhdep.com is dedicated to providing you with the “Image Tools” and “Image Inspiration” to not only craft stunning visuals but also to ensure they are perfectly optimized and preserved for every platform and purpose imaginable. Let your images shine, knowing they are saved correctly, professionally, and thoughtfully.