Mastering Image Saving on Your Chromebook: A Comprehensive Guide for Tophinhanhdep.com Enthusiasts

Chromebooks, with their lightweight design, robust security features, and seamless integration with Google’s ecosystem, have become indispensable tools for productivity, education, and creative pursuits. For enthusiasts of visual content, particularly those who frequent platforms like Tophinhanhdep.com for their stunning collection of images, wallpapers, and photography inspiration, knowing how to efficiently save and manage these visuals is crucial. Whether you’re curating a mood board, sourcing high-resolution stock photos for a graphic design project, or simply looking for the perfect aesthetic background, mastering image saving on your Chromebook is the first step towards unlocking a world of creative possibilities.
Tophinhanhdep.com prides itself on offering a diverse range of visual content, from breathtaking nature photography and abstract art to emotionally resonant images and trending design styles. This wealth of visual assets makes it a prime destination for anyone looking to enhance their digital experience. This guide will walk you through various methods of saving images on your Chromebook, ensuring that you can easily capture, store, and utilize the beautiful photography and creative ideas you discover, directly integrating them into your workflow and personal collections. We’ll cover everything from simple right-click downloads to advanced screenshot techniques and image format considerations, all while keeping the perspective of a Tophinhanhdep.com user in mind.
Essential Techniques for Acquiring Images on Your Chromebook
Your Chromebook offers several intuitive ways to save images you encounter online or within your applications. These methods cater to different needs, from quick grabs to more organized archiving. Understanding each approach will empower you to efficiently build your personal library of images, ready for any creative project or personal customization inspired by Tophinhanhdep.com.
Saving Directly from Webpages: The “Save Image As” Method
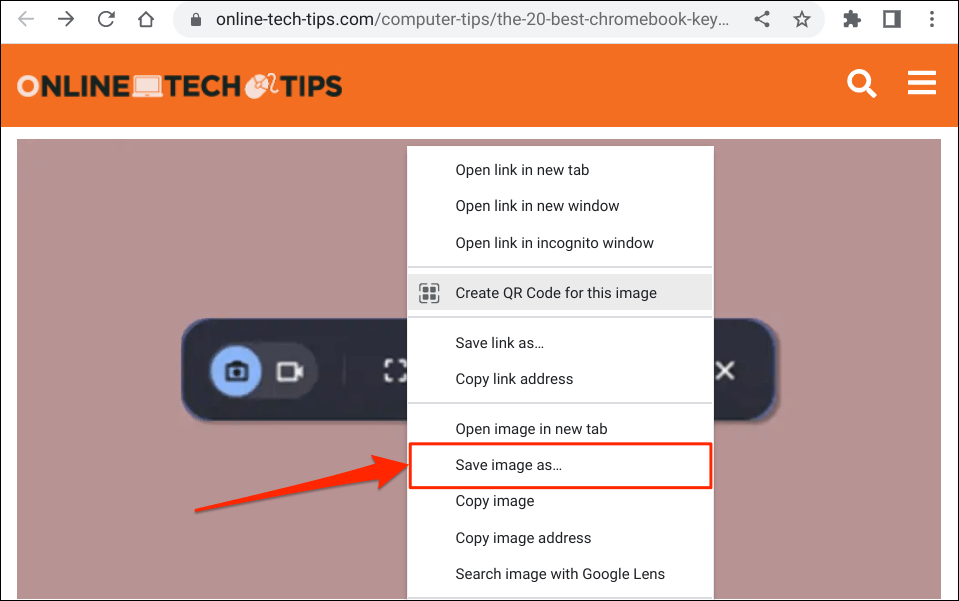
The most straightforward and commonly used method for saving images from websites, including Tophinhanhdep.com, involves a simple right-click or tap-and-hold action. This technique allows you to download an image directly to your Chromebook’s storage with minimal fuss, providing control over its filename and destination.
To begin, navigate to the webpage on Tophinhanhdep.com or any other site where the image you wish to save is displayed. Once you’ve found your desired image, follow these steps:
- Locate and Interact with the Image: Using your trackpad, hover your cursor over the image. If your Chromebook has a traditional trackpad, perform a two-finger tap to simulate a right-click. On a touchscreen Chromebook, simply tap and hold the image with one finger.
- Select “Save image as…”: A contextual menu will appear. From the options presented, select “Save image as…” This action will open the “Save file as” dialogue window.
- Choose Your Destination and Rename (Optional): By default, ChromeOS typically suggests saving files to your “Downloads” folder. This folder resides on your Chromebook’s local storage. However, you have the flexibility to change this.
- Local Storage: To keep the image on your device, simply confirm the “Downloads” folder or navigate to another local folder within the “My files” section.
- Cloud Storage: For easy access across multiple devices, consider saving directly to your Google Drive. Look for “Google Drive” in the left-hand panel of the “Save file as” window and select it, then choose a specific folder within your Drive, such as “Tophinhanhdep.com Wallpapers” or “Photography Projects.”
- External Storage: If you have an external storage device, such as a USB drive or an SD card, connected to your Chromebook, it will also appear as an option in the left-hand panel. This is ideal for archiving large collections of high-resolution images or backing up your Tophinhanhdep.com finds.
- Rename the File: Before saving, you can rename the image file to something more descriptive. This is highly recommended, especially when building thematic collections (e.g., “Abstract_Blue_Waves_Tophinhanhdep.com.jpg” or “Nature_Sunset_Tophinhanhdep.com_HighRes.png”). A well-named file makes it much easier to find later when you’re looking for specific wallpapers, backgrounds, or stock photos.
- Confirm and Save: After specifying the filename and destination, click the “Save” button or press Enter. A “Download complete” notification will briefly appear in the bottom-right corner of your screen. Clicking “Show in folder” will immediately open the Files app to display your newly saved image.
This method is perfect for capturing individual pieces of beautiful photography or specific aesthetic images from Tophinhanhdep.com that you want to add to your personal collection.
Quick Transfers with the Clipboard: Copy and Paste Images
Sometimes, you might not need to permanently save an image to your file system but rather insert it directly into a document, a presentation, or an online design tool. The Chromebook’s clipboard functionality offers a swift way to achieve this, making it incredibly useful for digital art, graphic design, or compiling photo ideas without intermediate saving steps.
Here’s how to copy an image to your clipboard and paste it elsewhere:
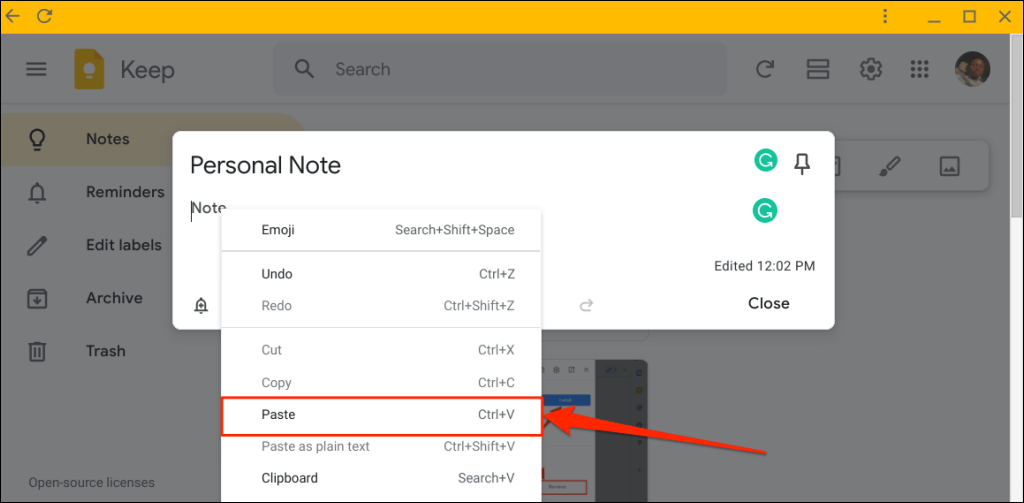
- Copy the Image: Just like with the “Save image as” method, right-click (two-finger tap) or tap and hold on the image you want to copy from Tophinhanhdep.com or any webpage. From the contextual menu, select “Copy image.” The image is now temporarily stored in your Chromebook’s clipboard.
- Paste into Your Application: Open the application or document where you intend to use the image (e.g., Google Docs, Google Slides, a web-based photo editor, or a graphic design app).
- Standard Paste: Place your cursor at the desired insertion point, then right-click (two-finger tap) and select “Paste” from the menu. Alternatively, use the keyboard shortcut
Ctrl + V. - Clipboard History: ChromeOS features a handy clipboard history. To access it, press
Search + V(the Search key is usually located where Caps Lock would be). A small pop-up will display recently copied items, including your image. Click or tap the image you want to paste. This is particularly useful if you’ve copied several items and need to select a specific one.
- Standard Paste: Place your cursor at the desired insertion point, then right-click (two-finger tap) and select “Paste” from the menu. Alternatively, use the keyboard shortcut
This clipboard method is excellent for dynamically incorporating images into your work, especially when you’re experimenting with visual design concepts or assembling mood boards directly in a creative application. It streamlines the process for quick iteration and integration, pulling elements from Tophinhanhdep.com into your evolving projects.
Capturing Visuals with Chromebook’s Screenshot Tools
Screenshots are an incredibly versatile tool for saving visuals, particularly when the “Save image as” option isn’t available, or when you need to capture a specific portion of a page that combines text and imagery. This is often the case when you’re gathering inspiration, capturing entire sections of thematic collections, or even preserving examples of trending styles from Tophinhanhdep.com.
Chromebooks offer a robust built-in screen capture tool, and there are also third-party options for more advanced needs.
Using the Built-in Screen Capture Tool:
- Activate the Tool: You can open the screen capture tool in two main ways:
- Keyboard Shortcut: Press
Ctrl + Shift + Show Windowkeys simultaneously. The “Show Window” key typically looks like a rectangle with two lines next to it, located on the top row of your keyboard. - System Tray: Click on the date/time display in the bottom-right corner of your screen to open the system tray, then select the “Screen capture” icon (it often looks like a camera).
- Keyboard Shortcut: Press
- Choose Your Capture Type: Once the tool is active, a toolbar will appear at the bottom of your screen. You’ll have options for:
- Full Screenshot: Captures the entire visible screen.
- Partial Screenshot: This is ideal for isolating a specific image or section. Select the “Take partial screenshot” icon (usually a dotted rectangle). Your cursor will turn into a crosshair. Click and drag to draw a box around the image you want to capture, then release.
- Window Screenshot: Captures a specific application window.
- Screen Recording: Captures video of your screen activity (useful for tutorials or dynamic visual explanations).
- Capture and Save: After selecting your area (for partial screenshots) or choosing full/window capture, the screenshot will be taken. Like direct downloads, screenshots are saved to your “Downloads” folder by default as PNG images. You’ll see a notification, and you can click “Show in folder” to view it.
- Customizing Save Location: If you wish to save screenshots to a different folder (e.g., directly to Google Drive or an external device), you can do so by clicking the gear icon within the screen capture tool’s toolbar, selecting “Select folder,” and choosing your preferred destination.
Screenshots in Tablet Mode: If you’re using a Chromebook in tablet (flipped) mode, pressing the physical power button and volume down button simultaneously will take a full-screen screenshot. This is convenient for quick captures without needing the keyboard. However, for partial screenshots, you’ll still need the keyboard or the on-screen toolbar.
Third-Party Snipping Tools/Extensions: For more advanced screenshot capabilities, such as annotations, timed captures, or direct cloud integration, you can explore Chrome extensions like Screencastify (which also supports screen recording) or similar tools available in the Chrome Web Store. These can be particularly useful for digital photography students or graphic designers who need more control over their captured visuals.
Screenshots are invaluable for capturing beautiful photography, aesthetic images, or complex visual layouts from Tophinhanhdep.com that might otherwise be difficult to save. They allow you to create your own “stock photos” from visual elements or compile image inspiration into thematic collections.
Saving Images from Cloud Services and Beyond
Beyond capturing images directly from web pages, your Chromebook also offers seamless integration with cloud storage services and external devices. This is particularly beneficial for managing your growing collection of high-resolution images, wallpapers, and creative assets sourced from Tophinhanhdep.com. Efficient storage and retrieval are key to maintaining an organized visual library for all your photography and visual design needs.
Downloading from Google Photos and Other Cloud Platforms
Google Photos is a popular cloud service for backing up and managing your personal photography collection. If you’ve uploaded images from your phone or other devices to Google Photos, downloading them to your Chromebook is a straightforward process. This is especially useful if you want to use your own beautiful photography as wallpapers or edit them further using Chromebook apps.
Here’s how to download images from Google Photos:
- Open the Photos App: On your Chromebook, open the Google Photos app. You can find it in your app launcher or by searching for “Photos.”
- Select Your Image: Browse through your library and click or tap on the image you wish to download. The image will open in full view.
- Access Download Options: In the top-right corner of the screen, you’ll typically see a three-dot menu icon (often labeled “More options”). Click on this.
- Select “Download”: From the dropdown menu, choose the “Download” option.
- Batch Downloads: If you want to download multiple images, you can select them by clicking the checkmark in the corner of each thumbnail before opening the three-dot menu and selecting “Download.”
- Locate the Downloaded Image: Similar to web downloads, images from Google Photos will be saved to your Chromebook’s “Downloads” folder by default. You can then move them to Google Drive, an external drive, or another local folder as needed, perhaps organizing them into “Tophinhanhdep.com Wallpapers” or “Digital Photography Projects.”
For other cloud storage apps like Dropbox or OneDrive, the process is generally similar. You’ll typically open the app, navigate to the image, and look for a “Download,” “Save to device,” or “Export” option. The goal is to bring the cloud-stored image onto your Chromebook’s local storage for direct access or manipulation. This ensures that all your aesthetic, nature, or abstract images, regardless of their original source, can be managed in one place.
Utilizing External Storage and Google Drive for Image Archiving
Chromebooks are inherently designed to work seamlessly with cloud storage, especially Google Drive. However, local and external storage options remain vital for many users, particularly those dealing with large volumes of high-resolution images or those who prefer offline access to their thematic collections and photo ideas.
Google Drive: The Chromebook’s Best Friend for Image Storage
Google Drive is deeply integrated into ChromeOS, making it an excellent choice for storing your Tophinhanhdep.com downloads.
- Saving Directly to Drive: As mentioned in the “Save image as” section, you can select Google Drive as your destination when downloading an image from the web. Create specific folders like “Tophinhanhdep.com Aesthetic Backgrounds” or “Abstract Photography Collection” within your Drive to maintain order.
- Moving Existing Files: If you’ve already downloaded images to your “Downloads” folder, you can easily move them to Google Drive using the Files app.
- Open the Files app (usually found in your app launcher).
- Navigate to “My files” > “Downloads.”
- Select the images you want to move. You can select multiple by holding
Ctrland clicking each one. - Drag and drop the selected images into your “Google Drive” section in the left-hand panel, choosing the appropriate subfolder.
Storing images in Google Drive ensures they are backed up, accessible from any device with an internet connection, and easily shareable. This is ideal for collaborating on visual design projects or simply enjoying your curated wallpapers across all your devices.
External Storage: For Large Collections and Offline Access
For photographers, digital artists, or anyone with extensive collections of high-resolution stock photos and beautiful photography, external storage devices like USB drives or SD cards offer additional space and portability.
- Saving Directly to External Device: When using the “Save image as” command, your connected external device will appear as a destination option in the Files app sidebar. You can then save images directly to it, bypassing local storage.
- Transferring Files to External Device: To move existing files from your Chromebook’s local storage to an external drive:
- Connect your USB drive or insert your SD card into your Chromebook.
- Open the Files app.
- Navigate to the folder containing the images you wish to transfer (e.g., “Downloads” or a custom folder).
- Select the images.
- Drag and drop the selected images to the external device’s folder, which will appear in the left-hand panel of the Files app.
Using external storage is particularly useful for archiving complete thematic collections, preparing images for printing, or working on large digital art projects that require substantial storage without relying on an internet connection. It allows you to build a robust physical archive of your favorite Tophinhanhdep.com inspiration.
Enhancing Your Tophinhanhdep.com Experience: From Saved Images to Creative Projects
Saving images is just the beginning. The true value comes from how you use these visuals to enrich your digital life and fuel your creative endeavors. With images saved from Tophinhanhdep.com, your Chromebook transforms into a hub for personalizing your device, designing striking visuals, and drawing continuous inspiration.
Transforming Downloads into Stunning Wallpapers and Backgrounds
One of the most popular uses for images downloaded from Tophinhanhdep.com is personalizing your Chromebook’s aesthetic. The site offers an unparalleled selection of wallpapers and backgrounds, ranging from serene nature scenes and captivating abstract patterns to vibrant aesthetic photography, all available in high resolution.
Once you have saved your desired images – perhaps a minimalist abstract wallpaper, a breathtaking landscape, or a calming aesthetic background – changing your Chromebook’s wallpaper is incredibly simple:
- Open Settings: Click on the time/status bar in the bottom-right corner of your screen, then select the gear icon to open “Settings.”
- Navigate to Personalization: In the Settings menu, look for “Personalization” (or “Wallpaper & style”) on the left-hand side.
- Choose “Wallpaper”: Click on “Wallpaper.”
- Select Your Image: You can browse through various categories offered by Google, but to use your saved images, click on “My images” (or “Custom”). This will open your Files app.
- Locate and Set: Navigate to the folder where you saved your Tophinhanhdep.com image (e.g., “Downloads,” “Google Drive,” or an external drive). Select the image, and it will immediately be applied as your new wallpaper.
For an even more dynamic experience, you can create a folder filled with multiple high-resolution images from Tophinhanhdep.com and set your Chromebook to cycle through them. This ensures your desktop always feels fresh, reflecting different moods – from sad/emotional to beautiful photography – and thematic collections you’ve curated. A personalized wallpaper is more than just a background; it’s a daily source of inspiration, reflecting your aesthetic preferences and creative ideas.
Leveraging Image Tools for Optimal Visual Quality and Design
The journey from discovering an image on Tophinhanhdep.com to integrating it into a sophisticated visual design project often involves more than just saving. Chromebook users can harness various image tools to ensure their visuals are optimized for their intended purpose, maintaining high resolution and perfect clarity.
Understanding Image Formats and Converters: When saving images, you might encounter different file formats like JPG, PNG, GIF, and WEBP. WEBP, for instance, is increasingly common online (including on Tophinhanhdep.com) due to its smaller file size and faster loading times. However, not all applications or design software fully support WEBP.
- Conversion Needs: If you download a WEBP image and find it incompatible with your preferred editing app or service, you’ll need to convert it. Chromebook users have several options:
- Online Converters: Numerous free web-based tools (you can search for “WEBP to JPG converter” on Google) allow you to upload an image and convert it to JPG, PNG, or TIFF formats.
- Chrome Extensions: Dedicated Chrome extensions can often handle image conversions directly from your browser or file system.
- Tophinhanhdep.com’s Image Tools (if applicable): If Tophinhanhdep.com offers its own image tools, these might include converters that can streamline this process, maintaining the high resolution and quality of the original stock photos or beautiful photography.
Compressors and Optimizers: For web design, presentations, or sharing images online, file size matters. Large high-resolution images can slow down websites or clog inboxes.
- Image Compressors: Tools available as web services or Chrome apps can significantly reduce an image’s file size without a noticeable drop in visual quality. This is crucial for optimizing images for web use or email attachments, especially when dealing with high-resolution digital photography.
- Image Optimizers: These tools go a step further, often integrating compression with other optimizations like metadata stripping, making images load faster and more efficiently.
AI Upscalers: Sometimes, you might find a beautiful image on Tophinhanhdep.com, but its resolution isn’t quite high enough for a large print or a detailed digital art project. AI upscalers use artificial intelligence to intelligently increase an image’s resolution, adding detail and sharpness.
- Enhancing Quality: For users passionate about high-resolution photography, an AI upscaler can breathe new life into smaller images, allowing them to be used as stunning wallpapers, printed art, or as components in larger graphic design works. This ensures that even lower-resolution finds can contribute to your premium thematic collections.
By judiciously using these image tools, you can ensure that every abstract, nature, or aesthetic image you save from Tophinhanhdep.com is perfectly prepared for its intended use, whether for personal enjoyment, professional graphic design, or intricate photo manipulation.
Building Inspiring Collections for Photography and Digital Art
The act of saving images from Tophinhanhdep.com goes beyond mere accumulation; it’s about building a curated visual library that serves as a wellspring of inspiration for your photography and digital art endeavors. Tophinhanhdep.com provides a rich landscape of photo ideas, trending styles, and diverse thematic collections that can directly feed into your creative process.
Creating Mood Boards and Thematic Collections: A Chromebook’s ease of saving images makes it an ideal device for compiling mood boards. As you browse Tophinhanhdep.com, you can quickly save images that resonate with a particular project or theme.
- Organized Folders: Create dedicated folders in your Google Drive or local storage for different mood board themes (e.g., “Minimalist Design Mood Board,” “Nature Photography Inspiration,” “Sad/Emotional Art Concepts”).
- Visual Brainstorming: Collect images featuring specific colors, textures, compositions, or emotional tones. These collections of abstract, beautiful, or aesthetic photography can guide your visual design choices, inform your digital art compositions, or inspire your next photo manipulation project.
- Trending Styles: Keep an eye on trending styles featured on Tophinhanhdep.com. Saving examples of these styles can help you stay current and infuse contemporary aesthetics into your work.
Fueling Digital Photography and Graphic Design Projects: The high-resolution stock photos and beautiful photography available on Tophinhanhdep.com are invaluable assets for various creative projects.
- Stock Photo Resources: Saved images can serve as stock photos for graphic design layouts, presentations, or even as base layers for digital painting and photo manipulation. Having a readily accessible library of diverse imagery, from nature to abstract, streamlines the design process.
- Learning and Analysis: Photographers can save images to analyze composition, lighting, editing styles, and artistic techniques. This provides a practical reference library for improving their own digital photography skills.
- Creative Ideas: The “Image Inspiration & Collections” aspect of Tophinhanhdep.com is directly supported by efficient image saving. Every saved image can spark a new creative idea, whether it’s for a social media graphic, a personal art piece, or a professional visual campaign.
By conscientiously saving and organizing images from Tophinhanhdep.com, you’re not just storing files; you’re cultivating a powerful resource for visual inspiration and practical application, transforming your Chromebook into an essential tool for artistic expression and design innovation. The extensive categories on Tophinhanhdep.com—from wallpapers and backgrounds to aesthetic and sad/emotional imagery—ensure that you’ll always find the perfect visual to add to your ever-growing and inspiring collection.