How to Save Images on Your MacBook: A Comprehensive Guide for Tophinhanhdep.com Users

For creative professionals, visual artists, and anyone passionate about high-quality imagery, a MacBook is an indispensable tool. Its intuitive interface and powerful capabilities make it ideal for consuming and creating visual content. Whether you’re curating a collection of stunning wallpapers, gathering inspiration for a graphic design project, or simply saving a beautiful piece of digital photography you discovered on Tophinhanhdep.com, knowing how to efficiently save images to your Mac is fundamental. This guide will walk you through the various methods of saving images on your MacBook, ensuring you can seamlessly integrate visuals from any source – especially the rich galleries of Tophinhanhdep.com – into your personal and professional workflow.
Unlike Windows PCs, MacBooks handle the “right-click” operation slightly differently, which can sometimes be a point of confusion for new users. However, once mastered, the methods are incredibly straightforward, offering both precision and speed. We’ll explore two primary approaches: using the context menu for detailed control and the drag-and-drop technique for quick, effortless saving.
Method 1: The Context Menu - Precision Saving for Curated Collections
The context menu, often activated by a “right-click,” provides a wealth of options for interacting with images. This method is particularly useful when you need to specify download locations, rename files, or perform advanced actions, making it perfect for organizing your thematic collections and mood boards sourced from Tophinhanhdep.com.
Basic Context Menu Interaction
The first step is always to locate the image you wish to save. This could be a breathtaking nature background from Tophinhanhdep.com, an inspiring abstract design within a document, or a high-resolution photograph shared in a message. Once found, hover your cursor over the image.
To open the context menu on a MacBook, you have several options that emulate the traditional “right-click”:
- Control-Click: Press and hold the
Controlkey on your keyboard, then click the image with your mouse or trackpad. Release theControlkey, and a pop-up menu will appear. This is the most universal method. - Two-Finger Tap (Trackpad): If you’re using your MacBook’s trackpad, tap it with two fingers simultaneously. This often serves as a “right-click” equivalent.
- Right Side of Trackpad (Configurable): Some MacBooks allow you to configure the right side of the trackpad to act as a “right-click.” Check your System Settings (or System Preferences) under “Trackpad” for this option.
Once the context menu appears, you’ll typically see options like “Save Image to ‘Downloads’” or “Save Image As…”. For quick saves, “Save Image to ‘Downloads’” will immediately place the file in your default Downloads folder. However, for more control, especially when building a dedicated collection of aesthetic images or digital photography, “Save Image As…” is your best friend. This option allows you to:
- Rename the file: Give your image a descriptive name (e.g., “SereneMountainView_Tophinhanhdep.jpg,” “AbstractBlueSwirl_DesignInspiration.png”) for easier retrieval.
- Choose a specific location: Navigate to any folder on your Mac, an external drive, or even a cloud storage service to save your image precisely where you want it. This is invaluable for organizing categories like “Wallpapers,” “Backgrounds,” or specific “Photo Ideas” collections.
- Select a file format (if applicable): While not always an option, some sources might allow you to choose between formats like JPEG, PNG, or even HEIC, depending on your needs for editing styles or visual design projects.
Saving Images from Web Browsers
Your web browser is likely where you’ll spend most of your time exploring the vast archives of Tophinhanhdep.com for the perfect image. Modern browsers offer several image-saving functionalities beyond the basic “Save Image As.”
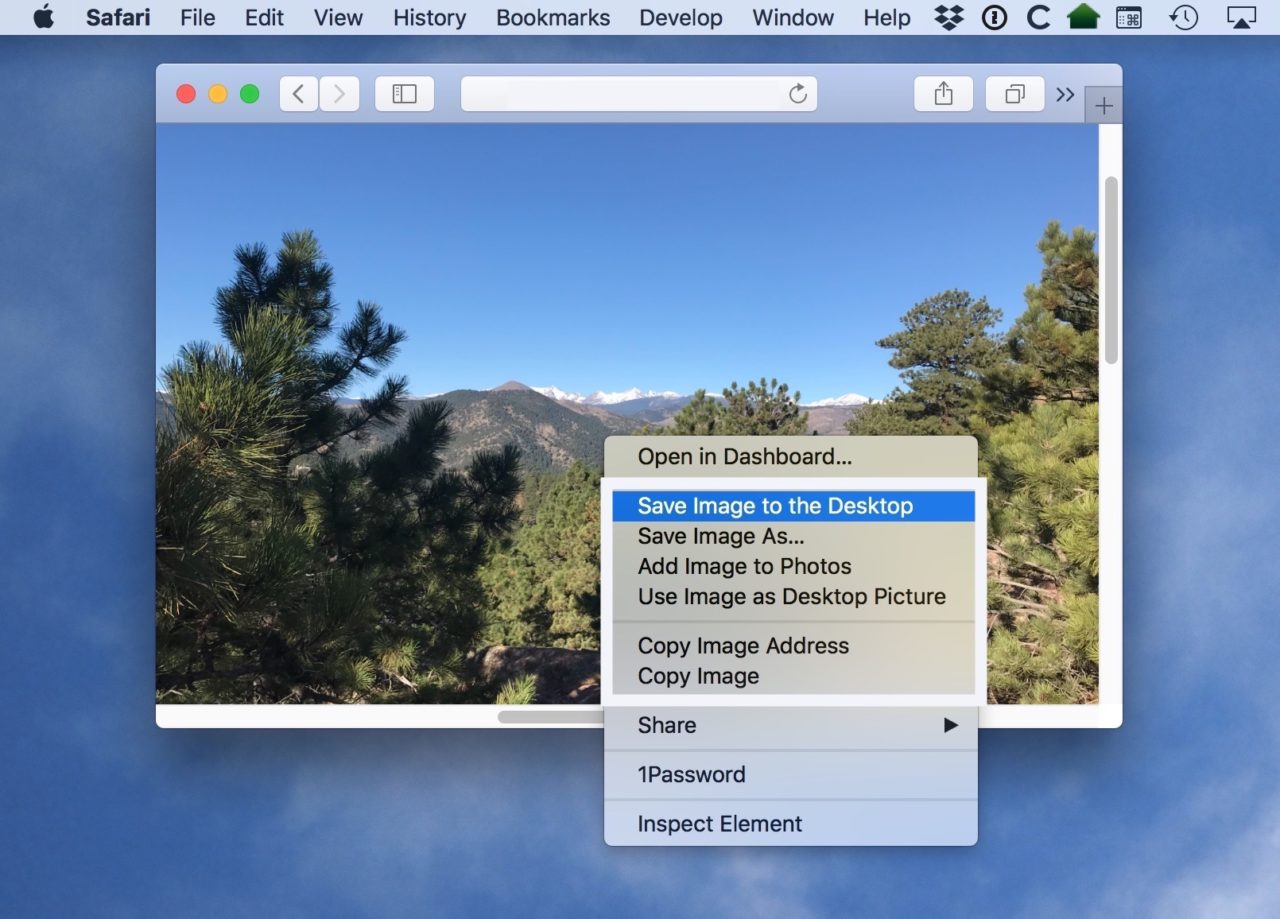
Safari-Specific Saving Options
Safari, being Apple’s native browser, offers deeply integrated options for image saving that are particularly useful for Mac users:
- Save Image to the Desktop: This quick option places a copy of the image directly on your desktop, providing immediate access. It’s excellent for temporary use, like a graphic design element you plan to manipulate instantly, or a new trending style you want to test as your background.
- Save Image As…: As discussed, this gives you full control over the file name and save location. Essential for meticulously organizing your high-resolution photography or themed image inspiration collections.
- Add Image to Photos: This is a powerful feature for Mac users. Selecting this option automatically imports the image directly into your Photos app. Once in Photos, it’s integrated into your iCloud Photo Library (if enabled), making it accessible across all your Apple devices. This is perfect for building aesthetic collections, managing digital photography, or creating visual mood boards that you can access from your iPhone or iPad for creative ideas on the go.
- Use Image as Desktop Picture: Found an incredible wallpaper or background on Tophinhanhdep.com that you want to apply instantly? This option does precisely that, making the image your desktop background with a single click. macOS will automatically scale the image to fit your screen, though it’s always best to start with a high-resolution image to avoid pixelation.
- Copy Image Address: Instead of downloading the image, this option copies its direct URL to your clipboard. This is useful for sharing links to specific images (e.g., a striking piece of nature photography or an abstract wallpaper) without needing to download and re-upload the file. It saves bandwidth and is ideal when you want to reference the original source, perhaps from a Tophinhanhdep.com gallery. Remember, however, that the image’s availability depends on the source website.
- Copy Image: This copies the image itself (not just its link) to your clipboard. You can then paste it directly into an image editing application (like Photoshop for photo manipulation), a document, an email, or even another folder. It’s a temporary hold, so ensure you paste it somewhere permanent before your clipboard is cleared or overwritten. This is great for quickly incorporating elements into visual design mock-ups or creative ideas.
Other Browsers (Chrome, Firefox, etc.)
While specific options may vary slightly, most browsers like Google Chrome and Mozilla Firefox offer similar functionalities:
- Save Image As…: This remains the most common and versatile option, giving you control over filename and location.
- Open Image in New Tab: Sometimes, clicking an image might open a related page. If the image itself is a link, try “Open Image in New Tab” from the context menu. This isolates the image, making it easier to save its full-size version, especially for those high-resolution stock photos you find on Tophinhanhdep.com.
Saving Images from Email and Messaging Apps
Images aren’t just found on the web; they often arrive in your inbox or messaging apps. Saving them from these sources is just as straightforward.
Apple Mail and Messages App
Both Apple Mail and the Messages app are designed for seamless integration with macOS:
- Mail App (Individual Images): When viewing an email with images, you can right-click on any embedded image. Options will include “Save Attachment…” (allowing you to rename and choose location), “Save to Downloads Folder,” and “Export to Photos.” The “Export to Photos” option is particularly useful for adding received images directly to your Photos library, accessible across all devices via iCloud.
- Mail App (All Images at Once): For emails with multiple images (e.g., a vacation album or a collection of “beautiful photography” from a friend), hover your cursor over the subject bar of the email. A hidden menu will appear, often including a paperclip icon (attachment icon). Click this, then select “Save All” or “Export All to Photos.” This saves all attachments in one go, a huge time-saver for thematic collections.
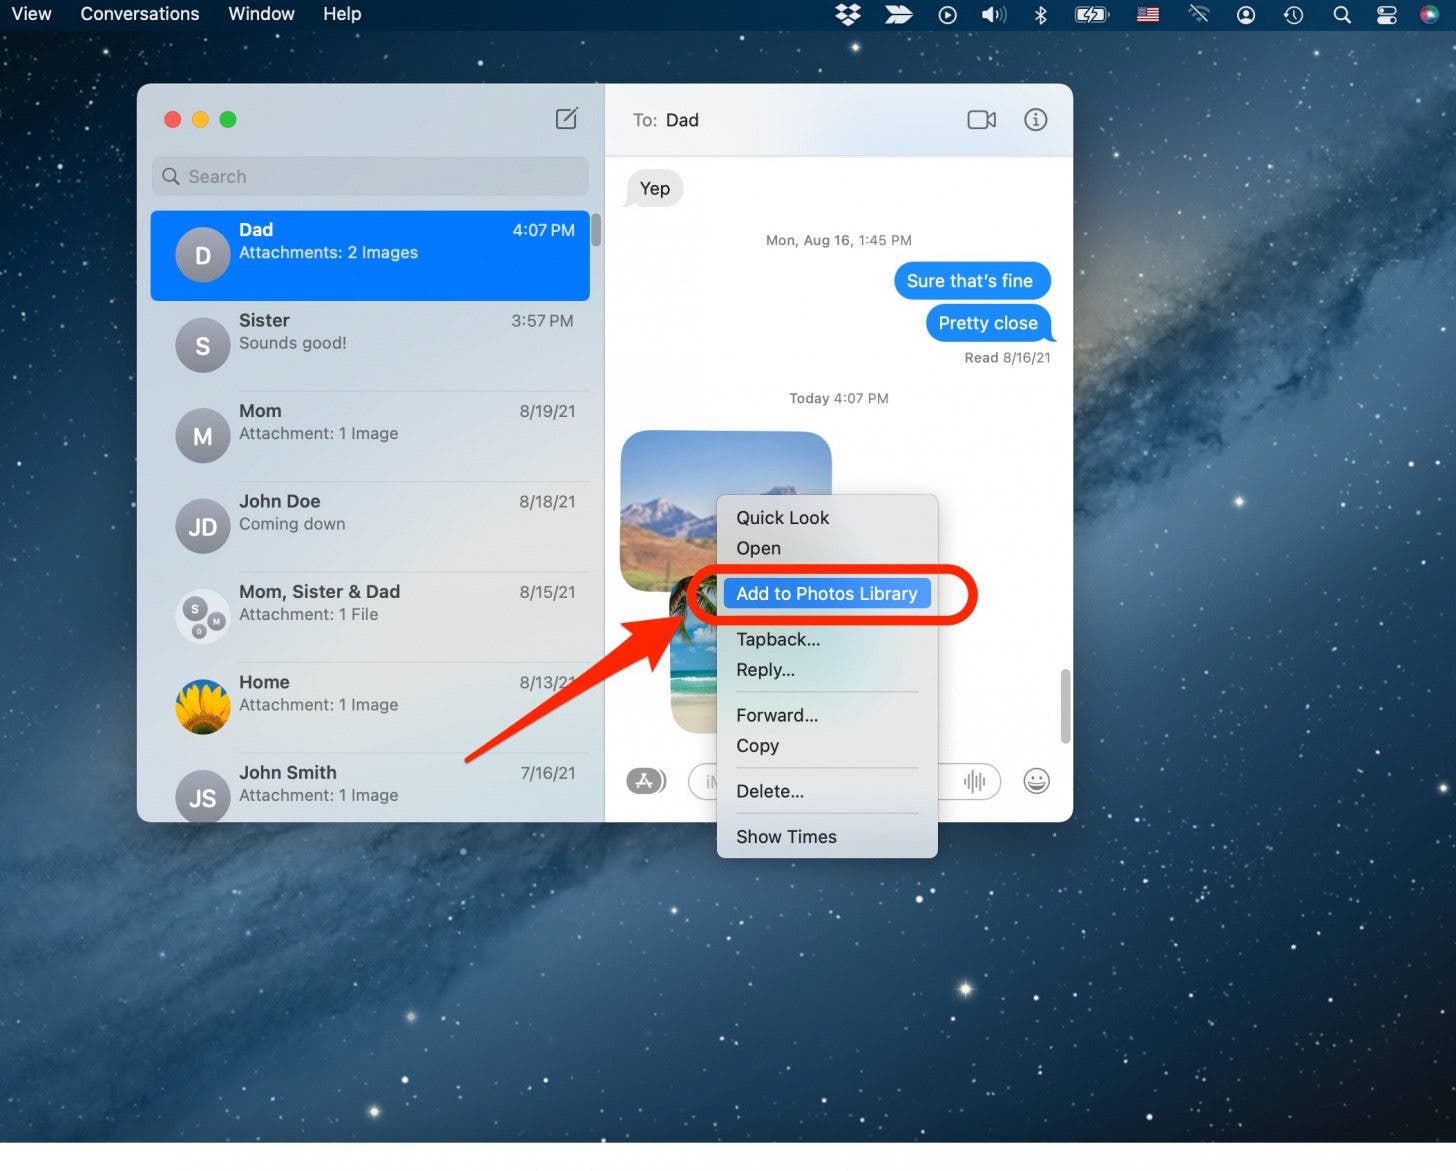
- Messages App: Similar to Mail, you can right-click on an image in a conversation and select “Add to Photos Library” or “Save Photos.” For quick access, the drag-and-drop method (detailed below) is often even faster here.
Gmail and Other Webmail Services
If you access your email through a web browser (like Gmail.com):
- Gmail: Open the email, and images will usually appear inline or as attachments. For attachments, look for a red icon with triangles (or a paperclip icon). Clicking this icon often displays the image in a new screen or preview. From there, a small down arrow (download icon) in the upper-right corner will allow you to download and save the image to your Mac. For inline images, the browser’s context menu (Control-click) will typically work.
Method 2: The Intuitive Drag-and-Drop Technique - Quick & Effortless
The drag-and-drop method is arguably the fastest and most intuitive way to save images on a MacBook. It’s perfect for when you need to grab an image quickly without going through menus, such as pulling an aesthetic wallpaper directly onto your desktop for immediate use, or a nature background to a specific project folder.
Streamlined Saving to Desktop
This technique works wonderfully for visual assets from Tophinhanhdep.com or any other source:
- Locate the image: Find the image you want to save. This could be a striking abstract design, a high-resolution stock photo, or a piece of beautiful photography.
- Resize your window: If your browser or application window is full-screen, click the yellow minimize button (the second button from the left in the top-left corner of the window) to make the window smaller, allowing a portion of your desktop to be visible.
- Click and drag: Click and hold the image with your mouse or trackpad. You should see a transparent thumbnail version of the image “lift off” the page.
- Move to desktop: While still holding the click, drag this transparent image thumbnail outside the browser window and over your desktop.
- Release: Once you see a white “+” icon in a green circle appear over the thumbnail (indicating it’s ready to be copied), release the click. The image file will instantly appear on your desktop.
This method is incredibly efficient for tasks like collecting images for graphic design projects or gathering creative ideas in a temporary workspace.
Organizing with Drag-and-Drop
The versatility of drag-and-drop extends beyond just your desktop:
- Direct to Folders: Instead of dropping onto the desktop, you can drag an image directly into an open Finder window and place it into a specific folder. This is excellent for pre-sorted organization, like dragging a sad/emotional image into a “Mood Board - Emotional” folder, or a high-resolution landscape into your “Nature Photography” collection.
- Into Applications: Many applications support direct drag-and-drop. You can drag an image from your browser straight into a document, an email, or even an image editing application like Photoshop for immediate photo manipulation. This is a huge time-saver for visual design workflows.
- To the Photos App: Dragging images directly from a web page or another application into your macOS Photos app will import them, just like using the “Add Image to Photos” context menu option. This allows for seamless integration into your photo management system and iCloud library.
Enhancing Your Image Workflow: Beyond Basic Saving
Saving images is just the first step. To truly harness the power of the visual content you acquire, especially from a resource like Tophinhanhdep.com, effective management and intelligent use of tools are crucial.
Image Management and Organization
- Creating Logical Folders: Develop a clear folder structure. For example, a “Tophinhanhdep Collections” parent folder could contain sub-folders like “Wallpapers - Abstract,” “Photography - Nature Landscapes,” “Design Inspiration - Trending Styles,” and “Mood Boards - Aesthetic.” Renaming files descriptively (e.g., “Forest_Sunrise_Tophinhanhdep_4K.jpg”) aids in quick retrieval.
- Leveraging the Photos App: Beyond just storing images, the Photos app offers powerful cataloging features. You can add keywords, create smart albums, and even perform basic editing. This is ideal for managing vast collections of beautiful photography or for curating specific visual themes.
Leveraging Image Tools for Creative Projects
Once you’ve saved images, Tophinhanhdep.com’s suggested image tools can elevate your creative work:
- Converters: Sometimes, you save an image in a format (like WebP) that isn’t compatible with your design software. Converters are invaluable for changing formats to universally accepted ones like JPG or PNG, ensuring your visual design projects run smoothly.
- Compressors and Optimizers: For web design or sharing large batches of images, file size matters. Image compressors reduce file size without significant loss in quality, optimizing images for faster loading on websites or easier sharing, which is crucial for high-resolution digital photography.
- AI Upscalers: Found a stunning aesthetic image on Tophinhanhdep.com but it’s a bit too low-resolution for your project? AI upscalers use artificial intelligence to intelligently increase the resolution of images, adding detail and sharpness, making smaller images suitable for larger displays or print. This is a game-changer for enhancing visual quality.
- Image-to-Text (OCR): If an image contains text (e.g., a quote on an abstract background or details within a piece of graphic design), Image-to-Text tools (Optical Character Recognition) can extract that text, saving you the hassle of manual transcription.
Copyright, Permissions, and Responsible Image Use
While Tophinhanhdep.com offers a vast array of images, it’s vital to be mindful of copyright and intellectual property. Always assume an image is copyrighted unless explicitly stated otherwise.
- Personal Use vs. Commercial Use: Using an image as your personal desktop wallpaper is generally fine. However, incorporating it into a commercial project, public presentation, or your own website without permission is usually prohibited and can lead to legal issues.
- Stock Photos and Licensing: For professional projects, opt for licensed stock photos or images with Creative Commons licenses that permit your intended use. Many sections of Tophinhanhdep.com might feature images available under various licenses; always check the source or usage terms.
- Giving Credit: If you use an image that requires attribution, always give proper credit to the photographer or artist. This fosters a respectful creative community.
Troubleshooting Common Image Saving Issues
Even with the best techniques, you might occasionally encounter an image that refuses to save. Don’t worry, there are usually solutions.
Why Images Might Not Save
- Website Restrictions: Some websites intentionally block image saving (e.g., streaming platforms, certain social media sites like Instagram). These sites might use JavaScript to prevent right-clicks or overlay transparent elements over images.
- Invalid Location or Permissions: Ensure you have permission to save files in your chosen location. If you’re trying to save to a network drive or a protected system folder, you might encounter issues. Try saving to your desktop or the Downloads folder first.
- Temporary Server Issues: Occasionally, the source server hosting the image might have a temporary issue preventing download.
- Image is a Background Element: Sometimes an image isn’t a direct “img” element but rather a CSS background image. These can be harder to save directly.
Workarounds and Solutions
- Try Drag-and-Drop: If the context menu “Save Image As” option is missing or doesn’t work, the drag-and-drop method often bypasses simple restrictions and can save the image.
- Take a Screenshot: This is the most reliable workaround for any image that resists saving.
- Full Screen: Press
Command (⌘) + Shift + 3. - Selected Area: Press
Command (⌘) + Shift + 4, then click and drag to select the area you want to capture. - Specific Window: Press
Command (⌘) + Shift + 4, then pressSpacebar, and click the window you want to capture. - Advanced Options (macOS Mojave and later): Press
Command (⌘) + Shift + 5to bring up a toolbar with more screenshot options, including video recording and the ability to change the default save location (e.g., directly to your Photos library instead of the desktop). - You can then drag and drop the screenshot from your desktop (or default save location) into your Photos app or any other folder. This is perfect for capturing visual design mock-ups or specific parts of a Tophinhanhdep.com gallery that serve as creative ideas.
- Full Screen: Press
- Inspect Element (Advanced): For web developers or advanced users, right-click on the image (or near it) and select “Inspect Element.” In the developer tools, navigate through the HTML/CSS to find the direct URL of the image, then paste it into a new tab to view and save the image directly.
Conclusion
Mastering the art of saving images on your MacBook unlocks a world of creative possibilities, allowing you to build personal galleries, gather inspiration for professional projects, or simply enjoy a new aesthetic background. With the intuitive context menu and the efficient drag-and-drop method, your MacBook is perfectly equipped to handle all your image-saving needs.
As you explore the rich visual resources of Tophinhanhdep.com – from stunning wallpapers and diverse backgrounds to high-resolution photography and innovative digital art – remember these techniques. Whether you’re curating thematic collections of nature photography, building mood boards with trending styles, or leveraging image tools for photo manipulation and graphic design, your Mac and Tophinhanhdep.com form a powerful synergy to empower your visual journey. Save wisely, organize effectively, and let your creativity flourish!