How to Save Images as PDF on Tophinhanhdep.com

In today’s visually-driven world, whether you’re a professional photographer, a digital artist, or someone who simply enjoys curating beautiful image collections, the ability to effectively manage and share your visual content is paramount. At Tophinhanhdep.com, we understand the importance of preserving the quality and accessibility of your cherished “Images,” “Photography,” and “Visual Design” projects. One of the most versatile and universally accepted formats for sharing documents that maintain their integrity across various platforms is the Portable Document Format, or PDF.
Converting images, documents, or even emails into PDFs offers a multitude of benefits, from ensuring consistent presentation and protecting your work to facilitating easy archiving and sharing. Imagine compiling a breathtaking “Nature” photography series, an intricate “Abstract” digital art portfolio, or a collection of “Aesthetic” wallpapers into a single, cohesive file that can be viewed on any device without losing its original layout or “High Resolution” quality. This article, crafted in the spirit of Tophinhanhdep.com’s focus on “Image Tools” and “Visual Design,” will guide you through various methods to save your visual content as PDF files, ensuring your creations always look their best.

The Indispensable Role of PDFs in Visual Content Management
The PDF format has become an industry standard for a reason. It encapsulates a complete description of a fixed-layout flat document, including the text, fonts, graphics, and other information needed to display it. For individuals and professionals dealing with rich visual content, this stability is invaluable.
Why Convert Your Visuals to PDF?
- Preservation of Visual Integrity: Unlike some image formats or word processing documents that can render differently depending on the software or device, PDFs guarantee that your “Beautiful Photography” or “Digital Art” appears exactly as you intended. This is crucial for maintaining the “Editing Styles” and overall aesthetic of your “Visual Design.”
- Professional Presentation: When sharing “Stock Photos,” a “Graphic Design” project, or a “Creative Idea” with clients or collaborators, a PDF elevates the professionalism of your presentation. It consolidates multiple assets into one easy-to-manage file.
- Enhanced Security: PDFs offer built-in security features such as password protection and content restriction (preventing copying, printing, or editing). This is particularly important for protecting original “Photography” or sensitive “Digital Art” from unauthorized use.
- Accessibility and Archiving: PDFs are highly accessible and can be viewed on virtually any operating system. For long-term archiving of “Image Collections” or important “Digital Photography” projects, the PDF format is robust and future-proof.
- Combining Multiple Assets: Whether you’re creating a “Mood Board” with various “Photo Ideas” or compiling a “Thematic Collection” of “Wallpapers,” PDFs allow you to merge numerous images and text into a single, navigable document.
Navigating Naming Conventions for Professional Archiving
Before diving into the conversion process, a thoughtful approach to file naming can significantly streamline your “Image Inspiration & Collections” management. A clear and consistent naming convention helps in quick identification and efficient organization, especially when dealing with a large volume of “Backgrounds” or “Sad/Emotional” image series.
For instance, when saving academic or professional documents, a common practice is to use a structure like: last-name-first-word(s)-year.pdf. For your visual content, Tophinhanhdep.com recommends adapting this to better suit “Photography” and “Visual Design” needs:
- For Individual Images:
[ImageSubject]-[Keyword]-[Year].pdf(e.g.,nature-sunset-2023.pdf,abstract-geometric-design-2024.pdf). - For Thematic Collections:
[CollectionName]-[Description]-[Year].pdf(e.g.,aesthetic-mood-board-summer-2024.pdf,high-resolution-cityscapes-2023.pdf). - For Project Portfolios:
[ProjectTitle]-[YourName]-Portfolio-[Year].pdf(e.g.,digital-art-portfolio-jane-doe-2024.pdf).
Using hyphens to separate words and keeping the file names lowercase ensures compatibility and readability across various systems. This small step contributes greatly to the efficiency of your “Image Tools” workflow.
Core Methods for Converting Images and Documents to PDF
The good news is that converting content to PDF is often straightforward, leveraging features built into your operating system, everyday applications, and specialized “Image Tools.”
Leveraging Built-in Operating System Functionality (Windows & Mac)
Both Windows and macOS offer native ways to convert various file types into PDFs, often through their “Print” functions. This is a quick and free method perfect for individual “Images” or documents.
On Windows 10: Using “Microsoft Print to PDF”
Windows 10 includes a virtual printer driver called “Microsoft Print to PDF.” This allows you to “print” any document or image that can be opened on your computer directly into a PDF file.
Steps:
- Open the Document or Image: Navigate to the image (or document) you wish to convert. Double-click to open it in its default viewer (e.g., Photos app for images, Word for documents, browser for webpages).
- Access the Print Function: Click on the “File” tab (if available) and select “Print,” or simply press
Ctrl + P(or right-click the image in Explorer and select Print). - Select “Microsoft Print to PDF”: In the print dialog box, choose “Microsoft Print to PDF” from the list of available printers.
- Initiate Save: Click the “Print” button.
- Name and Save: A “Save Print Output As” dialog box will appear. Enter your desired file name (following Tophinhanhdep.com’s suggested conventions, e.g.,
nature-forest-path-2024.pdf) and choose the destination folder. Click “Save.”
Considerations:
- Attachments: While you can “print” documents with attachments, merging the attachments directly into the same PDF as the main document isn’t natively supported with this method. You’d likely get separate PDFs for the main document and each attachment. For a comprehensive “Image Inspiration & Collections” document, you might need a separate PDF merging utility.
- Quality: This method generally preserves good quality for “High Resolution” images, but advanced compression options are limited.
On Mac OS X: Using the PDF Option in the Print Dialog
macOS has long provided robust PDF creation capabilities integrated directly into its printing system, making it incredibly easy to save almost anything as a PDF.
Steps:
- Open the Document or Image: Open the image, document, or webpage you want to save as a PDF.
- Access the Print Function: Click on “File” in the menu bar and select “Print…,” or press
Command + P. - Select “Save as PDF”: In the print dialog box that appears, look for the “PDF” dropdown menu, usually located in the lower-left corner. Click on it.
- Choose “Save as PDF…”: From the pop-up menu, select “Save as PDF…”.
- Name and Save: A “Save As” dialog box will open. Enter a name for your file, choose a save location, and add any relevant metadata. Click “Save.”
Considerations:
- Application Compatibility: While highly versatile, some applications (like certain versions of Adobe Acrobat Reader DC) might not directly support printing to PDF through the system dialog.
- Combining Images: You can often select multiple images in Finder, right-click, choose “Quick Actions” > “Create PDF” to combine them into a single PDF, perfect for a quick “Photo Ideas” collage.
Streamlining PDF Creation from Microsoft Office Applications
For users working with “Digital Photography” descriptions, “Graphic Design” proposals, or “Creative Ideas” documented in Word, Excel, or PowerPoint, Microsoft Office applications offer direct PDF export functionality that includes valuable features for “Visual Design.”
Steps:
- Open Your Document: Launch your Microsoft Word, Excel, or PowerPoint document.
- Access “Save As” or “Export”: Click on the “File” tab in the top-left corner.
- Choose PDF Format:
- Click “Save As” (or “Save a Copy” if working from cloud storage).
- From the “Save as type” (or “File Format”) dropdown list, select “PDF.”
- Alternatively, in some Office versions, you might see an “Export” option in the “File” menu, where you can directly choose “Create PDF/XPS Document.”
- Name and Locate: Enter a file name (e.g.,
sad-emotional-poem-2023.pdffor a Word document accompanying a “Sad/Emotional” image collection) and select your preferred save location. - Access Advanced Options (Crucial for Visual Design):
- Bookmarks: Under “Options” (often found next to the “Save” button), ensure “Create bookmarks using: Headings” is checked if you’ve used styles for your headings. This significantly improves document accessibility and navigation for longer “Visual Design” reports or “Image Inspiration & Collections” with descriptive text. LaTeX documents, for example, often generate bookmarks automatically.
- Optimization: You might see options like “Minimum size (publishing online)” for smaller file sizes (suitable for web-based “Wallpapers” or “Backgrounds” that don’t need print-quality resolution) or “Standard (publishing online and printing)” for higher quality.
- Security & Compliance: Here you can set passwords, restrict permissions (like printing or editing), and specify other compliance standards, safeguarding your “Digital Art” or “High Resolution” “Photography.”
- Page Range: Select specific pages to include, allowing you to create partial PDFs from larger documents.
- Final Save: Click “Save” (or “Publish”).
Tips for Visual Content:
- When incorporating “Images” into Word documents before saving as PDF, consider compressing the images within Word itself (
Picture Format > Compress Pictures) to manage the final PDF file size, especially for “Wallpapers” or “Backgrounds” that are inherently large. - Utilize Word’s heading styles (
Home > Styles) when structuring a portfolio or thematic collection. This ensures the “Create bookmarks using: Headings” option generates a navigable PDF table of contents, enhancing the user experience for your “Image Collections.”
Capturing Webpages as PDFs for Offline Viewing
Sometimes, the “Image Inspiration” or “Photo Ideas” you find online are best saved as a PDF for future reference, complete with their layout and embedded “Images.” Web browsers offer a straightforward way to do this.
Steps:
- Open the Webpage: Navigate to the webpage you wish to convert in your browser (Chrome, Firefox, Edge, Safari, etc.).
- Access Print Function: Press
Ctrl + P(Windows) orCommand + P(Mac). You can also typically find the “Print” option in your browser’s main menu (e.g., the three-dot menu in Chrome/Edge, or “File” menu in Safari/Firefox). - Select “Save as PDF”: In the print preview window, change the “Destination” (or “Printer”) to “Save as PDF.”
- Customize (Optional):
- Pages: If you only need specific sections, adjust the “Pages” setting to “Custom” and enter the desired page numbers.
- Layout & Margins: Click “More settings” to adjust layout, margins, and whether to include headers/footers or background graphics. This is useful for optimizing the visual clarity of “Aesthetic” layouts or “Visual Design” examples found online.
- Save: Click the “Save” button. A file manager window will appear for you to name and select the save location for your new PDF.
Advanced PDF Conversion: Emails, Attachments, and Enhanced Features
Beyond standard documents and images, converting emails to PDF is a critical need for “Digital Photography” professionals and “Visual Design” agencies, often for legal, archival, or project management purposes. Unfortunately, native email clients like Microsoft Outlook lack a direct “Save as PDF” option, necessitating alternative approaches.
Mastering Email to PDF Conversion with Attachments
Emails, especially those containing “Stock Photos,” “High Resolution” design drafts, or important project communications, need to be archived reliably. Tophinhanhdep.com highlights several methods to address this:
Option 1: Using Windows 10 “Print to PDF” Driver (Casual Use)
This method, though simple, has its limitations when dealing with attachments, especially for “Image Collections.”
Steps:
- Open Email: Open the email in Outlook.
- Initiate Print: Click “File” > “Print” or
Ctrl + P. - Select “Microsoft Print to PDF”: Choose this option from the printer list.
- Include Attachments (Optional): If you opt to include attachments for printing, Outlook will open each attachment in its associated application with the “Print to PDF” command invoked. This means you’ll save each attachment as a separate PDF.
- Save: Save each generated PDF individually.
Drawbacks: This method does not merge the email and its attachments into a single PDF, creating a fragmented archive that is less ideal for “Visual Design” project tracking. Unfamiliar attachment types will prompt you to choose an opening app, causing workflow interruptions.
Option 2: Using Microsoft Word to Save Email to PDF (No Attachments)
This workaround allows you to save the email content as a PDF but omits attachments.
Steps:
- Save Email as HTML: From Outlook, save the email message as an HTML file.
- Open in Word: Open the saved HTML file in Microsoft Word.
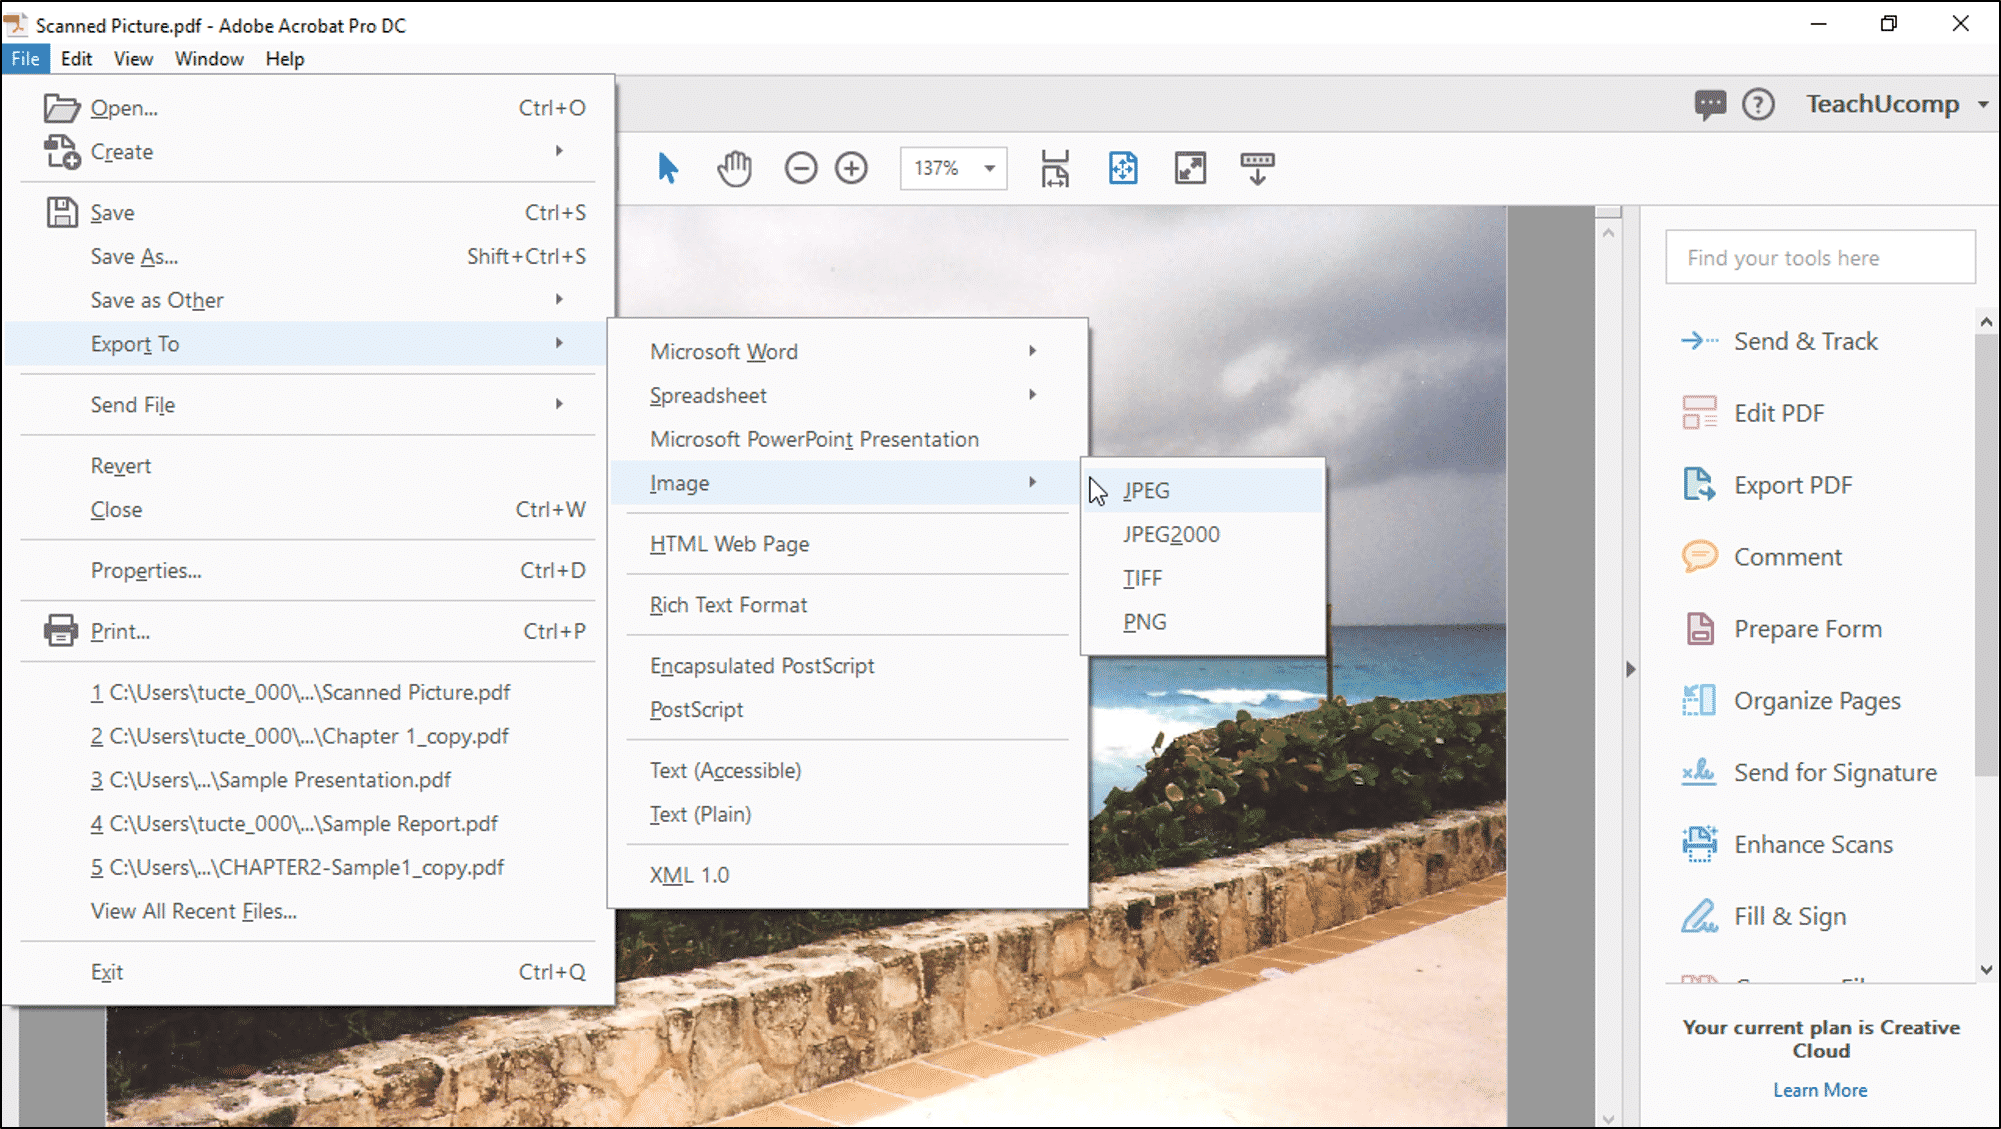
- Save Word Document as PDF: Use Word’s native “Save As PDF” functionality (as described in the Office applications section above).
Drawbacks: This method does not convert “Images” or other attachments, making it unsuitable for preserving the full context of “Photography” or “Visual Design” related email exchanges.
Option 3: Using Adobe Acrobat Outlook Add-in (Feature-Rich, Costly)
For those invested in the Adobe ecosystem, the Acrobat add-in for Outlook provides a robust solution.
Features:
- One-Click Conversion: Convert messages to PDF quickly.
- PDF Portfolios: Create sophisticated PDF portfolios, ideal for presenting “Image Collections” or “Digital Art” with advanced navigation.
- Security Features: Apply security settings like password protection and restrictions.
Considerations: This is a powerful, flexible tool, but its cost can be a barrier for many users, especially those only needing basic “Image Tools.”
Option 4: Specialized “Save as PDF” Add-ins for Outlook (Cost-Effective, Comprehensive)
Dedicated Outlook add-ins offer a specialized and often more affordable alternative, designed specifically to tackle the nuances of email-to-PDF conversion, including attachments. Tophinhanhdep.com recognizes these as essential “Image Tools” for comprehensive archival.
Key Functionalities:
- Multiple Output Formats:
- Individual PDFs: Email and each attachment saved as separate PDF files.
- Email as PDF, Attachments Merged: The email becomes one PDF, and all attachments are combined into a single separate PDF. This results in two PDFs per email.
- Email and Attachments Merged into One PDF: The most comprehensive option, creating a single, long PDF file containing both the email and all its attachments. This is excellent for creating complete records of “Photography” commissions or “Visual Design” project discussions.
- Batch Conversion: Export multiple selected emails to PDFs efficiently, vital for large “Image Collections” or project archives.
- Automatic Bookmarks and Table of Contents: The add-in automatically generates bookmarks and a table of contents within the PDF, allowing quick navigation between emails and attachments. This is a huge benefit for organizing “Image Inspiration & Collections.”
- Support for Composite Files: Even complex attachments like ZIP, MSG, or EML files (files within files) are scanned and included in the final merged PDF document, preserving all nested “Images” and data.
- Advanced Features:
- Smart Naming: Use email metadata to automatically name PDF files.
- Auto-Conversion of Attachments: Supports 120+ file formats (including common “Images,” Office documents, faxes) for automatic conversion to PDF.
- Appending to Existing PDFs: Continuously add new emails and attachments to an existing PDF, ideal for maintaining an evolving project log or “Mood Board” in a single file.
- Automation: Configure the add-in to automatically generate PDFs from incoming emails, freeing you from repetitive archiving tasks, especially for business-critical “Digital Photography” records.
- Watermarks and Encryption: Add watermarks to protect your “Digital Art” or “Beautiful Photography” and encrypt PDFs with passwords, setting security options.
This type of add-in offers the most robust solution for integrating email communications, including “Images” and files, into a well-organized PDF archive, aligning perfectly with Tophinhanhdep.com’s commitment to powerful “Image Tools.”
Enhancing PDF Output with Security, Watermarks, and Bookmarks
Beyond basic conversion, the “Image Tools” perspective on PDFs emphasizes control over the final output, crucial for protecting and presenting your “Visual Design” work.
- Security Permissions: When creating PDFs (especially from Office applications or advanced converters), always check for options to set passwords and restrict permissions. You can prevent others from copying text or “Images,” printing the document, or making edits. This is a primary line of defense for your unique “Digital Art” or proprietary “Stock Photos.”
- Watermarks: For “Photography” portfolios or “Graphic Design” drafts, applying a watermark (text or image) can subtly brand your work or indicate its status (e.g., “Draft,” “Confidential”). This feature is available in advanced PDF converters and some Office applications.
- Bookmarks and Hyperlinks: As mentioned, using headings in Word to generate PDF bookmarks is a simple yet powerful way to create a table of contents within your PDF. For “Image Collections” or “Thematic Collections” that tell a story, well-structured bookmarks make your PDF incredibly user-friendly. Some tools also allow you to embed hyperlinks, guiding viewers to related “Photo Ideas” or external resources.
Optimizing Your Image-to-PDF Workflow with Tophinhanhdep.com Tools
At Tophinhanhdep.com, we champion the use of smart “Image Tools” to make your “Photography” and “Visual Design” workflows efficient and impactful. Integrating the process of saving images as PDFs is a key part of this.
Balancing Quality and File Size for Visual Excellence
One of the perpetual challenges in “Digital Photography” and “Visual Design” is managing the trade-off between image quality and file size.
- For Web and Digital Sharing: When your PDF is destined for online viewing, email sharing, or embedding on a website (e.g., a collection of “Wallpapers” or “Backgrounds”), opting for “Minimum size (publishing online)” or a similar compression setting is advisable. Most PDF creation tools offer this. While it might slightly reduce the “High Resolution” detail, it ensures faster loading times and easier distribution. Before converting, consider using “Compressors” or “Optimizers” from Tophinhanhdep.com to pre-process your “Images,” achieving a good balance.
- For Printing and Professional Use: If your PDF will be printed, used for professional presentations, or showcases “Beautiful Photography” where every detail matters, always choose “Standard” or “High Quality Print” settings. This ensures that your “High Resolution” images retain their clarity and color fidelity. Avoid excessive compression here. If you start with low-resolution “Images,” consider using an “AI Upscaler” tool from Tophinhanhdep.com before PDF conversion to improve their quality, ensuring a sharp final product.
Batch Processing and Automation for Extensive Image Collections
Managing large “Image Collections,” whether they are “Nature” scenes, “Abstract” art, or client “Stock Photos,” can be time-consuming. Modern “Image Tools” and PDF converters offer features that significantly boost efficiency.
- Batch Conversion: Many dedicated PDF converters and some operating system methods (like selecting multiple images in macOS Finder and creating a PDF) allow you to process numerous files at once. This is invaluable when preparing a large “Thematic Collection” or archiving a year’s worth of “Digital Photography.”
- Automated Workflows: Advanced add-ins (like those for Outlook) can be configured to automatically convert and save incoming files as PDFs. Imagine all “High Resolution” attachments from client emails automatically archived as PDFs, freeing you to focus on “Creative Ideas” and “Photo Manipulation.”
In conclusion, mastering the art of saving images and documents as PDFs is an essential skill in the digital landscape. It empowers you to share, archive, and present your “Images,” “Photography,” and “Visual Design” projects with confidence, knowing that their visual integrity, accessibility, and security are maintained. By leveraging the various methods available—from built-in OS functions and Microsoft Office features to specialized “Image Tools” and add-ins—you can streamline your workflow and enhance your content management capabilities. Tophinhanhdep.com is your resource for understanding these “Image Tools” and for discovering “Image Inspiration” to elevate your visual creations. Embrace the versatility of the PDF and bring your “Trending Styles” and “Creative Ideas” to life in a format that speaks volumes.