How to Save Images on a Mac: A Comprehensive Guide for Visual Enthusiasts

In today’s visually-driven world, images are more than just pictures; they are inspiration, information, and often the foundation of creative projects. Whether you’re a professional designer, an aspiring photographer, or simply someone who appreciates the beauty of a well-crafted visual, knowing how to efficiently save and manage images on your Mac is an essential skill. From stunning wallpapers that transform your desktop to high-resolution photography destined for your next digital art piece, Tophinhanhdep.com is your ultimate resource for discovering, utilizing, and understanding the power of visual content. This guide will walk you through every method for saving images on your Mac, ensuring you can seamlessly integrate beautiful visuals from Tophinhanhdep.com and across the web into your personal and professional collections.
Macs are renowned for their intuitive user experience, and saving images is no exception. With a few clicks, drags, or keyboard shortcuts, you can capture almost any visual you encounter online or within your applications. This article will delve into the various techniques, offering insights that go beyond mere functionality, connecting each method to broader themes of digital photography, visual design, and effective image management. Get ready to enhance your digital workflow and curate an exquisite collection of images, backgrounds, and creative assets with ease.
Capturing Visuals from the Web: Browsers and Online Platforms
The internet is an endless gallery of visual inspiration, from aesthetic wallpapers to profound nature photography. Browsing Tophinhanhdep.com, you’ll find a curated selection of high-resolution images, abstract art, and thematic collections perfect for any project or personal preference. The first step to leveraging these visuals is knowing how to save them directly from your web browser.
Saving Images Directly from Web Browsers (Safari, Chrome, Firefox)
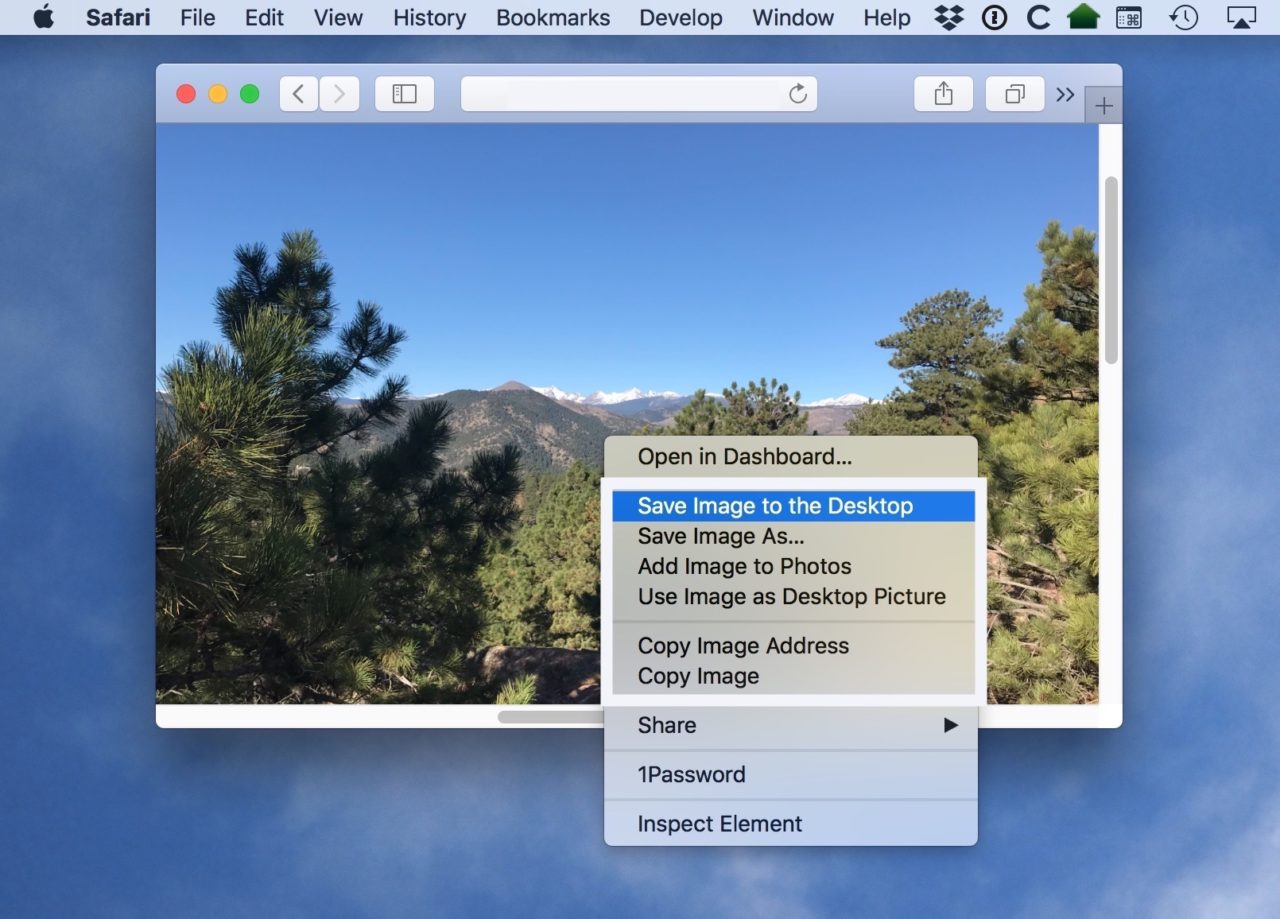
The most common way to save an image you encounter while browsing websites like Tophinhanhdep.com is through a simple right-click, also known as a secondary click. This method provides a contextual menu with several powerful options tailored to your saving needs.
To begin, open your preferred web browser (Safari, Chrome, Firefox, etc.) and navigate to the image you wish to save. For instance, imagine you’re on Tophinhanhdep.com, captivated by a high-resolution landscape photo or a vibrant piece of digital art that would make an ideal desktop background.

-
Right-Click (or Control-Click) the Image: Position your cursor over the image and perform a right-click. If you’re using a trackpad, this typically involves a two-finger tap or clicking with the Control key held down. This action will reveal a drop-down menu with various options.
-
“Save Image As…” for Organized Saving: This is arguably the most versatile option. Selecting “Save Image As…” will open a dialogue box, allowing you to choose the exact destination on your Mac for the image file. You can navigate to any folder, including external hard drives or network storage, and even rename the file before saving. This method is invaluable for maintaining an organized digital library, especially when you’re curating specific thematic collections, such as “Aesthetic Wallpapers,” “Nature Photography,” or “Abstract Backgrounds” from Tophinhanhdep.com. For graphic designers or those involved in photo manipulation, having the flexibility to save images directly into project-specific folders is crucial. It supports a structured workflow for digital art and creative ideas, ensuring that your high-resolution assets are exactly where you need them.
-
“Save Image to the Desktop” for Quick Access: For those moments when you need to quickly grab an image for immediate use, perhaps to open it in an image editing application or to simply preview it, “Save Image to the Desktop” is incredibly convenient. As its name suggests, this option saves a copy of the image directly to your Mac’s desktop. While excellent for temporary storage, relying too heavily on this can lead to a cluttered desktop, so it’s often best for images you plan to process or move soon after saving. This might be a placeholder for a mood board or a trending style image you want to experiment with before adding it to a more permanent collection.
-
“Add Image to Photos” for Seamless Apple Integration: If you’re deeply integrated into the Apple ecosystem, the “Add Image to Photos” option is a game-changer. This command automatically saves the image directly into your Photos app library. Once there, the image benefits from Photos’ robust management features, including tagging, album creation, and built-in editing tools. More importantly, if iCloud Photos is enabled, the image will sync across all your Apple devices (iPhone, iPad, other Macs), making it accessible for viewing, sharing, or further editing on any device. This is particularly useful for consolidating your collection of beautiful photography, personal snapshots, or images gathered for photo ideas, ensuring a unified visual experience across your devices.
-
“Use Image as Desktop Picture” for Instant Transformation: Ever seen a stunning background on Tophinhanhdep.com and wished it was your wallpaper immediately? This option does just that. Selecting “Use Image as Desktop Picture” will instantly set the chosen image as your Mac’s desktop background. macOS will typically scale the image to fit your screen. However, a crucial consideration here, especially for those who value high resolution, is the source image’s quality. If the original image is low resolution, stretching it to fit your display can result in pixelation or a “blocky” appearance, detracting from the aesthetic quality. Always aim for high-resolution images, like those often featured on Tophinhanhdep.com, when using this feature to ensure a crisp and visually pleasing background.
Handling Images from Online Communication (Gmail, Web-based Platforms)
Beyond browsing websites, images frequently arrive through email or other web-based communication platforms. Whether it’s a collection of holiday photos from friends or digital photography samples from a client, knowing how to extract these visuals is key.
-
Saving Pictures from Gmail: Gmail makes it straightforward to save attached images. When an email contains an image attachment, you’ll typically see a small red icon (often triangular or resembling a paperclip) next to the attachment name. Clicking this icon usually displays the image in a new screen or preview. From this view, look for a “down arrow” or a “download” icon, usually located in the upper-right corner. Clicking this will initiate the download, saving the image to your Mac’s default Downloads folder or prompting you to choose a location. This is an excellent way to save digital photography, personal snapshots, or visual assets sent via email, allowing you to easily add them to your collection of photo ideas or thematic mood boards.
-
General Approach for Other Web-based Image Sources: For other online platforms or webmail services, the general principles remain similar. If an image is displayed directly in a message or post, a right-click will often provide “Save Image As…” options. For attached files, look for a clear “Download” button or icon. Always be mindful of the image source and quality, especially if you plan to use these visuals for professional “Visual Design” or “Graphic Design” projects. Tophinhanhdep.com emphasizes high-resolution imagery, and ensuring your saved images meet similar standards will enhance your creative output.
Managing Images from Your Mail and Messages Apps
Apple’s native Mail and Messages applications are integral to many Mac users’ daily communication. Both apps offer robust ways to save images embedded within conversations, ensuring that shared photos, creative ideas, or beautiful photography don’t remain trapped within a message thread.
Saving Individual Images from Apple Mail and Messages
When you receive a single image, or only wish to save one from a collection, these methods offer precision and ease.
-
Drag and Drop Method (Mail and Messages): This is perhaps the most intuitive and quick way to save an image.
- Open the Mail or Messages app and navigate to the conversation containing the picture.
- Click and hold the image with your mouse or trackpad.
- While still holding, drag the image out of the app window and directly onto your Desktop, into an open Finder folder, or even into another application (like a word processor or an image editor).
- Release the click, and a copy of the image file will be placed in your chosen location. This method is perfect for rapidly extracting images you might want to immediately use for creative ideas or to contribute to a mood board, allowing for fluid photo manipulation.
-
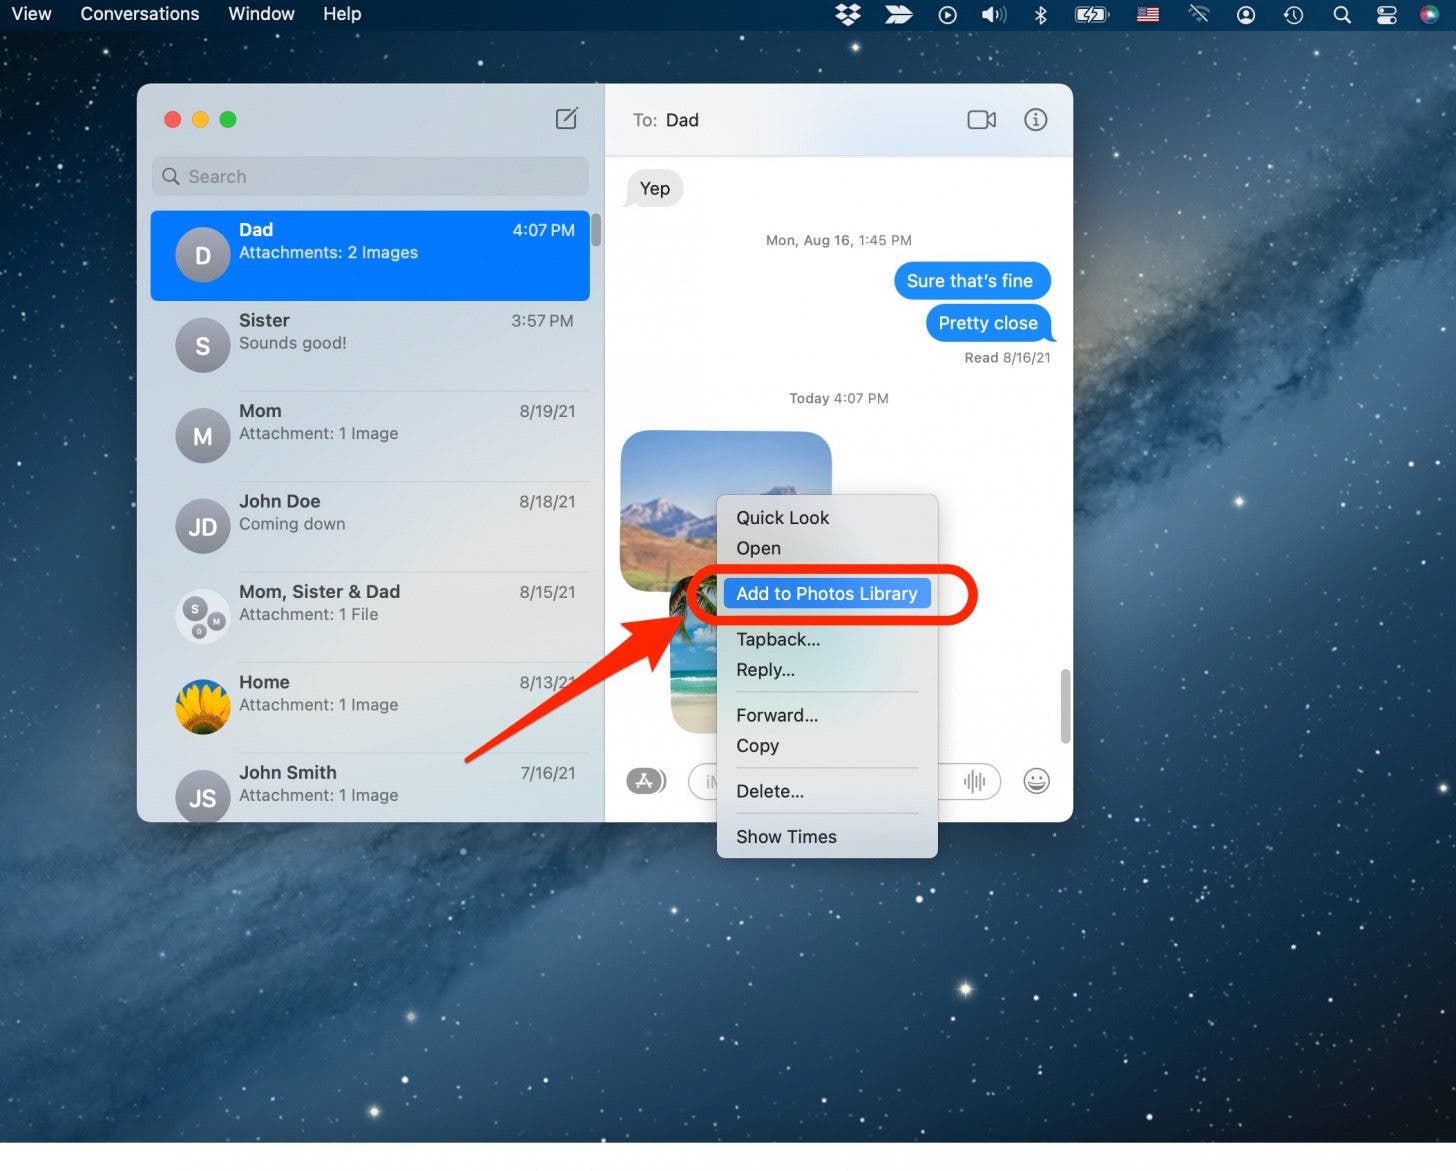
Right-Click Options in Messages (Add to Photos Library): For Messages, the right-click menu offers a direct path to Apple’s photo management system.
- Open the conversation with the image, then right-click (two-finger tap on trackpad or Control-click) on the picture.
- From the drop-down menu, select “Add to Photos Library.”
- You may see an additional prompt to “Save Photos.” Confirm this. The image will instantly be imported into your Photos app, making it available across all your iCloud-connected devices. This is an excellent feature for users who actively manage their personal and inspirational photo collections within Photos, allowing them to easily categorize and apply various editing styles to their saved visuals.
-
Right-Click Options in Apple Mail (Versatile Saving): The Mail app provides even more granular control when right-clicking on an image attachment.
- Right-click on the image within the email body.
- “Save Attachment…”: This option opens a standard “Save As” dialogue box, allowing you to choose any folder on your Mac, rename the file, and specify the format if multiple options are available. This provides maximum flexibility for organizing your “Digital Photography,” “Graphic Design” assets, or even “Stock Photos” received via email into specific project folders.
- “Save to Downloads Folder”: For a quick save without choosing a specific location, this option will place the image directly into your Mac’s default “Downloads” folder. It’s a convenient choice for images you need to access quickly and plan to sort later.
- “Export to Photos”: Similar to the Messages app, this command directly imports the image into your Photos library. If your iCloud Photos is enabled, the image becomes instantly available on all your Apple devices, enabling seamless access to your aesthetic backgrounds, beautiful photography, or curated image collections from Tophinhanhdep.com across your entire ecosystem. This is particularly useful for anyone creating “Image Inspiration & Collections” that they wish to access and share from various devices.
Efficiently Saving Multiple Images from Email
Sometimes, an email contains an entire album or a series of images that you want to save all at once. Apple Mail provides a highly efficient way to do this.
-
Open the Email with Multiple Attachments: In the Apple Mail app, select the email containing the multiple pictures you wish to save.
-
Access the Action Bar: Hover your mouse cursor over the horizontal line just under the email’s header information (sender, subject, date). This action will reveal a hidden action bar.
-
Select the Paperclip/Attachment Icon: On the action bar, locate and click the paperclip icon (also known as the Attachment icon). This will open a drop-down menu.
-
Choose “Save All”: From the menu, select “Save All.” Mail will then prompt you to choose a location on your Mac where you want to save all the attached images. This allows you to download an entire thematic collection, a set of “Photo Ideas,” or all components of a “Visual Design” project with a single action. This bulk-saving capability is a huge time-saver for anyone dealing with numerous images, such as a complete collection of “Nature Wallpapers” or “Sad/Emotional Photography” shared by a collaborator.
-
Outlook on Mac: If you use Microsoft Outlook on your Mac, a similar feature exists. Within an email containing multiple photo attachments, you’ll often see an option to “Download All” near the attachment list. Alternatively, you can click the down arrow next to individual attachments and select “Save As” for more specific control.
These methods ensure that whether you’re dealing with a single impactful image or an entire gallery, your Mac provides simple, effective ways to save and organize your visual assets, ready for use in any “Graphic Design” project, “Digital Art” endeavor, or simply to enrich your personal collection of beautiful images sourced from places like Tophinhanhdep.com.
Advanced Saving Techniques and Image Management Best Practices
While basic saving methods cover most needs, understanding advanced options and best practices can significantly streamline your image management, especially for professionals involved in “Photography,” “Visual Design,” or intense “Image Tools” usage.
Unlocking the “Save As” Command on Your Mac
Since around 2011, Apple subtly changed the behavior of the “Save” command in many macOS applications, often replacing “Save As” with “Duplicate” and emphasizing automatic versioning. However, for those who regularly create multiple iterations of a document or image, the traditional “Save As” command is indispensable. It allows you to save a modified file under a new name or in a new location without altering the original. This is critical in “Digital Photography” and “Photo Manipulation” workflows, where preserving originals while experimenting with “Editing Styles” is paramount.
There are a few ways to bring back this powerful feature:
-
Reveal “Save As” with the Option Key (Temporary): This is the quickest way to access “Save As” on the fly.
- In any application where you want to use “Save As” (e.g., Preview, Pages, an image editor), click on the “File” menu in the menu bar.
- While the menu is open, hold down the
Option(⌥) key. You’ll notice that the “Duplicate” command (or similar) will transform into “Save As…”. - Click “Save As…” to open the saving dialogue box, allowing you to name the new file and choose its location. This method is perfect for occasional use without permanently altering your system settings.
-
Invoke “Save As” with a Keyboard Shortcut (Advanced): For power users, direct keyboard shortcuts are often preferred.
- When you use the
Optionkey method described above, you’ll also see the corresponding keyboard shortcut revealed next to “Save As…”. This is typicallyOption + Shift + Command + S(⌥⇧⌘S). - Memorizing and using this shortcut allows you to quickly invoke the “Save As” command in most compatible applications without navigating through menus. This speed is invaluable when working on complex “Visual Design” projects or processing multiple “High Resolution” images.
- When you use the
-
Permanently Add “Save As” to the File Menu (System-wide): If you find yourself constantly needing “Save As,” you can make it a permanent fixture in the File menu of all applications that support it.
- Go to System Settings (or System Preferences on older macOS versions).
- Select Keyboard in the sidebar, then click on Keyboard Shortcuts… on the right.
- In the Keyboard Shortcuts window, select App Shortcuts from the sidebar.
- Click the plus (+) button to add a new shortcut.
- In the pop-up window:
- Application: Choose “All Applications” from the drop-down menu to make it work system-wide.
- Menu Title: Type “Save As…” (the three periods are crucial for an exact match).
- Keyboard Shortcut: Click in this field and press your desired key combination. While
Option + Shift + Command + Sis the default, you can choose another if it’s easier to remember and doesn’t conflict with existing shortcuts.
- Click Done twice to save your new shortcut. After this, “Save As…” will appear permanently in the File menu of most applications, enhancing your control over saving and versioning your “Digital Art,” “Photo Manipulation,” and general document files. This is a vital technique for maintaining multiple iterations of your creative work, enabling you to experiment with different “Editing Styles” or “Creative Ideas” without fear of overwriting your progress.
Copying Images and Image Addresses for Versatile Use
Beyond saving physical files, sometimes you need to work with images in other ways, such as embedding them or linking to their source.
-
“Copy Image Address” for Linking to the Source: This option, available via right-click on most web images, copies the direct URL of the image itself to your clipboard.
- Benefits: It’s incredibly useful when dealing with very large “High Resolution” images (e.g., gigapixel photos from a specialized photography site like Tophinhanhdep.com). Instead of downloading a massive file and emailing it, you can simply send the link. The recipient can then view the image directly from its source. It also saves your local storage and bandwidth. For “Image Inspiration” and “Mood Boards,” sharing a direct link can be more efficient than sending the actual file.
- Caveat: The link’s longevity is dependent on the source website. If the site operator removes or moves the image, your link will break. For critical images, always consider saving a local copy using one of the other methods.
-
“Copy Image” for Direct Pasting: This option copies the image data itself to your clipboard, allowing you to paste it directly into various applications.
- Usage: After right-clicking and selecting “Copy Image,” you can then paste the image directly into an email body, a Pages document, a PowerPoint presentation, a chat application, or even an “Image Editing” application like Photoshop or GIMP.
- Implication: This creates a temporary copy. To truly “save” the image, you must paste it somewhere permanent. If your clipboard cache is cleared or overwritten before you paste, the image will be lost. This method is fantastic for quick visual communication or for incorporating images into “Visual Design” layouts without creating intermediary files. It bridges the gap between finding “Trending Styles” on Tophinhanhdep.com and instantly using them in your creative work.
Ethical Considerations and Utilizing Image Tools
As you build your extensive collection of images from sources like Tophinhanhdep.com and the wider internet, it’s crucial to be mindful of copyright and intellectual property. Many images you’ll encounter are protected. While saving an image for personal use (like a desktop wallpaper from Tophinhanhdep.com’s “Aesthetic Backgrounds”) is generally acceptable, using copyrighted images without permission for commercial purposes, public display, or website content can lead to legal issues.
-
Responsible Image Sourcing: Tophinhanhdep.com offers a wealth of “Stock Photos” and “High Resolution” images that often come with clear usage rights, making it an ideal source for legal and high-quality visuals. Always check the licensing information or seek explicit permission if you plan to use an image beyond personal viewing. Google Image Search also provides advanced filters to search for images with specific re-use rights.
-
Leveraging Tophinhanhdep.com’s Image Tools: Once you’ve saved images, whether for “Graphic Design,” “Digital Art,” or personal use, Tophinhanhdep.com offers a suite of “Image Tools” to help you optimize and enhance them:
- Converters: Transform images between different formats (e.g., JPEG to PNG, or WebP to JPEG).
- Compressors & Optimizers: Reduce file sizes without significant loss of quality, crucial for web design and efficient storage of “High Resolution” photography.
- AI Upscalers: Enhance the resolution and detail of smaller images, making them suitable for larger displays or prints, especially beneficial if you’ve saved a beautiful but low-res “Nature” or “Abstract” image.
- Image-to-Text: Extract text from images, a useful tool for “Creative Ideas” involving typography or digital archival.
These tools, combined with your Mac’s saving capabilities, empower you to not only collect but also transform and refine your visual assets, aligning perfectly with Tophinhanhdep.com’s commitment to comprehensive image solutions.
Conclusion
Your Mac provides a versatile and intuitive environment for saving and managing images, transforming the vast digital landscape into your personal visual library. From the immediate gratification of setting a new aesthetic wallpaper from Tophinhanhdep.com to the meticulous organization required for “Digital Photography” projects, the methods outlined above cover every scenario.
By mastering techniques like right-clicking for quick saves, leveraging the “Save As” command for precise version control, or utilizing the drag-and-drop feature for seamless integration, you gain full control over your visual content. Remember to integrate your saved images into Apple’s Photos app for cross-device accessibility, and always be mindful of ethical considerations when using images from various online sources.
Ultimately, your Mac is more than just a computer; it’s a powerful canvas for creativity and a hub for visual inspiration. With the knowledge of these saving methods and the rich resources available on Tophinhanhdep.com—from diverse image collections and “Photography” insights to advanced “Image Tools” and “Visual Design” guidance—you are well-equipped to curate, create, and celebrate the incredible world of digital imagery. Start saving, organizing, and transforming your visual ideas today, and let Tophinhanhdep.com be your partner in every creative endeavor.