Transforming Presentations: How to Save PowerPoint Slides as Images with Tophinhanhdep.com

PowerPoint has long been the cornerstone of visual communication, enabling individuals and organizations to convey ideas, data, and stories through dynamic presentations. From academic lectures to corporate proposals, its ability to combine text, graphics, and multimedia into a cohesive narrative is unparalleled. However, there are numerous scenarios where the flexibility of a traditional .pptx file isn’t enough. Sometimes, you need the static, universally compatible power of an image. Whether for embedding in web pages, sharing on social media, using as a desktop wallpaper, or integrating into other design projects, converting your meticulously crafted PowerPoint slides into image files unlocks a new realm of possibilities.
At Tophinhanhdep.com, we understand the critical role images play in today’s digital landscape. Our platform is dedicated to providing a vast array of visual resources, from stunning wallpapers and backgrounds to high-resolution photography, alongside essential image tools like converters, compressors, and AI upscalers. This article delves into the process of saving your PowerPoint slides as images, guiding you through the steps and exploring how Tophinhanhdep.com’s extensive offerings can further enhance and optimize your converted visuals. By understanding this conversion process, you can transform your presentations into versatile assets for graphic design, digital art, and endless creative ideas, truly bringing your visual content to life.

The Versatility of Image Conversion: Why Turn Slides into Pictures?
Converting your PowerPoint slides into image formats like JPEG, PNG, or SVG might seem like a niche requirement, but it offers a profound advantage in terms of versatility, accessibility, and creative control. This process bridges the gap between structured presentation software and the fluid world of digital imagery, opening up your content to a wider audience and diverse applications.
Enhancing Visual Design and Digital Art
Imagine a standout slide from your presentation – a beautifully designed infographic, a compelling quote with an aesthetic background, or a captivating photograph. By saving this slide as an image, it instantly transforms into a standalone piece of digital art or a powerful design element.
- Social Media and Web Content: High-impact slides can be repurposed as engaging social media graphics, captivating blog post headers, or dynamic website banners. Tophinhanhdep.com, with its focus on aesthetic and beautiful photography, provides the perfect inspiration and supplementary images to make these visuals truly pop.
- Personalization and Wallpapers: A particularly striking slide can become a custom desktop wallpaper or a unique background for your devices, reflecting your style or showcasing your work. Tophinhanhdep.com’s “Wallpapers” and “Backgrounds” sections are built on this very principle, offering endless options for personalizing your digital space.
- Graphic Design Projects: Individual elements or entire slides, especially those designed with strong “Visual Design” principles in mind, can be integrated into larger graphic design projects. A transparent PNG of a diagram or a logo saved from a slide can be easily layered into brochures, posters, or digital collages, contributing to a cohesive brand identity or a creative new piece.
- Mood Boards and Thematic Collections: Designers often create mood boards to capture the essence of a project. Converted slides can become key components of these boards, contributing to “Thematic Collections” or inspiring “Photo Ideas” that align with “Trending Styles” in design.
Streamlined Sharing and Compatibility
One of the most significant advantages of converting PowerPoint slides to images is the unparalleled ease of sharing and broad compatibility. Not everyone has PowerPoint installed, and even if they do, software versions or operating systems can sometimes lead to formatting discrepancies. Images bypass these hurdles entirely.
- Universal Accessibility: Image files (like JPEG or PNG) are universally viewable across virtually all devices and operating systems, without requiring any specific software. This ensures that your audience can see your content exactly as you intended, whether they’re on a smartphone, tablet, or computer.
- Email and Messaging: Attaching a few image slides to an email or a messaging app is far more convenient and generally results in smaller file sizes than sending a full
.pptxfile, especially if the presentation is lengthy or contains many embedded media elements. - Integration into Other Documents: Images can be seamlessly embedded into Microsoft Word documents, Excel spreadsheets, or other presentation software without compatibility issues, serving as illustrative figures or standalone content blocks.
- Web Integration: For web developers or content creators, images are the native language of the internet. Exporting slides as images prepares them for direct upload to websites, content management systems, or online portfolios, making your visual narratives easily discoverable and shareable online.
Protecting Your Creative Work
In professional and academic environments, there’s often a need to share visual content without allowing others to modify the original design or text. Converting slides to images offers a simple yet effective method of protecting your intellectual property and maintaining design integrity.
- Unalterable Content: Once a slide is an image, its content becomes fixed. Recipients can view, print, and share it, but they cannot directly edit the text, rearrange elements, or change fonts. This is particularly useful when sharing final drafts or proprietary information where design consistency is paramount.
- Maintaining Design Fidelity: Different versions of PowerPoint or even different operating systems can sometimes slightly alter how a presentation appears. By converting to an image, you lock in the exact visual fidelity of your slide, ensuring that every viewer sees the presentation precisely as you designed it, preserving the “Digital Art” and “Graphic Design” intent.
- Licensing and Attribution: For those who use “Stock Photos” or licensed visual assets from platforms like Tophinhanhdep.com, converting a slide to an image ensures that the visual composition, including watermarks or attribution text, remains intact, simplifying compliance and protecting asset usage.
By leveraging image conversion, you transform your PowerPoint presentations from static files into dynamic, versatile visual assets that can serve multiple purposes, enhance your digital presence, and protect your creative output.
Step-by-Step: Saving Your PowerPoint Slides as Images
Converting your PowerPoint slides into image files is a straightforward process, whether you’re using a PC or a Mac. Both platforms offer intuitive methods to export single slides or an entire presentation as a collection of images. Understanding these steps is your first move towards repurposing your presentation content for broader visual applications, from custom “Wallpapers” to elements for advanced “Graphic Design.”
For Windows Users
The process on a Windows PC is efficient and offers various image formats to suit your specific needs, aligning with Tophinhanhdep.com’s comprehensive “Image Tools” for conversion.
Saving a Single Slide as an Image
If you have a particular slide that embodies a “Beautiful Photography” moment or a key piece of “Digital Art” you wish to extract, follow these steps:
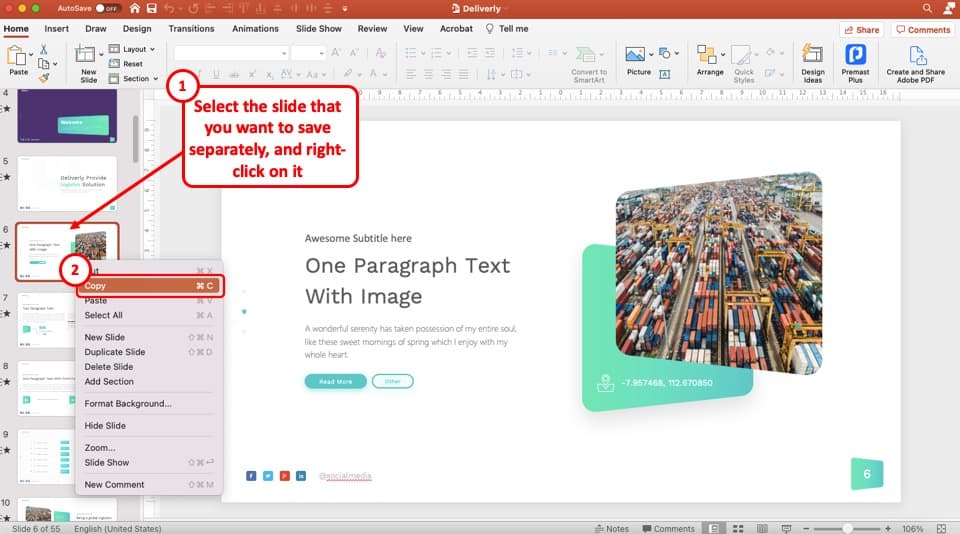
- Open Your Presentation: Launch PowerPoint and open the presentation containing the slide you want to save.
- Select the Slide: In the slide thumbnail pane on the left side of the PowerPoint window, click on the specific slide you intend to convert.
- Initiate Save As/Export: Go to the
Filetab in the top-left corner.- Select
Save As(if your presentation is not yet saved on OneDrive or SharePoint). - Alternatively, select
Export, thenChange File Type, and finally click onSave Asunder the “Image File Types” section.
- Select
- Choose Location and Name: Navigate to the folder where you want to save your image. In the
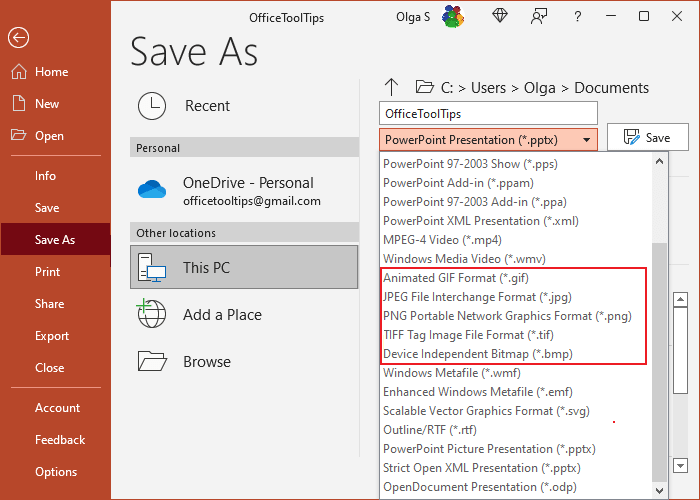
File nametext box, type a descriptive name for your image. - Select Image Format: Click the
Save as typedrop-down menu (orFile Formatunder Export). Here, you’ll find a selection of image formats:- JPEG File Interchange Format (.jpg): Excellent for “Photography” and complex images with continuous tones.
- PNG Portable Network Graphics Format (.png): Ideal for images requiring transparency (e.g., logos, diagrams without backgrounds) or sharp-edged graphics, common in “Aesthetic” designs.
- GIF Graphics Interchange Format (.gif): Best for simple animations or graphics with a limited color palette.
- Scalable Vector Graphics Format (.svg): A vector format that maintains quality at any size, perfect for “Abstract” designs or icons.
- TIFF (.tif) and BMP (.bmp): Other options offering high quality, though generally with larger file sizes.
- Confirm Selection: After choosing your desired format, click
Save. PowerPoint will then present a dialog box asking, “Do you want to export every slide in the presentation or just the current one?” SelectJust This One. The selected slide will be saved as an individual image file in your chosen format.
Saving All Slides as Images
To transform your entire presentation into a gallery of images, suitable for creating a “Mood Board” or “Thematic Collection”:
- Follow Steps 1-5 for Saving a Single Slide.
- Confirm All Slides: When the dialog box appears asking, “Do you want to export every slide in the presentation or just the current one?”, select
All Slides. PowerPoint will automatically create a new folder, named after your presentation, in the location you selected. Inside this folder, each slide will be saved as a separate image file, allowing you to treat your presentation as an “Image Inspiration” collection.
Saving from PowerPoint Online
For users working in the cloud:
- Open Presentation: In PowerPoint Online, open your presentation.
- Download as Images: Select
File > Download As > Download as Images. - Download ZIP: The image files will be compiled into a
.zipfile, which will then download to your computer.
For macOS Users
Mac users also have a streamlined process for converting slides to images, providing similar flexibility in output formats, complementing your “Digital Photography” and “Visual Design” efforts.
Saving a Single Slide as an Image
To capture a specific slide as a visual asset:
- Open Your Presentation: Open the PowerPoint presentation in which your desired slide resides.
- Open the Slide: Ensure the slide you wish to save is currently displayed in Normal view.
- Initiate Export: Go to the
Filemenu in the top menu bar and selectExport. - Choose Location and Name: In the
Save Asbox, type a name for your image file. Select where you want to save the file. - Select Image Format: Under
File Format, choose your preferred image format from the drop-down menu:- JPEG (.jpg): Versatile for most photographic and complex images.
- TIFF (.tif): High-quality, lossless format, often favored for print.
- PNG (.png): Excellent for transparency and web graphics.
- BMP (.bmp): Uncompressed bitmap image.
- You may also enter specific
WidthandHeightvalues to control the dimensions of your exported image.
- Confirm Selection: Select
Save Current Slide Only. Then clickExport. A message box will appear confirming where the image file has been saved on your system.
Saving All Slides as Images
To export an entire presentation as a series of images on a Mac:
- Follow Steps 1-5 for Saving a Single Slide.
- Confirm All Slides: Under
File Format, after selecting your image type, you will typically find an option toSave Every SlideorSave Current Slide Only. ChooseSave Every Slide. PowerPoint will create a folder, named after your presentation, containing each slide as a separate image file.
Key Image Formats and Their Applications
The choice of image format is crucial for how your converted slides will be used and how they will integrate with Tophinhanhdep.com’s “Image Tools.”
- JPEG (.jpg): The go-to for photographs and images with smooth color transitions. Its lossy compression makes for smaller file sizes, ideal for web use and general “Photography” displays. It’s perfect for turning your “Beautiful Photography” slides into shareable images.
- PNG (.png): Supports transparency and lossless compression, making it excellent for graphics, logos, and slides with intricate details or text that needs to stand out against various backgrounds. Essential for “Graphic Design” and creating “Aesthetic” elements.
- GIF (.gif): Best for simple, limited-color graphics, especially those with animation. Not suitable for complex photographs.
- SVG (.svg): A vector-based format, meaning it’s infinitely scalable without losing quality. Ideal for diagrams, illustrations, and “Abstract” designs, ensuring crispness at any resolution, aligning with Tophinhanhdep.com’s commitment to quality.
- TIFF (.tif): A high-quality, lossless format often used in professional printing and archival “Digital Photography.” Files are typically larger.
- BMP (.bmp): An uncompressed format, leading to very large file sizes. Generally less practical for modern web or sharing needs.
- WMF (.wmf): Windows Metafile, a vector graphic format used by Windows applications.
By understanding these formats and the step-by-step processes, you can efficiently convert your PowerPoint slides into versatile image assets, ready for further enhancement with Tophinhanhdep.com’s robust suite of “Image Tools” and rich “Image Collections.”
Advanced Techniques and Considerations for Professional Results
While the basic export functions cover most needs, certain scenarios demand a more nuanced approach. Achieving “High Resolution” images, optimizing file sizes, managing interactive elements, and extracting graphics without backgrounds are advanced considerations that can significantly impact the professional quality and utility of your converted slides. Tophinhanhdep.com’s dedication to “Photography” and “Visual Design” extends to these details, offering tools and insights that complement your advanced PowerPoint efforts.
Achieving High-Quality Image Exports (Resolution Control)
By default, PowerPoint exports images at a moderate resolution, typically around 96-150 DPI (dots per inch), which is fine for on-screen viewing but may appear pixelated when printed at larger sizes or when you need “High Resolution” images for professional “Digital Photography” or print media. For truly high-quality output, Windows users can adjust a setting in the Windows Registry.
Warning: Editing the Windows Registry can be risky. Incorrect changes can affect your system’s stability. Proceed with caution or seek assistance if you are unsure. Always back up your registry before making changes.
- Close All PowerPoint Programs: Ensure PowerPoint and any related Office applications are closed.
- Open Registry Editor: Right-click on the
Startbutton, then selectRun. Typeregeditin theOpenbox and clickOK. - Navigate to PowerPoint Options Key: In the Registry Editor, navigate to the appropriate key for your PowerPoint version:
- PowerPoint 2016, 2019, and Microsoft 365:
HKEY_CURRENT_USER\Software\Microsoft\Office\16.0\PowerPoint\Options - PowerPoint 2013:
HKEY_CURRENT_USER\Software\Microsoft\Office\15.0\PowerPoint\Options - PowerPoint 2010:
HKEY_CURRENT_USER\Software\Microsoft\Office\14.0\PowerPoint\Options - PowerPoint 2007:
HKEY_CURRENT_USER\Software\Microsoft\Office\12.0\PowerPoint\Options
- PowerPoint 2016, 2019, and Microsoft 365:
- Create a New DWORD (32-bit) Value: With the
Optionssub-key selected, go toEdit > New > DWORD (32-bit) Value. - Name the Value: Enter
ExportBitmapResolutionas the name for the new DWORD value and press Enter. - Edit the Value Data: Right-click on
ExportBitmapResolutionand selectModify. - Set Resolution: In the
Edit DWORD Valuebox, selectDecimalas the Base. In theValue databox, enter your desired resolution. Common values are:- 300: For high-quality print (300 DPI)
- 600: For very high-quality print or large format displays
- Note: PowerPoint has an internal limit, typically around 307 DPI for maximum effective resolution.
- Confirm and Close: Click
OKand close the Registry Editor. Now, when you export your PowerPoint slides as images, they will be saved at the specified higher resolution. For those who find registry edits too technical, Tophinhanhdep.com’s “AI Upscalers” offer a user-friendly post-export solution to boost image resolution and clarity, transforming standard exports into “High Resolution” assets suitable for any need.
Optimizing File Size and Performance (Image Tools)
Large image files can slow down web pages, consume excessive storage, and make sharing cumbersome. PowerPoint offers some built-in compression, and Tophinhanhdep.com provides dedicated “Compressors” and “Optimizers” to further streamline your visuals.
- PowerPoint’s Compress Pictures Option: Before saving your presentation, you can compress pictures within PowerPoint itself. Go to
File > Options > Advanced, and underImage Size and Quality, select a default target output or use theCompress Picturesbutton under thePicture Formattab (when an image is selected).- During export, especially with Tutsplus’ method described in the references, going to
File > Export > Change File Type > Save As, then clickingTools > Compress Pictures, allows you to chooseWeb Resolutionto decrease the size of the images significantly. Ensure “Delete cropped areas of pictures” is ticked. This is going to save the images in a smaller format so that the resulting JPEG images aren’t way too large.
- During export, especially with Tutsplus’ method described in the references, going to
- Tophinhanhdep.com’s Image Tools: After exporting, use Tophinhanhdep.com’s “Compressors” and “Optimizers” to further reduce file sizes without noticeable loss of visual quality. This is crucial for web performance, ensuring your “Backgrounds” and “Aesthetic” visuals load quickly.
Handling Hyperlinks and Interactive Elements
A critical limitation when converting slides to images is the loss of interactivity. Image formats, by nature, are static.
- No Hyperlink Retention: JPEG, PNG, GIF, and other standard image formats do not support embedded hyperlinks. If your PowerPoint slide contains active links, they will become inactive visual text or objects once converted to an image.
- PDF as an Alternative: If retaining hyperlinks is essential for your presentation, the best alternative is to export your PowerPoint presentation as a PDF file. PDFs preserve clickable links and offer broad compatibility across devices and operating systems.
- To convert to PDF: Go to
File > Save As(orExport), choose your save location, and selectPDFas theSave as typeorFile Format.
- To convert to PDF: Go to
Exporting Graphics Without Backgrounds (Visual Design)
Sometimes you don’t need the entire slide as an image, but just a specific graphic, shape, or piece of “Digital Art” from it, ideally with a transparent background for easy integration into other designs.
- Open PowerPoint: Launch PowerPoint and open your presentation.
- Select Graphic/Shape: Click on the specific graphic, shape, or picture on your slide that you wish to save as an image.
- Save as Picture: Right-click on the selected object. From the context menu, choose
Save as Picture. - Choose PNG Format: In the
Save as Picturedialog box, selectPNG Portable Network Graphics Format (.png)from theSave as typedrop-down menu. PNG is the preferred format for transparency. - Name and Save: Provide a file name and choose your save location, then click
Save. This method allows you to extract individual “Visual Design” elements or “Abstract” graphics with transparent backgrounds, ready for use in other applications or for “Photo Manipulation” projects using Tophinhanhdep.com’s resources.
By mastering these advanced techniques, you can ensure that your converted PowerPoint slides meet the highest standards of quality and utility, ready to be integrated into any visual project and further refined with the powerful “Image Tools” available on Tophinhanhdep.com.
Enhancing Your Visuals Beyond PowerPoint with Tophinhanhdep.com
Once you’ve mastered the art of converting your PowerPoint slides into images, the real creative journey begins. Tophinhanhdep.com is your ultimate partner in elevating these exported visuals, offering a rich ecosystem of “Image Tools” and an unparalleled library of “Image Inspiration & Collections” to transform your presentations into truly captivating digital assets. Our platform is designed to cater to every facet of visual content, from “Wallpapers” to “High Resolution” “Stock Photos,” ensuring your images always make a powerful impact.
Leveraging Tophinhanhdep.com for Post-Export Enhancements
The images you export from PowerPoint are just the beginning. Tophinhanhdep.com empowers you to refine, optimize, and reimagine them:
- Image Tools for Perfection:
- Converters: Should you need to change your image format again (e.g., from PNG to JPEG for smaller file size, or vice versa for transparency), Tophinhanhdep.com’s “Converters” offer seamless transitions.
- Compressors & Optimizers: Crucial for web integration, email sharing, or mobile viewing. Our “Compressors” and “Optimizers” intelligently reduce file sizes without compromising visual quality, ensuring your “Backgrounds” and “Aesthetic” slides load quickly and efficiently.
- AI Upscalers: For those instances where PowerPoint’s native resolution isn’t enough, or if the registry edit seems too daunting, Tophinhanhdep.com’s “AI Upscalers” can magically enhance the resolution of your exported slides. Transform a standard-resolution image into a “High Resolution” masterpiece, perfect for large prints or detailed “Digital Photography” projects, preserving the “Beautiful Photography” within your slides.
- Image-to-Text: If your exported slide images contain important textual information you wish to extract for content repurposing, our “Image-to-Text” tools can convert those visual words into editable text.
- Unleashing Creative Ideas with Visual Design:
- Your converted slides are raw material for “Graphic Design” and “Digital Art.” Use them as base layers in other design software, combine them with elements from Tophinhanhdep.com’s vast library, or apply “Photo Manipulation” techniques to create entirely new visuals.
- Explore “Creative Ideas” within Tophinhanhdep.com’s tutorials and curated collections to discover innovative ways to repurpose your presentation content – perhaps turning a data-heavy slide into an “Abstract” art piece, or a compelling narrative into a “Sad/Emotional” visual story.
Tophinhanhdep.com’s Resources for Presentation Design
Beyond post-export enhancement, Tophinhanhdep.com serves as an invaluable resource throughout your entire presentation creation process. Our platform is a treasure trove of inspiration and assets that can elevate your PowerPoint slides even before they are converted into images.
- Inspiring Visual Collections:
- Our extensive galleries of “Wallpapers,” “Backgrounds,” “Aesthetic,” “Nature,” “Abstract,” “Sad/Emotional,” and “Beautiful Photography” images can be directly incorporated into your PowerPoint slides. Imagine setting a “High Resolution” scenic landscape as a slide background or using an “Aesthetic” pattern to frame your key messages.
- Dive into our “Image Inspiration & Collections” for “Photo Ideas” and insights into “Trending Styles” that can inform your slide layouts, color palettes, and overall “Visual Design.”
- Quality Stock Photos: Tophinhanhdep.com offers access to “High Resolution” “Stock Photos” that can dramatically improve the visual appeal and professionalism of your presentations. Replacing generic clip art with stunning, professionally shot images from our collection will make your slides more engaging and credible.
- Digital Photography & Editing Styles: Learn about various “Digital Photography” principles and “Editing Styles” on Tophinhanhdep.com that you can apply directly to the images you use within PowerPoint, ensuring that your original presentation is visually striking even before conversion.
In essence, Tophinhanhdep.com transforms the act of saving PowerPoint slides as images from a mere technical step into a powerful gateway for comprehensive visual content creation and management. Our platform stands as a holistic solution, supporting your journey from initial design and asset sourcing to advanced optimization and creative repurposing, ensuring that every image you create or use achieves its maximum potential.
Conclusion
The ability to save PowerPoint slides as images is a fundamental skill that significantly expands the utility and reach of your presentations. It transforms static slide decks into versatile, universally compatible visual assets, perfect for everything from web content and social media sharing to custom “Wallpapers” and professional “Graphic Design” projects. Whether you’re extracting a single “Beautiful Photography” slide or converting an entire presentation into a “Thematic Collection” of images, the processes on both Windows and macOS are straightforward, empowering you to repurpose your visual narratives with ease.
Beyond the basic conversion, understanding advanced techniques like adjusting export resolution, optimizing file sizes, and extracting transparent graphics ensures that your images meet the highest standards of quality and utility. However, the true potential of these converted images is fully realized when paired with the robust resources available at Tophinhanhdep.com.
Tophinhanhdep.com is more than just a destination for “Images”; it’s a comprehensive ecosystem designed to enhance every aspect of your visual workflow. From our “Image Tools” like “Converters,” “Compressors,” and powerful “AI Upscalers” that refine and optimize your exported slides, to our vast “Image Inspiration & Collections” offering “High Resolution” “Stock Photos,” “Wallpapers,” and “Backgrounds” for your initial designs, we provide the resources you need to excel. Leverage our insights into “Visual Design,” “Digital Art,” and “Photography” to make your presentations, and the images derived from them, truly exceptional.
So, take that next step. Convert your PowerPoint slides into dynamic images, and then explore Tophinhanhdep.com to unlock their full potential. Transform your presentations into captivating visual stories that resonate across every digital platform, ensuring your message is not only seen but also remembered.