Mastering Image Scaling in GIMP: A Comprehensive Guide for Stunning Visuals on Tophinhanhdep.com

In the realm of digital imagery, the ability to effectively scale an image is a fundamental skill, whether you’re a budding photographer, a graphic designer, or simply curating a collection of beautiful wallpapers for your desktop. GIMP, the GNU Image Manipulation Program, stands out as a powerful, free, and open-source tool that empowers users to achieve precise control over their visual content. From resizing an entire composition for a web banner to meticulously adjusting an individual element within a complex digital art piece, mastering GIMP’s scaling capabilities is essential.
At Tophinhanhdep.com, we understand the diverse needs of our audience, ranging from those seeking high-resolution stock photos and aesthetic backgrounds to users delving into advanced photo manipulation and visual design. This comprehensive guide will walk you through the various methods of scaling images in GIMP, ensuring your visuals are perfectly sized, optimized, and ready for any creative endeavor. We’ll explore both numerical and manual scaling techniques, layer-specific adjustments, selection transformations, and crucial considerations for maintaining image quality and canvas integrity.
Resizing the Entire Image: The “Scale Image” Command
When you need to change the overall dimensions of your entire canvas and all its contents uniformly, the “Scale Image” command is your go-to feature in GIMP. This command is particularly useful when preparing a final image for a specific output, such as a wallpaper, a web background, or a print-ready photograph. It affects the total number of pixels in your image, thus directly influencing its file size and memory footprint.
Accessing and Understanding the Scale Image Dialog
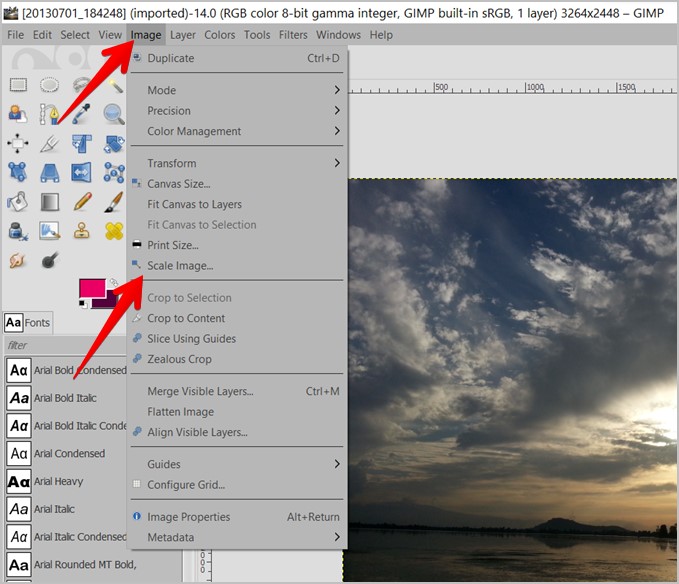
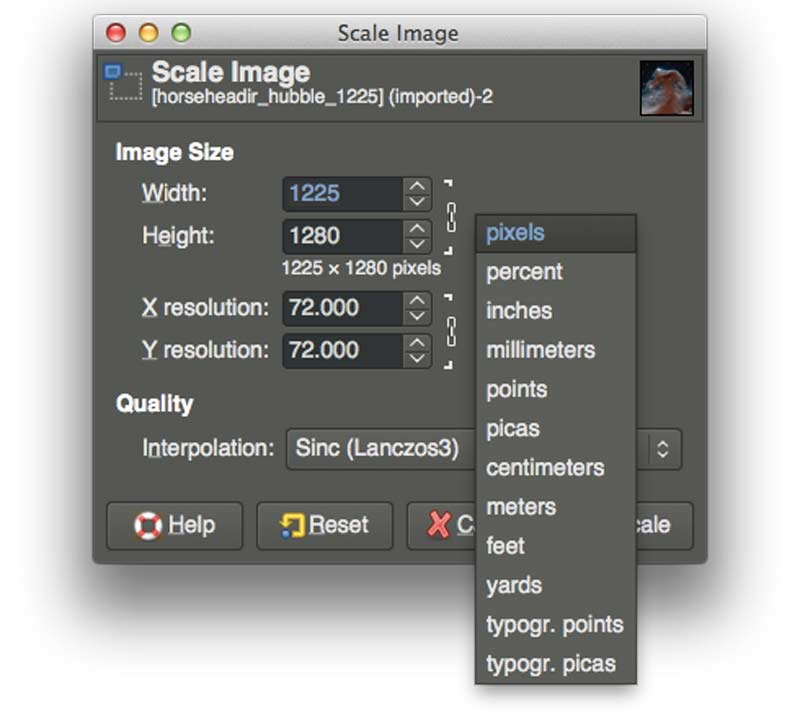
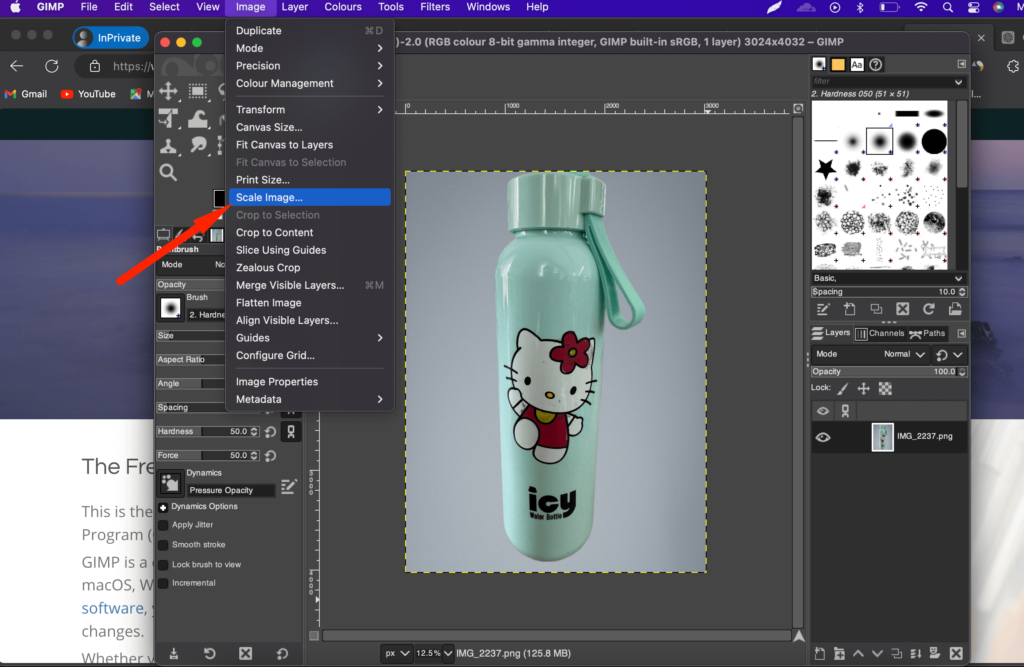
To initiate this process, simply navigate to Image > Scale Image from the main menu. This action brings up the “Scale Image” dialog box, a central hub for controlling your image’s global dimensions and resolution.
Within this dialog, you’ll find several key settings:
- Width and Height: These input fields display the current dimensions of your image, typically in pixels. Here, you can define the new desired width and height.
- Units Dropdown: Located next to the Width and Height fields, this dropdown allows you to specify your preferred unit of measurement. While pixels (px) are the default and most common for digital work, you can also choose percentages (%), inches (in), millimeters (mm), or other physical units, which are particularly useful when preparing images for print.
- Chain Icon: This critical icon, positioned between the Width and Height fields, controls the aspect ratio. When the chain is “locked” (unbroken), changing one dimension (e.g., width) will automatically adjust the other (height) to maintain the original proportions. This prevents your image from appearing stretched or squished, preserving its visual integrity. If you intentionally want to distort the image, you can click the chain icon to “break” it, allowing independent adjustments to width and height.
- X Resolution and Y Resolution: These fields determine the image’s resolution, measured in pixels per inch (ppi) or pixels per millimeter. Resolution is crucial for print quality. A common rule of thumb is to use 300 ppi for print output (e.g., high-resolution photography, graphic design for brochures) and 72 ppi for web-based content (e.g., digital art for websites, online wallpapers). Adjusting these values changes how many pixels are packed into a physical inch, directly impacting the print size without necessarily changing the pixel dimensions of the image itself.
- Interpolation: This dropdown offers various methods GIMP uses to calculate new pixel values when scaling. When you enlarge an image, GIMP has to “invent” new pixels, and when you reduce it, it has to discard some. The interpolation method determines the quality of this process. Common options include:
- None (Nearest Neighbor): Fastest, but often produces jagged edges, especially when enlarging. Best for pixel art.
- Linear: A good balance of speed and quality, producing smoother results than “None.”
- Cubic (Default): Generally produces the best quality for both enlargement and reduction, creating smoother transitions. This is often recommended for photographic images and digital photography where detail preservation is key.
- LoHalo/NoHalo: Optimized for reducing images, attempting to minimize halos.
- Lanczos: Often considered the highest quality for both upscaling and downscaling, particularly for photographs, as it provides a good balance of sharpness and smoothness.
Setting Dimensions and Resolution for Diverse Needs
Consider the purpose of your image. If you’re designing an aesthetic background for a widescreen monitor, you might input dimensions like 1920x1080 pixels with 72 ppi. For a high-resolution print of nature photography, you would likely use 300 ppi and choose physical units like inches for precise output size.
Practical Considerations:
- Upscaling (Enlarging): While GIMP can enlarge images, it does so by interpolating data, meaning it invents new pixels. This process cannot create new detail that wasn’t originally present. Excessive upscaling will lead to blurriness or pixelation, compromising the high resolution of your source. If you need a significantly larger image, starting with a higher-resolution original is always best. For extremely large scaling, consider AI Upscalers, which use advanced algorithms to intelligently add detail, a feature Tophinhanhdep.com explores in its image tools section.
- Downscaling (Reducing): Reducing an image discards pixels, which is generally less problematic for quality. Downscaling is crucial for optimizing images for web use, as smaller file sizes lead to faster loading times for wallpapers and backgrounds, enhancing the user experience.
- Memory Usage: Be aware that very large images consume significant system resources. GIMP will warn you if scaling an image might exceed your system’s memory limits, potentially leading to performance issues or crashes.
Once you have set your desired dimensions, resolution, and interpolation method, click the “Scale” button to apply the changes to your entire image.
Scaling Individual Layers: Precision with the Scale Tool
While “Scale Image” affects the entire composition, often in visual design or photo manipulation, you only need to resize a specific element or image on an individual layer without altering the canvas or other layers. This is where GIMP’s “Scale Tool” becomes indispensable. It allows for dynamic, interactive scaling of selected layers, providing flexibility for creative ideas and detailed compositions.
Setting Up Your Workspace and Layers
Before you begin scaling layers, ensure your GIMP workspace is set up. You’ll need a composition with at least one layer you wish to scale. If you’re starting fresh, you can create a new composition:
- Go to File > New and set your desired canvas dimensions and resolution. For example, 1920x1080 pixels at 72 ppi for web graphics, or 300 ppi for a print-quality digital art piece.
- Creating or Importing Layers:
- To create a new, blank layer, click the “New Layer” icon in the Layers panel (usually bottom right) or go to Layer > New Layer.
- To import existing images as new layers into your composition, go to File > Open as Layers. This is a common practice when combining multiple high-resolution stock photos or digital art elements into a single creative project. For this tutorial, we might import a “Pink” background image and a “Yellow” background image as separate layers from Tophinhanhdep.com’s extensive image collections.
- Renaming Layers (Optional but Recommended): To keep your project organized, especially in complex photo manipulations, double-click on a layer’s name in the Layers panel and give it a descriptive name (e.g., “Pink Background,” “Yellow Accent”).
Manipulating Layers with Transform Handles and Guides
With your layers ready, it’s time to engage the Scale Tool:
- Activate the Scale Tool:
- Locate the Scale Tool in your Toolbox (often grouped under “Transform Tools”). Its icon typically depicts a square with diagonal arrows.
- Alternatively, use the keyboard shortcut Shift + S.
- You can also access it via Tools > Transform Tools > Scale.
- Select Your Target Layer: In the Layers panel, click on the layer you wish to scale to make it the active layer.
- Click on the Layer: With the Scale Tool active, click anywhere on your selected layer in the image window. This will bring up the “Scale” dialog box (similar to the “Scale Image” dialog, but specifically for the layer) and, more importantly, a bounding box with “transform handles” around your layer.
- Understanding the Scale Dialog for Layers:
- Width and Height: Displays the current dimensions of the active layer. You can input numerical values here for precise scaling.
- Chain Icon: Just like with “Scale Image,” keep this locked to maintain the aspect ratio and prevent distortion, which is crucial for preserving the aesthetic quality of your images.
- Interpolation: Choose the appropriate interpolation method for your scaling needs, with Cubic or Lanczos often preferred for photographic elements.
- Reset, Readjust, Scale Buttons: “Reset” reverts to the original layer size, “Readjust” redraws the handles, and “Scale” applies the transformation.
- Using Transform Handles for Manual Scaling:
- Corner Handles: Click and drag any of the square handles located at the corners of the bounding box.
- To scale uniformly from the center, hold down the Ctrl key while dragging a corner handle. This is excellent for maintaining the balance of an element within your visual design.
- To scale from a corner without holding Ctrl, the opposite corner acts as the anchor point.
- Side Handles: Clicking and dragging the square handles in the middle of each side will scale the layer non-uniformly along that axis. This will distort the aspect ratio, which can be useful for specific creative ideas but should be used with caution to avoid unprofessional stretching.
- Middle Handles (Move Tool Functionality): The central crosshair or the overall bounding box (outside the handles) acts like the Move tool. Click and drag within the layer’s boundaries (but not on a transform handle) to reposition the layer on the canvas.
- Corner Handles: Click and drag any of the square handles located at the corners of the bounding box.
- Utilizing Guides for Precision:
- For tasks requiring exact alignment, like placing two images side-by-side as shown in the example from Tophinhanhdep.com, you can create guides. Go to Image > Guides > New Guide (By Percent) or New Guide (By Pixels). For instance, creating a vertical guide at 50% will help you perfectly divide your composition.
- Scale and move your layer until its edges align with these guides, ensuring a balanced and symmetrical layout for your digital art or photo collage.
- Comparing Layer Sizes: If you have multiple layers and want to ensure elements are proportionally sized (e.g., two models in different photographs), you can:
- Scale one layer, then activate the other.
- Temporarily reduce the opacity of the top layer in the “Tool Options” for the Scale Tool (under “Show Image Preview”) or in the Layers panel.
- Reposition the two layers to overlap, then scale the second layer while holding Ctrl and dragging, until its element matches the size of the first.
- Reposition the second layer back to its desired spot once matched, and restore its opacity.
- Apply Changes: Once you’re satisfied with the size and position of your layer, click the “Scale” button in the Scale dialog to commit the transformation.
Repeat this process for all layers you wish to resize, bringing harmony and precise control to your multi-layered compositions, whether for aesthetic backgrounds or complex photo manipulation projects.
Scaling Selections and Advanced Canvas Management
Beyond scaling entire images or individual layers, GIMP provides the granularity to scale specific “selections”—areas you’ve isolated within a layer. This is invaluable for fine-tuning details in digital photography, creative design, or when working with high-resolution images where subtle adjustments make a big difference. Furthermore, managing the canvas size relative to your scaled content is a crucial aspect of professional image editing.
Scaling Specific Areas with the Scale Tool’s Selection Mode
The Scale Tool isn’t just for layers; it’s versatile enough to transform selections. This allows you to precisely manipulate isolated parts of an image without affecting the rest.
- Create Your Selection: First, you need an active selection. GIMP offers numerous tools for this:
- Rectangle Select Tool (R)
- Ellipse Select Tool (E)
- Free Select Tool (L)
- Fuzzy Select Tool (U)
- Select by Color Tool (Shift+O)
- Intelligent Scissors (I)
- Paths Tool (B)
- You can also convert a Layer Mask or Quick Mask to a selection. For in-depth tutorials on these, refer to the GIMP Selection Areas guides on Tophinhanhdep.com.
- Activate the Scale Tool and Change Its Mode:
- Grab the Scale Tool (Shift + S) from your Toolbox.
- Crucially, you need to change the Scale Tool’s “Transform Mode.” Look at the Tool Options panel (usually below the Toolbox or customized to your preference). Under the “Transform:” section, you’ll see a series of icons.
- The default mode is usually “Layer” (an icon resembling a stacked layer). Click the icon that looks like a red box with a dotted line around it (representing a selection). This switches the Scale Tool to “Selection” mode. Forgetting this step is a common pitfall, so always double-check your tool options!
- Click on the Selection: Once in “Selection” mode, click anywhere within your active selection area. This will bring up the “Scale” dialog for the selection and a bounding box with transform handles around your selection.
- Scale and Reposition the Selection:
- Similar to scaling layers, use the transform handles to adjust the size of your selection.
- Lock Aspect Ratio: Ensure the chain-link icon in the Scale dialog is locked to prevent distortion, maintaining the aesthetic quality of your chosen area.
- Center Scaling: Hold the Ctrl key while dragging a corner handle to scale the selection uniformly from its center.
- Manual Input: For precise adjustments, use the “Width” and “Height” input fields in the Scale dialog.
- Reposition: Click and drag the central crosshair or within the selection’s boundaries (but not on a handle) to move the selection to a new location.
- Reset: The “Reset” button in the Scale dialog will revert the selection area to its original size before any scaling was applied.
- Apply Changes: After scaling and positioning your selection to your liking, click the “Scale” button in the Scale dialog. Your selection will now reflect the new dimensions.
- Revert Tool Mode: As a best practice, after you’re done scaling a selection, return to the Scale Tool’s Tool Options and change the “Transform Mode” back to “Layer.” This prevents confusion in future editing sessions.
Adapting the Canvas to Your Scaled Content
When you use the Scale Tool on individual layers, the canvas itself doesn’t automatically adjust. This can result in two common scenarios:
- Layer Smaller Than Canvas: If you scale a layer down, you’ll see transparent (checkerboard pattern) areas around it, indicating empty canvas space.
- Layer Larger Than Canvas: If you scale a layer up, parts of it might extend beyond the canvas boundaries, becoming invisible.
GIMP offers dedicated commands to manage the canvas size:
- Crop to Content:
- Purpose: This command automatically resizes the canvas to precisely fit the visible content of your image. It’s ideal when you’ve scaled down a layer or removed elements, leaving excess transparent canvas.
- How to Use: Go to Image > Crop To Content. GIMP will trim the canvas to the smallest possible size that contains all non-transparent pixels across all layers. This is great for optimizing images and removing unnecessary whitespace, especially for web-optimized visuals or aesthetic backgrounds.
- Fit Canvas to Layers:
- Purpose: This command expands the canvas to encompass all the content across all layers, including any parts that extended beyond the original canvas boundaries. It’s perfect when you’ve scaled a layer up and want to ensure its entirety is visible within the composition.
- How to Use: Go to Image > Fit Canvas to Layers. GIMP will automatically enlarge the canvas to fit the largest extent of all your layers. This is essential for maintaining the integrity of your visual design when working with expanded elements or high-resolution photography.
By mastering these canvas management techniques, you ensure that your final image compositions are clean, professional, and accurately reflect your creative ideas, whether you’re working on graphic design, digital art, or intricate photo manipulation projects for Tophinhanhdep.com.
Optimizing Your Scaled Images for Web, Print, and Creative Projects
Scaling an image is often just one step in a larger workflow, especially when preparing visuals for diverse platforms. The choices you make during scaling—from interpolation methods to final export formats—significantly impact the image quality, file size, and overall usability for your intended audience. Tophinhanhdep.com emphasizes the importance of these final steps to ensure your digital photography, graphic designs, and aesthetic backgrounds look their best everywhere.
Understanding Interpolation and Image Quality
We briefly touched upon interpolation methods earlier, but it’s worth reiterating their importance in the context of image quality. When scaling, GIMP must either create new pixels (upscaling) or remove existing ones (downscaling). The interpolation algorithm dictates how these new or remaining pixels are calculated:
- Upscaling (Enlargement): Always proceed with caution. While AI upscalers (which Tophinhanhdep.com features as an advanced image tool) can mitigate quality loss by intelligently predicting new pixel data, traditional GIMP interpolation methods will generally lead to some degree of softness or blurriness in enlarged images. For digital photography and high-resolution images, Cubic or Lanczos methods are usually preferred as they produce smoother gradients and better detail preservation compared to the harsher Nearest Neighbor.
- Downscaling (Reduction): This process generally yields better results in terms of perceived quality. Reducing an image for web use (e.g., website backgrounds, thumbnail previews for Tophinhanhdep.com’s image collections) is crucial for performance. Again, Cubic or Lanczos are excellent choices for maintaining sharpness and minimizing artifacts when reducing high-resolution images. Sometimes, after downscaling, a subtle application of the Sharpen (Unsharp Mask) filter can help restore a touch of crispness without over-processing.
The goal is always to start with the highest quality source image possible, especially for beautiful photography and detailed digital art, to provide the best foundation for any scaling operation.
Saving and Exporting Your Masterpiece
Once your image or layers are scaled and your canvas is perfectly adjusted, the final crucial step is to save and export your work. The method you choose depends on whether you intend to continue editing in GIMP or create a final, usable image file.
-
Saving Your Work (GIMP Project File):
- To preserve all your layers, selections, guides, and GIMP-specific edits for future modification, you must save your work as a GIMP project file.
- Go to File > Save As…
- GIMP’s native file format is XCF. This format retains all your project’s intricate details, making it ideal for ongoing visual design and photo manipulation projects.
- For compatibility with other professional image editing software like Adobe Photoshop or Affinity Photo, you might also consider saving as a PSD (Photoshop Document) if GIMP’s capabilities allow for direct export, maintaining some layer information.
- Tophinhanhdep.com recommends saving your work frequently in XCF format, especially during complex creative ideas and digital art processes, to prevent data loss.
-
Exporting Your Resized Image (Usable Image File):
- To obtain a standard image file (like JPG or PNG) that can be shared online, printed, or used in other applications, you need to export it.
- Go to File > Export As… (or use the keyboard shortcut Ctrl + Shift + E).
- The “Export Image” dialog will appear, allowing you to choose the file format and location.
- Common Export Formats and Their Uses:
- JPG (JPEG): Ideal for photographs (nature, beautiful photography, general high-resolution images) due to its efficient compression, which significantly reduces file size. JPG uses “lossy” compression, meaning some data is discarded, so it’s not ideal for images with sharp lines or transparency. You can adjust the quality slider during export to balance file size and visual fidelity.
- PNG (Portable Network Graphics): The preferred format for images requiring transparency (e.g., logos, graphic design elements, images with cut-out backgrounds). PNG uses “lossless” compression, preserving all image data, making it excellent for sharp lines and areas of flat color often found in digital art. PNG files are generally larger than comparable JPGs.
- TIF (TIFF): Often used for high-quality print production and archival purposes due to its ability to store uncompressed or losslessly compressed images. Suitable for high-resolution stock photos and professional print.
- PDF (Portable Document Format): Can be used for multi-page documents or single-image export, often for sharing print-ready files.
- Transparency: If your image contains transparent areas (like a logo on a clear background), ensure you export it as a PNG file. Exporting to JPG will typically fill transparent areas with white, losing that critical aspect for web backgrounds or composite images.
- Metadata: During export, you’ll often have options to include or remove metadata (like EXIF data from digital photography). Consider privacy and file size implications when making these choices.
By following these guidelines for saving and exporting, you ensure that your scaled images are not only visually perfect but also correctly formatted for their intended use, whether they are destined for Tophinhanhdep.com’s collections of aesthetic backgrounds, high-resolution photography, or an intricate digital art portfolio. Mastering GIMP’s scaling tools, coupled with smart export practices, will elevate your image editing capabilities, turning creative ideas into tangible, high-quality visual assets.