How to Scale an Image in Harlowe for Optimal Visual Design

In the dynamic world of interactive fiction, particularly when crafting narratives with Twine and its Harlowe Story Format, visuals play an increasingly crucial role. Gone are the days when text alone sufficed; modern players expect an immersive experience, complete with compelling imagery that complements the storytelling. However, simply dropping images into your Harlowe project isn’t enough. The challenge lies in ensuring these images scale correctly across a myriad of devices, from expansive desktop monitors to compact mobile screens, without compromising visual quality or performance. This comprehensive guide, drawing on insights from the interactive fiction community and the wealth of resources available at Tophinhanhdep.com, will delve into the art and science of scaling images in Harlowe, transforming your interactive stories into visually stunning masterpieces.
Tophinhanhdep.com, a hub for high-quality visual content and image manipulation tools, emphasizes the importance of carefully managed imagery. Whether you’re integrating breathtaking nature photography, abstract digital art, or aesthetic backgrounds, the fundamental principle remains: your visuals must adapt. This article will explore the technical underpinnings of image scaling in Harlowe, focusing on CSS-driven solutions, performance optimization, and integrating best practices for an unparalleled user experience, reflecting Tophinhanhdep.com’s commitment to superior visual design.
Understanding Image Integration in Harlowe

Before mastering the art of scaling, it’s essential to grasp how images are fundamentally integrated into a Harlowe project. Harlowe, being an HTML-based framework, leverages standard web technologies, primarily HTML and CSS, to display visual elements. While Harlowe provides its own macros for basic image embedding, for true control and responsiveness, custom CSS is indispensable.

Harlowe’s Approach to Visuals
Harlowe offers a straightforward macro, (image: "path/to/your/image.jpg"), to embed images directly within a passage. This is useful for simple inline images. For background images, authors often attempt to use direct background properties within passages or link to external stylesheets. However, issues frequently arise when trying to implement complex background designs, especially those intended to fill the entire screen or adapt to various aspect ratios. A common struggle, highlighted in various community discussions, is getting images to function correctly as backgrounds using simple bg:"image" or bg:"https://image" commands directly in Harlowe’s stylesheet or passage. This often leads to images not appearing, appearing incorrectly, or failing to scale, particularly when aiming for a full-screen, responsive effect.
For more robust visual control, particularly with backgrounds or images requiring specific styling, authors typically resort to adding custom CSS rules in Harlowe’s Story Stylesheet section. This is where the real power of web design comes into play, allowing for detailed manipulation of how images are displayed, positioned, and, most importantly, scaled. Leveraging this stylesheet to define rules for specific HTML elements (like div containers or even the html/body tags for full backgrounds) is the recommended path for sophisticated visual integration.
Common Challenges with Image Scaling in Interactive Fiction
The primary goal of scaling images in Harlowe is to ensure they look good on any device. However, this seemingly simple task is fraught with common challenges:
- Mobile Responsiveness: Images that look perfect on a desktop screen can become awkwardly cropped, stretched, or minuscule on a smartphone. Achieving a consistent and appealing look across different screen sizes and orientations is paramount for mobile-first interactive fiction.
- Aspect Ratio Distortion: When an image is forced into a container with a different aspect ratio, it can appear squashed or stretched, distorting the original visual intent. Maintaining the image’s inherent proportions while fitting it into varying layouts is a key challenge.
- Resolution and Quality Degradation: Scaling up a low-resolution image will inevitably lead to pixelation and blurriness, degrading the overall aesthetic. Conversely, using unnecessarily high-resolution images can bloat file sizes, slowing down load times. Tophinhanhdep.com’s focus on high-resolution photography and digital art underscores the importance of starting with quality assets, but also managing them appropriately.
- Loading Times and Performance: Large image files significantly impact the loading speed of your interactive story. This is particularly detrimental on mobile devices with slower internet connections. Users are increasingly impatient, and slow load times can lead to abandonment. Optimizing image file size without sacrificing too much quality is a delicate balance.
- Background vs. Foreground Images: Background images often need to cover an entire area, while foreground images (like character portraits or item visuals) need to fit within specific content flows. Each type requires different scaling approaches.
Addressing these challenges requires a strategic blend of effective CSS techniques and intelligent image preparation, topics that Tophinhanhdep.com excels in providing resources for, including image compressors and optimizers.
Mastering Responsive Image Scaling with CSS in Harlowe
The true secret to effective image scaling in Harlowe lies in harnessing the power of CSS. By defining specific styles within your Story Stylesheet, you can dictate how images behave under various conditions, especially for mobile devices. This section will explore the core CSS properties and techniques essential for responsive image scaling.
The Power of Custom CSS for Mobile Devices
The cornerstone of responsive web design, and thus responsive image scaling in Harlowe, is the @media rule in CSS. Media queries allow you to apply different styles based on the characteristics of the device, such as screen width, height, or even color scheme preferences. For instance, an interactive fiction community forum discussion on scaling images to mobile devices prominently features @media queries to handle different preferences for light and dark modes, and implicitly, different screen sizes.
/* Example of a media query targeting screens up to 768px wide (common for tablets/phones) */
@media (max-width: 768px) {
  /* CSS rules for smaller screens go here */
}

/* Example for targeting screens wider than 768px (desktops) */
@media (min-width: 769px) {
  /* CSS rules for larger screens go here */
}

/* Example for targeting specific screen orientations or aspect ratios */
@media (orientation: landscape) and (max-height: 500px) {
  /* Styles for small landscape devices */
}
By segmenting your CSS with media queries, you can tailor image scaling specifically for mobile devices, ensuring they display optimally without affecting the desktop experience. This granular control is vital for creating a truly adaptive and enjoyable interactive story.
Practical CSS Techniques for Image Scaling
Several CSS properties are indispensable for scaling images effectively in Harlowe:
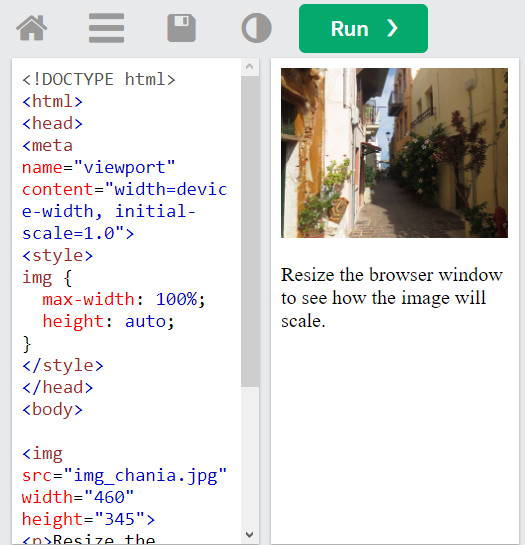
1. max-width: 100%; height: auto; for General Images
This is the golden rule for making most inline content images responsive. Apply it to any <img> tag you embed in your Harlowe passages:
img {
  max-width: 100%; /* Ensures the image never exceeds its container's width */
  height: auto;    /* Maintains the image's aspect ratio */
  display: block;  /* Prevents extra space below the image */
}
By setting max-width: 100%, the image will shrink to fit its parent container if the container is smaller than the image’s intrinsic width. height: auto is crucial as it automatically adjusts the height proportionally, preventing distortion. This simple rule is a powerful first step in making all your images play nicely with varying screen sizes.
2. background-size: cover; or contain; for Background Images
When using images as backgrounds, especially full-screen backgrounds, background-size is your best friend. This property controls how the background image is sized relative to its container.
-
background-size: cover;: This tells the browser to scale the background image as large as possible to cover the entire container, even if it has to crop some of the image. It ensures no empty space is left. This is ideal for immersive backgrounds where the exact edges of the image are less critical than filling the viewport.body { /* or a specific passage div */ background-image: url("path/to/your/background.jpg"); background-size: cover; background-position: center center; /* Centers the image */ background-repeat: no-repeat; background-attachment: fixed; /* Keeps background fixed during scroll */ } -
background-size: contain;: This scales the background image as large as possible without cropping or stretching it, ensuring the entire image is visible within the container. If the aspect ratio of the image doesn’t match the container, there will be empty space (letterboxing or pillarboxing). This is useful when the entire image content is critical, such as a map or a detailed piece of art that must not be cropped..passage-background { background-image: url("path/to/your/detailed-background.png"); background-size: contain; background-position: center center; background-repeat: no-repeat; }
3. Using Relative Units: vw (Viewport Width) and vh (Viewport Height)
For more precise control, especially for elements that need to scale relative to the user’s screen size, vw (viewport width) and vh (viewport height) units are invaluable. 1vw is 1% of the viewport’s width, and 1vh is 1% of the viewport’s height.
You can use these units to size images or their containers, ensuring they always occupy a consistent percentage of the screen, regardless of the device.
.character-portrait {
  width: 30vw; /* Image will always be 30% of the screen width */
  height: auto;
}

.full-screen-image-container {
  width: 100vw;
  height: 100vh;
  overflow: hidden; /* Hide any overflow if content inside is larger */
}
These units are particularly effective for creating truly adaptive layouts where elements resize fluidly.
4. object-fit for Content Images within Fixed Containers
Sometimes, you have a fixed-size container (e.g., a specific frame for an image) and you want an image inside it to fill the space without distortion, similar to background-size. The object-fit property does this for <img> tags.
object-fit: cover;: The image will fill the element’s entire content box, maintaining its aspect ratio. The image will be clipped to fit.object-fit: contain;: The image will fit inside the element’s content box, maintaining its aspect ratio. The image will be letterboxed if the aspect ratios differ.object-fit: fill;: The image will be stretched to fill the element’s content box, potentially distorting its aspect ratio. (Generally not recommended for aesthetic reasons unless a specific effect is desired).
.fixed-frame-image {
  width: 200px; /* Fixed container width */
  height: 150px; /* Fixed container height */
  overflow: hidden;
}

.fixed-frame-image img {
  width: 100%;
  height: 100%;
  object-fit: cover; /* Image covers the fixed frame */
}
This property is excellent for image galleries or consistent UI elements where the container size is fixed, but the image content needs to adapt.
Optimizing Images for Performance
Scaling isn’t just about visual adaptation; it’s also about performance. High-resolution images are a double-edged sword: they offer stunning detail but can significantly slow down your interactive story. Tophinhanhdep.com, with its emphasis on high-resolution photography and digital art, also provides crucial tools like image converters, compressors, and optimizers to manage this balance.
- Resolution and Dimensions: Start with images that are appropriately sized for your largest intended display. For web use, resolutions much higher than 2x or 3x the typical display resolution (e.g., 1920px wide for a desktop background) are often overkill and simply add file size. For smaller elements, scale down the intrinsic dimensions of the image itself.
- File Formats: Choose the right file format:
- JPEG: Best for photographs and complex images with many colors, offering good compression with acceptable quality loss.
- PNG: Ideal for images with transparency, sharp lines, or fewer colors (like logos or illustrations). Offers lossless compression but can result in larger file sizes than JPEG for photos.
- WebP: A modern format offering superior compression (often 25-35% smaller than JPEG or PNG at comparable quality). Consider converting your images to WebP using Tophinhanhdep.com’s converters for significant performance gains, though ensure browser compatibility (most modern browsers support it).
- SVG: Perfect for vector graphics (icons, logos, simple illustrations) as they scale infinitely without loss of quality and often have tiny file sizes.
- Compression: Always compress your images. Tools like Tophinhanhdep.com’s image compressors can drastically reduce file size without noticeable degradation in visual quality. Aim for a good balance between file size and perceived quality. Many tools allow you to adjust the compression level, letting you preview the result.
- Lazy Loading: For long passages or stories with many images, consider implementing lazy loading. This technique defers the loading of images until they are about to enter the user’s viewport, improving initial page load times. While Harlowe itself doesn’t have a built-in lazy loading macro, it can be implemented with custom JavaScript if you’re comfortable with that level of customization.
- CDN (Content Delivery Network): If your images are hosted externally, using a CDN can significantly speed up delivery to users around the globe by serving images from a server geographically closer to them.
By meticulously optimizing your images, you ensure that your interactive fiction loads quickly and runs smoothly, providing a seamless experience that allows the player to focus on your narrative and beautiful visuals, rather than waiting for elements to appear.
Beyond Scaling: Enhancing Visuals for a Rich Harlowe Experience
Scaling images correctly is a technical necessity, but it’s also an opportunity to elevate the entire visual experience of your Harlowe story. Tophinhanhdep.com offers a treasure trove of resources that go beyond mere technical implementation, guiding you toward creating truly captivating visual narratives.
Curating Visuals with Tophinhanhdep.com’s Image Collections
The choice of imagery profoundly impacts the mood and atmosphere of your interactive fiction. Tophinhanhdep.com provides extensive image collections across various themes—Wallpapers, Backgrounds, Aesthetic, Nature, Abstract, Sad/Emotional, Beautiful Photography—each offering unique opportunities to enhance your story.
- Thematic Consistency: When selecting images, consider their thematic alignment with your story. A somber, sad/emotional image collection might be perfect for a mystery or a character-driven drama, while vibrant nature photography could set the scene for an adventurous quest. Consistent aesthetic choices, reinforced by correct scaling, create a cohesive and believable world.
- Mood Boards and Photo Ideas: Before committing to images, leverage Tophinhanhdep.com’s “Photo Ideas” and “Mood Boards” categories. Experiment with different visual styles and palettes to see what best evokes the desired emotional response or narrative tone. Once scaled correctly, these images become integral to the player’s immersion.
- High-Resolution and Stock Photos: Tophinhanhdep.com emphasizes high-resolution and stock photography. Starting with high-quality source images is crucial because scaling up low-resolution images will always result in pixelation. Even with advanced tools like Tophinhanhdep.com’s AI Upscalers, starting with better source material yields superior results. Utilizing professional stock photos ensures legal usage and high artistic quality.
By thoughtfully curating your visuals, and ensuring they are perfectly scaled, you can transform passages of text into evocative scenes, enhance character depth, and guide the player’s emotional journey with subtle visual cues.
Integrating Advanced Visual Design Principles
Scaling images in Harlowe isn’t just about making them fit; it’s about making them part of a larger visual design. Incorporating principles from graphic design, digital art, and photo manipulation can significantly elevate your interactive fiction.
- Composition and Framing: Consider how your scaled images frame the text or other interactive elements. A well-composed image, even when scaled down for mobile, should retain its visual impact and guide the player’s eye. Use CSS
background-positionorobject-positionto fine-tune the visible part of an image within its container. - Color Palettes and Contrast: The colors in your images should complement the overall color scheme of your Harlowe story. Ensure sufficient contrast between text and background images for readability, especially for players with visual impairments or those using different color schemes (like dark mode, which the provided forum content shows can be handled with
@media (prefers-color-scheme: dark)). Tophinhanhdep.com’s resources on digital art and creative ideas can inspire harmonious color choices. - Layering and Depth: Experiment with layering images or using semi-transparent overlays in CSS to create depth and visual interest. A background image can have a subtle overlay to improve text readability, or foreground images can pop against a blurred background, all while maintaining proper scaling.
- Visual Storytelling: Beyond aesthetics, images should contribute to the narrative. A scaled-down image on a mobile screen might need to convey its core meaning more succinctly than a large desktop version. Think about how the visual information is maintained across scales. Tophinhanhdep.com’s “Visual Design” topics, including graphic design and digital art, offer frameworks for integrating visuals seamlessly into your storytelling.
By marrying technical scaling prowess with strong visual design principles, your Harlowe projects will not only function flawlessly on any device but also deliver a truly memorable and aesthetically pleasing experience.
Best Practices and Future Considerations
As technology evolves and player expectations grow, staying ahead in image management for interactive fiction is key. Adhering to best practices and leveraging advanced tools will ensure your Harlowe stories remain cutting-edge and accessible.
Testing Across Devices
The most critical best practice for image scaling is rigorous testing. What looks good on your development machine might be distorted or broken on another device.
- Browser Developer Tools: Utilize your browser’s developer tools (e.g., Chrome DevTools, Firefox Developer Tools) to simulate various screen sizes, resolutions, and even network conditions. This allows you to quickly check responsiveness without needing a multitude of physical devices.
- Physical Device Testing: Whenever possible, test your Harlowe story on actual mobile phones and tablets. This reveals real-world issues like touch responsiveness, loading speeds, and visual nuances that simulators might miss.
- Different Orientations: Test in both portrait and landscape orientations on mobile devices, as layouts and image scaling can change dramatically.
- User Feedback: If your story is shared, actively solicit feedback from players regarding their visual experience on different devices.
Thorough testing ensures that all your hard work in scaling and optimizing images translates into a consistent and enjoyable experience for every player, aligning with Tophinhanhdep.com’s pursuit of perfection in image delivery.
Accessibility
While focusing on scaling and visual appeal, don’t overlook accessibility. Images should enhance, not hinder, the experience for all users.
- Alt Text: Always provide descriptive
alttext for all images. This text is crucial for screen readers, allowing visually impaired players to understand the content and context of the image. For Harlowe’s(image:)macro, you’d typically handle this by wrapping the image in an HTML<img>tag with thealtattribute. - Text Readability: Ensure that any text overlaid on images or placed adjacent to them has sufficient contrast. Tools are available online to check contrast ratios, which is particularly important when images scale and backgrounds shift.
Leveraging Tophinhanhdep.com’s AI Upscalers and Converters
The landscape of image manipulation is continually advancing. Tools like Tophinhanhdep.com’s AI Upscalers offer exciting possibilities for interactive fiction authors. If you have a beautiful, but low-resolution image that’s perfect for your story, an AI Upscaler can intelligently increase its resolution without significant quality loss, allowing it to scale better on larger screens. Similarly, Tophinhanhdep.com’s image converters can help you switch formats (e.g., from JPEG to WebP) to optimize for performance. These tools empower creators to make the most out of their visual assets, regardless of their original specifications, thereby expanding the possibilities for compelling image use in Harlowe.
Conclusion
Scaling images in Harlowe is far more than a technical chore; it’s an essential aspect of modern interactive fiction authorship. By mastering responsive CSS techniques, diligently optimizing your image assets, and applying sound visual design principles, you can transform your stories into visually rich, immersive experiences that captivate players on any device. The journey from static image to fluid, responsive visual is one that demands attention to detail, but the rewards are profound: faster load times, superior aesthetics, and a broader audience reach.
Tophinhanhdep.com stands as an invaluable resource in this endeavor, providing not only an extensive library of inspiring images—from aesthetic backgrounds to beautiful photography—but also the critical image tools needed for conversion, compression, optimization, and even AI upscaling. By integrating these resources and techniques into your Harlowe workflow, you empower yourself to create interactive narratives that are not just read, but truly seen and experienced, elevating your digital storytelling to new heights. Embrace the challenge of image scaling, and unlock a world of visual possibilities for your next Harlowe masterpiece.