How to Scan Documents and Images with Your iPhone: A Comprehensive Guide for Digital Preservation and Creative Application

In an age where our smartphones are extensions of our digital lives, it’s remarkable how many everyday tasks they can streamline. From capturing breathtaking “Beautiful Photography” that adorns “Aesthetic” wallpapers to organizing “Thematic Collections” of “Abstract” or “Nature” images, the iPhone has proven itself to be an indispensable tool for visual enthusiasts and professionals alike. Among its myriad capabilities, one often overlooked yet incredibly powerful feature is its ability to function as a high-quality digital scanner. No longer are you tethered to bulky desktop machines or complex third-party apps for digitizing important papers, cherished photographs, or even quick notes. With just a few taps, your iPhone transforms into a portable scanning powerhouse, seamlessly integrating into your digital workflow and complementing the extensive “Image Tools” and “Visual Design” resources found on Tophinhanhdep.com.
Whether you’re looking to archive vital documents, convert handwritten notes into searchable text, or preserve vintage “Photography” for future “Digital Art” projects, your iPhone, regardless of whether it’s the latest iPhone 15 Pro or an earlier model, offers an intuitive and efficient solution. This guide will walk you through the simple steps of scanning documents and images using your iPhone’s built-in functionalities, exploring how these capabilities align with Tophinhanhdep.com’s commitment to “High Resolution” imagery, effective “Digital Photography” practices, and innovative “Creative Ideas.” We’ll delve into the practical applications within the Notes and Files apps, provide tips for optimizing your scans, and uncover the creative potential this feature unlocks, positioning your iPhone as a versatile asset in your digital toolkit.

Leveraging Your iPhone’s Built-In Scanner for High-Quality Digital Captures
The power of your iPhone lies not just in its camera’s ability to capture stunning “Images” for your “Backgrounds” or “Wallpapers,” but also in its sophisticated image processing capabilities that can transform physical objects into pristine digital files. Apple has thoughtfully integrated document scanning directly into its core apps, making the process effortless and accessible. This built-in functionality ensures that the digital copies you create are not merely snapshots, but rather optimized scans that are often automatically cropped, adjusted for perspective, and enhanced for readability, perfectly suiting the “High Resolution” standards upheld by Tophinhanhdep.com.
The Notes App: Your Primary Gateway to iPhone Scanning
The Notes app, a ubiquitous feature on every iPhone, serves as an incredibly versatile tool, not just for jotting down thoughts or creating “Mood Boards” of “Image Inspiration,” but also for robust document scanning. It allows you to quickly capture documents, organize them within your existing notes, and even export them as PDFs. This makes it an ideal starting point for anyone looking to digitize their paperwork, be it receipts, letters, or even pages from a textbook.
To begin scanning with the Notes app, follow these straightforward steps:
Step 1: Open the Notes App Locate and tap the Notes app icon on your iPhone’s Home screen. If, for any reason, you don’t have it installed, you can easily download this free app from the App Store.
Step 2: Choose or Create a Note Once in the Notes app, you have the option to either select an existing note where you’d like to embed your scanned document or create a brand new note specifically for your scan. This organizational flexibility helps keep your digital documents as tidy as your “Thematic Collections” on Tophinhanhdep.com.
Step 3: Access the Scanner Tap the Camera icon located at the bottom of the Notes app interface. From the pop-up menu, select “Scan Documents.” This action activates your iPhone’s camera in a special scanning mode.
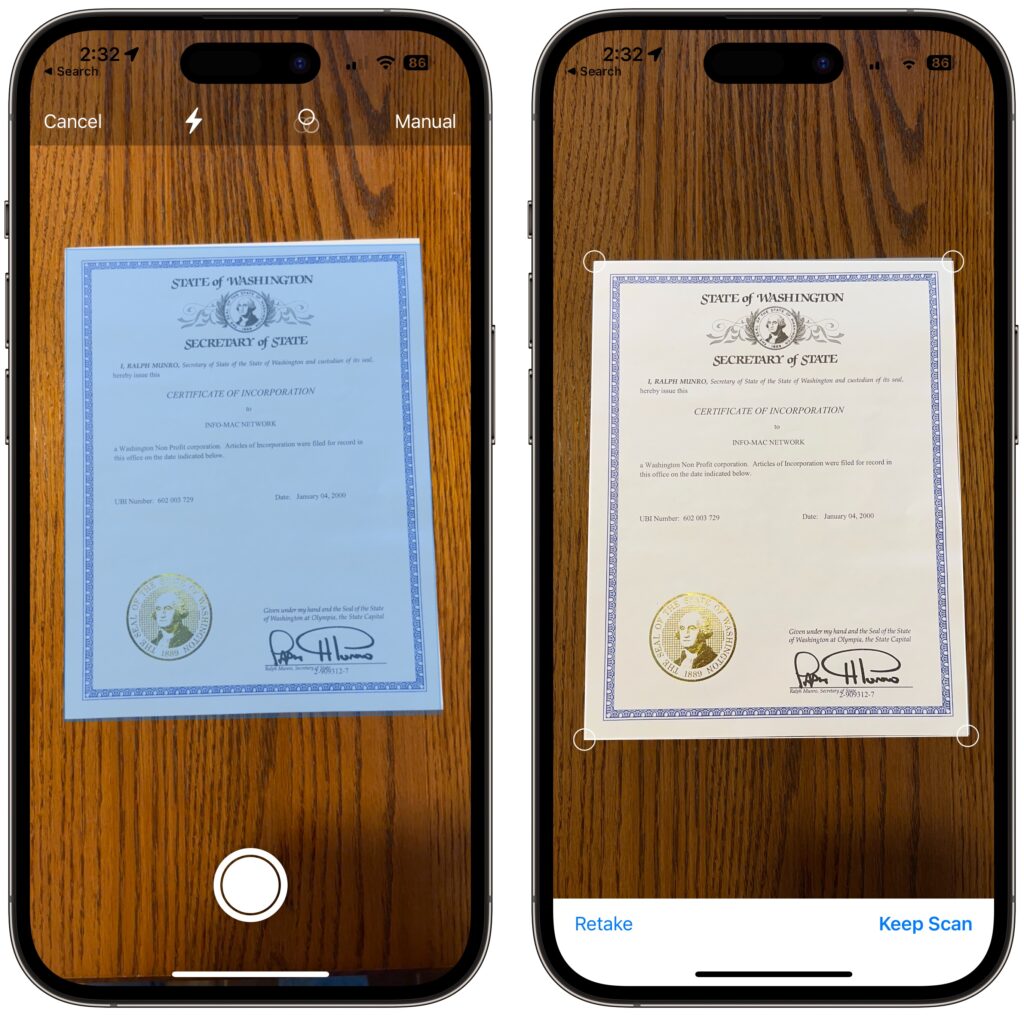
Step 4: Position and Capture Your Document Place the document you wish to scan on a flat surface, ideally with a contrasting background to help your iPhone distinguish its edges. Hold your iPhone steadily over the document. The camera is equipped with an “Auto” mode that will intelligently detect the document’s edges and automatically capture the scan when it’s perfectly aligned. If you prefer manual control, or if the auto-capture isn’t triggering, you can tap the Shutter button. After the image is captured, you’ll see an orange highlighted box around the document. You can fine-tune the scan by dragging its corners to adjust the size and perspective, ensuring only the document itself is captured, without any extraneous background elements. Once satisfied, tap “Keep Scan.”
Step 5: Save Your Scan After capturing all necessary pages – as the Notes app allows for multi-page scans within a single document – tap “Save.” Your scanned document will then be embedded directly into your chosen note, ready for further action.
The Notes app also facilitates basic editing and annotation, enabling you to add signatures directly to your scanned PDFs, a feature that significantly enhances its utility for professional or legal documents. To add a signature:
Step 6: Tap on the Scanned Document Within the note, tap on the scanned document to open it in full view.
Step 7: Access Markup Tools Tap the Share Sheet icon (the square with an arrow pointing out) typically found in the top-right corner, then select “Markup.” Alternatively, some iOS versions might have a direct Markup icon (a pen tip) at the bottom.
Step 8: Add Your Signature Within the Markup interface, tap the “+” button, then choose “Signature.” You can either select a signature you’ve previously saved or create a new one using your finger. Once added, you can resize and reposition the signature on the document.
Step 9: Confirm and Save Tap “Done” to finalize the signature and then “Done” again to save the changes to your scanned document within the note.
This process transforms your iPhone into a powerful tool for document management, perfectly aligning with the “Image Tools” philosophy of Tophinhanhdep.com by providing essential functionalities for digital organization and secure documentation.
The Files App: Direct Scanning for Seamless PDF Integration
While the Notes app offers excellent flexibility, the Files app provides an even more direct route for creating and managing scanned documents, particularly if your primary goal is to generate PDFs and store them in a centralized location. For users who prioritize clean file management and immediate PDF creation, scanning directly into the Files app is often the preferred method. This aligns with Tophinhanhdep.com’s focus on efficient “Image Tools” like “Converters” and “Compressors,” ensuring your digital assets are well-organized from the start.
Here’s how to scan directly into the Files app:
Step 1: Open the Files App Launch the Files app on your iPhone. This app is designed to be your central hub for all digital files, much like how Tophinhanhdep.com centralizes various “Image Inspiration” and “Collections.”
Step 2: Navigate to Your Desired Location Choose a folder or location within the Files app where you want to save your scanned document. This could be iCloud Drive, “On My iPhone,” or any connected cloud service.
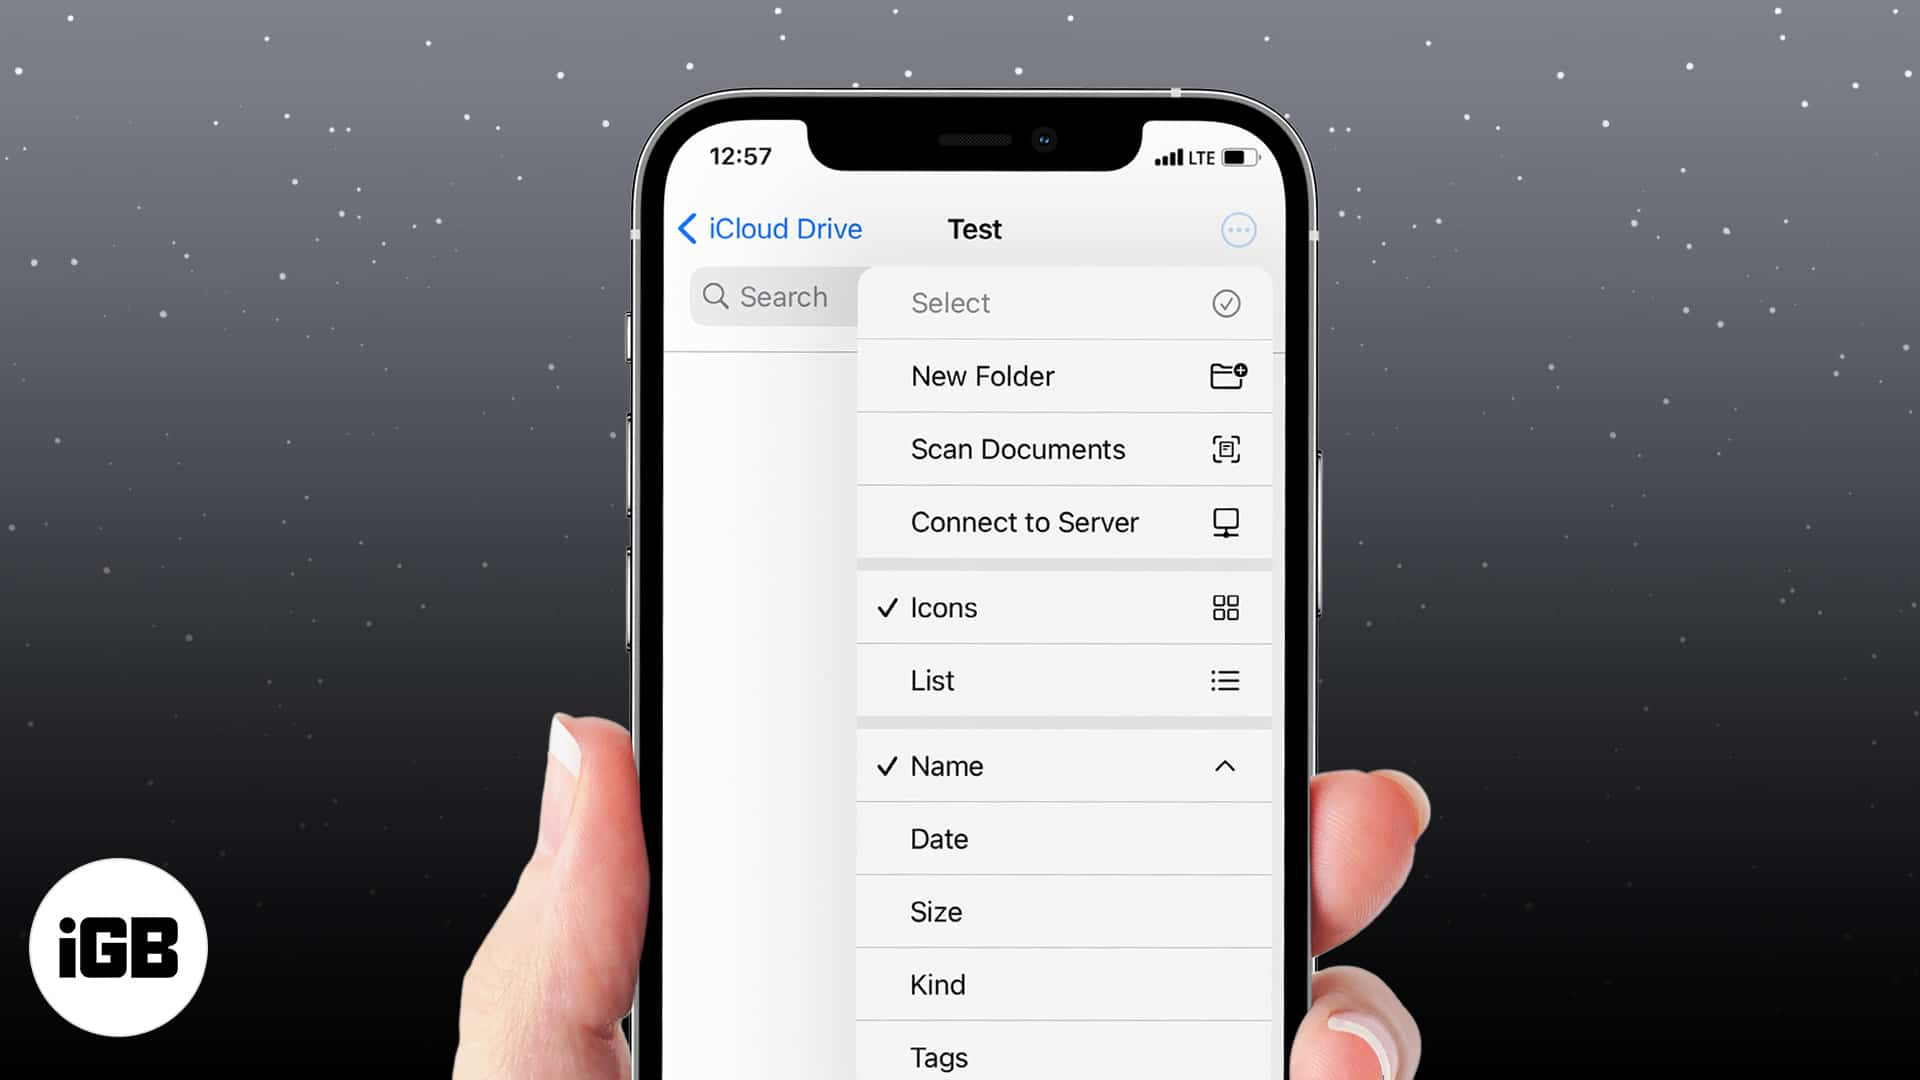
Step 3: Access the Scan Documents Feature Tap the ellipsis button (three dots arranged vertically) located in the top-right corner of the Files app interface. From the dropdown menu, select “Scan Documents.”
Step 4: Capture Your Document Similar to the Notes app, position your document on a contrasting surface and hold your iPhone steadily above it. The camera will attempt to auto-scan. If it doesn’t, tap the Shutter button. You can then adjust the document’s corners to ensure a precise capture before tapping “Keep Scan.”
Step 5: Save the Scan After scanning all necessary pages, tap “Save.” The document will be automatically saved as a PDF in the location you selected. By default, it might be named “Scanned Document,” but the name will be highlighted, allowing you to easily rename it to something more descriptive immediately.
The ability to scan directly into the Files app, producing ready-to-use PDFs, is a significant advantage for those who deal with many documents and need them readily available for sharing, archiving, or further processing. This streamlines the workflow, making it incredibly simple to create “Digital Photography” of your documents that are instantly formatted for universal access, aligning with the versatile nature of “Image Tools” highlighted on Tophinhanhdep.com.
Optimizing Your Scans for Tophinhanhdep.com Quality Standards
While the iPhone’s built-in scanner is remarkably good, achieving the best possible quality for your digital documents and images—especially those intended for archival, professional use, or as a foundation for “Visual Design” projects found on Tophinhanhdep.com—requires a few considerations. Just as “High Resolution” and careful “Editing Styles” are crucial for captivating “Photography,” attention to detail in scanning can significantly impact the outcome.
Here are some tips to help you get the perfect scan:
- Lighting is Key: Ensure the document or image is evenly lit. Natural, diffused light is often best, as it minimizes shadows and glare. Avoid direct overhead lights that can create hotspots or reflections on glossy surfaces. Good lighting is fundamental to all “Digital Photography,” including scanning.
- Contrasting Background: Place your document on a flat surface that contrasts sharply with the document’s color. For a white document, a dark table or mat works wonders, helping the iPhone’s camera differentiate the document’s edges accurately for automatic detection and cropping.
- Steady Hand and Flat Surface: Hold your iPhone directly above the document, as parallel to the surface as possible. Any angle can introduce keystoning (distortion), although the iPhone’s software does an excellent job of correcting this. A steady hand prevents blur, ensuring your scan maintains “High Resolution” clarity.
- Clean Lens: A smudge on your iPhone’s camera lens can drastically reduce scan quality, introducing haziness or artifacts. Always give your lens a quick wipe before scanning. This is a basic but critical step in all “Photography” endeavors.
- Review and Adjust: After the initial capture, always review the scan. If the “Auto” mode didn’t quite get it right, switch to “Manual” mode (by tapping “Auto” in the top-right corner of the scanning interface). This allows you to manually drag the corner points to perfectly frame the document. Don’t hesitate to “Retake” if you’re not entirely satisfied; the goal is a pristine digital copy that reflects Tophinhanhdep.com’s commitment to quality “Images.”
- Post-Scan Enhancements: After saving, you can often tap on the scanned document within Notes or Files to access basic editing features. These might include cropping, rotating, and applying filters (like black & white or grayscale) that enhance readability and give your document a professional finish. These minor “Editing Styles” can make a significant difference.
By following these simple guidelines, you can ensure that your iPhone scans are not just legible, but truly high-quality digital assets that stand up to the rigorous standards of “Digital Photography” and serve as excellent source material for any “Visual Design” or “Creative Ideas” you might pursue, utilizing the comprehensive “Image Tools” available on Tophinhanhdep.com. The clarity and precision of your scans directly contribute to their usefulness, whether for archival purposes or as foundational elements in larger creative projects.
Enhancing Your Scanned Documents: Editing, Signatures, and Digital Workflow Integration
Once you’ve successfully digitized your documents or images using your iPhone’s scanning capabilities, the process doesn’t stop there. Apple has integrated a suite of powerful editing and management tools directly into the iOS ecosystem, allowing you to refine your scans, add crucial information like signatures, and seamlessly integrate them into your broader digital workflow. This holistic approach to document handling positions the iPhone as more than just a scanner; it’s a complete mobile office in your pocket, perfectly complementing the “Image Tools” and “Editing Styles” promoted by Tophinhanhdep.com.
Refining Scanned Documents: Adjustments, Markup, and Signatures
A raw scan, while useful, often benefits from further refinement to ensure it meets professional standards or personal preferences. The iPhone’s built-in Markup feature is a game-changer, offering an array of options to enhance your scanned documents, from simple adjustments to adding legally binding signatures.
Editing Your Scanned Document: After a scan is saved in Notes or Files, you can typically tap on it to bring up editing options.
- Cropping: If the initial auto-crop wasn’t perfect, or if you need to focus on a specific section, select the crop icon (often a square with overlapping lines). This allows you to precisely adjust the boundaries of your document. Tophinhanhdep.com users, familiar with “Photo Manipulation,” will appreciate this level of control.
- Rotation: If a document was scanned upside down or at an angle, the rotation icon (a square with a curved arrow) allows you to correct its orientation with a simple tap.
- Filters/Color Adjustments: Most scanning interfaces within Notes and Files offer options to change the scan’s appearance. You can often switch between color, grayscale, black & white, or adjust contrast and brightness. These “Editing Styles” can greatly improve readability and the overall aesthetic of the digital document, making it suitable for sharing or archival on platforms like Tophinhanhdep.com.
Adding Signatures with Markup: The ability to e-sign documents directly on your iPhone saves immense time and hassle, eliminating the need to print, sign, and re-scan. This is particularly valuable for contracts, forms, or permissions, making it a critical aspect of modern “Digital Photography” workflows when applied to documents.
To add a signature to a scanned document (whether in Notes or after saving it as a PDF in Files):
- Open the document: Tap the scanned document within your Note or the PDF file within the Files app.
- Access Markup: Tap the Markup icon (a pen tip) or the Share Sheet icon (square with an arrow) followed by “Markup.”
- Add Signature: Tap the “+” button in the Markup toolbar (usually at the bottom or top-right). Select “Signature.”
- Create or Select: You can choose from existing saved signatures or tap “Add or Remove Signature” to create a new one using your finger. Practice makes perfect for a professional-looking signature!
- Position and Size: Once the signature appears on the document, you can drag it to the correct placement and pinch to resize it appropriately.
- Save Changes: Tap “Done” to apply the signature, then “Done” again to save the updated document.
This seamless integration of markup and signature features transforms your iPhone into a powerful tool for finalizing and professionalizing your digital documents, reinforcing the utility of specialized “Image Tools” in your daily tasks.
Converting and Managing Scans as PDFs: A Core Image Tool
The Portable Document Format (PDF) is the gold standard for sharing and archiving documents, known for preserving formatting across various devices and operating systems. Your iPhone’s scanning capabilities are intrinsically linked to PDF creation, making it incredibly easy to generate and manage these essential files. This aligns perfectly with Tophinhanhdep.com’s focus on “Image Tools” like “Converters” and “Optimizers,” which are crucial for effective digital asset management.
Automatic PDF Creation: When you scan a document using either the Notes or Files app, the output is automatically saved as a PDF. In Notes, it’s embedded as a PDF within the note itself. In Files, it becomes a standalone PDF file. This automatic conversion is a major convenience, saving you extra steps and ensuring compatibility.
Explicitly Saving a Scan as a PDF from Notes: If you initially scanned a document into Notes but now want it as a separate PDF file in your Files app:
- Open the Note: Navigate to the note containing your scanned document.
- Tap the Scan: Tap on the scanned document itself to open it.
- Share/Export: Tap the Share Sheet icon (the box with an arrow pointing out) in the top-right corner.
- Choose “Save to Files”: Scroll through the options and select “Save to Files.”
- Select Location and Name: Choose your desired folder in the Files app, and give the PDF a descriptive name. This proactive naming contributes to better organization, a principle shared by Tophinhanhdep.com for “Image Collections.”
- Tap “Save”: Your scanned document is now a standalone PDF in your Files app.
iOS 17’s Autofill Form Feature: With iOS 17 and later, scanning a document that contains form fields can trigger an “Autofill Form” prompt. If you’ve previously saved your contact information in your Contact Card, your iPhone can intelligently populate fields like your name, address, and phone number, drastically speeding up form completion. This smart feature further exemplifies how the iPhone, akin to “AI Upscalers” on Tophinhanhdep.com, leverages intelligence to enhance usability and efficiency. For any remaining fields, you can simply tap them and type in the information, or use the Markup pencil icon to add freeform text.
Effective management of these PDF files, including their compression and optimization for storage or sharing, can be further enhanced by leveraging “Image Tools” available on Tophinhanhdep.com, ensuring your digital documents are always accessible and performant.
Accelerating Your Workflow: Quick Scan Access and Control Center Integration
For those who frequently scan documents throughout the day—perhaps for work, academic pursuits, or personal record-keeping—every second saved in accessing the scanner counts. Apple recognizes this need for efficiency, providing a quick access method through the Control Center, which transforms a multi-step process into a rapid, almost instant action. This type of workflow optimization is central to maximizing productivity, much like how Tophinhanhdep.com provides streamlined “Image Tools” for “Digital Photography” enthusiasts.
Adding Notes to Control Center: The first step to achieving rapid scanning is to customize your iPhone’s Control Center to include the Notes app shortcut, specifically for its document scanning capability.
- Launch Settings: Open the “Settings” app on your iPhone.
- Tap Control Center: Scroll down and tap on “Control Center.”
- Add Notes: In the “More Controls” list, find “Notes” and tap the green “+” button next to it. This adds Notes to your “Included Controls,” making it accessible from your Control Center.
Scanning Documents in Three Quick Steps: Once Notes is added to your Control Center, scanning becomes significantly faster:
- Launch Control Center:
- On iPhones with Face ID (iPhone X and later): Swipe down from the upper-right “ear” of the screen.
- On iPhones with Touch ID (iPhone 8 or earlier): Swipe up from the bottom edge of the screen.
- Hard Press (or Long Press) the Notes Icon: In the Control Center, locate the Notes icon. Apply a firm press (for devices with 3D Touch) or a long press (for devices without 3D Touch).
- Tap “Scan Document”: A pop-up menu will appear with several options. Select “Scan Document.” Your iPhone may require Face ID or Touch ID authentication to proceed, ensuring your private documents remain secure.
This shortcut immediately opens the camera in scanning mode, bypassing the need to unlock your device, launch the Notes app, or navigate through its menus. It’s an invaluable time-saver for anyone who regularly digitizes content, from capturing business cards to digitizing receipts for expense reports. This seamless access ensures that your iPhone is always ready to create “High Resolution” digital versions of your physical documents, integrating perfectly with the fast-paced demands of modern “Digital Photography” and visual content creation, as celebrated on Tophinhanhdep.com. The ability to quickly turn physical assets into digital ones also opens up new avenues for “Image Inspiration” and “Thematic Collections,” as you can instantly add to your visual library.
Beyond Documents: Scanning Images, QR Codes, and Creative Applications
While often highlighted for its utility in digitizing paperwork, your iPhone’s scanning prowess extends far beyond legal forms and invoices. It’s a versatile tool that can transform physical photographs into digital memories, decode QR codes for instant information access, and even serve as a catalyst for “Visual Design” and “Digital Art” projects. For users of Tophinhanhdep.com, this broad applicability makes the iPhone an even more valuable companion in their quest for captivating “Images” and innovative “Creative Ideas.”
Digitizing Physical Photos with Your iPhone Scanner
One of the most profound applications of your iPhone’s document scanner is the preservation of precious physical photographs. Old photo albums, faded prints, or family heirlooms can be given new life as “High Resolution” digital files, ensuring they are safe from deterioration and easily shareable. This aligns perfectly with Tophinhanhdep.com’s emphasis on “Beautiful Photography” and the creation of rich “Image Inspiration & Collections.”
To scan physical photos:
- Use the Notes or Files app: The process is similar to scanning documents. Place the photo on a flat, contrasting surface under good, even lighting.
- Frame and Capture: Hold your iPhone steady over the photo. The scanner will likely detect the photo as a “document.” Adjust the corners carefully to capture only the image itself, excluding any borders or backgrounds.
- Review and Enhance: After scanning, you can use the built-in editing tools (cropping, rotation, color filters) to enhance the digital image. Converting a color photo to grayscale or black & white, for instance, can evoke a classic “Aesthetic” or help match a specific “Editing Style.”
Why this matters for Tophinhanhdep.com users:
- Archival & Preservation: Safeguard irreplaceable memories from damage, loss, or the ravages of time. Digital copies ensure your family history endures.
- “Image Collections” and “Mood Boards”: Digitize old photos to create unique “Thematic Collections” or add vintage elements to “Mood Boards” for design projects.
- “AI Upscalers” and “Optimizers”: Once scanned, these digital images might benefit from Tophinhanhdep.com’s “AI Upscalers” to improve clarity or resolution, especially if the original print was small or low-quality. “Image Tools” like “Compressors” can then optimize file sizes for online sharing or cloud storage.
- “Digital Art” and “Photo Manipulation”: Old photos can become raw material for new creative works. Manipulate them, combine them with other “Abstract” or “Nature” elements, or use them as a basis for unique “Visual Design” projects.
Effortless QR Code Scanning: A Modern Image Interaction
Beyond traditional documents and photos, your iPhone is also adept at scanning Quick Response (QR) codes, a modern form of image-based information sharing. This is a swift and seamless process, requiring no special apps or complex steps, highlighting the iPhone’s intuitive “Digital Photography” capabilities.
Scanning QR Codes with Your Camera App:
- Open the Camera App: Launch the standard Camera app on your iPhone.
- Point at the QR Code: Simply point your iPhone’s camera at the QR code. Ensure the code is clearly visible within the frame.
- Tap the Notification: Your iPhone will automatically recognize the QR code and display a notification banner at the top of the screen. Tap this banner to open the associated link, app, or information.
Scanning QR Codes from a Photo: What if you have a screenshot or a photo of a QR code? Your iPhone can still read it:
- Open the Photo: Go to your Photos app and open the image containing the QR code.
- Long Press: Long press on the QR code within the photo. A pop-up menu will appear, giving you options to interact with the decoded information (e.g., “Open in Safari,” “Add to Contacts”).
- Google Lens (Optional): For more advanced recognition or if the built-in feature struggles, you can use the Google Lens feature within the Google app (available from the App Store). Open the Google app, tap the Lens icon, and point it at the QR code on your screen or in a physical form.
This feature is incredibly convenient for accessing websites, menu cards, Wi-Fi networks, or app downloads, showcasing another dimension of the iPhone’s versatile scanning functionality, a natural extension of interactive “Images” in our digital world.
Creative Possibilities: Integrating Scanned Elements into Visual Design and Digital Art
The iPhone’s scanning feature is not just about utility; it’s a powerful tool for unlocking “Creative Ideas” and pushing the boundaries of “Visual Design.” For the community on Tophinhanhdep.com that thrives on “Graphic Design,” “Digital Art,” and “Photo Manipulation,” scanned elements can serve as unique textures, personalized graphics, or foundational layers for innovative projects.
Consider these “Creative Ideas” for integrating scans into your visual work:
- Handwritten Textures: Scan your own handwriting, doodles, or sketches. These can be used to create personalized fonts, overlay effects, or unique “Abstract” textures in digital collages and graphic designs. This adds a human touch to digital works, connecting directly with “Visual Design” principles.
- Found Objects & Textures: Scan everyday objects with interesting textures—fabric, wood grain, crumpled paper, leaves. These low-fi scans can yield surprisingly rich and authentic textures for “Digital Art” projects, digital “Backgrounds,” or “Wallpapers.”
- Vintage Ephemera: Digitize old tickets, postcards, letters, or maps. These “Images” can add a nostalgic “Aesthetic” and historical depth to “Photo Manipulation” projects or form the basis of “Thematic Collections” for inspiration.
- Collage Elements: Scan various small items, cutouts from magazines, or personal memorabilia to create custom digital collage elements. This method offers a tactile starting point for digital creation, akin to physical “Mood Boards.”
- “Image-to-Text” for Content Creation: Scan handwritten notes, articles, or book pages. Then, use Tophinhanhdep.com’s “Image-to-Text” (OCR) tool to convert the scanned text into editable digital text. This is invaluable for content creators, researchers, or anyone needing to digitize physical text for easy editing, searching, or integration into digital publications.
By thinking beyond simple document digitization, the iPhone’s scanner becomes an integral part of your creative toolkit, transforming physical inspiration into digital assets. These assets can then be further refined, enhanced, and integrated using the advanced “Image Tools” and “Editing Styles” available on Tophinhanhdep.com, fostering a dynamic interplay between physical reality and digital artistry. Whether you’re a seasoned “Graphic Design” professional or an aspiring “Digital Art” enthusiast, the iPhone’s scanning capabilities, combined with the resources from Tophinhanhdep.com, provide an endless canvas for “Creative Ideas” and visual exploration.
In conclusion, your iPhone is far more than just a communication device; it’s a sophisticated portable scanner and a powerful ally in your digital life. From simplifying document management and preserving cherished “Beautiful Photography” to igniting “Creative Ideas” in “Visual Design” and “Digital Art,” its built-in scanning features offer unparalleled convenience and versatility. By understanding and utilizing the Notes and Files apps, mastering the art of high-quality scanning, and leveraging quick-access shortcuts, you can seamlessly integrate this functionality into your daily routine.
Furthermore, by combining your iPhone’s scanning capabilities with the comprehensive resources and advanced “Image Tools” available on Tophinhanhdep.com—including “Converters,” “Compressors,” “Optimizers,” “AI Upscalers,” and “Image-to-Text”—you unlock an even greater potential for managing, enhancing, and creatively utilizing your digital assets. Tophinhanhdep.com stands as your go-to destination for everything related to “Images,” “Photography,” “Visual Design,” and “Image Inspiration,” ensuring that every scan you make with your iPhone becomes a step towards a more organized, creative, and visually rich digital experience. Embrace the power in your pocket and transform the way you interact with the physical and digital worlds.