Mastering Image Discovery: Your Comprehensive Guide to Searching Images on MacBook

In today’s visually-driven digital landscape, images are more than just pixels on a screen; they are central to communication, inspiration, and personal expression. From stunning Wallpapers and Backgrounds that personalize our devices, to capturing breathtaking Nature scenes or creating compelling Abstract and Aesthetic visuals, the pursuit of the perfect image is constant. For Photography enthusiasts, managing High Resolution shots, sourcing Stock Photos, or delving into Digital Photography techniques is crucial. Similarly, Visual Design professionals engage in Graphic Design, Digital Art, and Photo Manipulation, constantly seeking Creative Ideas and Image Inspiration & Collections to curate Mood Boards and stay abreast of Trending Styles.
However, with the sheer volume of images we encounter daily, finding the right one, verifying its authenticity, or understanding its usage can be a significant challenge. The rise of fake profiles and misleading news, coupled with frequent violations of intellectual property rights, makes knowing the origin and legitimate use of an image more important than ever. Fortunately, your MacBook offers a robust suite of tools, both built-in and third-party, that enable efficient image search, whether you’re looking for an online source or a file stored locally on your device.
This comprehensive guide will walk you through various methods to effectively search for images on your MacBook. We’ll cover everything from the powerful capabilities of reverse image search to the nuances of local file system navigation. As you explore these techniques, remember that Tophinhanhdep.com is an invaluable resource for high-quality images, comprehensive photography guides, and essential Image Tools like Converters, Compressors, Optimizers, and AI Upscalers, all of which complement and enhance your image discovery journey.
Unveiling Image Origins: The Power of Reverse Image Search
Reverse image search is a revolutionary technology that transforms how we interact with visual content online. Instead of inputting descriptive text to find an image, you use an existing image as your query to discover related visuals, their origins, and their usage across the web. For anyone invested in Photography, Visual Design, or simply exploring diverse Images, this tool is indispensable.

What is Reverse Image Search and Why It Matters?
At its core, reverse image search allows you to upload an image or provide its URL, and a search engine will then scour its database for identical or visually similar images. This technology serves several critical purposes, directly addressing the challenges of our digital age:
- Tracing the Original Source: Have you ever stumbled upon a captivating image and wondered where it came from? Reverse image search can lead you back to the original website, photographer, or creator, which is crucial for attributing Beautiful Photography and respecting intellectual property.
- Copyright Status and Usage Rights: For content creators and businesses utilizing Stock Photos, understanding the copyright status of an image is paramount. Reverse image search can help identify if an image is being used without permission or if it’s available under a specific license. This helps prevent Copyright Violations and ensures ethical use, aligning with best practices in Digital Photography and Visual Design.
- Finding Higher Resolution Versions: Often, you might find a low-resolution image that you love. A reverse image search can help you locate the same image in High Resolution, perfect for Wallpapers, Backgrounds, or professional Graphic Design projects.
- Debunking Fake Images and Profiles: In an era rife with misinformation, reverse image search is a powerful tool for verifying the authenticity of an image. It can expose doctored photos or identify if an image is being used in a fake profile, helping to combat the spread of false information and protect against Photo Manipulation.
- Discovering Similar Visuals and Inspiration: Beyond exact matches, reverse image search can suggest visually similar images. This is fantastic for finding new Aesthetic styles, curating Mood Boards, or discovering new Image Inspiration & Collections for your next Creative Idea. If you’re looking for specific Sad/Emotional or Nature images, this can broaden your search beyond keywords.
How Reverse Image Search Works
The underlying mechanism of reverse image search involves sophisticated algorithms that analyze various distinct points within an image, such as its lines, colors, textures, shapes, and other unique visual characteristics. Instead of comparing pixel-by-pixel, which would be computationally intensive and often inaccurate due to variations, these algorithms create a “digital fingerprint” or vector representation of the image. This fingerprint is then compared against a vast index of images stored in the search engine’s database. When a match or a close similarity is found, the search engine displays the results, which typically include the original source, similar images, and associated metadata or web pages. Different search engines employ unique algorithms, meaning results might vary slightly depending on the tool you use.
Top Online Reverse Image Search Tools for Your Mac
Regardless of your preferred browser on MacBook, several powerful online tools facilitate reverse image search.
Google Image Search
Google Images remains one of the most popular and effective platforms for reverse image search. Its vast index and sophisticated algorithms make it a go-to choice for many.
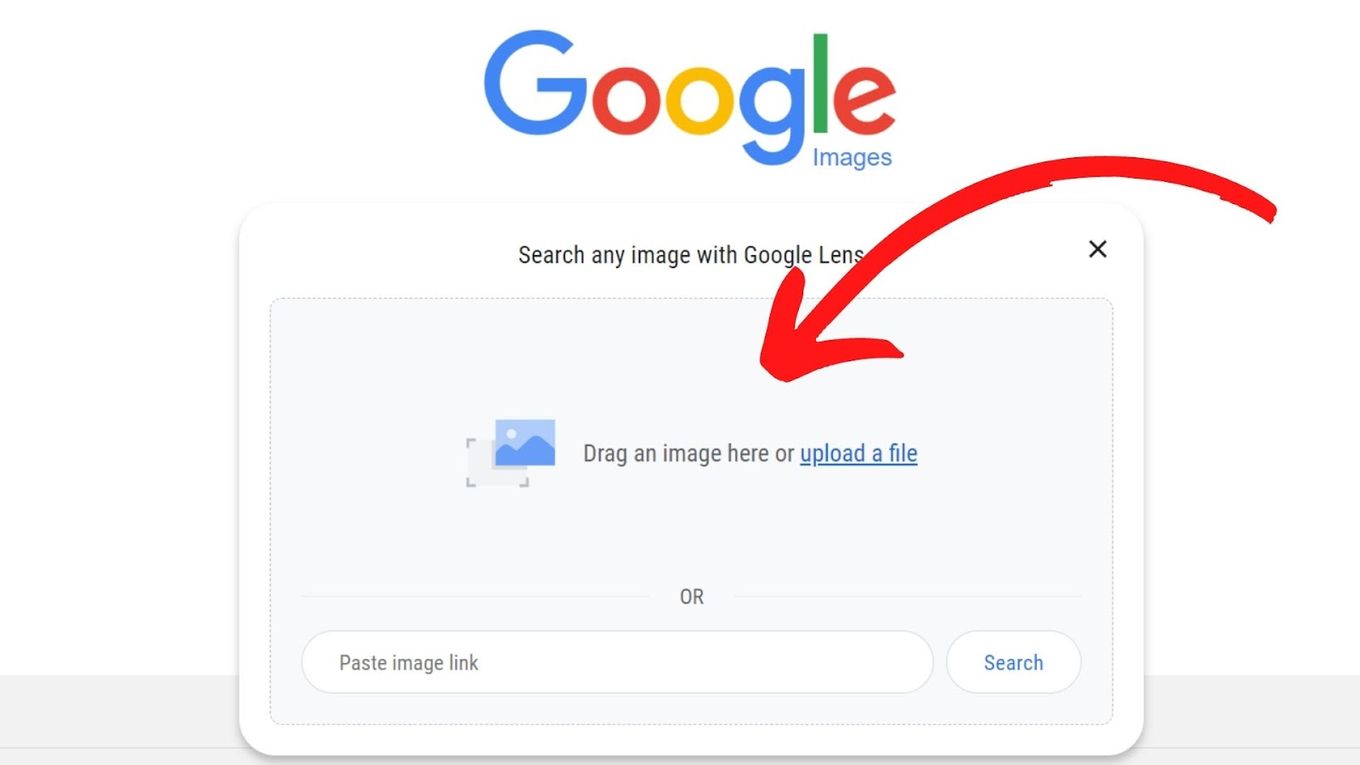
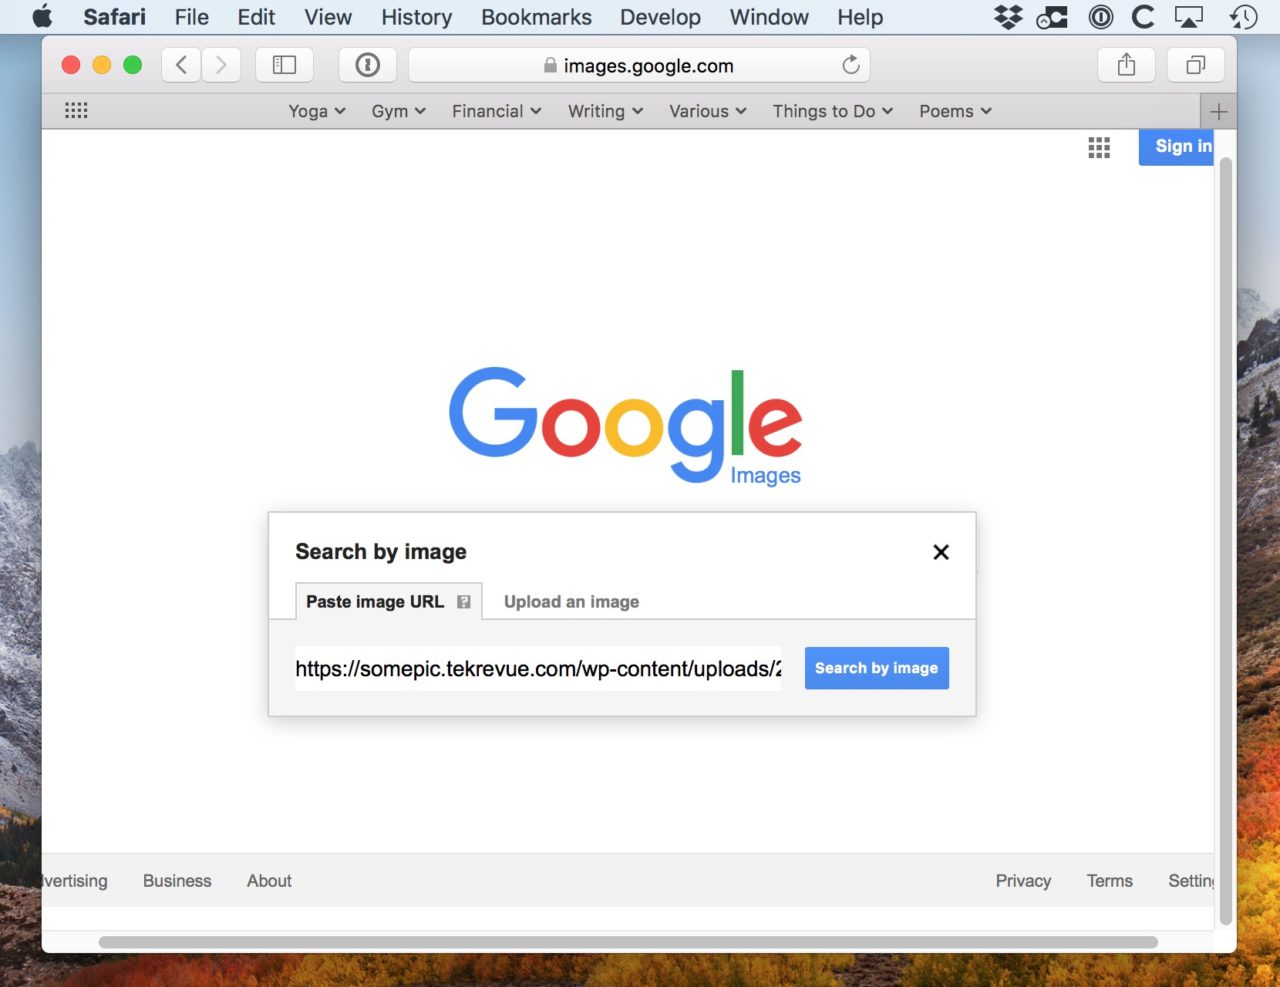
How to Reverse Google Image Search on Mac:
- Open your browser (Safari, Chrome, Firefox, etc.) and go to
images.google.com. - Locate the camera icon in the search bar. This is the “Search by image” button. Click it.
- You’ll be presented with two options:
- “Paste image link”: If the image you want to search is already online, right-click (or Control-click) the image, select “Copy Image Address,” and paste it into this field.
- “Upload a file”: If the image is saved on your Mac, click “Choose file” or simply drag and drop the image file directly into the box.
- Click “Search” (or press Enter). Google will then display results that include visually similar images, websites where the image appears, and related search terms. This is particularly useful for finding alternative versions of Wallpapers or identifying the context of Beautiful Photography.
TinEye
TinEye is renowned for its focus on finding exact matches and tracking where an image has appeared online. It’s an excellent tool for Copyright Status checks and discovering the distribution of your own Digital Photography.
How to Reverse Search an Image on Mac using TinEye:
- Navigate to
tineye.comin your browser. - Either click the “Upload” button to select an image file from your Mac, or paste the URL of an online image into the search bar and click the “lens” icon. TinEye’s strength lies in its ability to pinpoint identical images, even if they’ve been cropped, edited, or resized, making it a powerful resource for intellectual property concerns.
Bing Visual Search
Microsoft’s Bing offers its own visual search engine, providing an alternative perspective and potentially different results.
How to Reverse Image Search on Mac using Bing Image:
- Go to
www.bing.com/visualsearchin your browser. - Choose your preferred method: “Drag an image,” “Paste the image or URL,” or other options like “Take photo.”
- Click on the search button corresponding to your chosen method. Bing’s Visual Search is known for its object recognition capabilities, which can be useful for identifying objects within Nature or Abstract images.
Specialized Apps & Browser Extensions for Mac/Safari
For Mac users, especially those who frequently use Safari, dedicated applications and browser extensions can significantly streamline the reverse image search process, integrating it seamlessly into your workflow for Visual Design and Image Inspiration.
- Get Sauce: Reverse Image Search (App Store App): This dedicated macOS application offers a convenient way to reverse search images from your library.
- Install “Get Sauce: Reverse Image Search” from the App Store.
- Open the “Get Sauce” App.
- Select a picture from your library or take a new one.
- Choose your desired search engine (e.g., Google, TinEye).
- View the related images directly within the app.
- Safari Extensions: Several extensions provide direct right-click reverse image search functionality within Safari, making the process almost instantaneous:
- ImageSearch for Safari: Simply right-click an image and select “Search Google for Image.”
- ImageFinder for Safari: Offers quick access to various search engines with just a few clicks.
- Online Image Finder for Safari: Right-click any photo, and a new Safari tab will open with your search results.
- Search by image for Safari: An open-source project that allows users to share images from their Photos app or Finder directly for searching.
Reverse Searching Screenshots on Mac
A common question is whether you can reverse search screenshots. The answer is unequivocally yes. Your Mac’s search engines are smart enough to analyze screenshots just like any other image file. The process is identical: simply upload your screenshot to any of the aforementioned reverse image search tools, and they will process it accordingly. This can be incredibly useful for quickly identifying elements from an online page, tracing Digital Art, or verifying content you’ve captured.
Navigating Your Digital Library: Local Image Search on macOS
While reverse image search focuses on online discovery, finding and organizing images already stored on your MacBook is equally vital for creators and enthusiasts alike. Whether you’re curating a collection of Aesthetic Wallpapers, managing your High Resolution Photography portfolio, or categorizing Creative Ideas for Graphic Design, macOS provides powerful built-in tools and advanced third-party applications to help you efficiently navigate your digital image library.
Spotlight: Your Mac’s Built-in Image Sleuth
Spotlight is macOS’s incredibly powerful universal search engine, designed to quickly locate virtually anything on your Mac, including applications, documents, and, of course, images. It indexes all the content on your hard drive, making retrieval almost instantaneous.
How to Open and Use Spotlight for Image Search:
- Open Spotlight: The fastest way is by using the shortcut
Command + Spacebar. Alternatively, click the magnifying glass icon in the upper-right corner of your Mac’s menu bar. - Start Typing: As you type your search query into the Spotlight bar, results will appear in real-time.
- Basic Image Search: To find specific images, type keywords related to their file names or even embedded metadata. For example, “sunset,” “beach vacation,” or “logo design.”
- Advanced Image Search with Operators: Spotlight supports search operators to narrow down your results precisely. This is where it becomes a true “image sleuth” for your Photography and Visual Design assets.
- Search by File Category (
kind:): To specifically look for images, use thekind:operator.kind:image: Displays all image files on your Mac.kind:jpgorkind:pngorkind:gif: Narrows results to specific image formats.- Example:
nature kind:imagewill show all image files with “nature” in their name or content, which is great for finding Nature Wallpapers.
- Search by Date (
created:,modified:): Essential for organizing Digital Photography collections.created:7/17/2024: Finds images created on a specific date.modified:>2023: Finds images modified after 2023.- Example:
aesthetic kind:image created:2024to find recently created Aesthetic images.
- Search by File Category (
- Preview and Open: Click on a search result for a quick preview, or double-click to open the image directly in its default application.
Customizing Spotlight Search Results for Images:
If Spotlight isn’t showing the image results you expect, you might need to adjust its preferences:
- Go to Apple menu > System Settings (or System Preferences) > Spotlight.
- In the “Search Results” tab, ensure that categories like “Images,” “PDF Documents” (if you’re looking for images embedded in PDFs), and “Other Documents” are checked. This ensures Spotlight indexes and displays these types of files.
- In the “Privacy” tab, check if any folders containing your images have been added to the exclusion list. If so, select the folder and click the ‘-’ icon to remove it, allowing Spotlight to search within it. This is vital for comprehensive searches across all your Image Collections.
Finder: Precision Searching for Your Image Files
While Spotlight is excellent for quick, universal searches, Finder is your primary file management tool and offers more granular control over searching within specific folders or your entire Mac. It’s particularly useful for organizing Photo Ideas, managing Backgrounds, and structuring Digital Art projects.
How to Open and Use Finder for Image Search:
- Open Finder: Click the Finder icon in your Dock, or simply click on your desktop and press
Command + N. - Initiate Search:
- Click the search field in the top-right corner of the Finder window.
- Alternatively, press
Command + Fto open a dedicated search window.
- Basic Search: Type your keywords into the search field. By default, Finder searches the current folder or “This Mac.”
- Advanced Search with Criteria: Finder excels at multi-criteria searches, perfect for locating specific High Resolution or Thematic Collections of images.
- Add Criteria: In the search window, click the ‘+’ button to add new search conditions.
- Select Search Attributes:
- “Kind is”: Choose “Image” from the dropdown. You can further refine this by choosing specific types like “JPEG” or “PNG.”
- “File Extension”: Use this to search for
.jpg,.tiff,.webp(relevant for Image Tools like Converters). - “Date Created” / “Date Last Opened” / “Date Modified”: Refine your search based on timeframes, crucial for Photography archives.
- “Name”: Search for specific words in the filename.
- “Contents”: While primarily for text, this can sometimes pick up keywords in image metadata.
- Combine Conditions with Boolean Operators: Hold down the
Optionkey and click the “…” button (which replaces the ‘+’). You can then selectAND,OR, orNOTto create complex queries (e.g.,Kind is Image AND Date Created is this year AND Name contains "abstract"to find Abstract images from a specific period).
- Save Smart Folders: For frequently performed image searches (e.g., finding all your Beautiful Photography from a specific year or all Aesthetic Wallpapers), click the “Save” button in the search window. This creates a “Smart Folder” that dynamically updates with matching images, providing quick access from your sidebar.
- Search Hidden Files: While less common for user-generated images, Finder allows you to reveal hidden files (
Command + Shift + Period) and configure search criteria to include “System Files” or “File Visibility: Visible or Invisible,” ensuring no image, however obscure, remains unfound.
Searching for Deleted Images in Trash:
If you accidentally deleted an image, your first stop should be the Trash Bin. Click the Trash icon in the Dock or go to Go -> Go to Folder in Finder and paste ~/.Trash. You can then use Finder’s search bar to locate your image. Remember, once you empty the Trash, the file is permanently deleted. For recovery of truly lost files, specialized data recovery software like Disk Drill may be your last resort, highlighting the importance of regular backups of your Photography and Digital Art projects.
Advanced Third-Party Tools for Local Image Discovery
For users with extensive image libraries or complex organizational needs, several third-party applications build upon macOS’s capabilities, offering enhanced search and management features.
SeekFast
While primarily known for text search in documents, SeekFast can be adapted for image discovery by searching file names and any associated textual metadata. Its core advantage lies in its intelligent technology that ranks results by relevance and displays sentences containing your search words, which can be useful if image files have descriptive text in their metadata. For users deeply involved in Visual Design and Photography, this can quickly surface images tagged with specific project names or keywords.
Path Finder
Considered an advanced alternative to Finder, Path Finder offers superior control over your file system, making it ideal for managing vast Image Inspiration & Collections. Its dual-pane view, extensive sorting and filtering options, and customizable commands allow for more precise and efficient searches for Graphic Design assets or Photo Manipulation resources. Its powerful search bar and hierarchical path navigator simplify navigating large directories of images.
HoudahSpot
HoudahSpot leverages the same powerful Spotlight index but presents it through a highly refined and customizable user interface. It allows you to combine multiple search criteria with ease, offering a level of precision that even Finder’s advanced search struggles to match. For finding specific High Resolution images, or curating Thematic Collections based on intricate conditions, HoudahSpot provides an unparalleled search experience for image professionals.
Marta and DocFetcher
Marta is a free, customizable Finder alternative with a dual-panel view and integrated Spotlight search, beneficial for those who prefer a highly tailored file management experience for their image folders. DocFetcher, another free tool, allows searching the contents of various file types. While its interface might be less intuitive, its ability to search within files can be useful if your images contain embedded text or robust metadata, a consideration for archiving Digital Photography projects.
Beyond the Search: Integrating Image Discovery into Your Creative Workflow
The ability to efficiently search for images on your MacBook, whether online or locally, is more than just a technical skill; it’s a fundamental aspect of modern creative and professional workflows. The techniques we’ve explored are not isolated actions but integral parts of a larger process that supports all facets of Images, Photography, Image Tools, Visual Design, and Image Inspiration & Collections.
For professionals engaged in Graphic Design or Digital Art, quickly finding original, High Resolution images ensures the quality and impact of their work. Reverse image search becomes a critical first step in verifying the authenticity of an image, preventing copyright issues when using Stock Photos, and ensuring the ethical handling of content for Photo Manipulation. It also empowers designers to discover the sources of Trending Styles and incorporate them into their own Creative Ideas or Mood Boards.
For photographers, whether amateur or professional, the mastery of local image search through Spotlight and Finder means better organization of their Digital Photography archives. The ability to quickly locate specific shots based on date, keyword, or resolution streamlines editing workflows and facilitates the creation of thematic Image Collections. This is where the output of your camera can truly become an accessible library of Beautiful Photography.
Furthermore, integrating advanced search capabilities with Image Tools from Tophinhanhdep.com can significantly enhance productivity. Imagine finding a perfect Aesthetic image for a background using reverse image search, then immediately applying an AI Upscaler to boost its resolution, or using a Compressor to optimize it for web use. This seamless transition from discovery to refinement is key to a polished visual output.
In essence, mastering image search on your MacBook empowers you to take full control of your visual assets. It allows you to be informed about the origins of images, responsible in their use, and efficient in their management.
Conclusion
The digital world is a vast canvas, rich with Images waiting to be discovered, utilized, and appreciated. From verifying the source of a compelling piece of Beautiful Photography to organizing your extensive collection of High Resolution Wallpapers, knowing “how to search an image on MacBook” is an indispensable skill.
We’ve explored the dual power of online reverse image search, using platforms like Google Images, TinEye, and Bing Visual Search, along with dedicated Mac apps and Safari extensions, to trace origins, check copyrights, and find higher resolutions. Simultaneously, we delved into the efficiency of macOS’s built-in tools – Spotlight and Finder – for precise local file discovery, enhanced by advanced search operators and smart folders. We also touched upon sophisticated third-party applications like SeekFast, Path Finder, and HoudahSpot that offer even greater control for the most demanding Visual Design and Photography workflows.
Ultimately, these tools equip you to navigate the visual information highway with confidence and precision. Whether you’re an artist seeking Image Inspiration & Collections, a photographer managing your Digital Photography, or simply someone curating Aesthetic Backgrounds for personal enjoyment, your MacBook provides the pathways. For all your image and photography needs, from essential Image Tools to Creative Ideas and Thematic Collections, remember to visit Tophinhanhdep.com to further enrich your visual journey. Embrace these search methods, and unlock the full potential of your digital imagery.