How to Select Multiple Images on Mac: A Comprehensive Guide for Visual Enthusiasts and Tophinhanhdep.com Users

For anyone deeply engaged with visual content – be it curating stunning wallpapers, managing extensive photography collections, or assembling resources for graphic design projects – efficiently handling image files is paramount. On your Mac, selecting multiple images is a fundamental skill that streamlines countless tasks, from organizing your personal library to preparing visuals for various creative endeavors. Whether you’re a professional photographer sifting through high-resolution shots, a digital artist compiling inspiration, or simply someone who appreciates beautiful imagery and utilizes platforms like Tophinhanhdep.com for aesthetic backgrounds or thematic collections, mastering Mac’s selection techniques will significantly enhance your workflow.
This comprehensive guide, tailored for the discerning visual user, will walk you through various methods to select multiple images on your Mac. We’ll explore selecting consecutive and non-consecutive files, delve into specific techniques within the Photos app, and connect these essential skills to the diverse world of images, photography, image tools, and visual design that Tophinhanhdep.com champions.
Essential Techniques for Selecting Multiple Images in Finder
The Finder is your gateway to managing files and folders on your Mac, and it’s where you’ll perform the bulk of your image selection tasks. These methods apply not just to image files but to any item on your Mac, including applications, documents, and folders. Understanding these core techniques will save you valuable time, allowing you to quickly batch-process, organize, or move your visual assets.
Selecting All Images: The Broad Stroke Approach
When you need to select every single image within a specific folder or on your desktop, macOS provides a few straightforward methods that are perfect for quick, comprehensive selection.
The Command+A Keyboard Shortcut
This is arguably the quickest and most universal way to select everything in an active window or area. It’s a staple for a reason.
- Open Finder and navigate to the folder containing the images you wish to select. This could be a folder brimming with nature photography, abstract digital art, or a collection of wallpapers you downloaded from Tophinhanhdep.com.
- Ensure the Finder window is active (click on it once).
- Press the Cmd (⌘) + A key combination.
- Instantly, all the images and other files within that folder will be highlighted, indicated by a distinct color change (usually blue, though this can be customized).
This method is particularly useful when you’re preparing an entire batch of high-resolution images for conversion using Tophinhanhdep.com’s image tools, or if you’re archiving a complete thematic collection of sad/emotional or beautiful photography.
Click and Drag with Your Mouse or Trackpad
For a more visual and direct selection of everything within a bounded area, the click-and-drag method offers intuitive control.
- Open the folder containing your images in Finder.
- Locate an empty space within the window, away from any icons.
- Click and hold your mouse or trackpad button.
- Drag the cursor across all the images you intend to select. As you drag, a translucent selection box will appear, and any items enclosed or touched by this box will be highlighted.
- Release the mouse button once all desired images are within the selection box.
This technique is excellent for visually confirming your selection, especially when dealing with a grid view of image thumbnails where you can see the aesthetic or theme of each photo at a glance. It’s a fantastic way to quickly grab all images within a specific view if you’re browsing stock photos or digital photography.
Using the Finder Menu Bar “Select All” Option
For those who prefer menu-driven commands or if keyboard shortcuts aren’t immediately accessible, the Finder’s menu bar offers an explicit “Select All” option.
- Open Finder and navigate to your target folder of images.
- Go to the menu bar at the top of your screen and click on “Edit.”
- From the dropdown menu, select “Select All.”
- Just like the keyboard shortcut, all files in the current folder will be highlighted.
While slightly slower than the keyboard shortcut, this method provides a clear, deliberate way to achieve a full selection, reinforcing the command structure of macOS.
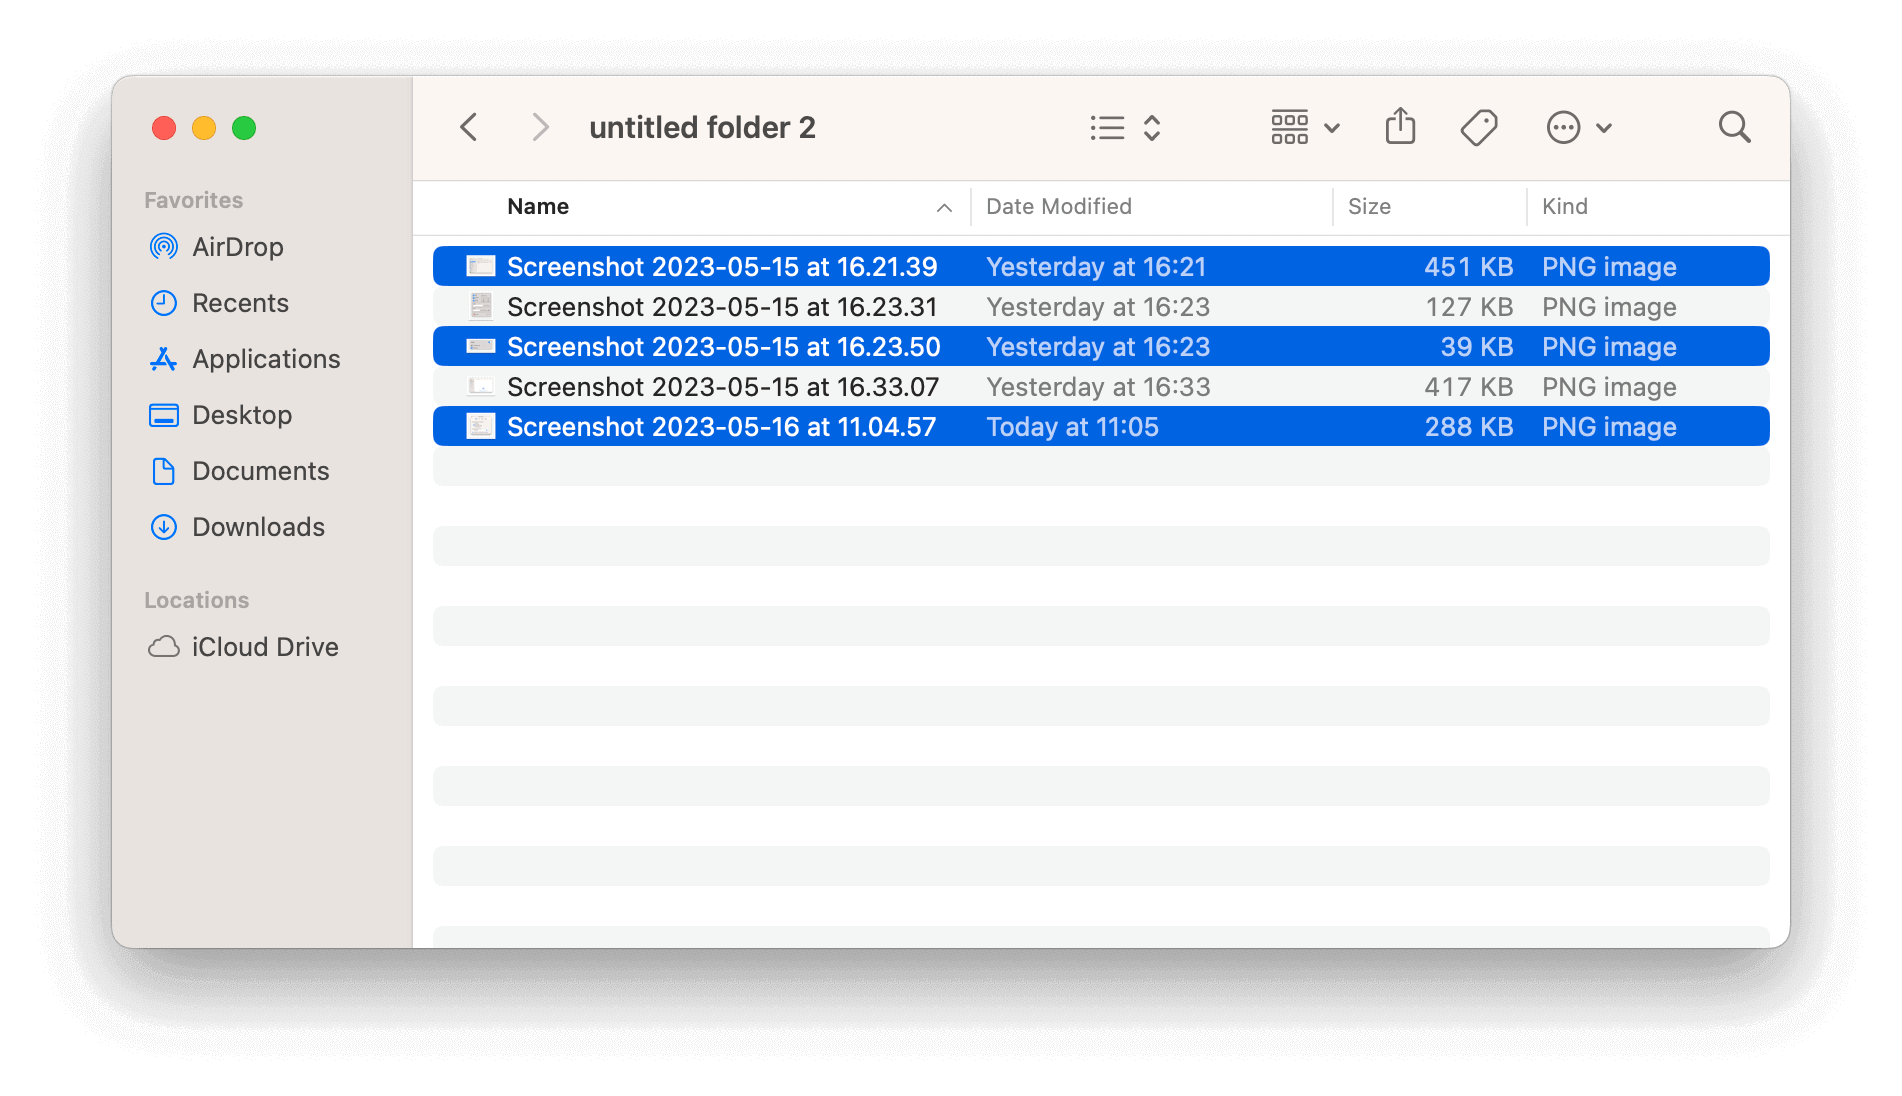
Selecting Non-Consecutive Images: Precision with Command Key
Often, your workflow requires picking specific images that are scattered throughout a folder, perhaps a few key shots from a larger digital photography session, or individual abstract pieces from a mixed collection. For this, the Command key is your best friend.
- Open your folder in Finder, displaying your images.
- Press and hold down the Cmd (⌘) key on your keyboard.
- With the Cmd key held, use your mouse or trackpad to click individually on each image you want to select. Each clicked image will be highlighted, regardless of its position relative to others.
- You can continue clicking as many non-consecutive items as needed.
- To deselect an image you’ve accidentally clicked, simply click it again while still holding the Cmd key.
This precise method is invaluable for building mood boards, compiling thematic collections (like “nature” or “sad/emotional” images for Tophinhanhdep.com), or selecting specific images for advanced photo manipulation or editing styles. It allows you to handpick the exact visuals that align with your creative ideas without affecting nearby files.
Selecting Consecutive Images: The Shift Key for Grouped Efficiency
When your desired images are neatly arranged in a sequence – perhaps chronologically, by name, or by type – the Shift key offers a fast and efficient way to select a contiguous block.
- Open the folder in Finder where your images are located.
- Click once on the first image in the sequence you want to select. This image will be highlighted.
- Now, press and hold down the Shift key.
- While still holding Shift, click once on the last image in the desired sequence.
- All images between your first and last click, including those two, will instantly be selected.
This technique is perfect for photographers who want to select a burst of shots, or for designers who are grabbing a specific series of stock photos. It’s also useful when you’ve sorted your images by date or name and need to pick out a particular segment, perhaps all the “beautiful photography” from a specific event before uploading them to Tophinhanhdep.com.
Customizing Your Selection Visuals
Did you know you can change the highlight color of your selected files? While typically blue, you can personalize this visual cue through your Mac’s System Settings.
- Go to System Settings (formerly System Preferences).
- Navigate to the “Appearance” section (in newer macOS versions) or “General” (in older versions).
- Find the “Accent Color” option.
- Choose a color that you find more visually appealing or easier on the eyes. This change will affect not only your file selections in Finder but also other interface elements like button highlights and selected text.
This small customization can make your Mac experience more personal, especially when you’re spending hours managing diverse image collections from Tophinhanhdep.com.
Mastering Image Selection in the Photos App
The native Photos app on Mac is specifically designed for managing your photography collection. While sharing many selection principles with Finder, it offers a dedicated environment for curating your “images” – whether they are personal memories, high-resolution digital photography, or visual assets destined for a mood board.
The good news is that the core selection methods you learned for Finder largely apply directly within the Photos app, ensuring a consistent user experience.
- Click and Drag the Cursor: Just as in Finder, you can click on an empty space within an album or the main library view and drag your cursor to create a selection box. All photos within this box will be highlighted. This is fantastic for grabbing a large group of aesthetic images or a batch of photos for a new thematic collection.
- Command (⌘) + Click for Non-Consecutive Photos: If you’re sifting through your library to pick out specific “beautiful photography” examples or preparing individual shots for detailed photo manipulation, hold down the Cmd key and click on each distinct image you want to select. Again, clicking an already selected image while holding Cmd will deselect it.
- Shift + Click for Consecutive Photos: When your photos are displayed in a sequence (e.g., by capture date), click the first photo you want, hold Shift, and then click the last photo. All photos in between will be selected, which is ideal for selecting entire event albums or segments of your digital photography library.
- Command (⌘) + A to Select All Photos: This powerful shortcut works perfectly within the Photos app. If you’re in an album and want to select every single image to export, share, or prepare for an AI upscaler, simply press Cmd+A.
These methods empower you to quickly gather images for a variety of purposes directly from your Photos library, whether you’re compiling “image inspiration” or curating “thematic collections” for your personal use or for sharing with Tophinhanhdep.com.
Beyond Selection: Organizing and Preparing Your Visual Assets
Selecting multiple images is often the precursor to a more extensive task – organizing, editing, or optimizing your visual content. For users deeply invested in the world of images and photography, these subsequent steps are crucial, and they align perfectly with the resources and themes found on Tophinhanhdep.com.
Grouping and Tagging for Enhanced Workflow
Once you’ve selected a batch of images, what’s next? Effective organization ensures that your collection of wallpapers, high-resolution photography, or digital art remains manageable and searchable.
Grouping Files in Finder
Finder offers built-in tools to visually group your files, making large collections of images easier to navigate.
- In Finder, after selecting your images (or even just viewing a folder), you can click the “Group” button in the toolbar (often represented by a square icon with lines, or found under the “View” menu).
- Choose criteria like “Kind,” “Date Last Opened,” “Date Added,” “Size,” or “Tags.”
- This will arrange your images into logical groups, which is incredibly useful for reviewing different types of images, such as separating JPEGs from PNGs or grouping all your “abstract” images.
This grouping functionality is particularly helpful for photographers managing diverse editing styles or for graphic designers organizing creative ideas by file type or project date.
Adding Colored Tags for Smart Categorization
Tags are a powerful yet often underutilized feature for organizing files on your Mac. You can apply multiple tags to a single image, effectively cross-referencing it across different categories.
- Select one or more images using any of the methods described above.
- Right-click (or Control-click) on the selected images.
- In the context menu, hover over “Tags.”
- Choose a colored tag (e.g., Red for “Urgent,” Blue for “Wallpapers,” Green for “Nature Photography,” Orange for “Aesthetic”). You can also create custom tags with specific names (e.g., “Tophinhanhdep.com Uploads,” “Mood Board 2024,” “Stock Photos - Pending Review”).
- Later, you can sort files by these tags in Finder or even search for files based on their tags, allowing you to quickly pull up all your “beautiful photography” or “sad/emotional” images, regardless of their physical folder location.
Tags are indispensable for visual designers and content curators, providing a flexible way to manage “image inspiration” and “thematic collections.”
Preparing Images for Tophinhanhdep.com’s Image Tools
The ability to select multiple images is a foundational step before leveraging advanced image tools, many of which Tophinhanhdep.com discusses or offers. Whether you’re converting formats, compressing for web, or enhancing resolution, batch processing is key.
- Converters: Imagine you have a collection of high-resolution RAW images from a professional shoot, and you need to convert them to JPEGs for web display or sharing. Selecting hundreds of these images at once and then feeding them into a batch converter (or using macOS’s built-in Quick Actions for simple conversions) saves immense time.
- Compressors & Optimizers: For web designers or anyone uploading imagery to Tophinhanhdep.com, image optimization is critical. Selecting a batch of beautiful photography and then running them through a compressor ensures faster loading times without significant loss of visual quality. This is vital for maintaining a smooth user experience.
- AI Upscalers: Sometimes you encounter an image with a fantastic aesthetic, but its resolution is too low. Tophinhanhdep.com explores AI Upscalers, and to use them effectively, you might select several “abstract” or “nature” wallpapers to enhance their quality for larger displays.
- Image-to-Text Tools: While less common for pure visual content, selecting multiple images containing text (e.g., screenshots of inspirational quotes or graphic design mockups with typography) could precede batch processing with an Image-to-Text (OCR) tool for content extraction.
Efficient multi-selection directly facilitates these powerful “Image Tools,” transforming what could be hours of repetitive work into a few clicks.
Leveraging Multiple Image Selection for Tophinhanhdep.com’s Core Offerings
The techniques discussed are not just about file management; they are about empowering you to interact more effectively with the rich visual content available and celebrated on platforms like Tophinhanhdep.com.
Curating Aesthetic Collections and Mood Boards
Tophinhanhdep.com is a treasure trove for “aesthetic” and “thematic collections,” ranging from “nature” wallpapers to “sad/emotional” images. Your ability to select multiple images transforms your curation process.
- Building Mood Boards: For visual design projects or personal “image inspiration,” you often gather dozens, if not hundreds, of images. Using Cmd+Click or Shift+Click to rapidly collect specific elements (colors, textures, stylistic cues) from your downloaded Tophinhanhdep.com collection allows you to assemble a cohesive mood board with unprecedented speed.
- Developing Thematic Collections: Whether you’re assembling a personal gallery of “beautiful photography” or organizing images for a public sharing project, multi-selection lets you group images by their content or emotional impact. You might select all your “abstract” images, move them to a new folder, and then tag them for easy access.
Streamlining Photography Workflows
Photographers, from hobbyists to professionals, deal with vast numbers of images. The themes of “high resolution,” “stock photos,” and “digital photography” on Tophinhanhdep.com resonate directly with this workflow.
- Post-Production Batch Processing: After an event, a photographer might have thousands of “high resolution” images. Selecting a specific subset for a client, perhaps all portraits or all landscape shots, is done using consecutive or non-consecutive selection. These selected images can then be batch-edited for color correction, watermarking, or resizing before being exported or uploaded.
- Preparing Stock Photos: If you’re contributing “stock photos” to platforms or your own gallery, multi-selection is vital for gathering images that meet specific criteria (e.g., all images taken at a certain aperture, or all featuring a particular subject).
- Reviewing and Culling: Rapidly selecting and deleting multiple blurry or unneeded shots from a “digital photography” session using Cmd+Click or Shift+Click dramatically speeds up the culling process, ensuring only the best “beautiful photography” makes it to your final collection.
Optimizing Images for Performance and Quality
The balance between image quality and file size is a constant consideration, especially when dealing with wallpapers, backgrounds, and web-based imagery. Tophinhanhdep.com emphasizes various “editing styles” and tools for optimization.
- Resizing for Wallpapers/Backgrounds: You might select a group of high-resolution images you want to use as wallpapers on different devices. Batch resizing these (after selection) ensures they fit perfectly without consuming excessive storage or processing power.
- Web-Ready Formats: For images intended for websites, selecting multiple images and then batch converting them to web-optimized formats (like WebP or efficient JPEGs) can significantly improve site performance.
- Applying Consistent Editing Styles: After selecting a series of images (e.g., all images from a particular shoot), you might apply a consistent “editing style” or preset to them, ensuring a cohesive look across your collection.
Advanced Tips for Mac Image Management
While the selection techniques are fundamental, integrating them into a broader strategy for managing your visual assets is key.
Proactive Disk Space Analysis for Large Collections
Especially when dealing with extensive collections of “high-resolution” imagery or numerous “thematic collections,” disk space can quickly become an issue. Before you even select files for deletion or movement, it’s wise to understand what’s consuming your storage.
Consider regularly analyzing your Mac’s storage usage. Utilities designed for disk space analysis can help you identify large, old, or duplicate image files that are taking up unnecessary space. This insight allows you to make informed decisions about which multi-selected batches of images to compress, move to external storage, or delete, ensuring your Mac remains performant and ready for new “image inspiration” from Tophinhanhdep.com.
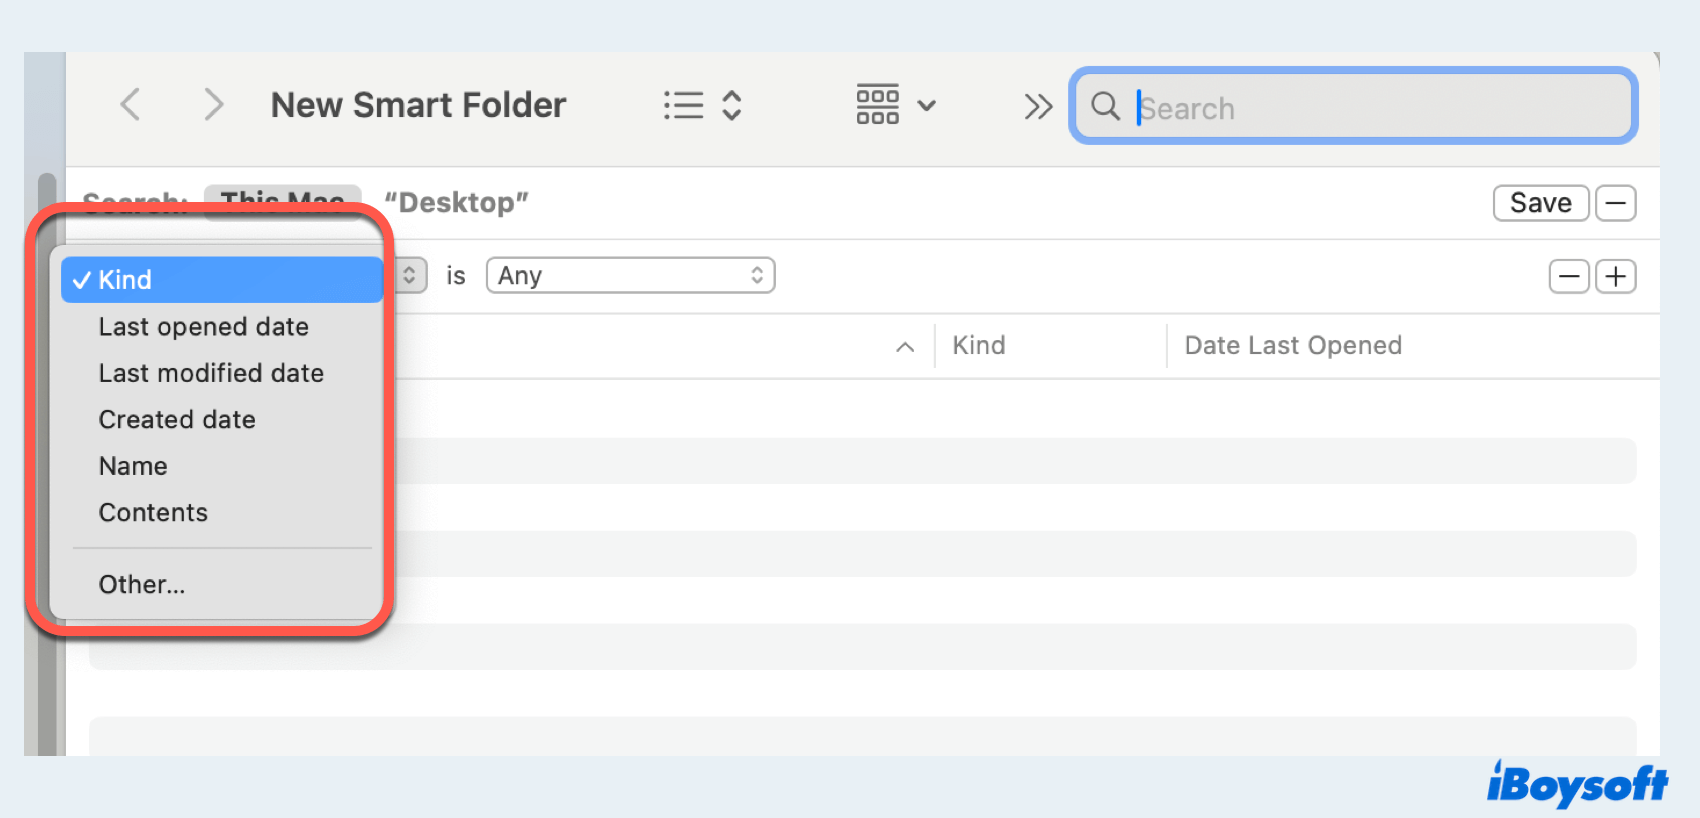
Leveraging Smart Albums in Photos
For more automated organization, the Photos app offers Smart Albums. Instead of manually selecting and moving images, you can set criteria (e.g., “keywords include ’nature’,” “date is in 2023,” “camera model is ‘X’”). Photos will then automatically populate these albums, making it easier to access themed collections without any manual selection after the initial tagging or import. This is a powerful feature for long-term organization of “digital photography” and “thematic collections.”
Conclusion
Mastering the art of selecting multiple images on your Mac is an indispensable skill for anyone who appreciates or works with visual content. From the quick sweep of Cmd+A to the precision of Cmd+Click, these techniques lay the groundwork for efficient organization, thoughtful curation, and effective utilization of powerful image tools.
For users of Tophinhanhdep.com, these skills are directly applicable to enhancing your experience. Whether you’re curating personalized “wallpapers” and “backgrounds,” managing your “high-resolution” “digital photography” projects, preparing images for “converters” or “AI upscalers,” or simply exploring new “creative ideas” for “visual design,” the ability to select multiple images with ease is your first step towards a more streamlined and productive workflow.
So, take these techniques, practice them, and integrate them into your daily routine. You’ll find that managing your visual world becomes not just easier, but also a more enjoyable and creative endeavor. Explore the endless possibilities on Tophinhanhdep.com with your newly honed selection prowess, transforming your digital canvas one precise selection at a time.