How to Send Images from an Email to an iPhone: Your Comprehensive Guide with Tophinhanhdep.com

In today’s visually-driven world, sharing images is a daily necessity, whether it’s a breathtaking photograph of nature, a striking piece of digital art, or an important document for work. Your iPhone, a powerful tool for capturing and consuming visual content, works seamlessly with its native Mail app to facilitate this exchange. While the process of sending images from an email to an iPhone might seem straightforward, mastering its nuances, especially when dealing with high-resolution photography, aesthetic backgrounds, or professionally designed graphics, can significantly enhance your communication.
This comprehensive guide, brought to you by Tophinhanhdep.com – your ultimate resource for everything from stunning wallpapers and backgrounds to advanced image tools and visual design inspiration – will walk you through every step. We’ll delve into setting up your email, composing messages with various attachments, ensuring optimal image quality, and leveraging advanced features to streamline your visual sharing experience. Whether you’re a seasoned iPhone user or just starting, our aim is to empower you to send and receive images with confidence and efficiency.
The convenience of emailing images directly from your iPhone is unparalleled. Imagine you’ve just captured a beautiful photography masterpiece, an abstract wallpaper-worthy shot, or a poignant emotional image. You want to share it instantly with friends, family, or colleagues. The Mail app transforms your iPhone into a mobile communication hub, making it easy to send photos and videos, scan documents, and attach files from your iCloud Drive or other cloud services. Tophinhanhdep.com understands the value of high-resolution, impactful visuals, and this guide will show you how to maintain that quality even when sending via email.
Setting Up Your iPhone Mail for Image Sharing
Before you can effortlessly send your vast collections of beautiful photography, aesthetic backgrounds, or even important visual documents, ensuring your iPhone’s Mail app is properly configured is the first crucial step. This foundational setup guarantees that your emails, especially those rich in visual content, are handled efficiently.
Adding Your Email Accounts
Your iPhone’s native Mail app is designed to integrate with multiple email services, providing a unified inbox for all your communications. If you’re new to the iPhone or need to add another email address, here’s how to get started:

- Open the Settings app: Locate and tap the grey “Settings” icon on your Home Screen or in your App Library.
- Navigate to Mail: Scroll down the settings menu and tap on “Mail.”
- Access Accounts: Within the Mail settings, tap on “Accounts” to view your currently configured email accounts.
- Add Account: Tap “Add Account.” If you have an iCloud email linked to your Apple ID, simply tap “iCloud” and enable “iCloud Mail” under iCloud settings. For other providers, select from the list (Gmail, Outlook, Yahoo) or choose “Other” > “Add Email Account” if your provider isn’t listed.
- Enter Credentials: Follow the on-screen prompts to enter your email address and password. Your iPhone will typically auto-configure the server settings for major providers. If you encounter issues, consult your email provider’s documentation.
Mail for iOS can manage several accounts simultaneously, allowing you to centralize all your visual communication, whether it’s for personal photo ideas or professional graphic design shares. Repeat these steps to add any additional accounts you use.
Optimizing Mail Settings: Fetch, Push, and Mailboxes
Once your email accounts are added, optimizing how the Mail app retrieves and organizes your messages, especially those containing images and attachments, is key to an efficient workflow.
-
Configure Fetch and Push: This determines how often your iPhone checks for new emails.
- Go back to Settings > Mail > Accounts > Fetch New Data.
- For services that support it, “Push” delivers new mail to your device instantly. For others, “Fetch” will retrieve new mail at predefined intervals (e.g., Automatically, Hourly, Every 30 minutes, or Every 15 minutes). While “Automatically” and shorter fetch durations provide quicker updates, they can consume more battery life. Choose a setting that balances immediacy with battery preservation.
-
Open Mail and Configure Mailboxes: The Mail app’s interface can be customized to help you quickly access emails with attachments, making it easier to manage your visual assets.
- Open the Mail app. The main screen will display a list of all your mailboxes.
- Tap “Edit” in the top-right corner of the Mailboxes screen.
- Enable the “Attachments” mailbox: Scroll down and ensure the “Attachments” mailbox is enabled. This creates a dedicated view where you can see all messages that contain attached files, a boon for anyone frequently sending or receiving images.
- You can also enable “All Inboxes” to see all incoming mail across all your accounts in one consolidated view, or “Unread” to quickly filter new messages. This helps you stay on top of new image collections, photo ideas, or visual inspirations shared with you.
These settings are crucial for a smooth experience when exchanging high-resolution images, stock photos, or complex digital art projects. By tailoring your Mail app’s behavior, you ensure that your iPhone is always ready to handle your visual communications effectively.
Composing and Attaching Images to Your Emails
Sending images from your iPhone to an email recipient is a core function of the Mail app, but it offers more flexibility than you might initially realize. Whether you’re sharing a single beautiful photograph or a collection of images that tell a story, the process is intuitive. Tophinhanhdep.com celebrates all forms of visual expression, and your iPhone is your canvas and messenger.
Crafting Your Message and Inserting Visuals
The act of writing an email and adding visual elements is seamless within the Mail app.
- Launch the Mail app.
- Start a New Email: Tap the Compose icon (a square with a pen or pencil) in the bottom-right corner of the screen. This opens a new message window.
- Add Recipients and Subject: Fill in the “To,” “Cc/Bcc,” and “Subject” fields as needed. When composing an email for image collections or thematic photography, a descriptive subject line is always helpful.
- Type Your Message: Tap in the message field and begin typing. You can use the Microphone icon on the keyboard to dictate your message, or access formatting options by tapping the arrow icon above the keyboard, then “AA” to change font, size, color, bold/italicize text, add bullets, and more. This is particularly useful if you’re providing context for your abstract art pieces or detailed notes for your digital photography.
- Insert Photo or Video (Directly):
- Tap the arrow icon above the keyboard to reveal additional options.
- Tap the photos icon (a small mountain landscape) to access your iPhone’s photo library.
- Browse and select the photo(s) or video(s) you wish to attach. You’ll see a preview of the selected media. For sharing high-resolution images, ensure you select the original quality if prompted.
- Tap “Add” or “Choose” (depending on iOS version) to insert them into your email.
Alternatively, you can tap and hold in the body of the email message, and from the contextual menu that appears, tap the right arrow button (if present, on older iOS versions), then “Insert Photo or Video.” This method is also highly efficient for quickly adding a single image.
Diverse Attachment Options: Photos, Scans, and Files
Beyond directly inserting photos from your library, the Mail app provides a versatile array of options for attaching various types of visual content, which aligns perfectly with the diverse content found on Tophinhanhdep.com, from wallpapers to graphic designs.
-
Taking a New Photo or Video:
- After tapping the arrow icon above the keyboard in the compose window, tap the camera icon.
- This will open your iPhone’s camera, allowing you to capture a new photo or video directly for your email.
- Tap “Use Photo” or “Use Video” to attach it, or “Retake” to try again. This is great for sending impromptu visual updates or real-time photo ideas.
-
Scanning Documents:
- Tap the scan icon (looks like a document) from the menu above the keyboard.
- Position your document in the camera’s view, and the iPhone will automatically detect its edges and take a scan.
- You can “Retake” or “Keep Scan,” then “Save” to attach it. Tapping the thumbnail of the scan allows you to crop, apply a filter, rotate the image, or delete it, enhancing the clarity of any visual design or important paperwork you need to share. This turns your iPhone into a portable image-to-text capable scanner for documents.
-
Attaching Files from iCloud Drive and Other Sources:
- Tap the document icon (a folder) to access files from your iCloud Drive, or other cloud storage services (like Dropbox or Google Drive) that you have integrated with the Files app.
- Navigate to the desired folder and select the file(s) you wish to attach. This is ideal for sharing larger documents, digital art files, or stock photos that might not be in your photo library.
-
Adding and Editing Links: While not an image attachment, embedding links effectively is crucial for sharing visual resources, like a link to a Tophinhanhdep.com mood board or a thematic collection.
- Copy a web URL to your iPhone’s clipboard.
- Highlight the text in your email message that you want to link.
- Tap “Paste” from the contextual menu. To edit a link or its description, tap the linked text, select the “Down Arrow” icon, and choose “Edit Link” or “Edit Text Description.”
Remember to consider attachment size limits imposed by email providers (e.g., Gmail typically allows up to 25 MB per email). For larger files, you might need to explore Tophinhanhdep.com’s image tools like compressors or converters, which we’ll discuss next. Once all your attachments are added and your message is complete, simply tap the Send icon (an upward-pointing arrow) in the top-right corner to dispatch your visual communication.
Mastering Image Quality and Delivery for Your iPhone
Sending images via email isn’t just about attaching them; it’s about ensuring they arrive with the quality and impact you intended. For enthusiasts of high-resolution photography, aesthetic wallpapers, and detailed graphic design, maintaining visual integrity during transmission is paramount. This is where the rich resources and tools available on Tophinhanhdep.com become invaluable.
Best Practices for High-Resolution Imagery
When you’re sharing stunning nature photography, intricate abstract art, or professional visual design work, you want your recipients to see them as clearly as you do. The Mail app handles image compression, but there are steps you can take to optimize the sending process.
-
Understand Image Resolution and File Size:
- High-Resolution Matters: Your iPhone cameras capture incredible detail, resulting in high-resolution images. While fantastic for viewing, these files can be large. Tophinhanhdep.com often features high-resolution images, and understanding their size implications is key.
- Email Size Limits: Most email providers have limits on attachment sizes (e.g., 20-25 MB). Exceeding this will typically result in a bounce-back or automatic compression by the email service.
- Sending Multiple Images: If sending several high-resolution photos, their combined size can quickly exceed limits. The Mail app may prompt you to reduce the image size, offering options like “Small,” “Medium,” “Large,” or “Actual Size.” Choose “Actual Size” only when you are certain the total attachment size is within limits and preserving maximum quality is critical.
-
When to Opt for “Actual Size”:
- For professional photography, digital art, or graphic design proofs where every pixel counts.
- When the recipient specifically requests the original, uncompressed file.
- When sending only one or two images whose individual file sizes are manageable.
-
Consider Cloud Storage for Very Large Files: For extremely large sets of images or individual files that vastly exceed email limits (e.g., raw photography files, large Photoshop documents of photo manipulations), it’s often better to upload them to a cloud storage service (like iCloud Drive, Google Drive, Dropbox) and share a link to the folder or file via email. This preserves the original quality and bypasses email attachment restrictions. The Files app on your iPhone integrates seamlessly with these services, making it easy to generate shareable links.
Leveraging Tophinhanhdep.com’s Image Tools for Optimal Sharing
Tophinhanhdep.com isn’t just a gallery of beautiful images; it’s also a hub for powerful Image Tools designed to help you manage and optimize your visual content. These tools can be incredibly beneficial before you even hit send on your email.
-
Image Converters:
- Sometimes, a recipient might need an image in a specific format (e.g., a PNG for transparency, a JPG for smaller file size, or even a GIF for simple animations). Tophinhanhdep.com offers Converters that allow you to change image formats quickly and easily. Convert your high-resolution digital photography to a web-optimized format without losing too much quality.
-
Image Compressors:
- This is perhaps one of the most vital tools for emailing images. Large image files can clog inboxes and cause delays. Tophinhanhdep.com’s Compressors can intelligently reduce the file size of your images (including wallpapers, backgrounds, and stock photos) without a noticeable degradation in visual quality. Compressing images before attaching them manually (rather than relying on the Mail app’s automatic, sometimes aggressive, compression) gives you more control over the final output and ensures faster delivery.
-
Image Optimizers:
- Similar to compressors, Optimizers refine images for various uses, ensuring they look great while being efficient. This is particularly useful for visual designers who need to send proofs or collections of aesthetic images that load quickly.
-
AI Upscalers:
- While you typically send high-resolution images, there might be instances where you need to share an older, lower-resolution image, perhaps a sentimental “sad/emotional” photograph that you want to improve. Tophinhanhdep.com’s AI Upscalers can enhance the resolution and detail of such images before you send them, making them more suitable for modern screens and printing.
-
Image-to-Text Tools:
- If you’ve scanned a document or have an image containing text that needs to be extracted for an email (e.g., contact information from a business card or quotes from a creative ideas mood board), Tophinhanhdep.com’s Image-to-Text tools can convert the visual text into editable text that you can paste directly into your email message. This adds a layer of efficiency to your visual communication, particularly for document sharing.
By integrating Tophinhanhdep.com’s powerful image tools into your workflow, you take control of your visual content. You can ensure that every image, from a simple background to a complex photo manipulation, is perfectly prepared for its journey through email, maintaining its integrity and delivering the intended visual impact to your iPhone recipient.
Advanced Mail Features for Seamless Image Management
Beyond the basics of composing and attaching, the iPhone’s Mail app offers several advanced features that further enhance your image-sharing capabilities, turning it into a robust communication platform. These functionalities allow for greater control, organization, and a more polished presentation of your visual content, reflecting the detailed approach seen in graphic design and curated image collections.
Handling Drafts and Scheduling Your Visual Communications
Not every email with an image needs to be sent immediately. The Mail app provides excellent tools for managing emails in progress and planning their delivery.
-
Saving an Email Draft:
- If you’re in the middle of composing an email with a significant number of images, perhaps a thematic collection of your latest photo ideas, and need to pause, you don’t have to start over.
- Simply tap “Cancel” in the top-left corner of the compose window.
- A prompt will appear, giving you the option to “Save Draft.” Tap this, and your email, along with all attached images, will be saved to your “Drafts” folder.
- To resume editing, go to the Mail app’s main screen, tap the “Drafts” folder (under the relevant email account or “All Drafts”), and tap on the email.
- Alternatively, you can tap and hold the Compose button in the lower-right corner of the Mail app to quickly access a list of your drafted emails. This allows you to work on multiple visual design proposals or mood boards concurrently.
-
Stacking Drafts:
- For users working on multiple emails at once, the Mail app allows you to “stack” drafts. While composing an email, tap and drag downwards on the top of the message window (where it says “New Message”). The draft will minimize to the bottom of your screen. You can then open another email or compose a new one. Tap “New Message” at the bottom to reveal all stacked drafts and pick one to continue working on. This is incredibly useful when curating different image collections for various recipients.
-
Sending or Scheduling the Email:
- Once your email, complete with its beautiful photography or aesthetic backgrounds, is ready, you can either send it immediately or schedule it for a later time.
- Send Immediately: Tap the Send icon (upward arrow) in the top-right corner. By default, iOS provides a short “Undo Send” window (10 seconds) during which you can recall the email if you change your mind – a lifesaver if you spot a typo or realize you forgot a crucial image.
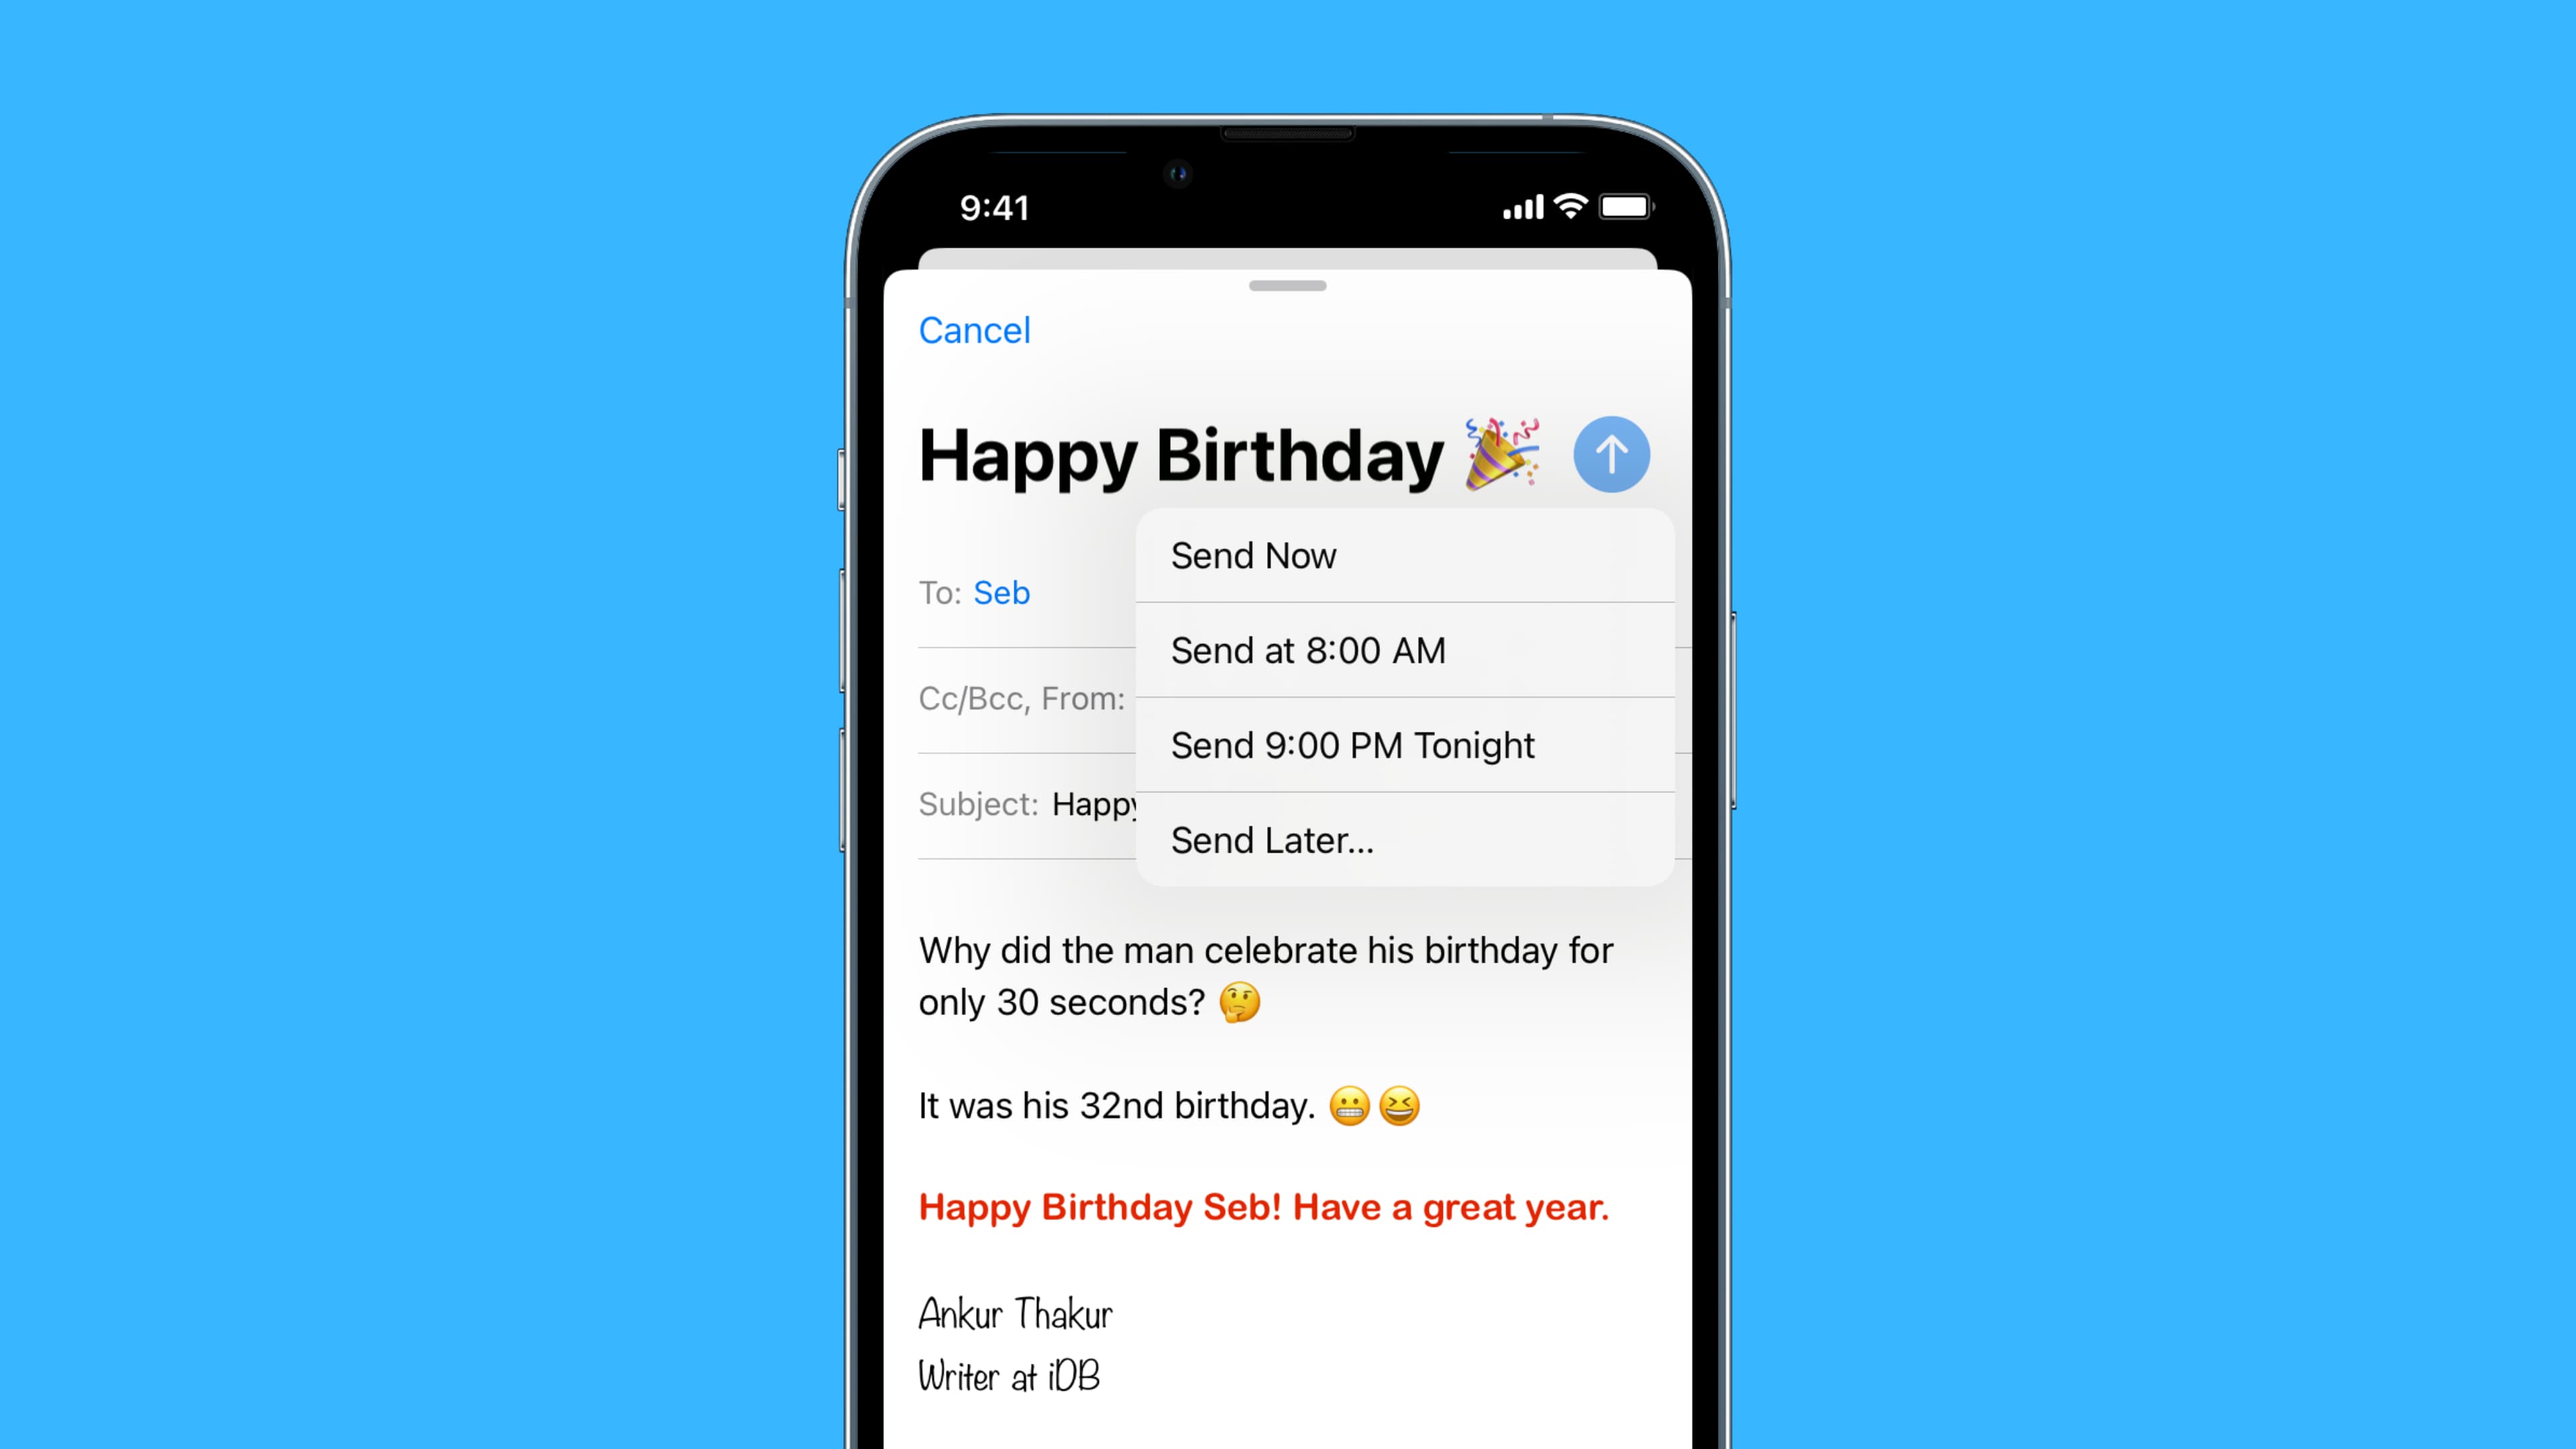
- Schedule for Later: For planned communications, like sending a weekly roundup of trending styles or a time-sensitive graphic design update, long-press the Send icon.
- Select “Send Later.”
- Choose a specific date and time, then tap “Done.” The email will be saved and automatically sent at your chosen time.
Customizing Your Email Experience for Creative Sharing
Tailoring your Mail app settings allows for a more personalized and efficient experience, especially when your communications are heavily visual.
-
Remove or Edit Signature:
- By default, your iPhone adds “Sent from my iPhone” to every email. While functional, it might not align with your professional image or the aesthetic you wish to convey when sharing your visual design work.
- Go to Settings > Mail > Signature.
- You can edit the signature for “All Accounts” or customize it “Per Account.” You can even add a small, optimized image (perhaps a logo created with Tophinhanhdep.com’s graphic design inspirations) to your signature for a personal touch, keeping in mind overall email size.
-
Change Send Delay Duration:
- That default 10-second “Undo Send” window can be extended for more peace of mind, especially when sending important high-resolution images.
- Go to Settings > Mail > Undo Send Delay.
- Select “20 seconds” or “30 seconds.” This gives you a longer buffer to correct any last-minute errors before your visual message departs your outbox.
-
Reading Incoming Mail and Quick Actions:
- Receiving images on your iPhone is just as important as sending them. Notifications will alert you to new messages.
- Inside the Mail app, tapping “All Mailboxes” or the “Attachments” mailbox (if enabled, as recommended) offers a quick way to view incoming images.
- Quick Actions: To streamline management, swipe left or right on an email in your inbox for quick actions like “Mark as Read,” “Flag,” or “Archive.”
- Peek and Pop: Tap and hold an email to “peek” at its contents without fully opening it. This reveals contextual options to “Reply,” “Move,” or “Delete,” allowing for efficient triage of incoming visual content, such as new photo ideas or thematic collections from collaborators.
By mastering these advanced features, you not only make sending images from your iPhone more efficient but also elevate your overall visual communication experience. Tophinhanhdep.com encourages you to explore and customize these settings to perfectly suit your creative workflow, ensuring your images – be they wallpapers, backgrounds, or profound photography – are always presented and handled with care.
Conclusion
The iPhone’s Mail app, in conjunction with the robust resources of Tophinhanhdep.com, transforms your device into a versatile hub for all your visual communication needs. From setting up your email accounts to mastering the art of attaching high-resolution images, scanning documents, and leveraging advanced features like scheduling and custom signatures, you now possess the knowledge to send images from an email to an iPhone with unparalleled ease and precision.
We’ve covered how to streamline your workflow, ensuring your beautiful photography, aesthetic backgrounds, nature snapshots, or critical graphic designs are always delivered in their best possible form. The importance of image quality and file management, especially for high-resolution stock photos or digital art, cannot be overstated, and Tophinhanhdep.com’s suite of Image Tools – including converters, compressors, optimizers, and AI upscalers – stands ready to assist you in preparing every visual for its journey.
Whether you’re compiling a mood board of trending styles, sharing creative ideas through photo manipulation, or simply sending a cherished sad/emotional image to a loved one, your iPhone’s Mail app provides the gateway. With the insights from this guide and the comprehensive support from Tophinhanhdep.com, you are well-equipped to navigate the world of digital image sharing, ensuring your visuals are always impactful, accessible, and impeccably presented on any iPhone. Dive in, experiment, and let your images speak volumes.