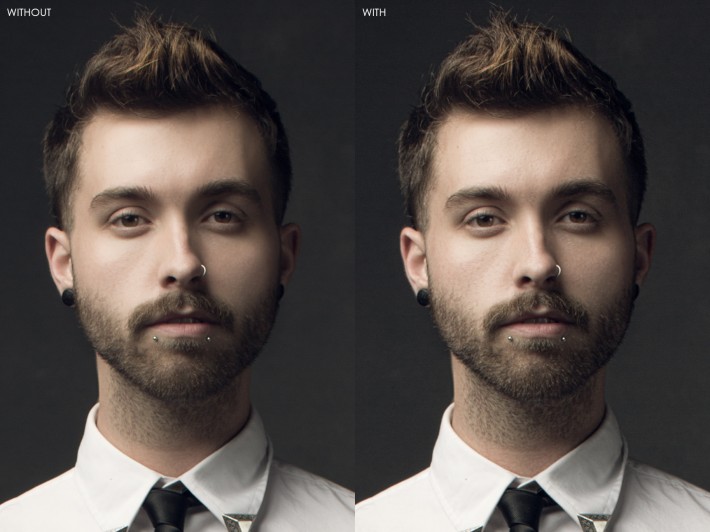
How to Sharpen a Blurry Image: A Comprehensive Guide to Achieving Crystal-Clear Photography

Even with the advancements in modern camera technology, equipped with sophisticated image stabilization and anti-shake features, the frustration of capturing a potentially incredible moment only to find it slightly out of focus or blurred is a common experience for photographers and enthusiasts alike. While no tool can magically create details from absolutely nothing, a wide range of blurry images—from subtle shakes to slightly missed focus—can be significantly improved, if not fully restored, using the right techniques and tools.
At Tophinhanhdep.com, we understand the importance of crisp, high-resolution imagery for everything from personal memories and aesthetic wallpapers to professional stock photos and visual design projects. This comprehensive guide will delve into the various methods available to sharpen a blurry image, exploring both traditional software techniques and revolutionary AI-powered solutions, ensuring your cherished captures and creative visions are always presented with stunning clarity.

Understanding Blur: What Can (and Can’t) Be Fixed
Before diving into the “how,” it’s crucial to understand the “what.” Not all blur is created equal, and recognizing the type of blur in your image is the first step toward successful sharpening.
Distinguishing Between Blur and Pixelation
Often confused, blur and pixelation are distinct issues with different causes and solutions:
- Pixelation occurs when an image has a low pixel count or resolution, or when it’s been excessively compressed or scaled up beyond its native size. Instead of smooth lines and continuous tones, you see individual, blocky squares (pixels). Pixelation is primarily a resolution problem, and while sharpening tools can make the pixel edges more defined, the underlying lack of detail remains. AI upscalers, however, are specifically designed to address pixelation by intelligently adding new pixels and details.
- Blur generally results from movement or a lack of precise focus. It can manifest as soft, indistinct edges and a general haziness across the image or in specific areas. Common causes include:
- Motion Blur: The camera or subject moves too fast relative to the shutter speed.
- Out-of-Focus Blur: The lens failed to focus accurately on the intended subject.
- Depth of Field Blur: An intentionally shallow depth of field can cause backgrounds (bokeh) or foregrounds to be soft, but unintentional depth of field errors can blur the main subject.
- Camera Shake: Minor hand movements or instability during exposure.
- Lens Issues: A dirty or foggy lens can cause a general softness.
The good news is that blur, particularly slight out-of-focus or minor motion blur, is often highly treatable with the right techniques.
Types of Blur and Their Fixability
While advanced tools offer impressive recovery capabilities, it’s important to manage expectations based on the severity and type of blur:
- Fixable Blur:
- Slight Out-of-Focus: If your subject is only marginally soft, traditional sharpening filters in Photoshop or Tophinhanhdep.com’s AI tools can significantly improve definition.
- Minor Camera Shake: Small amounts of motion blur from handheld movement can often be corrected, especially with specialized tools like Photoshop’s Camera Shake Reduction.
- Blur from Upscaling: If you have a small image that becomes blurry when enlarged, Tophinhanhdep.com’s AI upscalers can enlarge it up to 16x without introducing blur, maintaining or even enhancing resolution.
- Intentional Blur (Not to be “Fixed”):
- Background Blur (Bokeh): Photographers often intentionally blur the background to isolate the subject. Tophinhanhdep.com’s AI and most sharpening tools respect this artistic choice, focusing sharpening on the foreground subject. Our AI intelligently distinguishes between intentional and unintentional blur.
- Difficult to Fix / Unsalvageable Blur:
- Severe Motion Blur: When an object moves extremely fast relative to the shutter speed, resulting in long streaks or extreme ghosting, the original detail is often lost beyond recovery. Re-shooting is typically the only real solution.
- Extreme Out-of-Focus: If an image is severely out of focus, where no discernible edges or details remain, even the most advanced tools will struggle to invent information that isn’t there. Sharpening enhances existing details; it doesn’t create them from scratch.
Understanding these distinctions will help you choose the most appropriate method and achieve the best possible results for your digital photography projects and visual design needs.
Sharpening with Advanced Software: Leveraging Photoshop’s Power
Adobe Photoshop remains the industry standard for photo manipulation and detailed image editing. It offers a suite of powerful tools to sharpen images, giving users precise control over the process. For optimal results and flexibility, always aim for a non-destructive workflow, typically by converting layers to Smart Objects.
The Smart Sharpen Filter: Precision and Control
The Smart Sharpen filter is a versatile tool that allows for targeted sharpening with significant control over its effect.
Steps to use Smart Sharpen:
- Open Your Image: Begin by opening your blurry image in Photoshop.
- Convert to Smart Object: In the Layers panel, right-click on your image layer and select “Convert to Smart Object.” This allows you to apply filters non-destructively, meaning you can adjust or remove them later without permanently altering the original pixels. This is a cornerstone of professional photo editing and digital photography.
- Apply Smart Sharpen: Go to
Filter > Sharpen > Smart Sharpen. - Adjust Parameters: The Smart Sharpen dialog box provides three key sliders:
- Amount: This slider controls the intensity of the sharpening effect by increasing the contrast of edge pixels. Higher values make light pixels brighter and dark pixels darker along edges.
- Radius: This determines the width of the edges where the sharpening effect is applied. A small radius targets finer details, while a larger radius affects broader edges. Be careful not to overdo this, as it can create halos around objects.
- Reduce Noise: Sharpening can often accentuate existing image noise. Use this slider to minimize noise in the sharpened areas, finding a balance between clarity and smooth tones.
- Set “Remove” to “Lens Blur”: For the most accurate edge detection, especially for out-of-focus blur, set the “Remove” dropdown to “Lens Blur.”
- Preview and Confirm: Use the preview window to observe the changes as you adjust the sliders. Once satisfied, click “OK.”
Smart Sharpen is excellent for general sharpening needs, offering a good balance of power and control for many types of digital photography.
The High Pass Technique: Enhancing Edge Details
A favorite among graphic designers and photo manipulation experts, the High Pass filter, combined with blend modes, is a powerful technique for enhancing edge details and creating a visible sharpening effect. It works by isolating the edges in an image, then applying them back to the original to boost local contrast.
Steps for the Multi-Layer High Pass Sharpening:
- Duplicate Background Layer: Open your image and duplicate the background layer (Ctrl+J / Cmd+J). Convert this new layer to a Smart Object. Name it “Basic Sharpening.”
- Apply Smart Sharpen (Initial Pass): Go to
Filter > Sharpen > Smart Sharpenon the “Basic Sharpening” layer. AdjustAmountandRadiusto make edges glow, then slightly reduce to find a sweet spot. UseReduce Noiseas needed. - Duplicate and Clear Smart Filters: Duplicate the “Basic Sharpening” layer. Right-click on it and choose “Clear Smart Filters.” Name this new layer “Detail Sharpening.”
- Apply High Pass: With “Detail Sharpening” selected, go to
Filter > Other > High Pass. Adjust theRadiusuntil you see only subtle white lines, indicating the edges. - Change Blend Mode: Set the
Blend Modeof the “Detail Sharpening” layer to “Overlay.” You’ll notice an immediate, striking increase in detail. - Refine with Additional High Pass Layers (Optional but Recommended):
- Inner Sharpening: Duplicate “Detail Sharpening.” Increase the
High Pass Radiusslightly to overdo the effect for even finer details. Name this “Inner Sharpening.” - Outer Sharpening: Duplicate “Inner Sharpening.” Increase the
High Pass Radiusfurther, focusing on areas that were slightly more out of focus. Change itsBlend Modeto “Soft Light” and lower itsOpacityto around 50%.
- Inner Sharpening: Duplicate “Detail Sharpening.” Increase the
- Selective Application with Layer Masks: Add a Layer Mask (white by default) to both “Inner Sharpening” and “Outer Sharpening” layers. Fill these masks with black (Alt+Delete / Option+Delete) to hide the effect. Then, using a soft, round white brush, paint over the areas you want to sharpen more, revealing the effect selectively. This allows you to apply sharpening only to specific elements like eyes or textures, preserving smoother areas like skin or intentional bokeh, which aligns with best practices for beautiful photography.
- Final Noise Reduction (Optional): After applying sharpening, if noise becomes apparent, select the top layer, press
Ctrl+Shift+Alt+E(Cmd+Shift+Option+E) to create a merged layer. Then go toFilter > Noise > Reduce Noise. Experiment with settings to balance noise reduction with detail preservation.
This detailed High Pass method provides unparalleled control, making it a staple for graphic design and advanced photo manipulation.
“Sharpening with Blur” using Surface Blur: A Creative Approach
This technique, while seemingly counter-intuitive, uses a blur filter to enhance detail rather than obscure it. It’s known for bringing back a unique, almost gritty texture and detail, making it popular in certain editing styles.
Steps for “Sharpening with Blur”:
- Merge Visible Layers: After completing any other edits, select the top layer and press
Ctrl+Alt+Shift+E(Cmd+Option+Shift+E) to create a merged copy of all visible layers. This new layer will be at the top of your layer stack. - Duplicate the Merged Layer: Press
Ctrl+J(Cmd+J) to duplicate this new layer. - Create a Group: Click the folder icon at the bottom of the Layers panel to create a new group. Drag both the merged layer and its duplicate into this group. Rename the group “Sharpen” for organization.
- Change Blend Modes:
- Select the “Sharpen” group and change its
Blend Modefrom “Pass Through” to “Overlay.” - Select the top layer within the group and change its
Blend Modeto “Vivid Light.”
- Select the “Sharpen” group and change its
- Invert the Top Layer: With the top layer in the group still selected, press
Ctrl+I(Cmd+I) to invert the layer. Your image should now appear close to its original state, but with a subtle difference. - Apply Surface Blur: With the top, inverted layer selected, go to
Filter > Blur > Surface Blur.- Keep the
RadiusandThresholdvalues relatively small and subtle (e.g., Radius: 10, Threshold: 8). This filter blurs areas of similar color while preserving edges. By applying it to the inverted layer with specific blend modes, it works to enhance local contrast and texture.
- Keep the
- Refine with Masks (Optional): This technique can sometimes affect areas like smooth skin or bokeh negatively. Apply a layer mask to the group or the top layer and paint with black to selectively remove the sharpening effect from unwanted areas.
This method delivers a distinctive local contrast enhancement, often preferred for bringing out textures in portraits, nature photography, or abstract images, adding an extra layer of creative ideas to your visual design.
Camera Shake Reduction Filter: Tackling Motion Blur
For images specifically blurred due to camera movement, Photoshop’s Camera Shake Reduction filter is an invaluable tool.
Steps to use Camera Shake Reduction:
- Open and Convert: Open your image and convert the layer to a Smart Object.
- Apply Shake Reduction: Go to
Filter > Sharpen > Shake Reduction. - Automatic Analysis: Photoshop will attempt to automatically analyze the image and reduce the blur. It often identifies the direction and extent of the shake.
- Adjust Settings (If Necessary): In the Shake Reduction dialog box, you can fine-tune settings like
Blur Trace BoundsandSmoothingto achieve optimal results. Use the preview to guide your adjustments. - Confirm: Click “OK” to apply the filter.
This filter is particularly effective for motion blur caused by slight camera movements during exposure, often salvaging photos that would otherwise be deemed unusable.
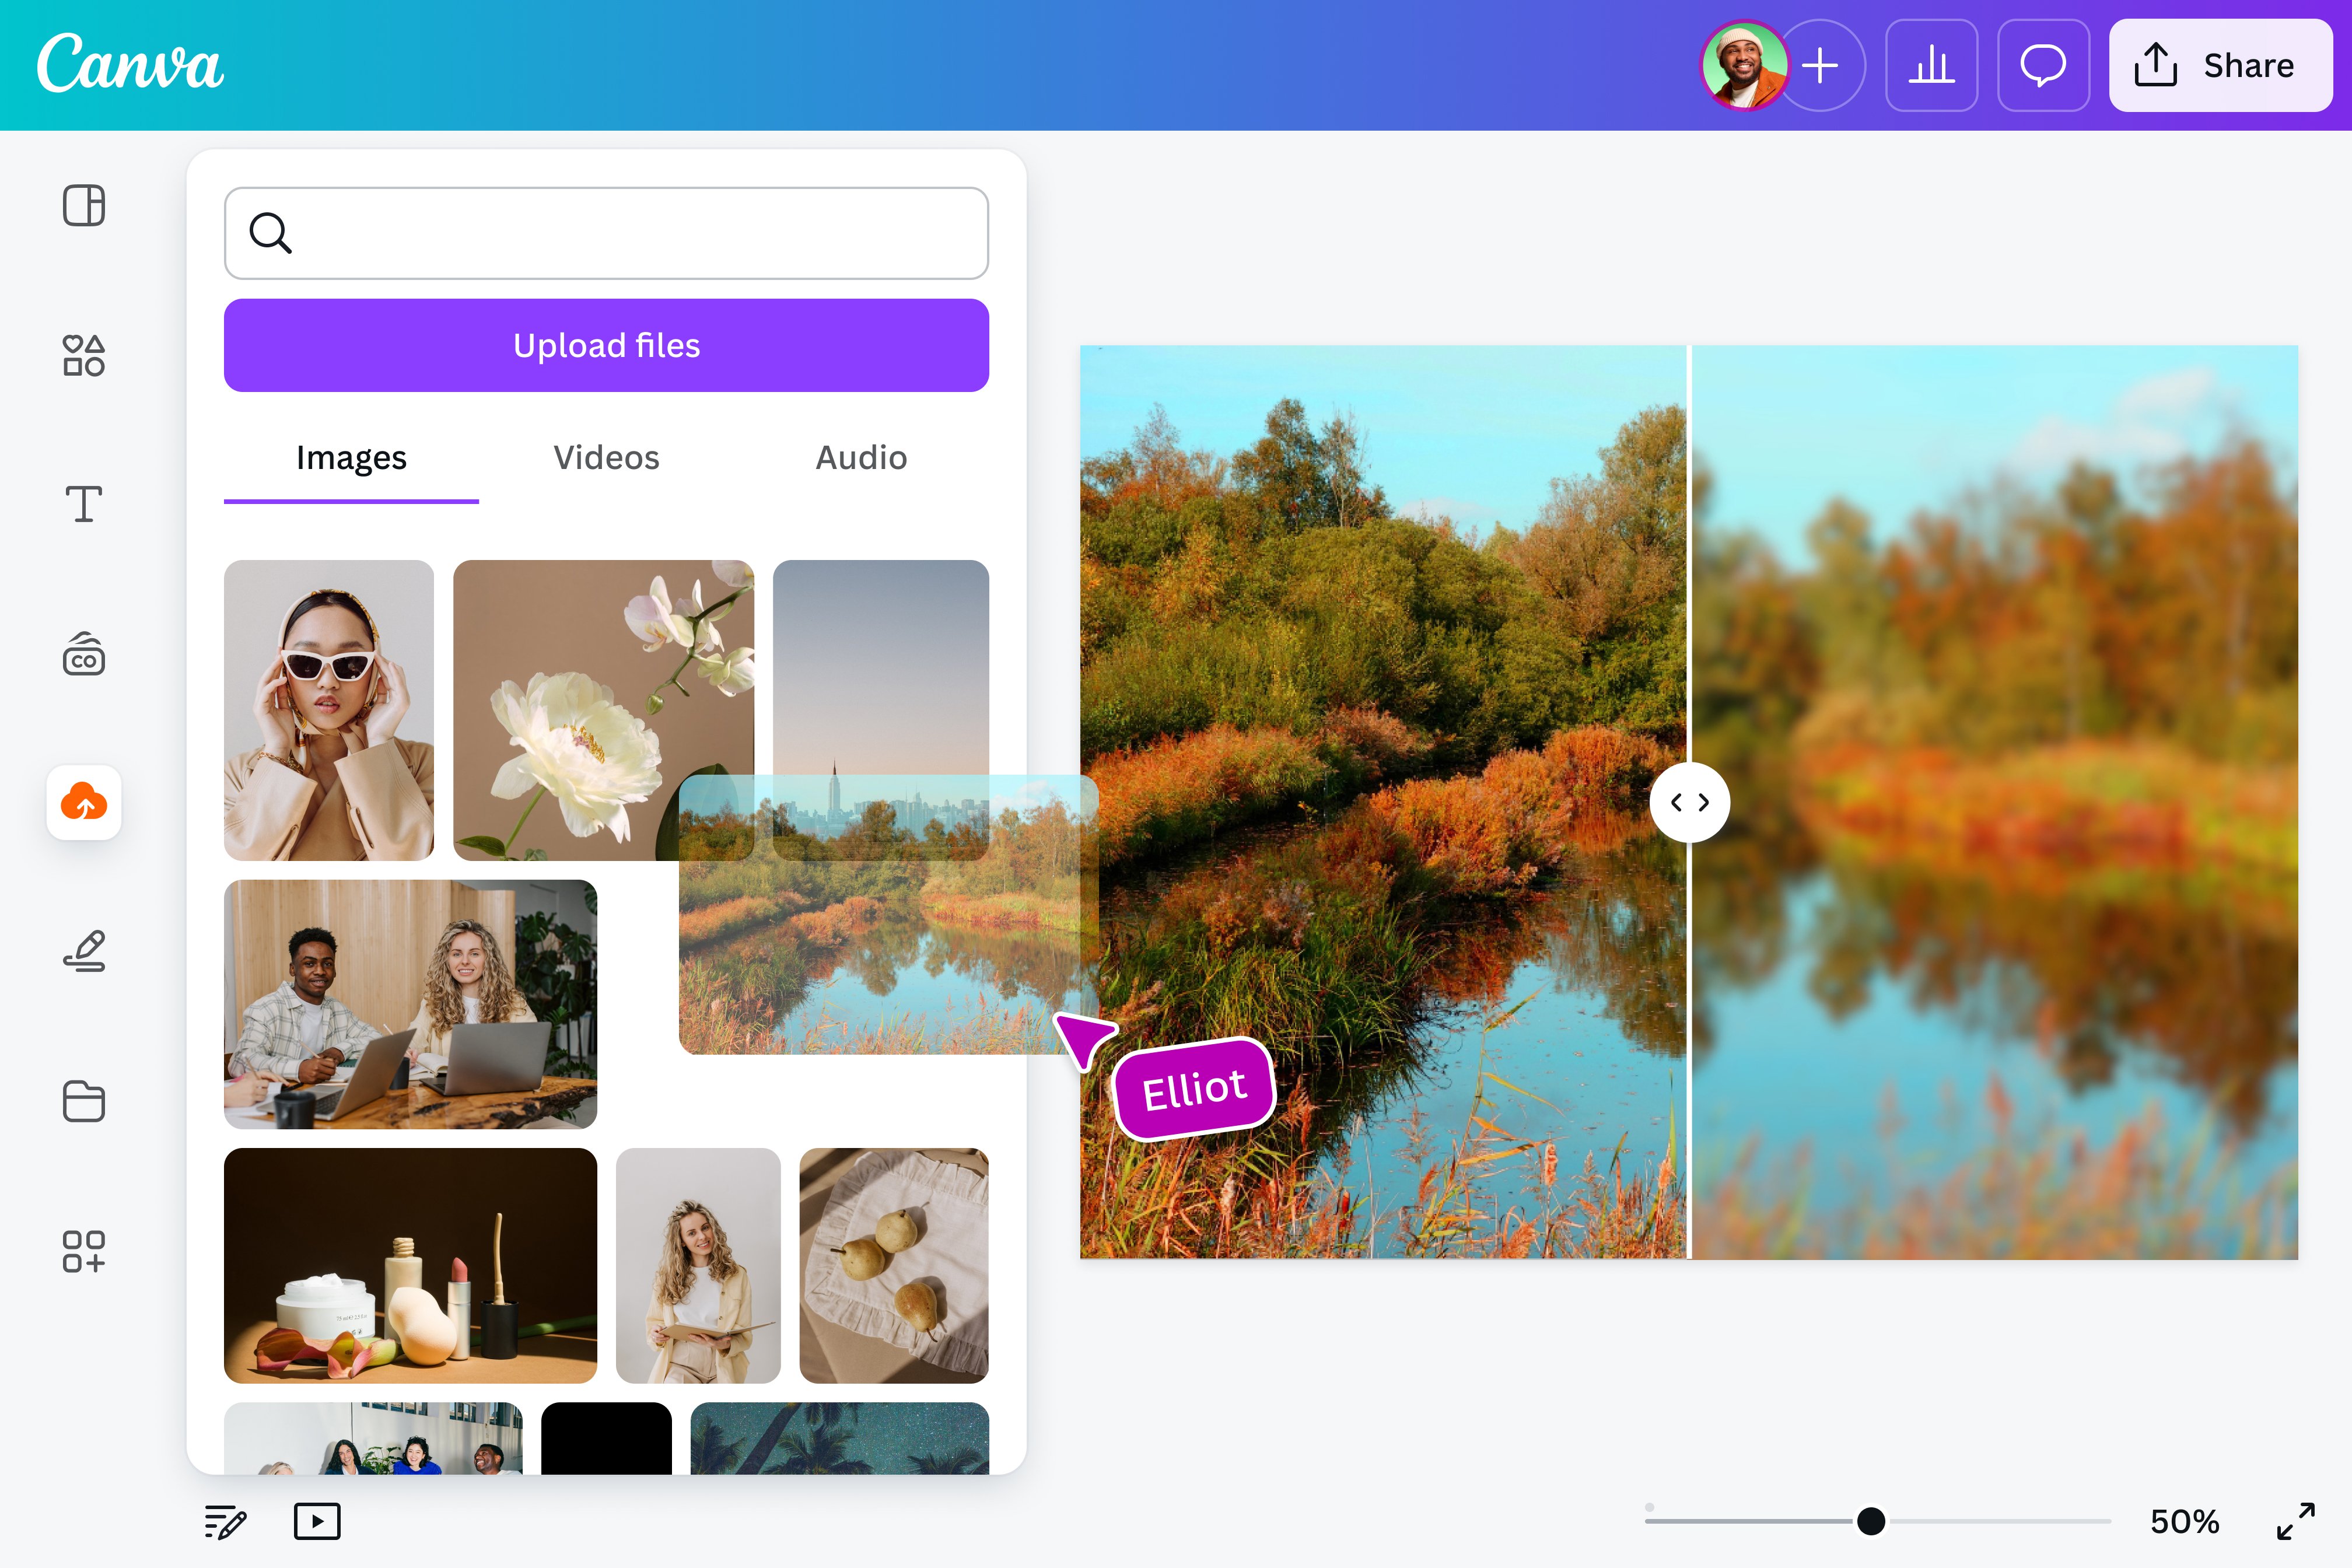
Instant Clarity: AI-Powered Image Sharpening with Tophinhanhdep.com
While Photoshop offers unparalleled control, the rise of Artificial Intelligence (AI) has revolutionized image processing, providing incredibly powerful, fast, and often simpler solutions for sharpening blurry images, especially for high-resolution output and bulk processing. Tophinhanhdep.com is at the forefront of this innovation, offering advanced AI tools that significantly enhance image quality.
Tophinhanhdep.com’s AI Upscaler: How it Works
Tophinhanhdep.com’s AI-powered upscaling and sharpening tools are designed to not only sharpen existing details but also intelligently reconstruct missing information, a feat traditional methods cannot achieve. This makes it ideal for breathing new life into old, low-resolution, or very blurry images. It perfectly aligns with our offerings in Image Tools and AI Upscalers, delivering high-resolution results for various applications, from aesthetic backgrounds to beautiful photography.
Steps to use Tophinhanhdep.com’s AI Tools:
- Upload Your Image: Visit Tophinhanhdep.com and upload your blurry picture. Our platform supports a wide range of image formats for seamless integration into your digital photography workflow.
- Select AI Enhancer: Choose your preferred AI upscaling method. For general unblurring and clarity, options like our “Magic” enhancer work wonders. For more subtle adjustments or specific use cases, our “Balanced” mode serves as a reliable backup.
- Adjust Settings (Optional):
- Output Size: Set your desired output resolution. For images smaller than 800x800px, we recommend 4x or higher upscaling to ensure significant detail enhancement. For larger images (over 1 megapixel), even 1x upscaling can deliver excellent sharpening results while managing file size.
- Strength & Similarity: These sliders allow you to control the intensity of enhancement and how closely the result matches the original. For deblurring, a lower
Similaritysetting allows our AI to introduce more intelligent enhancements. - Text Description (Advanced): For even more control, you can add a text description (e.g., “sharp, clear photo, hyper detailed, 8k”) to guide the AI’s processing.
- Start Processing: Click the “Start processing” button and let Tophinhanhdep.com’s powerful AI work its magic. Processing typically takes only a few seconds, depending on image size and server load.
- Download Your Unblurred Image: Once complete, review the results and download your newly sharpened, enhanced image. Experiment with different
StrengthandSimilaritylevels to find the perfect balance for your specific image.
Advantages of Tophinhanhdep.com’s AI Tools:
- Ease-of-Use: A straightforward, intuitive interface makes advanced sharpening accessible to everyone, from beginners to seasoned professionals.
- Advanced AI Quality: Our proprietary algorithms go beyond simple sharpening, intelligently reconstructing details and enhancing overall image quality.
- Speed & Efficiency: Quickly unblur multiple photos at once, ideal for bulk processing in professional workflows.
- No Installation Required: Access powerful tools directly through your web browser, anytime, anywhere.
- API for High-Volume Processing: For businesses and developers, our API allows for the automated deblurring and enhancement of thousands of images, streamlining operations for image tools and optimizers.
- Cost-Effective: Often more budget-friendly than subscribing to complex expert editing software, with initial uses typically available for free.
Tophinhanhdep.com’s AI is particularly adept at handling blur caused by upscaling and out-of-focus issues, making it an indispensable resource for creating high-resolution wallpapers, backgrounds, and professional-grade photography.
Specialized AI for Product Photography and High-Volume Needs
For eCommerce businesses, maintaining crisp, consistent product photos is paramount. Tophinhanhdep.com offers specialized AI solutions (akin to dedicated services for product imagery) that cater to these specific demands:
- Automated Enhancement: Automatically sharpen and enhance product photos across your entire catalog.
- Detail Preservation: Our AI expertly removes blur while meticulously maintaining accurate colors and intricate product details.
- Consistent Quality: Ensure a uniform, professional look for all your product images, crucial for online marketplaces and visual design.
Our API solutions are ideal for photo printing services, real estate platforms, or any business managing large quantities of images, allowing for automated blur removal at scale. This integration transforms your workflow, turning potentially blurry user-generated content into high-quality, market-ready assets.
Mobile Solutions for On-the-Go Sharpening
Recognizing the need for instant photo fixes, Tophinhanhdep.com also extends its advanced sharpening capabilities to mobile users through our dedicated app or via integration with popular mobile editing platforms. Whether you’re using an Android or iOS device, you can achieve professional-grade clarity directly from your smartphone or tablet.
Key features include:
- One-Tap Sharpening: Effortlessly enhance your images with intelligent, automated adjustments.
- Basic and Advanced Adjustments: Fine-tune
Amount,Radius, andNoise Reductionthrough intuitive sliders. - High-Resolution Output: Process images on your mobile device and get results suitable for sharing, printing, or further editing.
These mobile-friendly solutions ensure that no matter where you capture your moments, Tophinhanhdep.com provides the image tools to transform them into stunning, clear visuals.
Best Practices for Sharpening Your Images
Achieving optimal sharpness without introducing unwanted artifacts requires a thoughtful approach. Here are some best practices that apply across both Photoshop and AI-driven workflows:
Non-Destructive Workflow: The Golden Rule
Always strive for a non-destructive editing workflow. In Photoshop, this means using Smart Objects and adjustment layers. With Tophinhanhdep.com’s AI, your original image remains untouched, and you simply download the enhanced version. This approach provides maximum flexibility, allowing you to fine-tune, undo, or reapply effects without permanently altering your original data. It’s fundamental to professional digital photography and photo manipulation.
Selective Sharpening: Focus on What Matters
Not every part of an image needs the same amount of sharpening. Applying sharpening globally can sometimes over-sharpen smooth areas (like skin) or amplify noise in shadows, creating an unnatural look.
- Layer Masks: In Photoshop, use layer masks to selectively apply sharpening only to the areas where it’s most beneficial—such as the subject’s eyes, hair, or textured elements. This helps preserve the aesthetic quality of smooth areas and intentional bokeh.
- AI Intelligence: Tophinhanhdep.com’s AI is often intelligent enough to identify and selectively sharpen subjects while maintaining the natural appearance of backgrounds, contributing to beautiful photography.
Reducing Noise: A Balancing Act
Sharpening inherently increases contrast, which can make existing image noise more apparent. It’s a delicate balance:
- Integrated Noise Reduction: Both Photoshop’s Smart Sharpen filter and Tophinhanhdep.com’s AI tools include options for noise reduction. Use these features to mitigate noise without sacrificing too much detail.
- Post-Sharpening Noise Reduction: Sometimes, an additional pass of noise reduction (e.g., Photoshop’s
Filter > Noise > Reduce Noise) may be necessary after sharpening. Apply it selectively using layer masks to avoid blurring important details. Tophinhanhdep.com’s AI often handles this balance automatically and more effectively.
Post-Sharpening Adjustments and Creative Touches
After sharpening, consider these additional steps to refine your image:
- Soft Focus Effects: Sometimes, adding a very subtle soft focus effect to certain areas can help blend any harshness introduced by sharpening, or simply add to the overall aesthetic.
- Color Adjustments: Adjusting
LevelsorColor Lookup Tables(as demonstrated by experts like Unmesh Dinda) can enhance the overall mood and impact of the image, helping to cover up for any minor loss of detail and making the image look more interesting. These “Editing Styles” are readily achievable within Photoshop and can also be inspired by Tophinhanhdep.com’s “Image Inspiration & Collections” for “Thematic Collections” and “Trending Styles.” - Test at Different Zoom Levels: Always examine your sharpened image at 100% zoom, and also at smaller sizes (how it will appear online or in print). What looks good zoomed in might look over-sharpened when viewed smaller, and vice-versa.
- Output Considerations: The level of sharpening required often depends on the final output medium. Images for print usually require more sharpening than images for web display due to the differences in resolution and viewing distance.
These creative ideas and editing styles, combined with precise sharpening, will elevate your visual design and ensure your photography stands out.
Conclusion
A blurry image doesn’t always spell disaster. With the right knowledge and tools, many captures can be salvaged and transformed into crisp, detailed visuals. Whether you prefer the granular control of traditional software like Photoshop or the speed and advanced capabilities of AI-powered platforms like Tophinhanhdep.com, you have powerful options at your fingertips.
Tophinhanhdep.com empowers you to achieve high-resolution, professional-grade results, turning your blurry snapshots into stunning photography, perfect for everything from aesthetic wallpapers and vibrant backgrounds to professional stock photos and intricate visual design projects. Embrace the versatility of modern image tools, explore various editing styles, and unlock the full potential of your images. With Tophinhanhdep.com, crystal-clear clarity is within your reach, allowing your creative ideas to shine through in every pixel.