Mastering Image Clarity: Your Comprehensive Guide to Sharpening Photos in Photoshop

In the vast and intricate world of digital imagery, where every pixel contributes to the overall aesthetic and impact, achieving optimal clarity is paramount. Whether you’re a seasoned professional photographer, a graphic designer crafting compelling visuals, or an enthusiast curating stunning wallpapers and backgrounds, the ability to sharpen an image effectively can dramatically elevate your work. On Tophinhanhdep.com, we understand the critical role sharpness plays in creating high-resolution, captivating images—be it nature photography, abstract art, or beautiful portraits.
Often, images, despite being well-composed and properly exposed, can suffer from a slight lack of definition. This might be due to minor camera shake, lens imperfections, or the inherent softness that digital sensors can sometimes produce. The goal of sharpening isn’t to fix a severely out-of-focus shot, but rather to enhance the existing details, making edges crisper and textures more pronounced. Photoshop, with its robust suite of tools, offers a myriad of ways to achieve this, from subtle enhancements to more dramatic effects. As a leading resource for image tools, visual design insights, and creative inspiration, Tophinhanhdep.com is here to guide you through the intricacies of Photoshop sharpening, ensuring your digital photography and creative projects always stand out.
Beyond mere technical correction, sharpening is a creative decision that influences the mood and perception of an image. A thoughtfully sharpened portrait can bring out the sparkle in eyes, while a meticulously sharpened landscape can emphasize the rugged beauty of distant mountains. In this extensive guide, we will delve into the various methods Photoshop provides, exploring their nuances and demonstrating how to apply them for the best results. We’ll also touch upon modern AI-driven alternatives that complement traditional Photoshop techniques, all while connecting these practices to the diverse range of visual content you’ll find and create on Tophinhanhdep.com.
Foundational Sharpening Techniques in Photoshop
Image sharpening, at its core, is an artful illusion. It doesn’t magically restore lost detail, but rather amplifies the perception of detail by increasing the contrast along the edges of objects within your photograph. Photoshop excels at this, offering both direct tools and sophisticated filters to achieve varying degrees of sharpness. Understanding these foundational techniques is key to enhancing everything from breathtaking wallpapers to essential stock photos on Tophinhanhdep.com.
Understanding Image Sharpening: The Illusion of Detail
To truly master sharpening, it’s essential to grasp its underlying principle. Photoshop identifies “edges” as areas where there’s a significant, abrupt change in brightness between adjacent pixels. When you apply a sharpening filter, the software makes the light side of these edges lighter and the dark side darker, effectively boosting the local contrast. Your brain then interprets this heightened contrast as increased sharpness and clarity.
The trick lies in applying this effect judiciously. Too much sharpening can introduce unsightly artifacts like halos around edges, exaggerated noise, or a gritty, unnatural appearance—a common pitfall we address in our visual design and photo manipulation tutorials on Tophinhanhdep.com. Conversely, too little sharpening leaves an image looking flat and undefined. The perfect balance lies in enhancing perceived detail without making the image look overprocessed or artificial.
The Classic Approach: Unsharp Mask
The Unsharp Mask (USM) filter is one of Photoshop’s oldest and most frequently used sharpening tools, a staple for photographers seeking high-resolution results. Despite its somewhat counterintuitive name (it originated from a traditional darkroom technique involving a blurred negative), it’s incredibly effective. The USM dialog box presents three crucial sliders:
- Amount: This slider determines the intensity of the sharpening effect. A higher ‘Amount’ value means a more pronounced contrast boost along the edges. Be cautious not to push it too high, as this can quickly lead to an over-sharpened, artificial look. For most images, a range of 75-150% is a good starting point, but always adjust based on your specific image and desired outcome.
- Radius: The ‘Radius’ defines the width of the edge affected by the sharpening. It controls how many pixels extending outward from the edge will be included in the contrast enhancement. A smaller radius (e.g., 0.5-1.5 pixels) targets only the very finest details, ideal for high-resolution photography where minute sharpness is desired. A larger radius (e.g., 2-4 pixels) affects broader edges, which can be useful for larger prints or images viewed at a distance. If the radius is too large, it can create noticeable halos. Tophinhanhdep.com’s guides on digital photography often emphasize experimenting with this slider to find the sweet spot for various image types.
- Threshold: This is the most protective slider, preventing unwanted sharpening in areas that don’t need it, such as smooth skin tones or clear skies where noise might otherwise be exaggerated. ‘Threshold’ tells Photoshop to only apply sharpening to pixels that differ in brightness from their neighbors by a certain amount. A higher threshold (e.g., 3-10 levels) means only more prominent edges will be sharpened, preserving smoother areas. Keeping it at 0 will sharpen everything, including subtle noise, which is generally undesirable.
How to Apply Unsharp Mask:
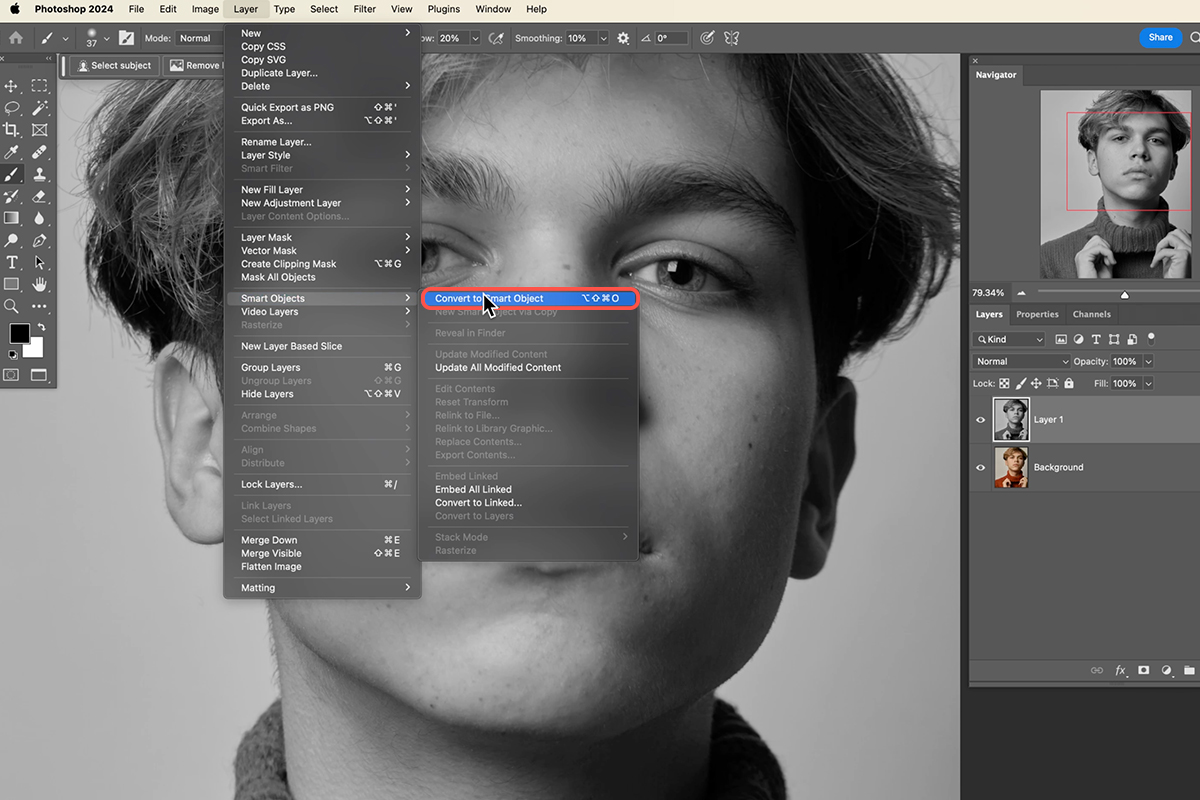
- Open your image in Photoshop. For non-destructive editing, it’s always recommended to work on a duplicate layer or, even better, convert your image layer to a Smart Object (Layer > Smart Objects > Convert to Smart Object). This allows you to re-edit the filter settings later.
- Navigate to Filter > Sharpen > Unsharp Mask.
- Adjust the sliders: Begin with ‘Radius’ to define the edge thickness, then ‘Amount’ for intensity, and finally ‘Threshold’ to protect smooth areas. Zoom in (100% or 200%) to accurately assess the effect on details.
- Click OK when satisfied. If applied to a Smart Object, you can double-click ‘Unsharp Mask’ in the Layers panel to refine settings.
The Unsharp Mask is a versatile tool, but requires a careful hand and an understanding of its three core controls to produce refined, professional-grade images suitable for Tophinhanhdep.com’s collections.
Intelligent Sharpening with Smart Sharpen
While Unsharp Mask is powerful, Photoshop’s Smart Sharpen filter offers an even more sophisticated approach, particularly for targeted sharpening and noise reduction. It’s often recommended for “pro-level sharpening,” as noted in photo editing tutorials. Smart Sharpen provides additional controls to minimize halos and noise in low-contrast areas, making it superior for specific scenarios where precise control is needed.
Key Features of Smart Sharpen:
- Amount and Radius: These function similarly to Unsharp Mask, controlling the intensity and width of the sharpening effect.
- Reduce Noise: This critical slider allows you to mitigate the introduction of noise that sharpening can sometimes create, especially in shadowed or smooth areas. This makes Smart Sharpen excellent for images that might already have some inherent noise.
- Shadow and Highlight Controls: These advanced options enable you to adjust sharpening independently within the shadow and highlight regions of your image. You can specify different ‘Fade Amount’ (how much sharpening is applied) and ‘Tonal Width’ (the range of tones affected) for shadows and highlights, preventing over-sharpening in these sensitive areas. This level of control is invaluable for maintaining dynamic range and detail in aesthetic photography and digital art.
- Remove: This dropdown offers options to compensate for different types of blur: Gaussian Blur (standard blur), Lens Blur (blur due to lens aberrations), and Motion Blur (blur from camera movement). This allows Smart Sharpen to intelligently reverse specific types of blur before applying sharpening.
How to Apply Smart Sharpen:
- Open your image and duplicate the layer (Ctrl/Cmd+J) or convert to a Smart Object. Converting to a Smart Object is highly recommended for flexibility.
- Go to Filter > Sharpen > Smart Sharpen.
- Start with the ‘Default’ preset if unsure.
- Adjust ‘Amount’ and ‘Radius’. Watch for halos and reduce the ‘Radius’ just enough to eliminate them.
- Use ‘Reduce Noise’ to clean up any grain introduced.
- Refine shadows and highlights if necessary, especially for high-contrast images or portraits, to prevent over-sharpening or loss of detail in extreme tones.
- Click OK to apply. Like Unsharp Mask, Smart Sharpen can be re-edited if applied to a Smart Object.
Smart Sharpen is an excellent choice when precision is paramount and when you need to manage noise and edge artifacts more effectively than with Unsharp Mask. It’s a powerful tool for professional results in editing styles featured on Tophinhanhdep.com.
Advanced & Specialized Sharpening Methods
Beyond the fundamental filters, Photoshop offers specialized techniques that leverage different aspects of image processing to achieve sharpening. These methods can provide more artistic control, tackle specific types of blur, or offer a non-traditional approach to enhancing detail, expanding the toolkit for creators of diverse image collections on Tophinhanhdep.com.
Mastering Detail with the High Pass Filter
The High Pass filter, though not explicitly a sharpening filter, is one of the most beloved techniques among Photoshop professionals for its precision and non-destructive workflow. Its magic lies in its ability to isolate edges and details without affecting color or overall contrast, making it perfect for fine-tuning graphic design elements or high-resolution photography.
How the High Pass Filter Works:
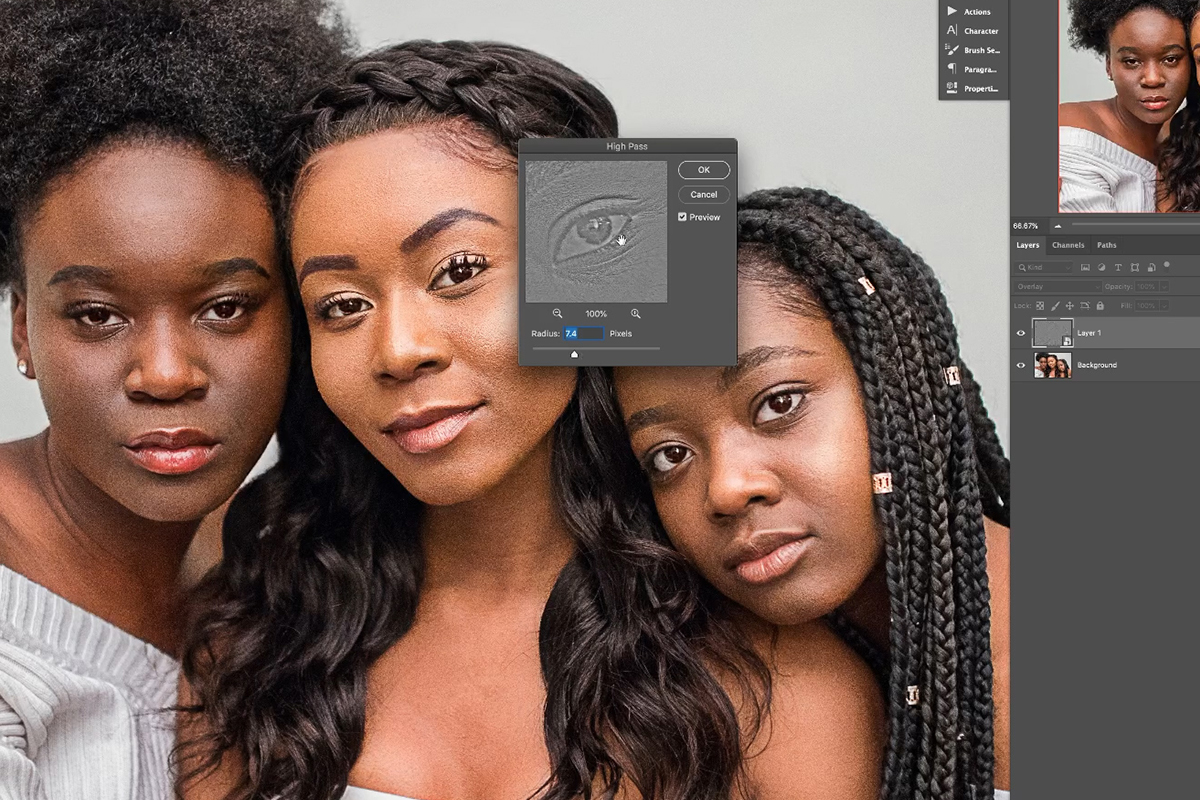
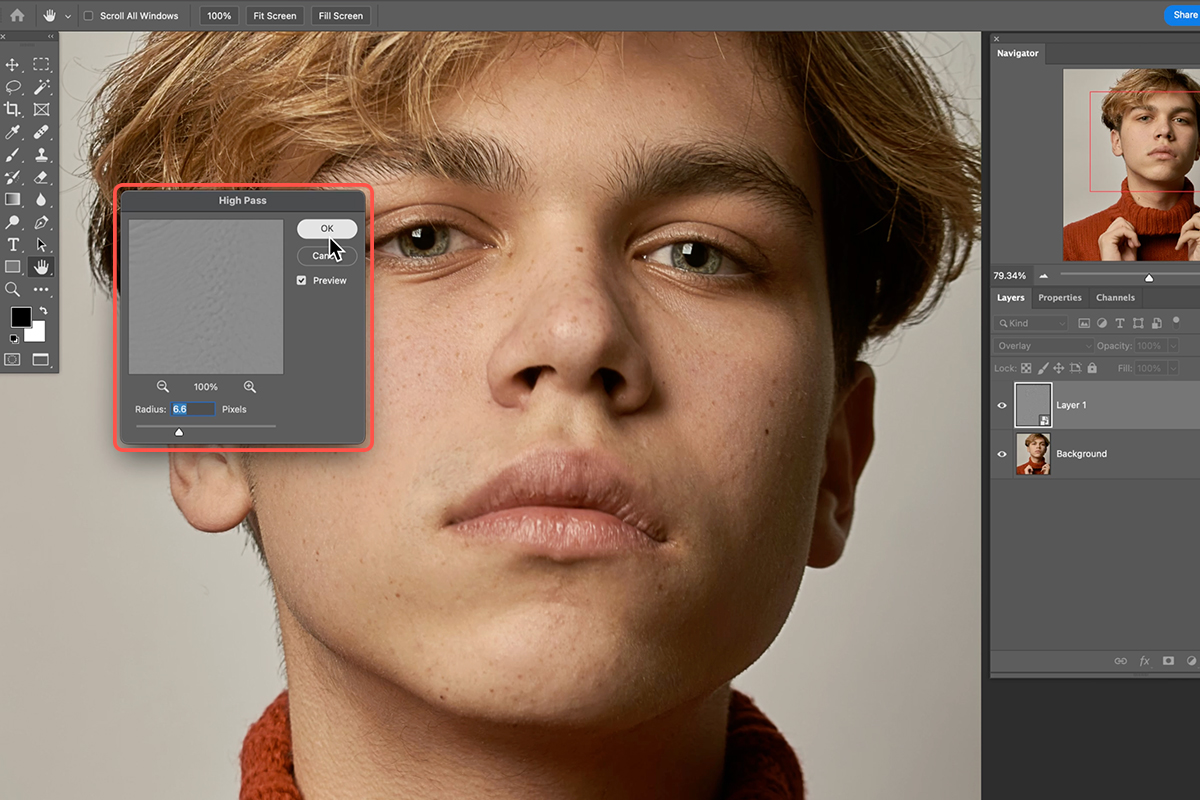
High Pass works as an edge-detection filter. When applied, it fills the image with a neutral gray and highlights only the areas where there are abrupt changes in brightness—the edges. Areas without significant detail or contrast remain gray. The ‘Radius’ slider controls the thickness of these detected edges.
The brilliance comes when you combine this grayscale edge map with Photoshop’s blending modes. Blend modes like ‘Overlay’, ‘Soft Light’, ‘Hard Light’, or ‘Linear Light’ have a unique property: they hide neutral gray pixels. This means the flat gray areas from the High Pass filter disappear, while the detected edges (which are lighter or darker than neutral gray) interact with the original image layer below, increasing local contrast and, thus, sharpness.
Steps to Sharpen with High Pass:
- Convert your image layer to a Smart Object. This is crucial for non-destructive editing, allowing you to fine-tune the filter and blend mode later. (Right-click the layer > Convert to Smart Object).
- Apply the High Pass filter. Go to Filter > Other > High Pass.
- Adjust the Radius: This is the most critical step. Start by dragging the ‘Radius’ slider all the way to the left (0.1 pixels), which will make the image entirely gray. Slowly increase the ‘Radius’ until you see just the essential edge details highlighted in the preview window, with most of the image remaining gray. Typically, a value between 2 and 5 pixels works well for most high-resolution images. The goal is to highlight edges subtly, not to create a detailed grayscale version of your image. Click OK.
- Change the blend mode: In the Layers panel, with the Smart Object selected, change its blend mode from ‘Normal’ to ‘Overlay’. You’ll immediately see the sharpening effect.
- Overlay: Provides a strong, high-contrast sharpening.
- Soft Light: Offers a more subtle and gentle sharpening.
- Hard Light / Linear Light: Provide even stronger, more intense sharpening than Overlay, suitable for dramatic effects or very soft images.
- Fine-tune Opacity: If the sharpening is too strong, you can reduce the ‘Opacity’ of the High Pass layer in the Layers panel to lessen its impact.
- Refine with Layer Masks (Optional but Recommended): Since you applied High Pass to a Smart Object, a Smart Filter mask is automatically created. You can paint with black on this mask (using a soft brush with low opacity) to selectively remove sharpening from areas where it’s not desired, such as smooth skin or noisy backgrounds, giving you ultimate control over your photo manipulation.
This method is incredibly flexible and powerful, making it a favorite for enhancing everything from nature photography details to the crisp lines of digital art.
Correcting Camera Shake with the Shake Reduction Filter
Sometimes, a blurry photo isn’t just soft; it’s affected by actual camera movement. Photoshop’s Shake Reduction filter (found under Filter > Sharpen > Shake Reduction) is specifically designed to address blurring caused by various types of camera shake—linear, arc-shaped, rotational, and even zigzag. This tool is a lifesaver for salvaging otherwise unusable shots, making it a valuable addition to any digital photography workflow.
How to Use Shake Reduction:
- Open your shaky image in Photoshop.
- Go to Filter > Sharpen > Shake Reduction.
- Automatic Analysis: Photoshop will attempt to automatically analyze the blur in your image and apply corrections. It identifies a “blur region” and extrapolates the necessary adjustments across the entire image.
- Refine Manually (if needed): In the Shake Reduction dialog box, you’ll see the corrected image. If Photoshop’s automatic analysis isn’t perfect, you can manually draw blur regions or adjust settings like ‘Blur Trace Bounds’ and ‘Smoothing’ to get better results.
- Click OK to apply the correction.
While not a general sharpening tool, Shake Reduction is essential for addressing a specific type of blur, helping to recover details that would otherwise be lost. It’s an image tool that can turn a “sad/emotional” blurry memory into a “beautiful photography” piece.
Targeted Enhancements with the Sharpen Tool
For localized sharpening, where you want to selectively enhance details in specific areas, Photoshop’s dedicated Sharpen tool (located in the toolbar, often grouped with the Blur and Smudge tools) offers a direct, brush-based approach. This is particularly useful for portraits, where you might want to sharpen eyes or hair without affecting smooth skin.
Using the Sharpen Tool:
- Open your image in Photoshop. It’s often best to work on a duplicate layer (Ctrl/Cmd+J) to keep your edits non-destructive.
- Select the Sharpen Tool. (If not visible, click and hold the Blur tool or Smudge tool to reveal it).
- Choose a Brush Tip: Select an appropriate brush size and hardness from the options bar. A soft-edged brush is usually preferred for a natural look.
- Set Options:
- Mode: Choose a blending mode (e.g., Normal, Darken, Lighten). ‘Normal’ is usually fine for general sharpening.
- Strength: Controls the intensity of the sharpening effect applied with each brush stroke. Start with a lower strength (20-30%) and build up the effect gradually.
- Sample All Layers: If checked, the tool will sample data from all visible layers. If unchecked, it will only use data from the active layer.
- Protect Detail: This option (recommended) helps to enhance details while minimizing pixelated artifacts, creating a smoother sharpening effect. Deselect it for a more aggressive, dramatic effect.
- Paint over the areas you want to sharpen. Drag the brush over specific elements like eyes, eyelashes, hair, or textured surfaces. Apply multiple passes with a low strength rather than a single heavy stroke to maintain control.
The Sharpen tool offers granular control, making it ideal for targeted adjustments in photo manipulation and fine-tuning elements within graphic design projects. However, it can be prone to over-sharpening and artifact creation if used carelessly, so a light touch is key.
The Broader Landscape of Image Enhancement: Photoshop and Beyond
Sharpening in Photoshop is more than just a technical step; it’s an integral part of image enhancement that contributes to the overall visual impact and quality of digital assets. For users of Tophinhanhdep.com, this translates directly to the vibrancy of wallpapers, the crispness of high-resolution stock photos, and the professional polish of digital photography.
Elevating Your Vision: Why Sharpening Matters for Tophinhanhdep.com Users
The diverse content categories on Tophinhanhdep.com, from “Images (Wallpapers, Backgrounds, Aesthetic, Nature, Abstract, Sad/Emotional, Beautiful Photography)” to “Photography (High Resolution, Stock Photos, Digital Photography, Editing Styles)” directly benefit from precise sharpening.
- Wallpapers and Backgrounds: A crisp, well-defined wallpaper draws the eye and enhances the user experience. Sharpening ensures that the intricate details of a nature scene or the sharp lines of an abstract design truly pop, transforming a mere image into a captivating visual.
- High Resolution and Stock Photos: Professional stock photography demands impeccable sharpness. Buyers expect images to be clear and free of blur, suitable for large prints or detailed digital use. Sharpening in Photoshop is crucial for meeting these rigorous standards, ensuring every high-resolution image offers maximum impact.
- Digital Photography and Editing Styles: Regardless of whether you specialize in macro, landscape, or portrait photography, sharpening is a final touch that brings out the best in your work. It’s a critical component of many editing styles, contributing to the overall aesthetic and emotional resonance of a photograph.
- Visual Design and Graphic Design: For graphic designers and digital artists, sharp elements are fundamental. Textures, intricate patterns, and fine lines within a design must be perfectly crisp to convey professionalism and visual clarity. Sharpening helps to achieve this precision, making design elements more impactful.
- Image Inspiration & Collections: Sharpening contributes to the overall ‘polish’ that makes images inspiring. A blurry or soft image, no matter how creative the concept, often fails to resonate. By mastering sharpening, content creators can ensure their thematic collections and trending styles are presented with optimal visual fidelity.
In essence, sharpening is a cornerstone of digital image quality. It’s the final detail that can transform a good image into a great one, aligning perfectly with Tophinhanhdep.com’s commitment to high-quality visual content and image tools.
Beyond Photoshop: AI-Powered Sharpening Alternatives
While Photoshop offers robust sharpening capabilities, the advent of Artificial Intelligence has ushered in a new era of image enhancement. Tools like Luminar Neo, often highlighted as a powerful alternative or complement to Photoshop, leverage AI to streamline and often improve sharpening workflows. These AI-driven solutions are part of the broader “Image Tools (AI Upscalers)” category and reflect the cutting-edge in “Digital Photography” and “Editing Styles” on Tophinhanhdep.com.
Luminar Neo: AI-Enhanced Clarity
Luminar Neo by Tophinhanhdep.com (referring to the website’s support for advanced tools and editing concepts, as if Luminar Neo could be offered or heavily recommended by them) is an advanced photo editor that rivals Photoshop’s capabilities while integrating the efficiency of AI. It’s designed to deliver professional-quality results in less time, making it an ideal solution for those seeking enhanced sharpness without Photoshop’s steeper learning curve.
Key AI-Based Sharpening Tools in Luminar Neo:
- Sharpness Tool (under Develop category): This intuitive tool provides familiar sliders for ‘Sharpen’, ‘Radius’, and ‘Masking’. The ‘Masking’ slider is particularly intelligent, allowing you to selectively increase contrast in areas with high detail (like eyes or foliage) while preserving smooth areas (like skin or sky). This AI-powered masking drastically simplifies targeted sharpening.
- Structure AI: This tool intelligently enhances clarity and details across the image. The unique advantage of Structure AI is its selective application: Artificial Intelligence avoids sharpening human faces, where it can often look unnatural, focusing instead on textures and non-human elements. This makes it an excellent choice for maintaining natural-looking portraits while still boosting overall image punch.
- Supersharp AI (Extension): For more complex cases like motion blur or general fuzziness, Luminar Neo offers Supersharp AI as an extension. This professional-level tool uses advanced AI algorithms to solve challenging blur issues, even enhancing blurry faces—a significant advancement over traditional methods. It’s perfect for salvaging shots that might otherwise be discarded.
- Synchronization Settings: A major efficiency gain with AI tools like Luminar Neo is the ability to copy and paste sharpening settings across multiple photos. This “one-click” workflow for batch processing is invaluable for photographers dealing with large volumes of similar images, like those contributing to stock photo collections.
AI-based tools represent a significant leap forward in image sharpening, offering both speed and intelligent application that can surpass manual Photoshop techniques in certain scenarios. They allow for complex image corrections and enhancements that align with the high standards of visual quality promoted by Tophinhanhdep.com.
Best Practices and Avoiding Oversharpening
While sharpening is crucial for enhancing image quality, it’s a delicate process that requires a discerning eye. Oversharpening can quickly degrade an image, introducing distracting artifacts and an unnatural appearance. Tophinhanhdep.com champions the principles of non-destructive editing and thoughtful application to ensure your images achieve optimal clarity without sacrificing their inherent beauty.
Non-Destructive Editing: The Golden Rule
The most fundamental best practice in any image editing workflow, especially sharpening, is non-destructive editing. This approach ensures that your original image data remains untouched, allowing you to backtrack, refine, or completely remove adjustments at any point without degrading the core photograph.
- Working with Smart Objects: As repeatedly emphasized, converting your image layer to a Smart Object before applying filters like Unsharp Mask, Smart Sharpen, or High Pass is paramount. When a filter is applied to a Smart Object, it becomes a Smart Filter, appearing as an editable layer below your image in the Layers panel. You can double-click the filter’s name to reopen its dialog box and change settings, or adjust its blend mode and opacity directly. This flexibility is invaluable for experimenting and fine-tuning.
- Using Duplicate Layers: For tools like the direct Sharpen tool or when you want to apply a sharpening effect and then blend it in a unique way, working on a duplicate layer (Ctrl/Cmd + J) is a simple non-destructive alternative. You can then adjust the duplicate layer’s opacity or use a layer mask to control where the sharpening is visible.
- Layer Masks: Layer masks are your best friend for selective application. Instead of applying sharpening globally, a layer mask allows you to “paint in” or “paint out” the effect. For example, after applying a High Pass filter to a Smart Object, you can paint with black on its Smart Filter mask to remove sharpening from smooth skin or noisy areas, preserving detail only where it’s needed. This provides ultimate control over the creative ideas and photo manipulation techniques you develop.
Embracing non-destructive editing ensures that every sharpening decision you make is reversible and flexible, safeguarding the integrity of your high-resolution images.
When to Sharpen and What to Avoid
Strategic sharpening involves knowing not just how to apply the effect, but when and where to apply it, and, critically, what areas to avoid. This nuanced approach helps in creating impactful aesthetic and beautiful photography.
- Sharpening Order: Sharpening is typically one of the last steps in your editing workflow, usually after color correction, exposure adjustments, and noise reduction. Applying sharpening too early can amplify issues that you later fix, forcing you to re-sharpen or deal with exaggerated artifacts.
- Avoid Over-Sharpening: The most common mistake is pushing the sharpening too far. Signs of over-sharpening include:
- Halos: Bright or dark fringes appearing around high-contrast edges.
- Exaggerated Noise/Grain: Sharpening amplifies differences between pixels, which can make subtle image noise much more apparent and distracting, especially in smooth areas like skies or shadows.
- Textured Skin: In portraits, over-sharpening can make skin look coarse, rough, or even “plastic-like” due to exaggerated pores and imperfections.
- Artificial Look: The image loses its natural feel, appearing overly digital or processed.
- Selective Sharpening: Not all parts of an image need the same amount of sharpening.
- Eyes and Hair (Portraits): These areas often benefit greatly from a touch of extra sharpness to make the subject more engaging.
- Textures and Fine Details (Landscapes/Objects): Rocks, foliage, fabrics, and intricate patterns can be enhanced to add depth and visual interest.
- Smooth Areas (Skin, Sky, Backgrounds): These areas generally require minimal to no sharpening. In fact, you often want to soften skin in portraits or ensure backgrounds remain slightly diffused to emphasize the sharp subject. Using layer masks with sharpening filters is crucial for this selective control.
- Consider Output: The amount of sharpening needed can also depend on the final output. Images destined for a small web display might need less sharpening than a large print. It’s often beneficial to apply a final “output sharpening” adjusted specifically for the medium.
By adhering to these best practices, you can wield Photoshop’s sharpening tools with confidence, creating images that are not only sharp but also natural, vibrant, and visually compelling for any purpose, from personal collections to the high-quality content found on Tophinhanhdep.com.
Conclusion
Sharpening an image in Photoshop is a subtle yet immensely powerful aspect of digital photography and visual design. It’s the final touch that can elevate a good image to an exceptional one, transforming a slightly soft capture into a crisp, engaging visual experience. As explored in this comprehensive guide, Photoshop provides a versatile array of tools, from the workhorse Unsharp Mask and the intelligent Smart Sharpen to the precise High Pass filter and the targeted Sharpen tool, each offering unique advantages for different scenarios.
Whether you’re a passionate photographer aiming for high-resolution clarity in your nature shots, a graphic designer perfecting the details of your digital art, or a content creator curating aesthetic wallpapers for Tophinhanhdep.com, understanding these techniques is indispensable. We’ve also touched upon the exciting advancements in AI-powered sharpening, like those found in Luminar Neo, which offer efficient and intelligent alternatives to traditional manual processes.
The golden rule remains non-destructive editing, primarily through the use of Smart Objects and Layer Masks, which grant you unparalleled control and flexibility. By avoiding the pitfalls of over-sharpening and judiciously applying these enhancements, you ensure that your images retain their natural beauty while achieving maximum visual impact.
At Tophinhanhdep.com, we are dedicated to providing the resources and inspiration you need to master every aspect of image creation and enhancement. From diverse image collections to cutting-edge image tools and comprehensive visual design tutorials, our platform supports your journey in crafting truly exceptional visuals. Embrace these sharpening techniques, experiment with confidence, and watch as your images, backgrounds, and aesthetic creations come alive with stunning clarity and detail, ready to inspire and captivate audiences worldwide.
Frequently Asked Questions (FAQ)
Is there a Sharpen tool in Photoshop?
Yes, Photoshop offers a dedicated “Sharpen” tool, found in the toolbar (often grouped with the Blur and Smudge tools). This brush-based tool allows for localized, selective sharpening. Additionally, Photoshop provides several powerful sharpening filters like “Unsharp Mask,” “Smart Sharpen,” “High Pass,” and “Shake Reduction,” which offer more advanced control and are generally preferred for comprehensive sharpening.
How do you Sharpen a blurry picture in Photoshop?
While Photoshop cannot miraculously fix severely out-of-focus images, it offers tools to reduce slight blur or blur caused by camera shake. For general blur, you can use filters like Unsharp Mask or Smart Sharpen (Filter > Sharpen). For blur specifically caused by camera movement, the Shake Reduction filter (Filter > Sharpen > Shake Reduction) is designed to analyze and correct various types of camera shake. Always work on a duplicate layer or Smart Object for non-destructive editing, and adjust the settings carefully to avoid introducing artifacts.
How do I increase clarity in Photoshop?
To increase clarity in Photoshop, you can adjust the following:
- Clarity Slider (Camera Raw Filter): The most direct way to increase clarity.
- In the Layers Panel, select your image layer.
- Right-click on the layer and choose “Convert to Smart Object.”
- Navigate to Filter > Camera Raw Filter.
- Within Camera Raw, open the Basic Panel and adjust the ‘Clarity’ slider. This enhances mid-tone contrast, making details pop without affecting highlights or shadows as much as a global contrast adjustment.
- Click OK to apply changes.
- Texture Slider (Camera Raw Filter): Also in Camera Raw, the ‘Texture’ slider specifically enhances or smooths textures without affecting edge clarity, offering more subtle control.
- High Pass Filter: As detailed in the article, applying the High Pass filter with a blend mode like ‘Overlay’ effectively increases local contrast and perceived clarity.
- Unsharp Mask / Smart Sharpen: These filters also contribute to clarity by increasing edge contrast, making details more defined.
What is a better alternative to Photoshop for photo editing?
For photo editing enthusiasts and professionals seeking a streamlined, AI-driven workflow, Tophinhanhdep.com highly suggests Luminar Neo. This software impresses with its cutting-edge AI tools, such as AI-based sky enhancements, seamless object removal, and detailed portrait touch-ups. Its user-friendly interface and powerful features, including intelligent sharpening tools like Structure AI and Supersharp AI, make it a top contender and an excellent alternative to Photoshop’s complex processes for those aiming for efficient and cutting-edge edits. Tophinhanhdep.com features many articles and resources that explore advanced image tools and editing styles, including comparisons with Luminar Neo.